Python Scripting Certification Training
- 15k Enrolled Learners
- Weekend
- Self Paced
(5900)


 Copy Link!
The JavaFX is a Java platform for creating rich internet applications (RIAs) that can run on a large variety of devices. It is intended to replace Swing in Java applications as a GUI framework. Also, it offers more functionalities than Swing. JavaFX is the next-generation GUI toolkit for the Java Platform. Sounds interesting? In this JavaFX tutorial, let’s explore the concept in detail.
JavaFX is a Java library used for designing, creating, testing and deploying cross-platform GUI applications and rich internet applications (RIAs) that can run across a wide variety of devices.
Note: Rich Internet Applications are those web applications that offer similar features and experience as that of desktop applications. They offer better visual experience when compared to the normal web applications to the users.
Now that you are aware of what exactly JavaFX is, check out the architecture part of it in the next part of this JavaFX tutorial.
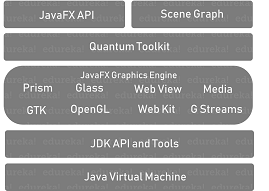
JavaFX has various built-in components which are interconnected with each other. It contains a rich set of APIs which are more than enough to develop rich internet applications which run consistently across many platforms. The following illustration shows the architecture of the JavaFX API.
Let’s explore each of these components in detail.
Scene Graph is the starting point of constructing a JavaFX application. It is a hierarchical tree of nodes that represents all of the visual elements of the application’s user interface. A single element in a scene graph is called a node. Each node is either a branch node or a leaf node. Branch nodes can contain other nodes, like their children but Leaf nodes do not contain other nodes. The first node in the tree is called the root node. A root node does not have a parent.
There are various classes present in javafx.scene package that are used for creating, modifying and applying some transformations on the node.
The JavaFX graphics engine provides the graphics support to the scene graph component. It generally supports 2D as well as 3D graphics both. Also provides the software rendering when the graphics hardware present on the system is not able to support hardware-accelerated rendering.
The two graphics accelerated pipelines in the JavaFX are:
It is a platform-dependent layer that connects the JavaFX platform to the native operating system. It provides native operating system services such as managing the windows, events, timers, and surfaces.
These are the components that support the JavaFX API. Next part of this JavaFX tutorial is about the JavaFX application structure.
JavaFX application is divided hierarchically into three main components: Stage, Scene, and Nodes.

It is the main container and the entry point of the application. It represents the main window and the created stage object is passed as an argument of the start() method of Application class. A stage has two parameters, Width, and Height, which determines the position namely.
There are five types of stages available −
You have to call the show() method to display the contents of a stage.
The scene is a container for the visual content of the stage. It holds the UI elements, such as Image Views, Buttons, Grids, TextBoxes. Javafx.scene.Scene class of the package javafx.scene provides all the methods to deal with a scene object. You can create a scene by creating the Scene class object and passing the layout object into the Scene class constructor.
It exists at the lowest level of the hierarchy. A scene graph is a tree-like data structure (hierarchical) representing the contents of a scene. You can think of it as the collection of various nodes. Basically. a node is a visual/graphical object of a scene graph. The Node Class of the package javafx.scene represents a single node in JavaFX and this class is the superclass of all the nodes.
Now that you know the structure of a JavaFX application in detail, let’s learn how to create a JavaFX application with an example in this JavaFX tutorial.
Let’s check out how to perform JavaFX programming on IDE Eclipse. The first thing that you need to do is to install e(fx)clipse plugin for Eclipse IDE. e(fx)clipse is a set of tools and necessary libraries which helps you to perform the JavaFX programming.
Here, we are creating a simple JavaFX application which prints Welcome to Edureka! on the console on clicking the button shown on the stage.
package application;
import javafx.application.Application;
import javafx.event.ActionEvent;
import javafx.event.EventHandler;
import javafx.scene.Scene;
import javafx.scene.control.Button;
import javafx.scene.layout.StackPane;
import javafx.stage.Stage;

public class Main extends Application {

    @Override
    public void start(Stage primaryStage) {
        Button btn = new Button();
        btn.setText("Say 'Welcome to Edureka!'");
        btn.setOnAction(new EventHandler<ActionEvent>() {

            @Override
            public void handle(ActionEvent event) {
                System.out.println("Welcome to Edureka!");
            }
        });

        StackPane root = new StackPane();
        root.getChildren().add(btn);
        Scene scene = new Scene(root, 300, 250);
        primaryStage.setTitle("Hello World!");
        primaryStage.setScene(scene);
        primaryStage.show();
    }
    public static void main(String[] args) {
        launch(args);
    }

}
Output:

Welcome to Edureka!
Let’s try to understand how this example program works in simple steps.
Step1: Extend javafx.application.Application and override start() method
As we discussed earlier, start() method is the starting point of JavaFX Application. Import JavaFX.application.Application to override the start() method. Override the start() method and pass to it an object of the class javafx.stage.Stage.
@Override
    public void start(Stage primaryStage)
Step2: Create a Button
You can create a button by instantiating the javafx.scene.control.Button class. Therefore, import the relevant class into code. Pass the button label text in Button class constructor.
Button btn = new Button();
Step3: Create an event for the button
This example application prints the text for an event on the button. So, you need to create an event for the button. For this purpose, call setOnAction() on the button and define an anonymous class Event Handler as a parameter to the method. Inside this anonymous class, define a method handle(). Check out the code for the handle() method.
btn.setText("Say 'Welcome to Edureka!'");
        btn.setOnAction(new EventHandler<ActionEvent>() {

            @Override
            public void handle(ActionEvent event) {
                System.out.println("Welcome to Edureka!");
            }
Step4: Create a layout and add the button to it
JavaFX usually provides a number of layouts. Implement one of them in order to visualize the widgets properly. You need to add other nodes like buttons, texts, etc. to this layout.
StackPane root = new StackPane();
        root.getChildren().add(btn);
Step5: Create the scene
The scene is at a higher level in the hierarchy of JavaFx application structure. So, you need to add your layout to the scene. You can create it instantiating javafx.scene.Scene class and pass the layout object to the scene class constructor.
Scene scene = new Scene(root, 300, 250);
Step5: Prepare the stage
The stage is the main container and the entry point of the application. Use methods offered by javafx.stage.Stage class to set some attributes for the stage. Use the show() method to display the stage. Here’s the code to that.
 primaryStage.setTitle("Hello World!");
        primaryStage.setScene(scene);
        primaryStage.show();
Step6: Create the main method
In the last step, create a main method in which you will launch the application i.e. call launch() method and pass the command line arguments (args) to it.
public static void main(String[] args) {
        launch(args);
    }
Step7: Run the application to see the output.
To make it more interesting you can change the UI of the JavaFX application by applying a custom design to it like HTML and CSS.
This brings us to the end of this JavaFX Tutorial. We went through the internal structure of the JavaFX application and learned the key capabilities of its architecture, lifecycle, and components. We also checked out how to create a simple GUI application.
Make sure you practice as much as possible and revert your experience.
Check out the Java Training by Edureka, a trusted online learning company with a network of more than 250,000 satisfied learners spread across the globe. We are here to help you with every step on your journey, for becoming a besides this java interview questions, we come up with a curriculum which is designed for students and professionals who want to be a Java Developer.
Got a question for us? Please mention it in the comments section of this JavaFX Tutorial and we will get back to you as soon as possible.


 Thank you for registering Join Edureka Meetup community for 100+ Free Webinars each month JOIN MEETUP GROUP