
Python Scripting Certification Training
- 15k Enrolled Learners
- Weekend
- Self Paced
(5900)


 Copy Link!
Java has been around in the industry for quite some time now. It has its roots deep in various domains of the programming world, be it a web application, mobile application or embedded systems. Even if you talk about GUI programming, Java provides a rich set of libraries for developing highly interactive GUIs wrapped within AWT API. In this Java AWT Tutorial, I will be giving you a brief introduction to it along with its components.
Below are the topics covered in this Java AWT Tutorial:
Let’s get started.
Abstract Window Toolkit acronymed as AWT is a toolkit of classes in Java which helps a programmer to develop Graphics and Graphical User Interface components. It is a part of JFC (Java Foundation Classes) developed by Sun Microsystems. The AWT API in Java primarily consists of a comprehensive set of classes and methods that are required for creating and managing the Graphical User Interface(GUI) in a simplified manner. It was developed for providing a common set of tools for designing the cross-platform GUIs. One of the important features of AWT is that it is platform dependent. This means that the AWT tools use the native toolkits of the platforms they are being implemented. This approach helps in preserving the look and feel of each platform. But as said everything comes with a price, there is a major drawback of this approach. When executed on various platforms because of platform dependency it will look different on each platform. This hampers the consistency and aesthetics of an application.
Apart from being platform-dependent, there are several other features of AWT classes about which I will be talking in the next section of this Java AWT Tutorial.
Now that you are aware of the various features of AWT let me now introduce the aspects of GUI in the next section of this Java AWT tutorial.
Any UI will be made of three entities:
I hope, by now you have a brief idea about AWT and what is its role in any application. In the next section of this Java AWT Tutorial, I will be throwing some light on the complete AWT hierarchy.
Hierarchy Of AWT
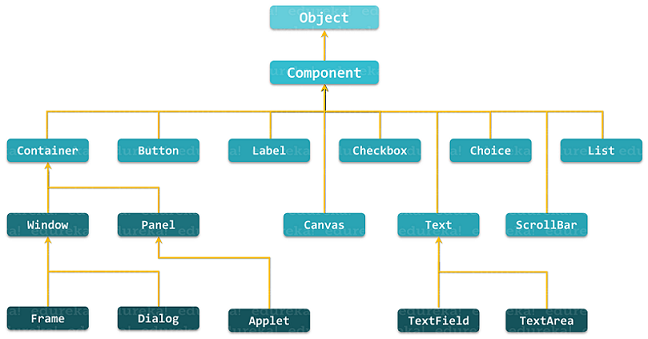 As you can see in the above diagram, Component is the superclass of all the GUI controls. It is an abstract class which encapsulates all the attributes of a visual component and represents an object with graphical representation. A component class instance is basically responsible for the look and feel of the current interface.
Below I have shown the general class description of java.awt.Component:
public abstract class Component
		extends Object
		implements ImageObserver, MenuContainer, Serializable{
  //class body
}Container in Java AWT is a component that is used to hold other components such as text fields, buttons, etc. It is a subclass of java.awt.Component and is responsible for keeping a track of components being added. There are four types of containers provided by AWT in Java.
That was all about the container and its types let us now move further in this Java AWT Tutorial article and learn about the rest of the components.
java.awt.Button class is used to create a labeled button. GUI component that triggers a certain programmed action upon clicking it. The Button class has two constructors:
//Construct a Button with the given label
public Button(String btnLabel);

//Construct a Button with empty label
public Button();
A few of the methods provided by this class have been listed below:
//Get the label of this Button instance
public String getLabel();

//Set the label of this Button instance
public void setLabel(String btnLabel);

//Enable or disable this Button. Disabled Button cannot be clicked
public void setEnable(boolean enable);
A java.awt.TextField class creates a single-line text box for users to enter texts. The TextField class has three constructors which are:
//Construct a TextField instance with the given initial text string with the number of columns.
public TextField(String initialText, int columns);

//Construct a TextField instance with the given initial text string.
public TextField(String initialText);

//Construct a TextField instance with the number of columns.
public TextField(int columns);
A few of the methods provided by TextField class are:
// Get the current text on this TextField instance
public String getText();

// Set the display text on this TextField instance
public void setText(String strText);
//Set this TextField to editable (read/write) or non-editable (read-only)
public void setEditable(boolean editable);
The java.awt.Label class provides a descriptive text string that is visible on GUI. An AWT Label object is a component for placing text in a container. Label class has three constructors which are:
// Construct a Label with the given text String, of the text alignment
public Label(String strLabel, int alignment);

//Construct a Label with the given text String
public Label(String strLabel);

//Construct an initially empty Label
public Label();
This class also provides 3 constants which are:
public static final LEFT; // Label.LEFT

public static final RIGHT;  // Label.RIGHT

public static final CENTER; // Label.CENTER
Below I have listed down the public methods provided by this class:
public String getText();

public void setText(String strLabel);

public int getAlignment();

//Label.LEFT, Label.RIGHT, Label.CENTER
public void setAlignment(int alignment);
A Canvas class represents the rectangular area where you can draw in an application or receive inputs created by the user.
Choice class is used to represent a pop-up menu of choices. The selected choice is shown on the top of the given menu.
The Scrollbar class object is used to add horizontal and vertical scrollbar in the GUI. It enables a user to see the invisible number of rows and columns.
The object of List class represents a list of text items. Using the List class a user can choose either one item or multiple items.
The Checkbox is a class is a graphical component that is used to create a checkbox. It has two state options; true and false. At any point in time, it can have either of the two.
So, that was all you need to know about the AWT components. Now, I hope you are ready to get your feet wet with Java AWT application.
In the next section of this Java AWT tutorial, I will show you how to build a calculator using AWT components.
Here I will show you how to create a calculator using AWT, where you will be able to perform basic mathematical operations. Below is a screenshot of how your Calculator will look like:
Now in order to build this, you need to type in the following code:
package edureka.awt;

import java.awt.*;
import java.awt.event.ActionEvent;
import java.awt.event.ActionListener;

class Calculator extends Frame implements ActionListener

{
    Label lb1,lb2,lb3;

    TextField txt1,txt2,txt3;

    Button btn1,btn2,btn3,btn4,btn5,btn6,btn7;

    public Calculator()
    {
        lb1 = new Label("Var 1");
        lb2 = new Label("Var 2");
        lb3 = new Label("Result");

        txt1 = new TextField(10);
        txt2 = new TextField(10);
        txt3 = new TextField(10);

        btn1 = new Button("Add");
        btn2 = new Button("Sub");
        btn3 = new Button("Multi");
        btn4 = new Button("Div");
        btn5 = new Button("Mod");
        btn6 = new Button("Reset");
        btn7 = new Button("Close");

            add(lb1);
            add(txt1);
            add(lb2);
            add(txt2);
            add(lb3);
            add(txt3);
            add(btn1);
            add(btn2);
            add(btn3);
            add(btn4);
            add(btn5);
            add(btn6);
            add(btn7);

            setSize(200,200);
            setTitle("Calculator");
            setLayout(new FlowLayout());
            //setLayout(new FlowLayout(FlowLayout.RIGHT));
            //setLayout(new FlowLayout(FlowLayout.LEFT));
            btn1.addActionListener(this);
            btn2.addActionListener(this);
            btn3.addActionListener(this);
            btn4.addActionListener(this);
            btn5.addActionListener(this);
            btn6.addActionListener(this);
            btn7.addActionListener(this);

    }
    public void actionPerformed(ActionEvent ae) {
        double a=0,b=0,c=0;
        try
        {
            a = Double.parseDouble(txt1.getText());
        }
        catch (NumberFormatException e) {
            txt1.setText("Invalid input");
        }
        try
        {
            b = Double.parseDouble(txt2.getText());
        }
        catch (NumberFormatException e) {
            txt2.setText("Invalid input");
        }
        if(ae.getSource()==btn1)
        {
            c = a + b;
            txt3.setText(String.valueOf(c));
        }
        if(ae.getSource()==btn2)
        {
            c = a - b;
            txt3.setText(String.valueOf(c));
        }
        if(ae.getSource()==btn3)
        {
            c = a * b;
            txt3.setText(String.valueOf(c));
        }
        if(ae.getSource()==btn4)
        {
            c = a / b;
            txt3.setText(String.valueOf(c));
        }
        if(ae.getSource()==btn5)
        {
            c = a % b;
            txt3.setText(String.valueOf(c));
        }
        if(ae.getSource()==btn6)
        {
            txt1.setText("0");
            txt2.setText("0");
            txt3.setText("0");
        }
        if(ae.getSource()==btn7)
        {
            System.exit(0);
        }
    }
    public static void main(String[] args)
    {
        Calculator calC = new Calculator();
        calC.setVisible(true);
        calC.setLocation(300,300);
    }
}
As you might have noticed that here we have used just functionalities. You can always add more functions to your application and create a full-fledged Calculator.
With this, we come to an end of this Java AWT Tutorial. If you want to know more about Java you can refer to our other Java Blogs.
Now that you have understood what is a Java AWT Tutorial, check out the Java Certification Training by Edureka, a trusted online learning company with a network of more than 250,000 satisfied learners spread across the globe. Edureka’s Java J2EE and SOA Training and Certification course is designed for students and professionals who want to be a Java Developer. The course is designed to give you a head start into Java programming and train you for both core and advanced Java concepts along with various Java frameworks like Hibernate & Spring.
Got a question for us? Please mention it in the comments section of this “Java AWT Tutorial” article and we will get back to you as soon as possible.


 Thank you for registering Join Edureka Meetup community for 100+ Free Webinars each month JOIN MEETUP GROUP