Python Scripting Certification Training
- 15k Enrolled Learners
- Weekend
- Self Paced
(5900)


 Copy Link!
Most of the developers start off their career with Java as their base language. Well, this is because Java provides various intriguing features such as servlets, frameworks, etc. which helps in establishing a stronghold on the programming concepts. One such feature is applets in Java. A Java Applet is a small software program which can be transferred over HTTP. In this Java Applet Tutorial, I will be giving you a complete insight into Java Applets along with examples.
Below are the topics which I will be covering in this Java Applet Tutorial:
Applets in Java are small and dynamic internet-based programs. A Java Applet can be only executed within the applet framework of Java. For an easy execution of applets, a restricted ‘sandbox’ is provided by the applet framework. Generally, the applet code is embedded within an HTML page. The applet codes are executed when the HTML pages get loaded into the Java-compatible web browsers. Applets are mainly downloaded on remote machines and used on the client side.
A Java applet can be a fully functional Java application as well since it can utilize a complete Java API at its own accord. But still, there is a thin line between an applet and an application in Java.
In the next section of this article on Applets in Java, I will be listing down the differences between a Java Applet and a Java application.
Now that you know, how a Java applet differs from a Java application, let me show you how to create a basic applet in Java through the next section of this Java Applets Tutorial.
As displayed above, the Java Applet class which is a class of applet package extends the Panel class of awt package. The Panel class is a subclass of the Container class of the same package. The Container class is an extension of Component class belonging to the same package. The Component class is an abstract class and derives several useful classes for the components such as Checkbox, List, buttons, etc.
Now that you know about the complete hierarchy of the Java Applet class, let’s now try creating a simple Java Applet.
Below I have written a simple Java applet program which will simply display the welcome message.
EduApplet.java
import java.applet.Applet;
import java.awt.Graphics;

//Extending the Applet class
public class EduApplet extends Applet{
public void paint(Graphics g){
g.drawString("Welcome To Edureka's Applet Tutorial",150,150);
}
}
By now you are familiar with applets and know how to create them. In the next section of this Java Applet Tutorial, I will be showing how to execute an applet in Java.
By now I have demonstrated how to create an applet, but how do you execute them? Well, unlike Java programs, executing applets is a bit different process. Since applets are net based applications they need a special environment to execute. Java provides two standard way to execute an applet:
If you are trying to execute your Applet in this way, first you need to compile your Java Applet file. Once done, you have to create a separate HTML file and add the applet code within it with the reference to your .class file within it. Now you can click the HTML file to launch the applet in the browser. Below I have given the code required to create the HTML file:
appletDemo.html
<html>
<body>
<applet code="EduApplet.class" width="300" height="300">
</applet>
</body>
</html>
In order to execute a Java Applet in this way, all you need to do is, instead of creating a separate file for HTML code, you can directly add comment at the beginning of your Java source code file indicating the presence of APPLET tag within. This helps in documenting your Java code with a prototype of the necessary HTML statements. This been done, now you can execute your applet just by starting the Java Applet Viewer which comes by default with JRE. When using this way of execution, your source code should look like below:
EduApplet.java
import java.applet.Applet;
import java.awt.Graphics;

/*
<applet code="EduApplet" width=200 height=60>
</applet>
*/

public class EduApplet extends Applet{
public void paint(Graphics g){
g.drawString("Welcome To Edureka's Applet Tutorial",150,150);
}
}
Note: You can also install any IDE such as Eclipse, and execute your codes directly from there itself.
Now that you know what is Java Applet and how it is executed, let’s dive deeper into Java Applets Tutorial and get familiar with the lifecycle of the Java Applets in the next section of this Java Applet Tutorial.
Every Java Applet needs to go through a series of phases from initialization to destruction in order to complete its execution. For that, the very first step is to inherit the java.applet.Applet class. This class aids with various methods which help in holding up a basic framework for the Java Applets. The various methods involved in the life cycle of Java Applet has been depicted by the below diagram.
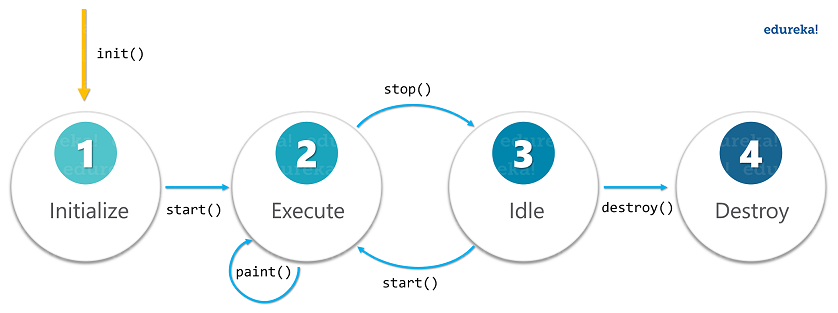 As you can see, there are 4 main methods which are mandatory for any Java Applet to override. Let me brief you about each of these methods one by one.
One more method that is mostly used along with the above four is paint().
Below is the basic skeleton of a Java Applet with all the life cycle methods.
AppletLifeCycle.java
import java.applet.*;

public class AppletLifeCycle extends Applet{
public void init(){
System.out.println("Applet is Initialized");
}
public void start(){
System.out.println("Applet is being Executed");
}
public void stop()
{
System.out.println("Applet execution has Stopped");
}
public void paint(Graphics g)
{
System.out.println("Painting the Applet...");
}
public void destroy()
{
System.out.println("Applet has been Destroyed");
}
}
Let’s now put whatever we have learned in this tutorial together and try to create an applet which can respond to user actions.
Below I have included a small and simple Java Applet program where you will see how event handling works while an applet courses through its life cycle.
AppletEventHandling.java
import java.awt.event.MouseListener;
import java.awt.event.MouseEvent;
import java.applet.Applet;
import java.awt.Graphics;
import java.awt.Color;
import java.awt.Font;

public class AppletEventHandling extends Applet implements MouseListener {
StringBuffer strBuf;

public void init() {
addMouseListener(this);
strBuf = new StringBuffer();
addItem(" Initializing the applet");
addItem(" Welcome to the Edureka's Applet Tutorial");
}

public void start() {
addItem(" Starting the applet ");

}

public void stop() {
addItem(" Stopping the applet ");

}

public void destroy() {
addItem(" Destroying the applet");
addItem(" Good Bye!!");

}

void addItem(String word) {
System.out.println(word);
strBuf.append(word);
repaint();
}

public void paint(Graphics g) {

g.drawString(strBuf.toString(), 10, 20);

setForeground(Color.white);
setBackground(Color.black);

}

public void mouseEntered(MouseEvent event) {
}
public void mouseExited(MouseEvent event) {
}
public void mousePressed(MouseEvent event) {
}
public void mouseReleased(MouseEvent event) {
}
public void mouseClicked(MouseEvent event) {
addItem(" Mouse is Clicked!!");
}
}
Next step is to compile the above .java file into .class file. Once done, now you need to create an HTML file and add the reference of the .class file in the applet tag. Below I have demonstrated how to write the code for this HTML file.
eventHandling.html
<html>
   <title>Event Handling</title>
   <applet code = "AppletEventHandling.class"
      width = "300" height = "300">
   </applet>
</html>
When you execute this code, your applet should look like the below-shown screenshot. Now, to check whether your applet is working perfect or not, you can check in your terminal. There you can see, all the phases your aplet is going through with your every action. Below I have attached a screenshot for the same.
 With this, we come to an end of this article on Java Applet Tutorial. I hope now you have a clear picture of what exactly is a Java Applet, why do we need them and how they are created. If you wish to learn Java in more detail you can refer to our other Java articles as well.
Now that you have understood basics of Java Applet, check out the Java Certification Course by Edureka, a trusted online learning company with a network of more than 250,000 satisfied learners spread across the globe. Edureka’s Java J2EE and SOA Training and Certification course is designed for students and professionals who want to be a Java Developer. The course is designed to give you a head start into Java programming and train you for both core and advanced Java concepts along with various Java frameworks like Hibernate & Spring.
Got a question for us? Please mention it in the comments section of this “Java Applet Tutorial” and we will get back to you as soon as possible.


 Thank you for registering Join Edureka Meetup community for 100+ Free Webinars each month JOIN MEETUP GROUP