
 //Code
Python Scripting Certification Training
- 15k Enrolled Learners
- Weekend
- Self Paced
(5900)


 Copy Link!
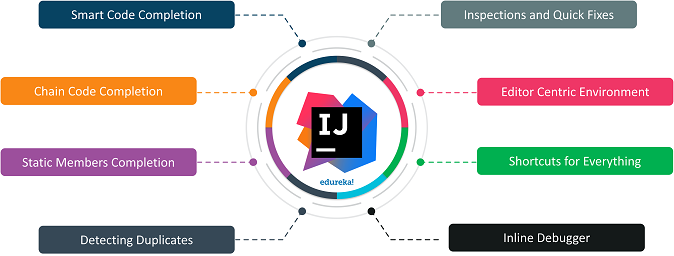
IntelliJ IDEA IDE for Java is the most powerful Integrated Development Enterprise. It is developed and maintained by JetBrains. This IDE is loaded with rich features and functionalities that, one can possibly imagine. In this tutorial, I’ll walk you through its important capabilities.
IntelliJ is a powerful IDE designed by JetBrains. This particular IDE was created for importing, developing, modelling, and deploying computer software.
It is available in two versions, namely:
Smart code completion: IntelliJ can predict exactly what are you trying to type. It follows context-based code completion.
Some equivalent IDE such as Eclipse has ground-breaking features and is capable give a cutting-edge competition to IntelliJ IDEA IDE, then How IntelliJ is a better choice?
Of course, IntelliJ and Eclipse are both the top-notch IDEs that the Eclipse Foundation and JetBrains respectively had to offer. But, JetBrains also added in some crucial characteristics which developers often look for.
We will install IntelliJ from the official site of Jet brains and remember to choose the version as per your requirements. Few prerequisites are:
Let us first begin with Windows.

Now, let us begin with Linux.

Similar to Windows You need to download all the prerequisites here as well.
./idea.sh
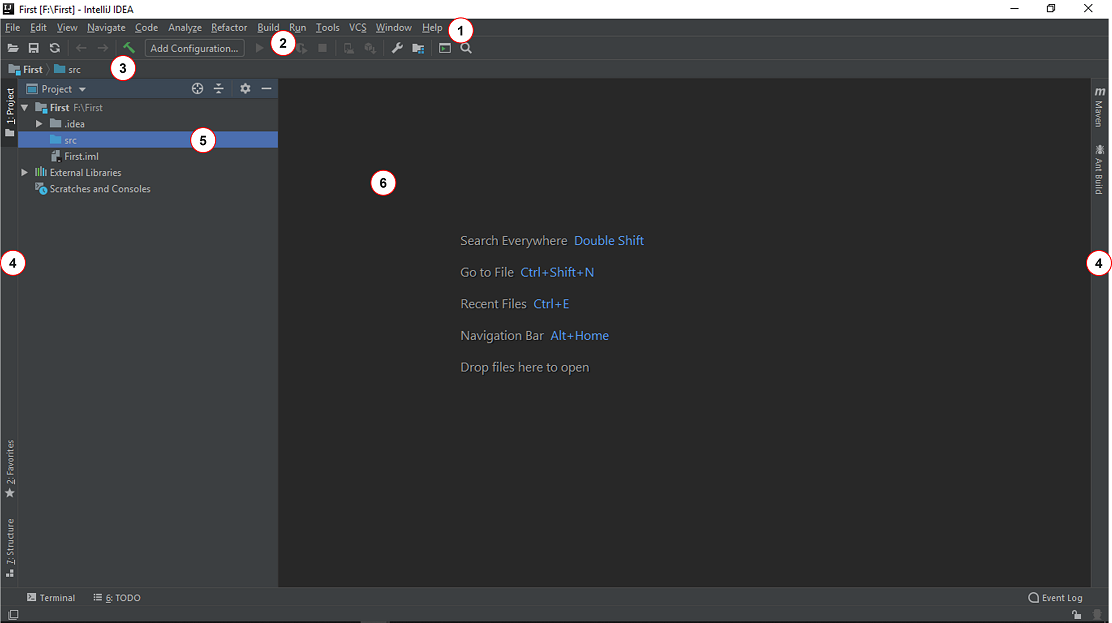
Now that we have successfully understood how to install IDEA in both the operating systems, let us understand how the user interface for this particular IDE looks like.
It is important that you must know how to interact with your IDE in order to be an efficient programmer. The typical User Interface of the IDEA looks as follows.
Plugins: File –> Settings –> plugins.
Settings: File –> Import/Export Settings –> OK
Configuring JVM Options and Platform Properties: Help –> Edit Custom VM Options.
Now that we got basic Idea about all the functionalities available on the instrumental cluster, let us start executing some basic programs.
Once you fire up IntelliJ, You can find different options to start with a project. the picture below depicts the various options available to start with a project.
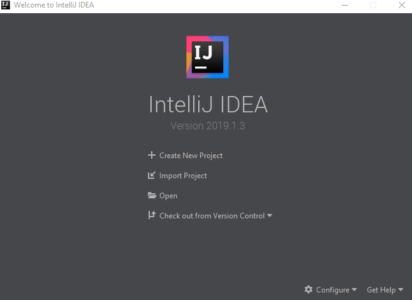
Let us first try to create a simple project by using the create option.
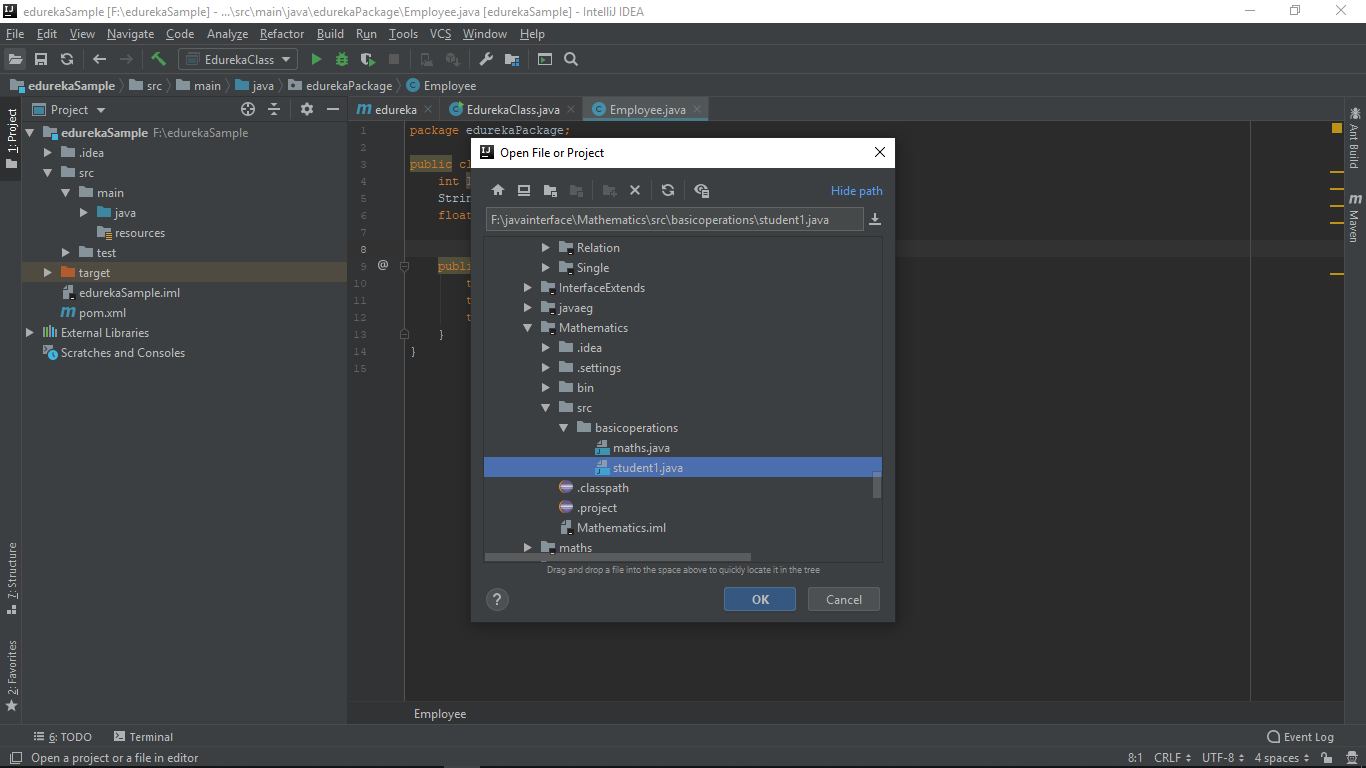
If you have a project in your Local File System and you would like to run it. Then, all you have to do is, just import the project execute it.
For example, I have a Java file in my local system which I would like to run using the IntelliJ IDEA IDE. I can do it by opening it from the File options and open it from its location.
The Additional operations available in IntelliJ are as follows:
Unit Testing

Unit Testing can be defined as a procedure where individual units of the source code are run against tests associated with usage procedures and operating procedures in order to find out if they are fit for usage or not. Unit Testing in IntelliJ can be achieved by following these steps below:
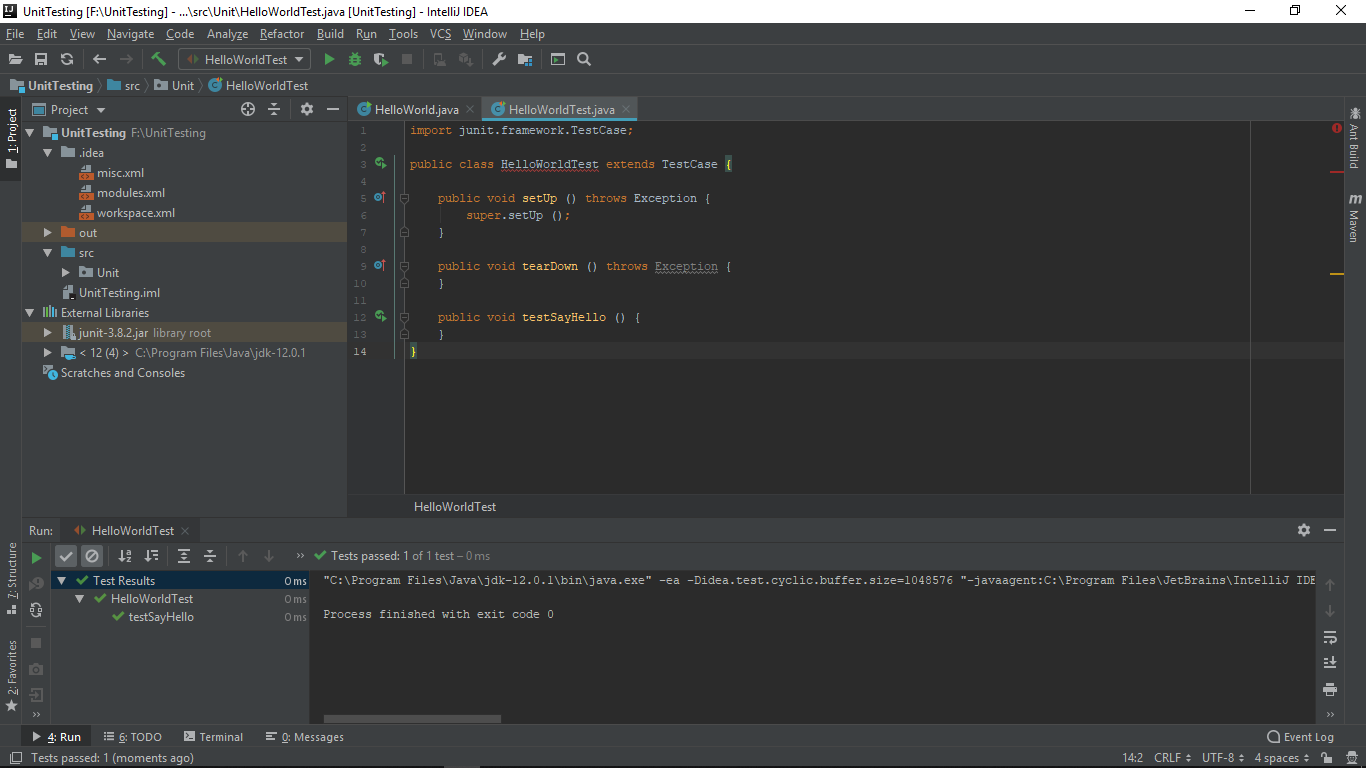
//Unit Testing code
package Unit;
public class HelloWorld {
    public static void main ( String[] args ) {
        sayHello ( "Hello World...!" );
}
    static void sayHello ( String msg ) {
        System.out.println ( msg );
    }
}
//UnitTest Code by IntelliJ
junit.framework.TestCase;
public class HelloWorldTest extends TestCase {
    public void setUp () throws Exception {
        super.setUp ();
}
   public void tearDown () throws Exception {
     }
   public void testSayHello () {
     }
}
Debugging
 Java IntelliJ IDEA IDE comes with a Built-in Debugger. The debugging process is made easier with this In-built Debugger. The Debugger enables us to set break-points in the code, so, that we can stop the execution of the program at a certain point and take a step in to inspect the code and its variables.
We can execute the Debugging process by following these steps below:
Find and Replace
 IntelliJ also supports Find and Replace options. You can do it by using the shortcut Ctrl + Shift + R keys, this will result in a pop-up window (as shown below) which will ask you for the keys to be found and then its asks for the word to be replaced with the currently found word throughout the program.

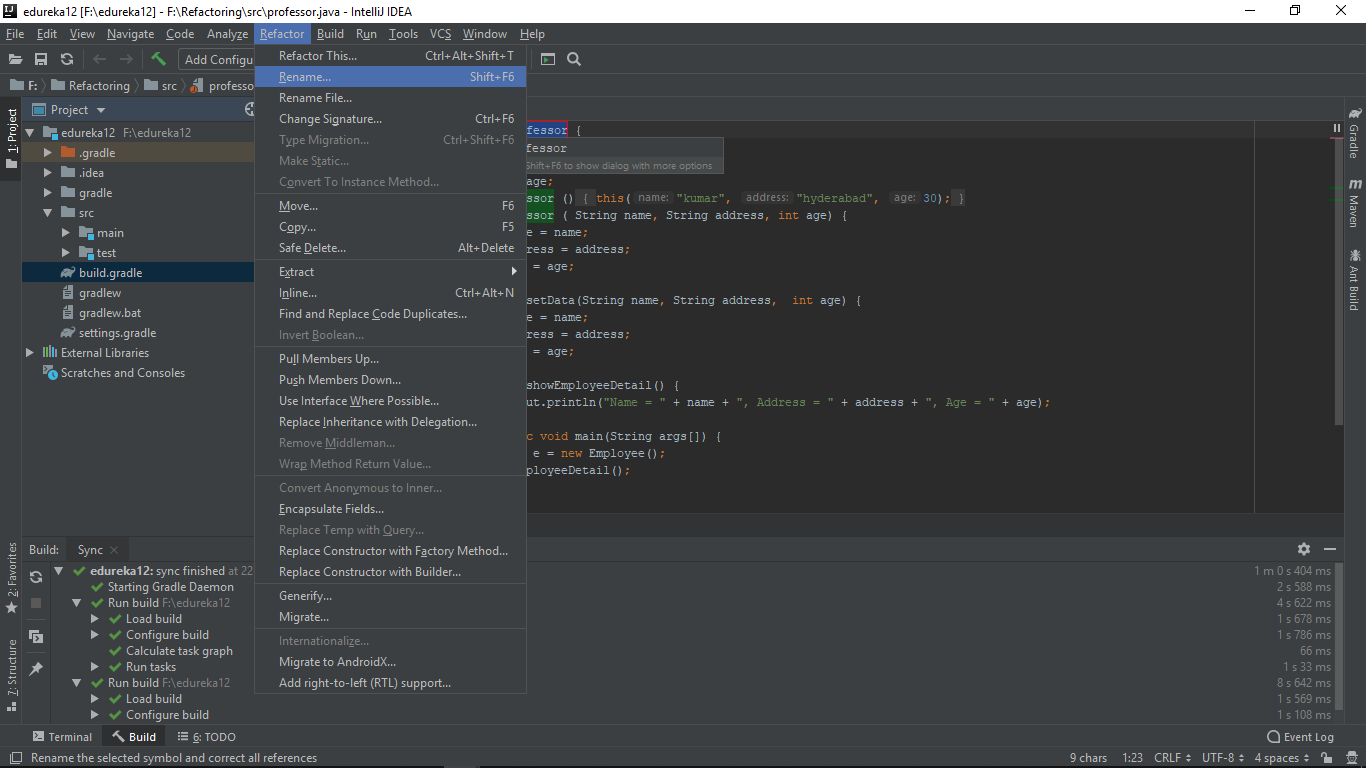
Rename
IntelliJ IDEA IDE supports Rename operation. You can use the Rename operation by selecting the word and hovering to Refactor option, then, select the Rename option as shown below.
In the above code, I wish to apply Code Refactor Operation where I would rename Professor to Student. This will result in changing the class, objects and all other operations related to Professor will be changed to Student.
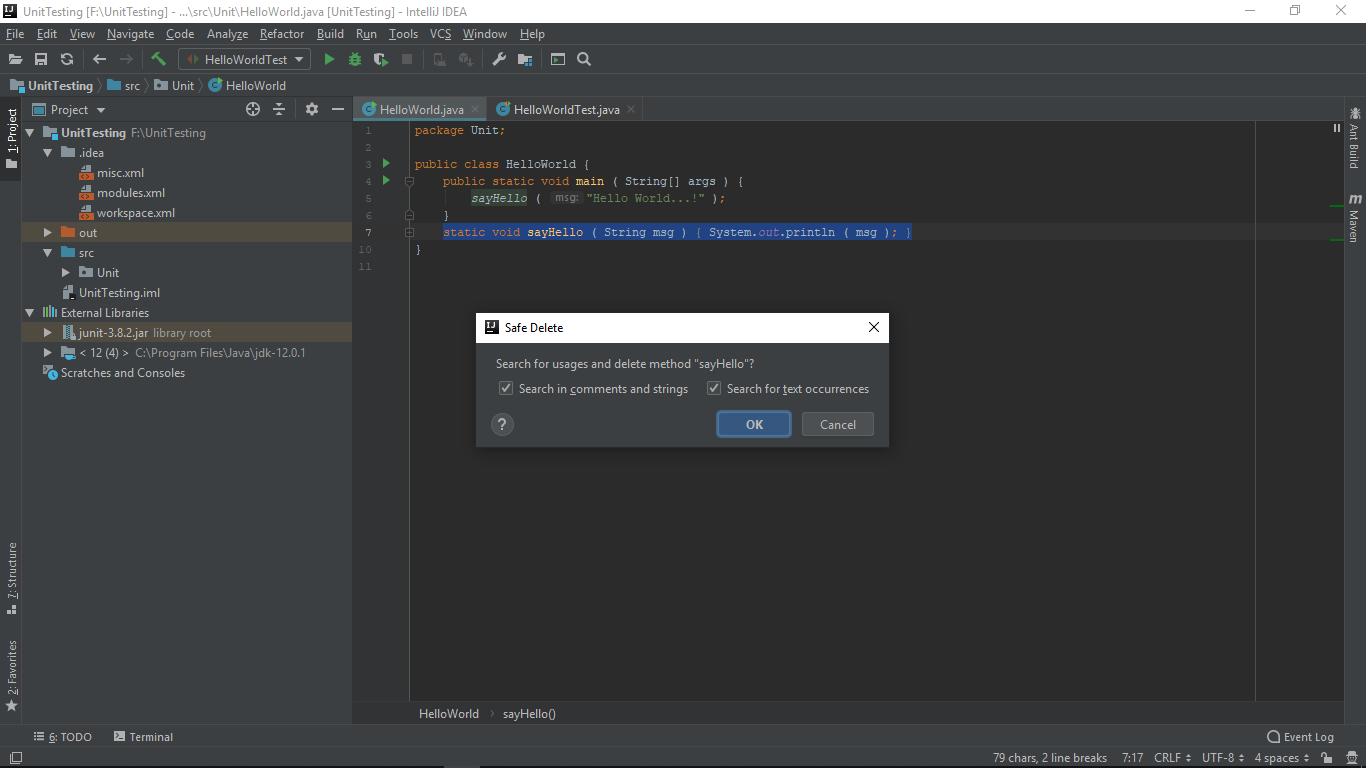
Safe Delete
 We can try to delete a code segment by using the Safe Delete option. The code will be deleted only if the participants of that particular code segment are not participating in the execution of the remaining code.The delete command can be executed by pressing Alt + Delete keys together.
Now we shall try out some major build tools. I shall explain to you some build tools like Maven and Gradle and other ones are also used and executed in a similar manner.
Maven

To begin with, the Maven project, let us follow the steps below.
To work with Maven, you need to download and install Maven in your system and also set the home and path variables for Maven.
//Pom.XML
</pre>
<?xml version</span><span>="1.0" </span><span>encoding</span><span>="UTF-8"</span><span>?>
<project xmlns="http://maven.apache.org/POM/4.0.0" xmlns:xsi ="http://www.w3.org/2001/XMLSchema-instance" xsi : schemaLocation ="http://maven.apache.org/POM/4.0.0 http://maven.apache.org/xsd/maven-4.0.0.xsd">
<modelVersion>4.0.0</modelVersion>
<groupId>com.edureka</groupId>
<artifactId>edureka</artifactId>
<version>1.0-SNAPSHOT</version>
<packaging>jar</packaging>
<dependencies>
   <!-- https://mvnrepository.com/artifact/com.google.code.gson/gson -->
    <dependency>
       <groupId>com.google.code.gson</groupId>
        <artifactId>gson</artifactId>
       <version>2.8.5</version>
    </dependency>
</dependencies>
</project>
To run this program, the IntelliJ requires Gson Dependencies in its Pom.XML file, You can download all the required dependencies from the Maven Respository.

Similarly, let us get started with a Gradle project.
Gradle

You can begin with a Gradle project by following the steps below:
To work with Gradle, you need to download and install Gradle in your system and also set the home and path variables for Gradle.
 //Code
package edurekagraddle;
public class factorial {
public static void main(String args[]){
int i,fact=1;
int number=5;//It is the number to calculate factorial&amp;amp;lt;/pre&amp;amp;gt;
for(i=1;i&amp;amp;lt;=number;i++){
fact=fact*i;
}
System.out.println("Factorial of "+number+" is: "+fact);
}
}
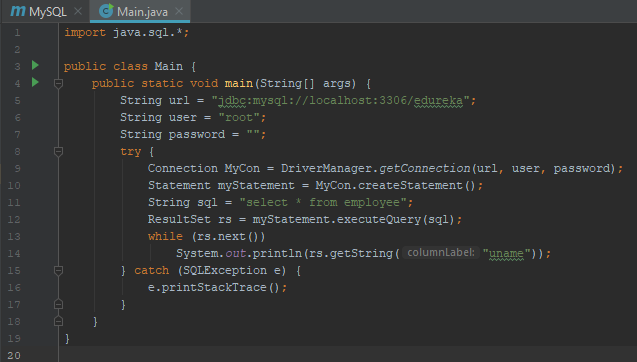
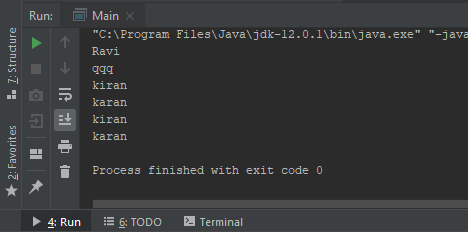
Let us try to work with MySQL and Databases. in IntelliJ IDEA IDE.
MySQL

You can begin with a MySQL project by following the steps below:
To work with MySQL, you need to download and install MySQL in your system and also set the Local Host using XAMPP.
//Pom.XML
<?xml version="1.0" encoding="UTF-8"?>
<project xmlns="http://maven.apache.org/POM/4.0.0" xmlns:xsi="http://www.w3.org/2001/XMLSchema-instance" xsi : schemaLocation="http://maven.apache.org/POM/4.0.0 http://maven.apache.org/xsd/maven-4.0.0.xsd">
   <modelVersion>4.0.0</modelVersion>
  <groupId>com.edureka.MySQL</groupId>
  <artifactId>MySQL</artifactId>
  <version>1.0-SNAPSHOT</version>
  <dependencies>
      <!-- https://mvnrepository.com/artifact/mysql/mysql-connector-java -->
     <dependency>
            <groupId>mysql</groupId>
           <artifactId>mysql-connector-java</artifactId>
          <version>5.1.6</version>
        </dependency>
    </dependencies>
</project>
To run this program, the IntelliJ requires MySQL Dependencies in its Pom.XML file, You can download all the required dependencies from the Maven Respository.
Now, Last but not the least, achieving the pro mode, let us quickly grasp some important shortcuts we have on our IDE which makes our programming methods seamlessly simpler and efficient.
| Operation | Shortcut |
| Search | Ctrl + Shift + Y |
| Go to Line | Ctrl + G |
| Rename | Shift + F6 |
| Run | Ctrl + Shift + F10 |
| Move Lines | Ctrl + Shift + Up / Down |
| Format Code | Ctrl + Shift + L |
| Generate Getter and Setter | Alt + Insert |
| Delete | Ctrl + Y |
With this, we come to the end of this IntelliJ IDEA IDE tutorial. I hope you understood how to install this IDE and what are the prerequisites for installation, the basic operations and build tools supported in IDE.
Now that you have understood the basics of IntelliJ IDEA IDE, check out the Java training by Edureka, a trusted online learning company with a network of more than 250,000 satisfied learners spread across the globe. The course is designed to give you a head start into Java programming and train you for both core and advanced Java concepts along with various Java frameworks like Hibernate & Spring.
Got a question for us? Mention it in the comments section of this “IntelliJ IDEA IDE” blog and we will get back to you as soon as possible.


 Thank you for registering Join Edureka Meetup community for 100+ Free Webinars each month JOIN MEETUP GROUP