

SQL Essentials Training
- 13k Enrolled Learners
- Weekend/Weekday
- Self Paced
(4800)


 Copy Link!
There is no doubt in the fact that MySQL is one of the most popular relational database systems. This article is going to be a brief guide on How to install MySQL, for beginners.
MySQL is a database management system that is used extensively in today’s industry. It comes with multi-user access to support many storage engines and is backed by Oracle.
So, if you follow these few simple steps, you should be able to download and install MySQL on your Operating Systems, completely hassle-free. You can even check out the details of relational databases, functions, and queries, variables, etc with the SQL Training.
Now, to install MySQL, there are mainly three factors you must consider:
In this article, I am going to install MySQL on Windows using the MySQL Installer.
MySQL Installer makes it easy to install MySQL with the help of the wizard. Once you finish installing MySQL, you will see various other features installed, such as MySQL Server, MySQL Workbench, MySQL Shell and so on.
Now, let us get started with the installation of MySQL.
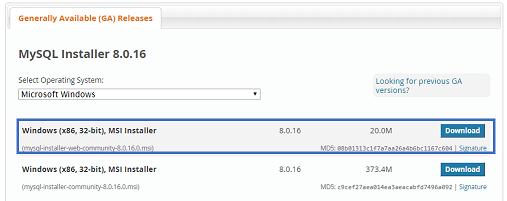
Step 1: Go to the official website of MySQL and scroll down. Then you will see an option to choose the Operating System. Here I will choose Windows.
Step 2: After that, you will see two options to Download. If you have internet connectivity then you can go forward and choose the mysql-installer-web-community, else you can choose the other one. Refer below.
Step 3: Once, you click on Download, you will be redirected to the following page:

In the above page, just click on the option of “No thanks, just start my download.” Once, you click on this option, you will see that MySQL Installer is getting downloaded.
Step 4: After MySQL Installer gets downloaded, double click on it, and you will see that the MySQL installer Community is getting installed. Once, it is downloaded you will see the following screen.

In the above dialog box, just check in in the radio button and accept the License Agreement. After that, click on Next.
Step 5: In the next wizard, you have to choose the setup type. Basically, this is where you choose which features you wish to install. Here I will choose the option Full and click on Next.

This option will MySQL Server, MySQL Shell, MySQL Router, MySQL Workbench, MySQL Connectors, documentation, samples and examples and much more.
Step 6: Once you click on Next, you might see that some features may fail to install due to lack of requirements. So, either you can resolve them, or can skip them, by clicking on Next. Here I will click on Next.

Step 6.1: Next, you will see a dialog box asking for your confirmation of a few products not getting installed. So, you can just click on Yes. Refer below.

As soon as you click on Next, you will see the list of the products which will get installed. So, if you are fine with the products, go ahead and click on Execute as below.

Once you hit on Execute, you will see that the products are getting installed. Refer below:
Now, once the installation is complete, click on Next.

Next, you have to configure the Server and Router. Well, over here let me tell you that, I am not going to configure the Router now since it is not required to simply use MySQL. But, I will show you how to configure Server. So, in the below dialog box, click on Next.

Step 7: In the below wizard, you can either choose the Standalone MySQL Replication or the InnoDB Cluster based on your requirement. Here I will choose, Standalone MySQL Cluster and then click on Next.

Step 8: Once, you click on Next, you have to mention the server configuration. So, I will leave it as it is and then click on Next.

Step 9: Now, you have to choose the authentication method. Here, I will choose the first option and click on Next. Refer below.

Step 10: Next, you have to mention the MySQL Root Password and again click on Next.
 NOTE: Please make a note of this password.
Step 11: Finally, you have to choose whether you want to start the server or not. Here, I am going to leave it as it is. Then, click on Next.

Now, the wizard will give you a list of the configurations which will be applied. So, if you agree with the configuration click on Execute.

Once the execution is done, click on Finish. This will finish the configuration of Server.

Step 12: In the next wizard that comes up, you can choose to configure the Router. So just click on Next and click on Finish.

Step 13: Once, you click on Finish, you will see the following wizard, to Connect to server. Here mention the root password, which you had set in the previous steps. Refer below.
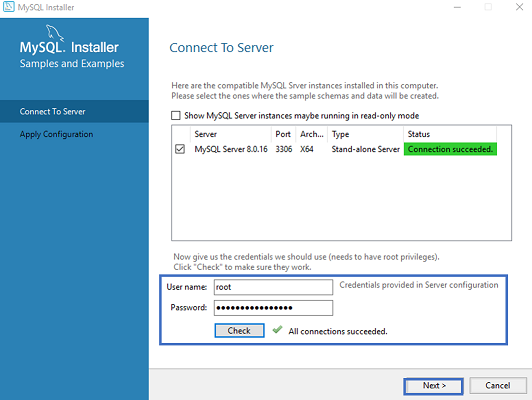
Check if the connection is successful, by clicking on the Check button and then click on Execute. Now, once the configuration is complete click on Next.
Step 14: Once, you click on Next, choose the configurations applied and click on Execute.

After the configurations get applied, you will see the following screen. So, here just click on Finish. Refer below.

Step 15: Now, to check whether MySQL is installed or not, you can open the MySQL Shell and mention the root password.

The above output indicates that MySQL has been installed in your system. Now, that you know how to install MySQL if you wish to know about the GUI of MySQL, you can refer to my article on MySQL Workbench.
Immerse yourself in the world of NoSQL databases with our MongoDB Certification.
If you wish to learn more about MySQL and get to know this open source relational database, then check out our MySQL DBA Certification Training which comes with instructor-led live training and real-life project experience. This training will help you understand MySQL in depth and help you achieve mastery over the subject.
Got a question for us? Please mention it in the comments section of ”How To Install MySQL?” and I will get back to you.


 Thank you for registering Join Edureka Meetup community for 100+ Free Webinars each month JOIN MEETUP GROUP