
Microsoft Azure Data Engineering Training Cou ...
- 16k Enrolled Learners
- Weekend
- Live Class
(3450)


 Copy Link!
You must have got a theoretical idea about Hadoop, HDFS and its architecture. But to get Hadoop Certified you need good hands-on knowledge. I hope you would have liked our previous blog on HDFS Architecture, now I will take you through the practical knowledge about Hadoop and HDFS. The first step forward is to install Hadoop.
There are two ways to install Hadoop, i.e. Single node and Multi-node.
A single node cluster means only one DataNode running and setting up all the NameNode, DataNode, ResourceManager, and NodeManager on a single machine. This is used for studying and testing purposes. For example, let us consider a sample data set inside the healthcare industry. So, for testing whether the Oozie jobs have scheduled all the processes like collecting, aggregating, storing, and processing the data in a proper sequence, we use a single node cluster. It can easily and efficiently test the sequential workflow in a smaller environment as compared to large environments which contain terabytes of data distributed across hundreds of machines.
While in a Multi-node cluster, there are more than one DataNode running and each DataNode is running on different machines. The multi-node cluster is practically used in organizations for analyzing Big Data. Considering the above example, in real-time when we deal with petabytes of data, it needs to be distributed across hundreds of machines to be processed. Thus, here we use a multi-node cluster.
This Edureka Big Data & Hadoop Full Course video will help you understand and learn Hadoop concepts in detail.
In this blog, I will show you how to install Hadoop on a single node cluster. You can get a better understanding from the Hadoop Admin Training in Bangalore.
Command: tar -xvf jdk-8u101-linux-i586.tar.gz

Fig: Hadoop Installation – Extracting Java Files
Command: wget https://archive.apache.org/dist/hadoop/core/hadoop-2.7.3/hadoop-2.7.3.tar.gz

Fig: Hadoop Installation – Downloading Hadoop
Command: tar -xvf hadoop-2.7.3.tar.gz

Fig: Hadoop Installation – Extracting Hadoop Files
Open. bashrc file. Now, add Hadoop and Java Path as shown below.
Learn more about the Hadoop Ecosystem and its tools with the Hadoop Certification.
Command: vi .bashrc

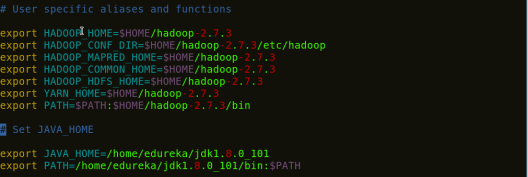
Fig: Hadoop Installation – Setting Environment Variable
Then, save the bash file and close it.
For applying all these changes to the current Terminal, execute the source command.
Command: source .bashrc

Fig: Hadoop Installation – Refreshing environment variables
To make sure that Java and Hadoop have been properly installed on your system and can be accessed through the Terminal, execute the java -version and hadoop version commands.
Command: java -version
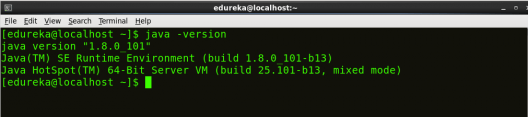
Fig: Hadoop Installation – Checking Java Version
Command: hadoop version

Fig: Hadoop Installation – Checking Hadoop Version
Command: cd hadoop-2.7.3/etc/hadoop/
Command: ls
All the Hadoop configuration files are located in hadoop-2.7.3/etc/hadoop directory as you can see in the snapshot below:
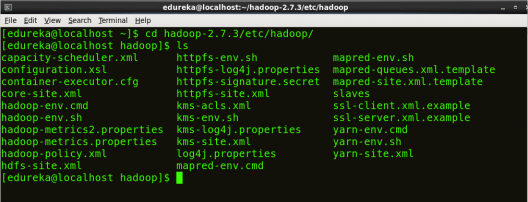
Fig: Hadoop Installation – Hadoop Configuration Files
core-site.xml informs Hadoop daemon where NameNode runs in the cluster. It contains configuration settings of Hadoop core such as I/O settings that are common to HDFS & MapReduce.
Command: vi core-site.xml


Fig: Hadoop Installation – Configuring core-site.xml
<?xml version="1.0" encoding="UTF-8"?>
<?xml-stylesheet type="text/xsl" href="configuration.xsl"?>
<configuration>
<property>
<name>fs.default.name</name>
<value>hdfs://localhost:9000</value>
</property>
</configuration>
hdfs-site.xml contains configuration settings of HDFS daemons (i.e. NameNode, DataNode, Secondary NameNode). It also includes the replication factor and block size of HDFS.
Command: vi hdfs-site.xml

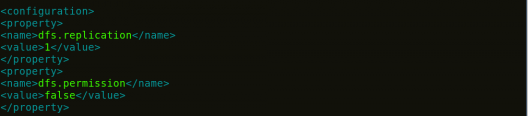
Fig: Hadoop Installation – Configuring hdfs-site.xml
<?xml version="1.0" encoding="UTF-8"?>
<?xml-stylesheet type="text/xsl" href="configuration.xsl"?>
<configuration>
<property>
<name>dfs.replication</name>
<value>1</value>
</property>
<property>
<name>dfs.permission</name>
<value>false</value>
</property>
</configuration>
mapred-site.xml contains configuration settings of MapReduce application like number of JVM that can run in parallel, the size of the mapper and the reducer process, CPU cores available for a process, etc.
In some cases, mapred-site.xml file is not available. So, we have to create the mapred-site.xml file using mapred-site.xml template.
Command: cp mapred-site.xml.template mapred-site.xml
Command: vi mapred-site.xml.


Fig: Hadoop Installation – Configuring mapred-site.xml
<?xml version="1.0" encoding="UTF-8"?>
<?xml-stylesheet type="text/xsl" href="configuration.xsl"?>
<configuration>
<property>
<name>mapreduce.framework.name</name>
<value>yarn</value>
</property>
</configuration>
This Edureka “Web Development Full Course” video will help you understand and learn Web Development technologies like HTML, CSS, JavaScript, React.js, Angular concepts in detail.
yarn-site.xml contains configuration settings of ResourceManager and NodeManager like application memory management size, the operation needed on program & algorithm, etc.
You can even check out the details of Big Data with the Azure Data Engineering Certification in Hyderabad.
Command: vi yarn-site.xml

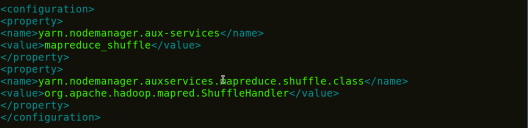
Fig: Hadoop Installation – Configuring yarn-site.xml
<?xml version="1.0">
<configuration>
<property>
<name>yarn.nodemanager.aux-services</name>
<value>mapreduce_shuffle</value>
</property>
<property>
<name>yarn.nodemanager.auxservices.mapreduce.shuffle.class</name>
<value>org.apache.hadoop.mapred.ShuffleHandler</value>
</property>
</configuration>
hadoop-env.sh contains the environment variables that are used in the script to run Hadoop like Java home path, etc.
Command: vi hadoop–env.sh

![]()
Fig: Hadoop Installation – Configuring hadoop-env.sh
Command: cd
Command: cd hadoop-2.7.3
Command: bin/hadoop namenode -format

Fig: Hadoop Installation – Formatting NameNode
This formats the HDFS via NameNode. This command is only executed for the first time. Formatting the file system means initializing the directory specified by the dfs.name.dir variable.
Never format, up and running Hadoop filesystem. You will lose all your data stored in the HDFS.
You can even check out the details of Big Data with the Azure Data Engineer Training.
Command: cd hadoop-2.7.3/sbin
Either you can start all daemons with a single command or do it individually.
Command: ./start-all.sh
The above command is a combination of start-dfs.sh, start-yarn.sh & mr-jobhistory-daemon.sh
Or you can run all the services individually as below:
The NameNode is the centerpiece of an HDFS file system. It keeps the directory tree of all files stored in the HDFS and tracks all the file stored across the cluster.
Command: ./hadoop-daemon.sh start namenode

Fig: Hadoop Installation – Starting NameNode
On startup, a DataNode connects to the Namenode and it responds to the requests from the Namenode for different operations.
Command: ./hadoop-daemon.sh start datanode
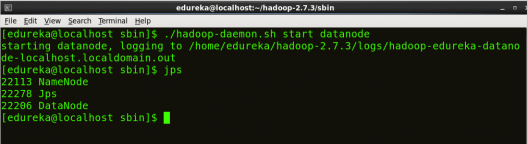
Fig: Hadoop Installation – Starting DataNode
ResourceManager is the master that arbitrates all the available cluster resources and thus helps in managing the distributed applications running on the YARN system. Its work is to manage each NodeManagers and the each application’s ApplicationMaster.
Command: ./yarn-daemon.sh start resourcemanager
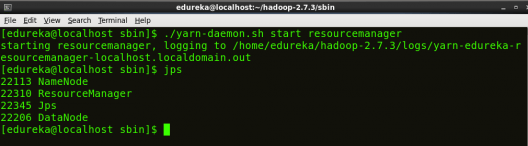
Fig: Hadoop Installation – Starting ResourceManager
The NodeManager in each machine framework is the agent which is responsible for managing containers, monitoring their resource usage and reporting the same to the ResourceManager.
Command: ./yarn-daemon.sh start nodemanager

Fig: Hadoop Installation – Starting NodeManager
JobHistoryServer is responsible for servicing all job history related requests from client.
Command: ./mr-jobhistory-daemon.sh start historyserver
Command: jps
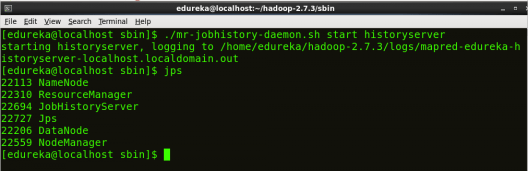
Fig: Hadoop Installation – Checking Daemons

Fig: Hadoop Installation – Starting WebUI
Congratulations, you have successfully installed a single-node Hadoop cluster in one go. In our next blog of the Hadoop Tutorial Series, we will be covering how to install Hadoop on a multi-node cluster as well.
Now that you have understood how to install Hadoop, check out the Hadoop admin course by Edureka, a trusted online learning company with a network of more than 250,000 satisfied learners spread across the globe. The Edureka Data architect course helps learners become experts in HDFS, Yarn, MapReduce, Pig, Hive, HBase, Oozie, Flume, and Sqoop using real-time use cases on Retail, Social Media, Aviation, Tourism, Finance domains.
Got a question for us? Please mention it in the comments section and we will get back to you.


 Thank you for registering Join Edureka Meetup community for 100+ Free Webinars each month JOIN MEETUP GROUP


cannot run the command :- cd hadoop-2.7.3/sbin, as it showing the error “No such file or directory”.
I’m not able to get hadoop -version output, also when I am adding the lines to the .bashrc file and running source .bashrc it says command not found for every command I enter ,Please help!
Please provide how to install Hadoop in Windows 8 with steps , as shown for unix.
Thanks
Anish
Excellent tutorial! Got my Hadoop instaled by following the steps. Thanks.
Can be install hadoop on Win10 machine and use python as base languagae.
Hi everyone, I have some troubles running “vi .bashrc” command. When I use it the console does not show as it looks in the image. I’m newbie with linux so I do not know how to proceed, i’ll be really gratefull for help
Command: vi .bashrc
• Now you can have to type the codes.
• Then, You need to save and close the file.
• For that, you have press [ESC] button.
• Then W: [Enter]
Now go to next step.
Thanks Mr Sinha, I have installed a single node cluster, but my job get stuck saying “Accepted, waiting for AM container to allocate, launched and registered with RM”, I have checked and edited configuration files yet I dont seem to find a way around this problem. Please help
where are we typing this
Command: tar -xvf jdk-8u101-linux-i586.tar.gz
We are typing this command in the directory where the Java file has been downloaded.
hi,
I am on Win 10. Plz suggest what is the best option for Virtual Box?
i am facing the same problem
plz help
I would suggest you to use Oracle Virtual Box.
I am facing problem when trying to run ./start-all.sh. I am getting permisson denied error.
[edureka@localhost sbin]$ ./start-all.sh
This script is Deprecated. Instead use start-dfs.sh and start-yarn.sh
17/04/07 10:11:47 WARN util.NativeCodeLoader: Unable to load native-hadoop library for your platform… using builtin-java classes where applicable
Starting namenodes on [localhost]
edureka@localhost’s password:
localhost: starting namenode, logging to /usr/lib/hadoop-2.2.0/logs/hadoop-edureka-namenode-localhost.localdomain.out
localhost: /usr/lib/hadoop-2.2.0/sbin/hadoop-daemon.sh: line 157: /usr/lib/hadoop-2.2.0/hadoop2_data/hdfs/pid/hadoop-edureka-namenode.pid: Permission denied
edureka@localhost’s password:
localhost: starting datanode, logging to /usr/lib/hadoop-2.2.0/logs/hadoop-edureka-datanode-localhost.localdomain.out
localhost: /usr/lib/hadoop-2.2.0/sbin/hadoop-daemon.sh: line 157: /usr/lib/hadoop-2.2.0/hadoop2_data/hdfs/pid/hadoop-edureka-datanode.pid: Permission denied
Starting secondary namenodes [0.0.0.0]
edureka@0.0.0.0’s password:
0.0.0.0: starting secondarynamenode, logging to /usr/lib/hadoop-2.2.0/logs/hadoop-edureka-secondarynamenode-localhost.localdomain.out
0.0.0.0: /usr/lib/hadoop-2.2.0/sbin/hadoop-daemon.sh: line 157: /usr/lib/hadoop-2.2.0/hadoop2_data/hdfs/pid/hadoop-edureka-secondarynamenode.pid: Permission denied
17/04/07 10:12:35 WARN util.NativeCodeLoader: Unable to load native-hadoop library for your platform… using builtin-java classes where applicable
starting yarn daemons
starting resourcemanager, logging to /usr/lib/hadoop-2.2.0/logs/yarn-edureka-resourcemanager-localhost.localdomain.out
edureka@localhost’s password:
localhost: starting nodemanager, logging to /usr/lib/hadoop-2.2.0/logs/yarn-edureka-nodemanager-localhost.localdomain.out
[edureka@localhost sbin]$
[edureka@localhost sbin]$ jps
5364 Jps
3497 SecondaryNameNode
5310 NodeManager
[edureka@localhost sbin]$
[edureka@localhost sbin]$ jps
5405 Jps
3497 SecondaryNameNode
[edureka@localhost sbin]$
Hey Deepak, thanks for checking out our blog. Here’s what you need to do:
Use : sudo ./start-all.sh Then Use : sudo jps
If you are using edureka VM the follow the below steps.
==>Open the terminal and fire reboot.
==> Now when the VM start fire sudo service hadoop-master restart
==> sudo jps.
And if you still want to start from sbin the first got to root
=> su (fire this command in the terminal and when it prompts for password give edureka as password. )
Hope this helps. Cheers!
You can try this command: sudo chmod 777 -R /your/hadoop/folder