So, let’s get started, folks!
Screenshot in Selenium WebDriver: Why Screenshot is required in Automation testing?
Screenshots are desirable for bug analysis. Selenium can automatically take screenshots during execution. Suppose you write a test script to automate a web page, you would not keep monitoring to see if it’s working right every time. You would let the script do its job and you’d be occupied in some other work.
- Screenshots help us in understanding the flow of application and checks if it is behaving accordingly.
- You need to typecast WebDriver instance to TakesScreenshot.
- It helps while you are performing cross-browsing testing as the user requires to view the reports of the execution
- Tracking the execution would become much easy if you are working on a headless browser.
- Screenshot of the tests that failed can also be easily captured.
Now, let us move ahead and learn how exactly you can take a screenshot in while testing an application.
Screenshot in Selenium WebDriver: How to capture Screenshot in Selenium?
To capture a screenshot in Selenium, we can make use of an interface, called TakesScreenshot. This method indicates the driver, that it can capture a screenshot and store it in different ways.
Syntax:
 File file = ((TakesScreenshot) driver).getScreenshotAs(OutputType.FILE);
String screenshotBase64 = ((TakesScreenshot) driver).getScreenshotAs(OutputType.BASE64);
where OutputType defines the output type for a screenshot.
In order to capture screenshot and store it in a particular location, there is a method called “getScreenshotAs“
Let’s understand this in detail
For WebDriver extending TakesScreenshot method, this makes the best effort depending on the browser to return the following in a preferable order:
- The entire page
- Current window
- Visible portion of the current frame
- A screenshot of the entire display containing the browser
- The entire content of the HTML element – The visible portion of the HTML element
Syntax:
X getScreenshotAs(OutputType(X). target) throws WebDriverException
where
- X is the return type of the method
- Target holds the destination address
- Throws WebDriverExecption if the underlying implementation does not support screenshot capturing.
Test case failed
Selenium WebDriver has come up with some great new functionalities that make testing an application much easier. This is because the WebDriver architecture allows interaction outside of Javascript sandbox. One of the new useful functionality is being able to take screenshots from the WebDriver.
You can take screenshots at any stage of the test, but mostly, it is used for when a test fails and taking screenshots helps the analysis so we can see what went wrong during a test failure. This can be done using TestNG annotations.
To do this, first, I’ll need to
- Create a class and then implement TestNG ‘ITestListener‘.
- Then call a method ‘onTestFailure’.
- Add the code to take the screenshot in this method.
- Instead of just taking the screenshot, get the Test method name and take a screenshot with the test name and place it in the destination folder.
Now, the question is how to get the driver object in the TestListeners class using TestNG?
I’ll help you understand how easy it is to do that.
I will be explaining two different programs here so that you get a proper idea about how to take a screenshot in Selenium.
First program deals with how to capture a screenshot of the test case run successfully. The second program helps you understand how to take a screenshot during the test failure.
Screenshot in Selenium WebDriver: Demo
The very first thing to do when you want to test a web application is to have the Selenium Jar files and the Java libraries. You can choose an IDE of your choice. I prefer working on the Eclipse IDE because it is user-friendly.
- I will set the browser driver to ChromeDriver.
- Instantiate the driver instance with the ChromeDriver.
- Get the URL of the webpage.
- Perform corresponding actions.
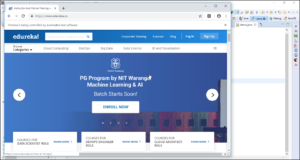
In this case, I will take a screenshot of our official webpage Edureka.co.
Refer to the below code:
import java.io.File;
import java.io.IOException;
import org.apache.commons.io.FileUtils;
import org.openqa.selenium.OutputType;
import org.openqa.selenium.TakesScreenshot;
import org.openqa.selenium.WebDriver;
import org.openqa.selenium.chrome.ChromeDriver;
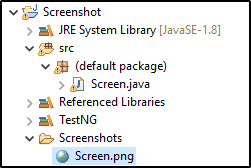
public class Screen {
public static void main(String[] args) throws Exception {
System.setProperty("webdriver.chrome.driver", "C:UsersNeha_VaidyaDesktopchromedriver_win32chromedriver.exe");
WebDriver driver = new ChromeDriver();
driver.get("http://www.edureka.co/");
TakesScreenshot ts = (TakesScreenshot)driver;
File source = ts.getScreenshotAs(OutputType.FILE);
FileUtils.copyFile(source, new File("./Screenshots/Screen.png"));
System.out.println("the Screenshot is taken");
driver.quit();
}
}
The output for the above code is depicted below:


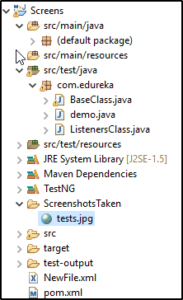
And the folder contains the image

Now, let us understand how to take a screenshot of the test failed
- First, create a Maven project.
- Add the TestNG XML file.
- Add the maven dependencies.
- Create a class BaseClass which holds the WebDriver instance.
- Define two functions namely initialization() and failed()
- Call these two functions in another class, demo which inherits the BaseClass.
- This Demo class holds the two methods setUp() which calls the initialization() function, tearDown() helps in closing the driver and ScreenshotTest() where we assert the actual and the expected output.
- In this case, I will assert both true and false which results in the failure of the test case.
- Create another class, ListenersClass which helps the WebDriver listen to the particular events.
- Add this code in the demo class @Listeners(ListenersClass.class) before the main function in order to listen to the test case.
You can refer to this code:
BaseClass
package com.edureka;
import java.io.File;
import java.io.IOException;
import org.apache.commons.io.FileUtils;
import org.openqa.selenium.OutputType;
import org.openqa.selenium.TakesScreenshot;
import org.openqa.selenium.WebDriver;
import org.openqa.selenium.chrome.ChromeDriver;
import org.testng.annotations.Listeners;

public class BaseClass {
public static WebDriver driver;

public static void initialization()
{
System.setProperty("webdriver.chrome.driver", "C:UsersNeha_VaidyaDesktopchromedriver_win32chromedriver.exe");
driver = new ChromeDriver();
driver.get("http://www.edureka.co/");

}
public void failed()
{
File srcFile = ((TakesScreenshot)driver).getScreenshotAs(OutputType.FILE);
try {
FileUtils.copyFile(srcFile, new File("/C:/Users/Neha_Vaidya/eclipse-workspace/Screens/"
+ "ScreenshotsTaken/tests.jpg"));
} catch (IOException e) {
e.printStackTrace();
}
}

}
DemoClass
package com.edureka;
import org.testng.Assert;
import org.testng.annotations.AfterMethod;
import org.testng.annotations.BeforeMethod;
import org.testng.annotations.Listeners;
import org.testng.annotations.Test;
@Listeners(ListenersClass.class)
public class demo extends BaseClass{
@BeforeMethod
public void setUp() {
initialization();

}

@AfterMethod
public void tearDown()
{
driver.quit();
}

@Test
public void takeScreenshotTest()
{
Assert.assertEquals(true, false);
}
}
ListenersClass
package com.edureka;
import org.testng.ITestContext;
import org.testng.ITestListener;
import org.testng.ITestResult;

public class ListenersClass extends BaseClass implements ITestListener{

public void onTestStart(ITestResult result) {
// TODO Auto-generated method stub

}

public void onTestSuccess(ITestResult result) {
// TODO Auto-generated method stub

}

public void onTestFailure(ITestResult result) {
System.out.println("Failed Test");
failed();

}

public void onTestSkipped(ITestResult result) {
// TODO Auto-generated method stub

}

public void onTestFailedButWithinSuccessPercentage(ITestResult result) {
// TODO Auto-generated method stub

}

public void onStart(ITestContext context) {
// TODO Auto-generated method stub

}

public void onFinish(ITestContext context) {
// TODO Auto-generated method stub

}

}
The output is depicted in this manner: