


HDFS 2.x High Availability Cluster Architecture
In this blog, I am going to talk about HDFS 2.x High Availability Cluster Architecture and the procedure to set up an HDFS High Availability cluster. This is an important part of the Big Data course. The order in which the topics have been covered in this blog are as follows:
- HDFS HA Architecture
- Introduction
- NameNode Availability
- Architecture of HA
- Implementation of HA (JournalNode and Shared storage)
- How to set up HA (Quorum Journal Nodes) in a Hadoop cluster?
Introduction:
The concept of High Availability cluster was introduced in Hadoop 2.x to solve the single point of failure problem in Hadoop 1.x. As you know from my previous blog that the HDFS Architecture follows Master/Slave Topology where NameNode acts as a master daemon and is responsible for managing other slave nodes called DataNodes. This single Master Daemon or NameNode becomes a bottleneck. Although, the introduction of Secondary NameNode did prevent us from data loss and offloading some of the burden of the NameNode but, it did not solve the availability issue of the NameNode.
NameNode Availability:
If you consider the standard configuration of HDFS cluster, the NameNode becomes a single point of failure. It happens because the moment the NameNode becomes unavailable, the whole cluster becomes unavailable until someone restarts the NameNode or brings a new one.
The reasons for unavailability of NameNode can be:
- A planned event like maintenance work such has upgradation of software or hardware.
- It may also be due to an unplanned event where the NameNode crashes because of some reasons.
In either of the above cases, we have a downtime where we are not able to use the HDFS cluster which becomes a challenge.
HDFS HA Architecture:
Let us understand that how HDFS HA Architecture solved this critical problem of NameNode availability:
The HA architecture solved this problem of NameNode availability by allowing us to have two NameNodes in an active/passive configuration. So, we have two running NameNodes at the same time in a High Availability cluster:
- Active NameNode
- Standby/Passive NameNode.
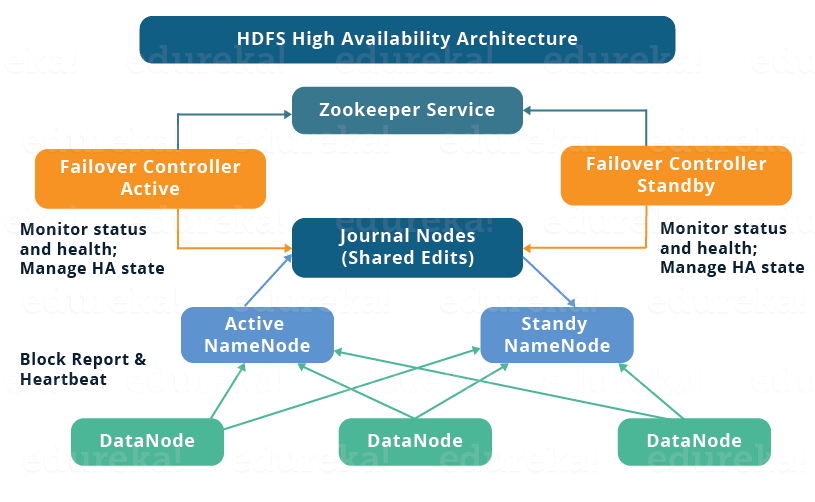

If one NameNode goes down, the other NameNode can take over the responsibility and therefore, reduce the cluster down time. The standby NameNode serves the purpose of a backup NameNode (unlike the Secondary NameNode) which incorporate failover capabilities to the Hadoop cluster. Therefore, with the StandbyNode, we can have automatic failover whenever a NameNode crashes (unplanned event) or we can have a graceful (manually initiated) failover during the maintenance period.
There are two issues in maintaining consistency in the HDFS High Availability cluster:
- Active and Standby NameNode should always be in sync with each other, i.e. They should have the same metadata. This will allow us to restore the Hadoop cluster to the same namespace state where it got crashed and therefore, will provide us to have fast failover.
- There should be only one active NameNode at a time because two active NameNode will lead to corruption of the data. This kind of scenario is termed as a split-brain scenario where a cluster gets divided into smaller cluster, each one believing that it is the only active cluster. To avoid such scenarios fencing is done. Fencing is a process of ensuring that only one NameNode remains active at a particular time.
Implementation of HA Architecture:
Now, you know that in HDFS HA Architecture, we have two NameNodes running at the same time. So, we can implement the Active and Standby NameNode configuration in following two ways:
- Using Quorum Journal Nodes
- Shared Storage using NFS
Let us understand these two ways of implementation taking one at a time:
1. Using Quorum Journal Nodes:
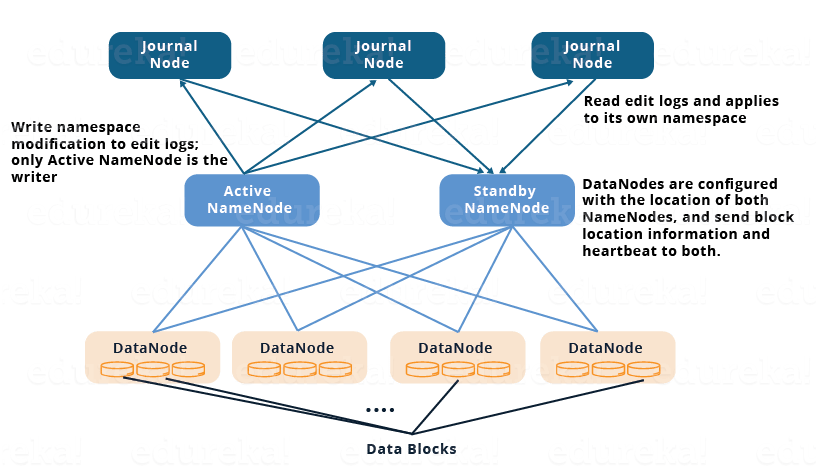

- The standby NameNode and the active NameNode keep in sync with each other through a separate group of nodes or daemons -called JournalNodes. The JournalNodes follows the ring topology where the nodes are connected to each other to form a ring. The JournalNode serves the request coming to it and copies the information into other nodes in the ring.This provides fault tolerance in case of JournalNode failure.
- The active NameNode is responsible for updating the EditLogs (metadata information) present in the JournalNodes.
- The StandbyNode reads the changes made to the EditLogs in the JournalNode and applies it to its own namespace in a constant manner.
- During failover, the StandbyNode makes sure that it has updated its meta data information from the JournalNodes before becoming the new Active NameNode. This makes the current namespace state synchronized with the state before failover.
- The IP Addresses of both the NameNodes are available to all the DataNodes and they send their heartbeats and block location information to both the NameNode. This provides a fast failover (less down time) as the StandbyNode has an updated information about the block location in the cluster.
Fencing of NameNode:
Now, as discussed earlier, it is very important to ensure that there is only one Active NameNode at a time. So, fencing is a process to ensure this very property in a cluster.
- The JournalNodes performs this fencing by allowing only one NameNode to be the writer at a time.
- The Standby NameNode takes over the responsibility of writing to the JournalNodes and forbid any other NameNode to remain active.
- Finally, the new Active NameNode can perform its activities safely.
2. Using Shared Storage:
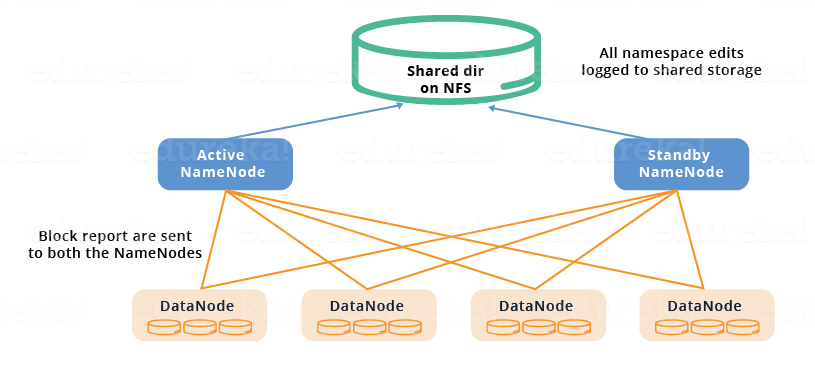

- The StandbyNode and the active NameNode keep in sync with each other by using a shared storage device. The active NameNode logs the record of any modification done in its namespace to an EditLog present in this shared storage. The StandbyNode reads the changes made to the EditLogs in this shared storage and applies it to its own namespace.
- Now, in case of failover, the StandbyNode updates its metadata information using the EditLogs in the shared storage at first. Then, it takes the responsibility of the Active NameNode. This makes the current namespace state synchronized with the state before failover.
- The administrator must configure at least one fencing method to avoid a split-brain scenario.
- The system may employ a range of fencing mechanisms. It may include killing of the NameNode’s process and revoking its access to the shared storage directory.
- As a last resort, we can fence the previously active NameNode with a technique known as STONITH, or “shoot the other node in the head”. STONITH uses a specialized power distribution unit to forcibly power down the NameNode machine.
Automatic Failover:
Failover is a procedure by which a system automatically transfers control to secondary system when it detects a fault or failure. There are two types of failover:
Graceful Failover: In this case, we manually initiate the failover for routine maintenance.
Automatic Failover: In this case, the failover is initiated automatically in case of NameNode failure (unplanned event).
Apache Zookeeper is a service that provides the automatic failover capability in HDFS High Availabilty cluster. It maintains small amounts of coordination data, informs clients of changes in that data, and monitors clients for failures. Zookeeper maintains a session with the NameNodes. In case of failure, the session will expire and the Zookeeper will inform other NameNodes to initiate the failover process. In case of NameNode failure, other passive NameNode can take a lock in Zookeeper stating that it wants to become the next Active NameNode.
The ZookeerFailoverController (ZKFC) is a Zookeeper client that also monitors and manages the NameNode status. Each of the NameNode runs a ZKFC also. ZKFC is responsible for monitoring the health of the NameNodes periodically.
Now that you have understood what is High Availability in a Hadoop cluster, it’s time to set it up. To set up High Availability in Hadoop cluster you have to use Zookeeper in all the nodes.
The daemons in Active NameNode are:
- Zookeeper
- Zookeeper Fail Over controller
- JournalNode
- NameNode
The daemons in Standby NameNode are:
- Zookeeper
- Zookeeper Fail Over controller
- JournalNode
- NameNode
The daemons in DataNode are:
- Zookeeper
- JournalNode
- DataNode
If you wish to master HDFS and Hadoop, check out the specially curated Big Data certification course by Edureka. Click on the button below to get started.
![]()

Setting Up and Configuring High Availability Cluster in Hadoop:
You have to first set up the Java and host names of each node.
| Virtual machine | IP address | Host name |
| Active NameNode | 192.168.1.81 | nn1.cluster.com or nn1 |
| Standby NameNode | 192.168.1.58 | nn2.cluster.com or nn2 |
| DataNode | 192.168.1.82 | dn1.cluster.com or dn1 |
Download the Hadoop and Zookeeper binary tar file, extract the files to edit configuration files.
Command : wget https://archive.apache.org/dist/zookeeper/zookeeper-3.4.6/zookeeper-3.4.6.tar.gz


Untar the zookeeper-3.4.6.tar.gz
Command: tar –xvf zookeeper-3.4.6.tar.gz


Download the stable Hadoop binary tar to from Apache Hadoop site.
Command: wget https://archive.apache.org/dist/hadoop/core/hadoop-2.6.0/hadoop-2.6.0.tar.gz


Extract the Hadoop tar ball.
Command: tar –xvf hadoop-2.6.0.tar.gz

Add the Hadoop, Zookeeper and paths to .bashrc file.
Open the .bashrc file.
Command: sudo gedit ~/.bashrc
Add the below paths:
export HADOOP_HOME=< Path to your Hadoop-2.6.0 directory>
export HADOOP_MAPRED_HOME=$HADOOP_HOME
export HADOOP_COMMON_HOME=$HADOOP_HOME
export HADOOP_HDFS_HOME=$HADOOP_HOME
export YARN_HOME=$HADOOP_HOME
export HADOOP_CONF_DIR=$HADOOP_HOME/etc/hadoop
export YARN_CONF_DIR=$HADOOP_HOME/etc/hadoop
export JAVA_HOME=<Path to your Java Directory>
export ZOOKEEPER_HOME =<Path to your Zookeeper Directory>
export PATH=$PATH: $JAVA_HOME/bin: $HADOOP_HOME/bin: $HADOOP_HOME/sbin:$ZOOKEEPER_HOME/bin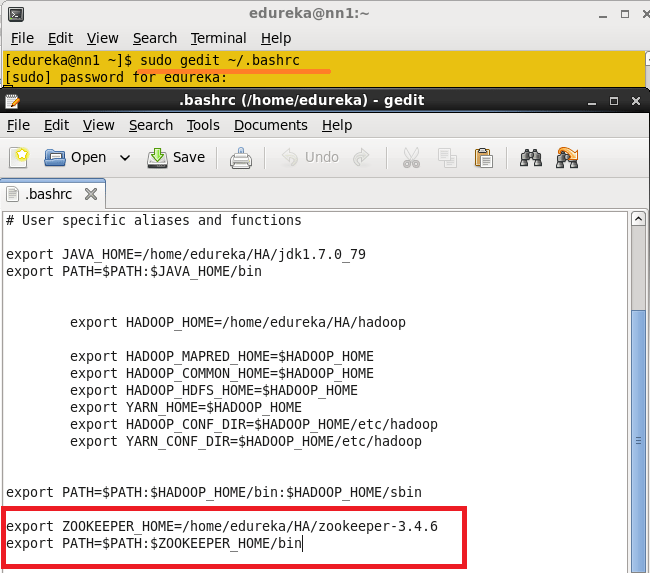
Enable the SSH in all the node.
Generate the SSH key in all the nodes.
Command: ssh-keygen –t rsa (This Step in all the Nodes)

Don’t give any path to the Enter file to save the key and don’t give any passphrase. Press enter button.
Generate the ssh key process in all the nodes.
Once ssh key is generated, you will get the public key and private key.
The .ssh key Directory should contain the Permission 700 and all the keys inside the .ssh directory should contain the permissions 600.

Change the directory to .ssh and change the permission of files to 600

You have to copy the Name nodes ssh public key to all the nodes.
In Active Namenode, copy the id_rsa.pub using cat command.
Command: cat ~/.ssh/id_rsa.pub >> ~/.ssh/authorized_keys

Copy the NameNode public key to all the nodes using ssh-copy-id command.
Command: ssh-copy-id –i .ssh/id_rsa.pub edureka@nn2.cluster.com

Copy NameNode public key to data node.
Command: ssh-copy-id –i .ssh/id_rsa.pub edureka@dn1.cluster.com

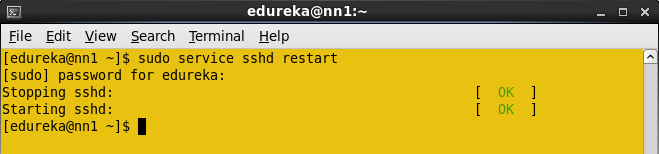
Restart the sshd service in all the nodes.
Command: sudo service sshd restart (Do in all the nodes)
Now you can login to the any node from Namenode without any authentication.
Open the core-site.xml file from the Active Name node and add the below properties.

Open hdfs-site.xml file in Active Namenode. Add the below Properties.
<property>
 <name>dfs.namenode.name.dir</name>
 <value>/home/edureka/HA/data/namenode</value>
 </property>
 <property>
 <name>dfs.replication</name>
 <value>1</value>
 </property>
 <property>
 <name>dfs.permissions</name>
 <value>false</value>
 </property>
 <property>
 <name>dfs.nameservices</name>
 <value>ha-cluster</value>
 </property>
 <property>
 <name>dfs.ha.namenodes.ha-cluster</name>
 <value>nn1,nn2</value>
 </property>
 <property>
 <name>dfs.namenode.rpc-address.ha-cluster.nn1</name>
 <value>nn1.cluster.com:9000</value>
 </property>
 <property>
 <name>dfs.namenode.rpc-address.ha-cluster.nn2</name>
 <value>nn2.cluster.com:9000</value>
 </property>
 <property>
 <name>dfs.namenode.http-address.ha-cluster.nn1</name>
 <value>nn1.cluster.com:50070</value>
 </property>
 <property>
 <name>dfs.namenode.http-address.ha-cluster.nn2</name>
 <value>nn2.cluster.com:50070</value>
 </property>
 <property>
 <name>dfs.namenode.shared.edits.dir</name>
 <value>qjournal://nn1.cluster.com:8485;nn2.cluster.com:8485;dn1.cluster.com:8485/ha-cluster</value>
 </property>
 <property>
 <name>dfs.client.failover.proxy.provider.ha-cluster</name>
 <value>org.apache.hadoop.hdfs.server.namenode.ha.ConfiguredFailoverProxyProvider</value>
 </property>
 <property>
 <name>dfs.ha.automatic-failover.enabled</name>
 <value>true</value>
 </property>
 <property>
 <name>ha.zookeeper.quorum</name>
 <value> nn1.cluster.com:2181,nn2.cluster.com:2181,dn1.cluster.com:2181 </value>
 </property>
 <property>
 <name>dfs.ha.fencing.methods</name>
 <value>sshfence</value>
 </property>
 <property>
 <name>dfs.ha.fencing.ssh.private-key-files</name>
 <value>/home/edureka/.ssh/id_rsa</value>
 </property>
Change the directory to zookeeper’s conf directory.
Command: cd zookeeper-3.4.6/conf

In a conf directory you have zoo_sample.cfg file, create the zoo.cfg using zoo_sample.cfg file.
Command: cp zoo_sample.cfg zoo.cfg

Create the directory in any location and use this directory to store the zookeeper data.
Command: mkdir <path, where you want to store the zookeeper files>

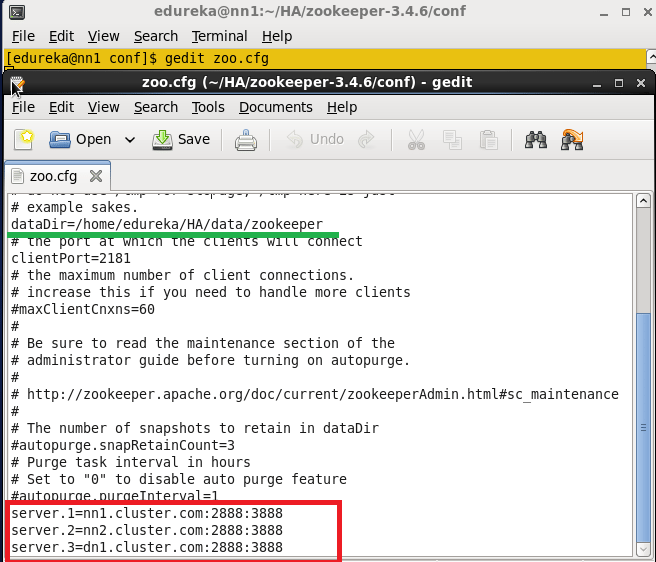
Open the zoo.cfg file.
Command: gedit zoo.cfg
Add the directory path that is created in above step to the dataDir property and add the below details regarding remaining node, in the zoo.cfg file.
Server.1=nn1.cluster.com:2888:3888
Server.2=nn2.cluster.com:2888:3888
Server.3=dn1.cluster.com:2888:3888
Now copy the Java and Hadoop-2.6.0, zookeeper-3.4.6 directories, and .bashrc file to all the nodes (Standby name node, Data node) using scp command.
Command: scp –r <path of directory> edureka@<ip address>:<path where you need to copy>

Similarly, copy the .bashrc file and zookeeper directory to all the nodes and change the environment variables in each according to the respective node.
In a data node, create any directory where you need to store the HDFS blocks.
In a data node, you have to add the dfs.datanode.data.dir properties.
In my case, I created datanode directory to store the blocks.

Change the permission to data node directory.

Open the HDFS-site.xml file, add this Datanode directory path in dfs.datanode.data.dir property.
Note: Keep all the properties that are copied from the Active namenode; add dfs.datanode.data.dir one extract property in namenode.
<property>
<name> dfs.datanode.data.dir</name>
<value>/home/edureka/HA/data/datanode</value>
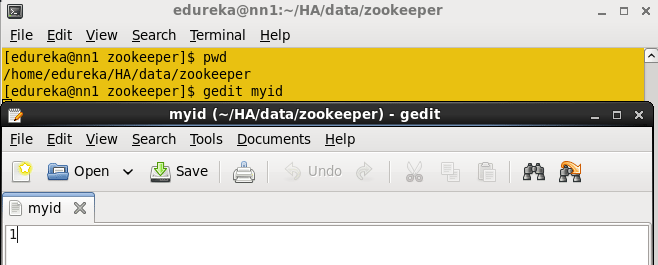
</property>In Active namenode, change the directory where you want to store the zookeeper configuration file (dataDir property path).
Create the myid file inside the directory and add numeric 1 to the file and save the file.
Command: vi myid
In a standby namenode change the directory where you want to store the zookeeper configuration file (dataDir property path).
Create the myid file inside the directory and add numeric 2 to the file and save the file.
In a data node, change the directory where you want to store the zookeeper configuration file (dataDir property path).
Create the myid file inside the directory and add numeric 3 to the file and save the file.
Start the Journalnode in all the three nodes.
Command: hadoop-daemon.sh start journalnode
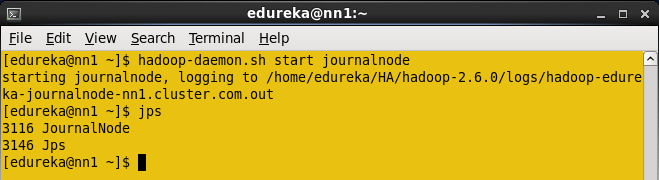
When you enter jps command, you will see the JournalNode daemon in all the nodes.
Format the Active namenode.
Command: HDFS namenode -format

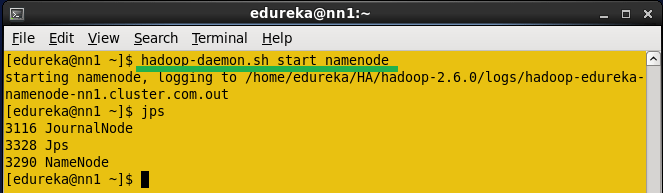
Start the Namenode daemon in Active namenode.
Command: hadoop-daemon.sh start namenode
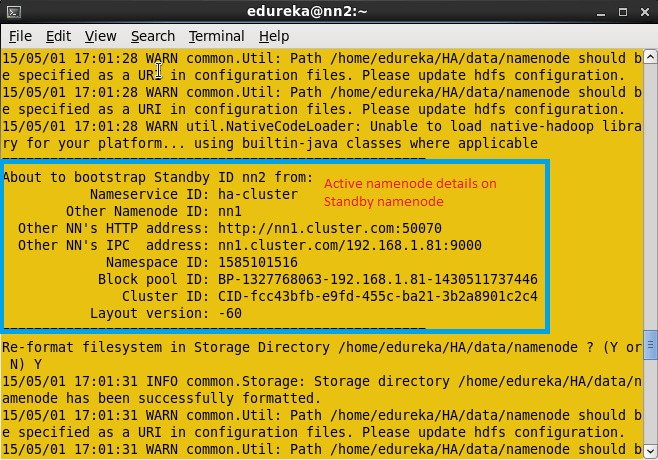
Copy the HDFS Meta data from active name node to standby namenode.
Command: HDFS namenode -bootstrapStandby
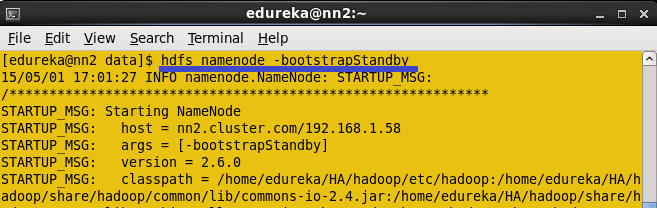
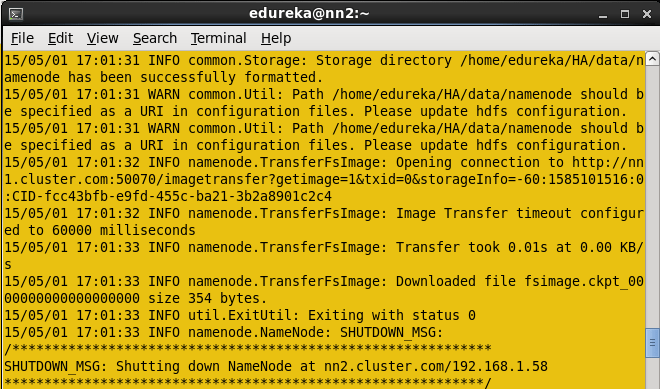
Once you run this command, you will get the information from which node and location the meta data is copying and whether it is copying successfully or not.
Once Meta data is copied from Active namenode to standby namenode, you will get the message shown below in the screenshot.
Start the namenode daemon in Standby namenode machine.
Command: hadoop-daemon.sh start namenode
Now start the Zookeeper service in all the three nodes.
Command: zkServer.sh start (Run this command in all the nodes)
In Active Namenode:

In Standby Namenode:

In Data node:

After running the Zookeeper server, enter JPS command. In all the nodes you will see the QuorumPeerMain service.
Start the Data node daemon in Data node machine.
Command: hadoop-daemon.sh start datanode
Start the Zookeeper fail over controller in Active name node and standby name node.
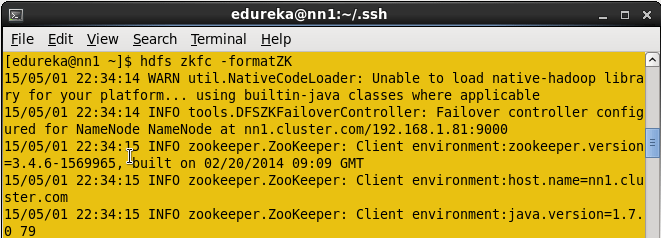
Format the zookeeper fail over controller in Active namenode.
Command: HDFS zkfc –formatZK
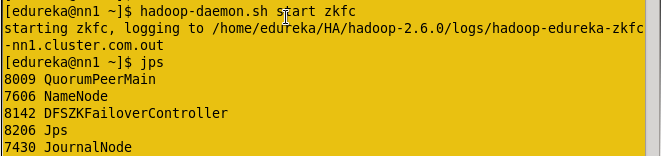
Start the ZKFC in Active namenode.
Command: hadoop-daemon.sh start zkfc
Enter jps command to check the DFSZkFailoverController daemons.
Format the zookeeper fail over controller in Standby namenode.
Command: hdfs zkfc –formatZK
Start the ZKFC in Standby namenode.
Command: hadoop-daemon.sh start zkfc
Enter jps command to check the DFSZkFailoverController daemons.
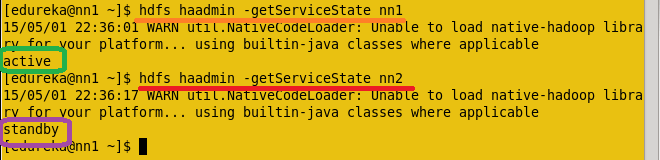
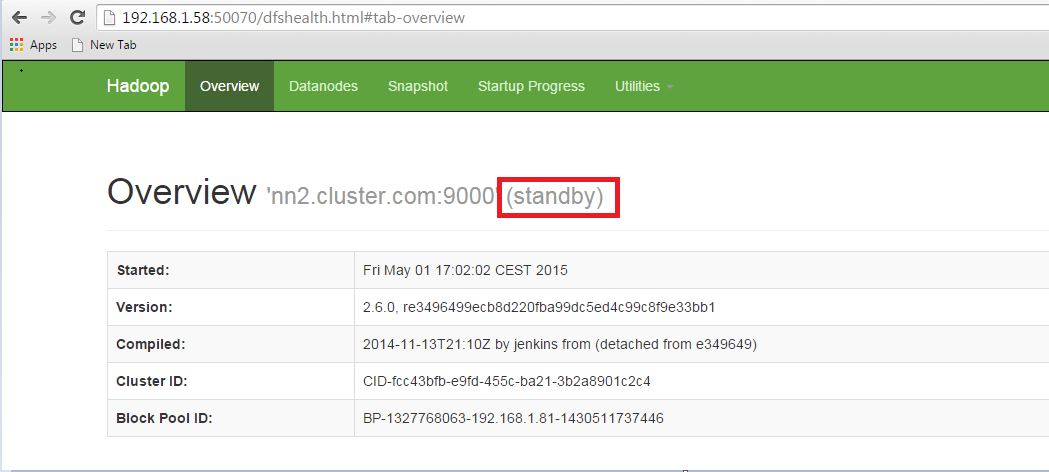
Now check the status of each Namenode, which node is Active or which node is on Standby by using the below command.
Command: hdfs haadmin –getServiceState nn1
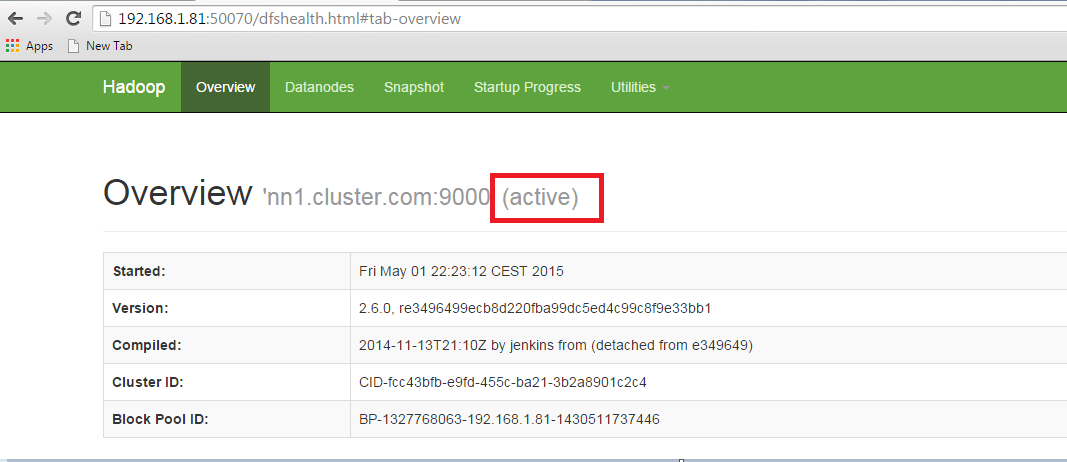
Now Check the status of each Namenode using the web browser.
Open the Web browser and enter the below URL.
<IP Address of Active Namenode>:50070
It will show whether the name node is Active or on standby.
Open another name node details using the web browser.
In the Active namenode, kill the namenode daemon to change the Standby name node to active namenode.
Enter jps in Active namenode and kill the daemon.
Command: sudo kill -9 <namenode process ID>
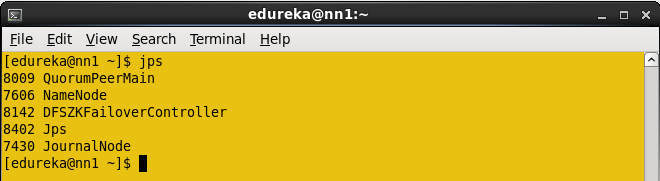
The Namenode process ID is 7606, kill the namenode.
Command : Sudo kill -9 7606

Open the two nodes through web browser and check the status.
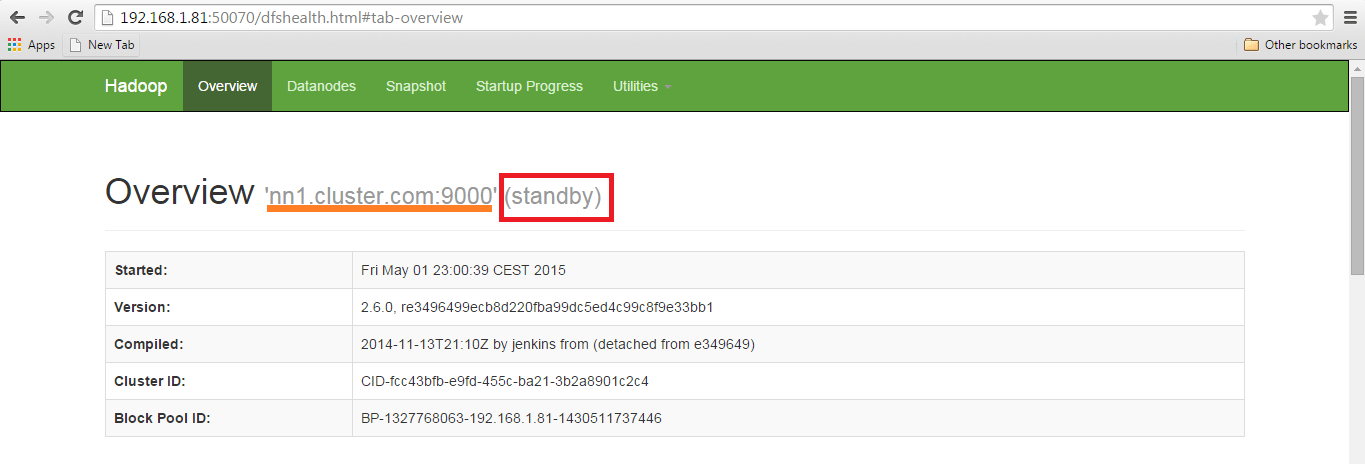
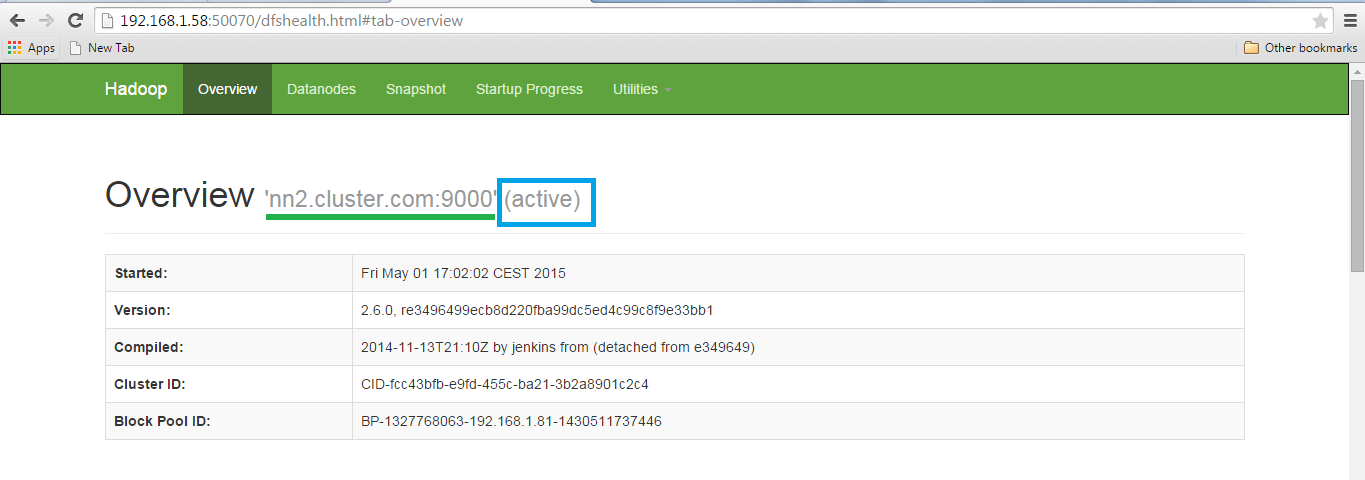
NameNode status.
Congratulations, you have successfully setup a HDFS High Availability Cluster in Hadoop.
Now that you have understood Hadoop High Availability Cluster Architecture, check out the Big Data course in Pune by Edureka, a trusted online learning company with a network of more than 250,000 satisfied learners spread across the globe. The Edureka’s Big Data Architect Course helps learners become expert in HDFS, Yarn, MapReduce, Pig, Hive, HBase, Oozie, Flume and Sqoop using real-time use cases on Retail, Social Media, Aviation, Tourism, Finance domain.
Got a question for us? Please mention it in the comments section and we will get back to you.
window._LQ_ = window._LQ_ || {};
lqQuizModal(window, document, {quizId:’XAIVp8′,baseUrl:’https://quiz.leadquizzes.com/’,trigger:’exit’}, _LQ_);