
Advanced DevOps Certification Training with G ...
- 24k Enrolled Learners
- Weekend
- Live Class
(7990)


 Copy Link!
Learning Git is as easy as using the tool. The motive of this Git tutorial blog is to omit this dilemma from your mind. I am sure with this Git tutorial blog, you will go brimming through all the concepts.
I hope that you have gone through the basic concepts and terminologies of Git and learned all about Version Control in my first blog of the Git Tutorial series. If you haven’t, please check out my previous blog to get a better understanding of Git.
In this Git Tutorial, you will learn:
Topics covered in this git tutorial will only gear you closer to become an Edureka certified GitHub professional.
Before starting with the commands and operations let us first understand the primary motive of Git.
The motive of Git is to manage a project or a set of files as they change over time. Git stores this information in a data structure called a Git repository. The repository is the core of Git.
To be very clear, a Git repository is the directory where all of your project files and the related metadata resides.
Git records the current state of the project by creating a tree graph from the index. It is usually in the form of a Directed Acyclic Graph (DAG).
Before you go ahead, check out this video on Git tutorial to have better in-sight.
Before you can use Git, you must first install it and make some fundamental configuration adjustments. The methods for installing the Git client on Ubuntu and Linux are listed below.
Step 1: Start the General OS and Package update,
First of all, we should start with the general OS and package updates. To do so, run the below command:
$ apt-get update Now we have started the general OS and package updates. After this, we will run the general updates on the server so that we can get started with installing Git. To do so, run the following commands:
Step 2: Install Git
To install Git, run the below command:
$ apt-get install git-core The above command will install Git on your system, but it may ask you to confirm the download and installation.
Step 3: Confirm Git the installation
To confirm the installation, press the “y” key on the editor. Now, Git is installed and ready to use.
When the central installation is done, first check to ensure the executable file is set up and accessible. The best way to do this is the git version command. It will be run as
$ git --version Step 4: Configure the Git for the First use
Now you can start using Git on your system. You can explore many features of the version control system. To go with Git, you have to configure the initial user access process. It can be done with the git config command.
Suppose I want to register a user whose user name is “edureka” and email address is “edureka@xyz”, then it will be done as follows:
To register a username, run the below command:
$ git config --global user.name “edureka”To register an email address for the given author, run the below command:
$ git config --global user.email "edureka@xyz" Now, you have successfully registered a user for the version control system.
let us go ahead with the operations and commands.
A basic overview of how Git works:
Git Bash and Git Shell are two different command line programs which allow you to interact with the underlying Git program. Bash is a Linux-based command line while Shell is a native Windows command line.
Some of the basic operations in Git are:
Some advanced Git operations are:
Let me first give you a brief idea about how these operations work with the Git repositories. Take a look at the architecture of Git below:
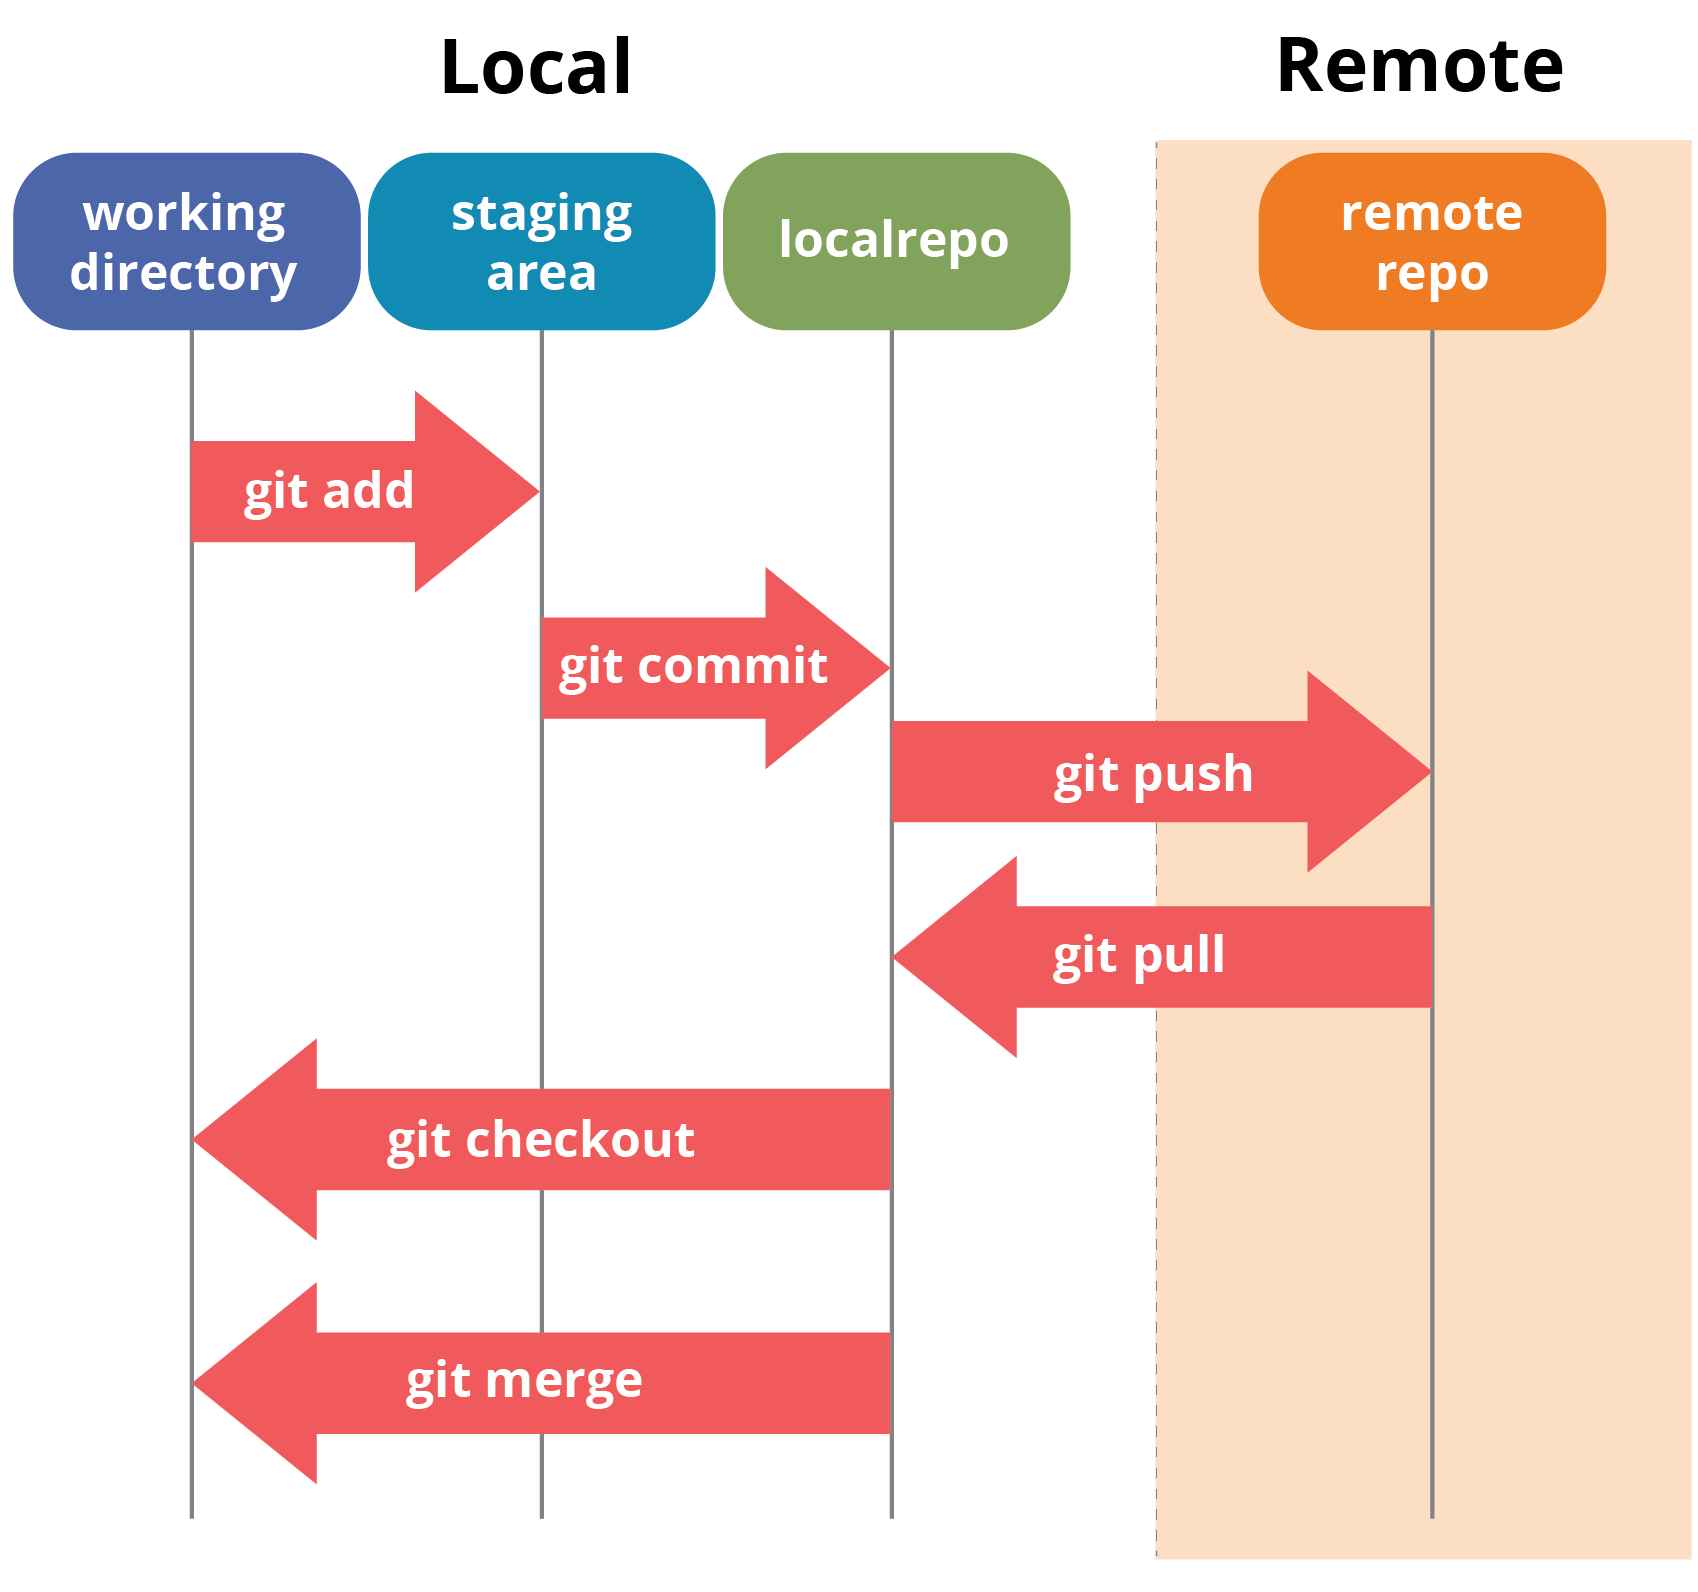
If you understand the above diagram well and good, but if you don’t, you need not worry, I will be explaining these operations in this Git Tutorial one by one. Let us begin with the basic operations.
You need to install Git on your system first. If you need help with the installation, click here.
This Git Bash Tutorial focuses on the commands and operations that can be used on Git Bash.
Note: The commands cannot be executed on GitHub. You can check out this blog on GitHub tutorial for reference.
After installing Git in your Windows system, just open your folder/directory where you want to store all your project files; right click and select ‘Git Bash here’.
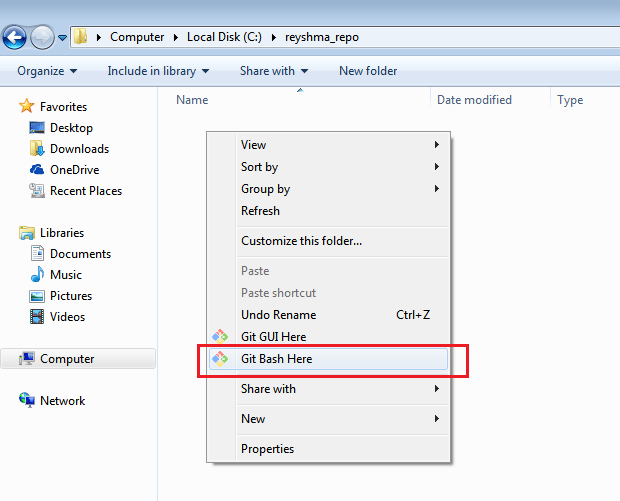
This will open up Git Bash terminal where you can enter commands to perform various Git operations.
Now, the next task is to initialize your repository.
In order to do that, we use the command git init. Please refer to the below screenshot.

git init creates an empty Git repository or re-initializes an existing one. It basically creates a .git directory with sub directories and template files. Running a git init in an existing repository will not overwrite things that are already there. It rather picks up the newly added templates.
Now that my repository is initialized, let me create some files in the directory/repository. For e.g. I have created two text files namely edureka1.txt and edureka2.txt.
Let’s see if these files are in my index or not using the command git status. The index holds a snapshot of the content of the working tree/directory, and this snapshot is taken as the contents for the next change to be made in the local repository.
The git status command lists all the modified files which are ready to be added to the local repository.
Let us type in the command to see what happens:
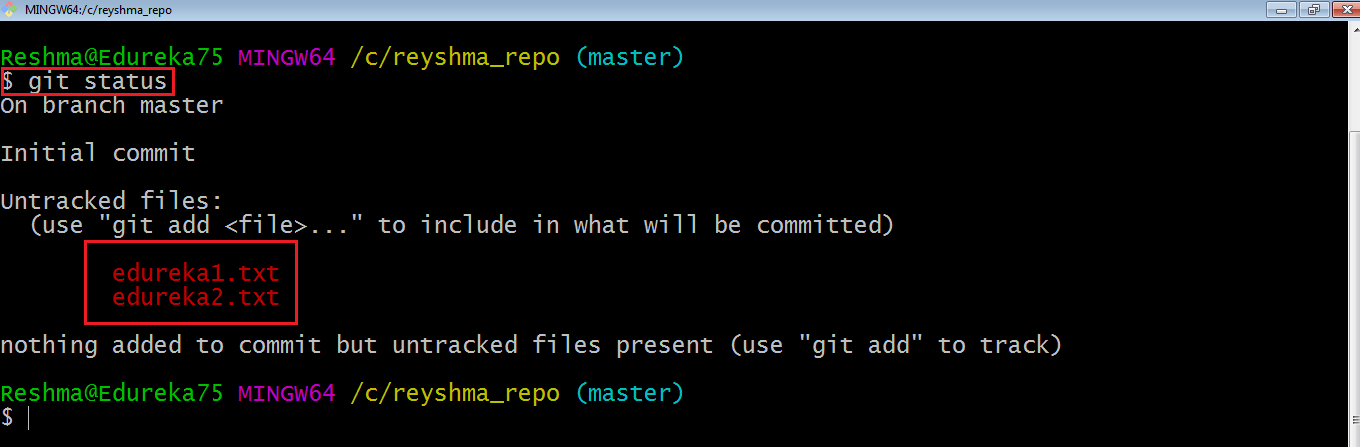
This shows that I have two files which are not added to the index yet. This means I cannot commit changes with these files unless I have added them explicitly in the index.
This command updates the index using the current content found in the working tree and then prepares the content in the staging area for the next commit.
Thus, after making changes to the working tree, and before running the commit command, you must use the add command to add any new or modified files to the index. For that, use the commands below:
git add <directory>
or
git add <file>
Let me demonstrate the git add for you so that you can understand it better.
I have created two more files edureka3.txt and edureka4.txt. Let us add the files using the command git add -A. This command will add all the files to the index which are in the directory but not updated in the index yet.
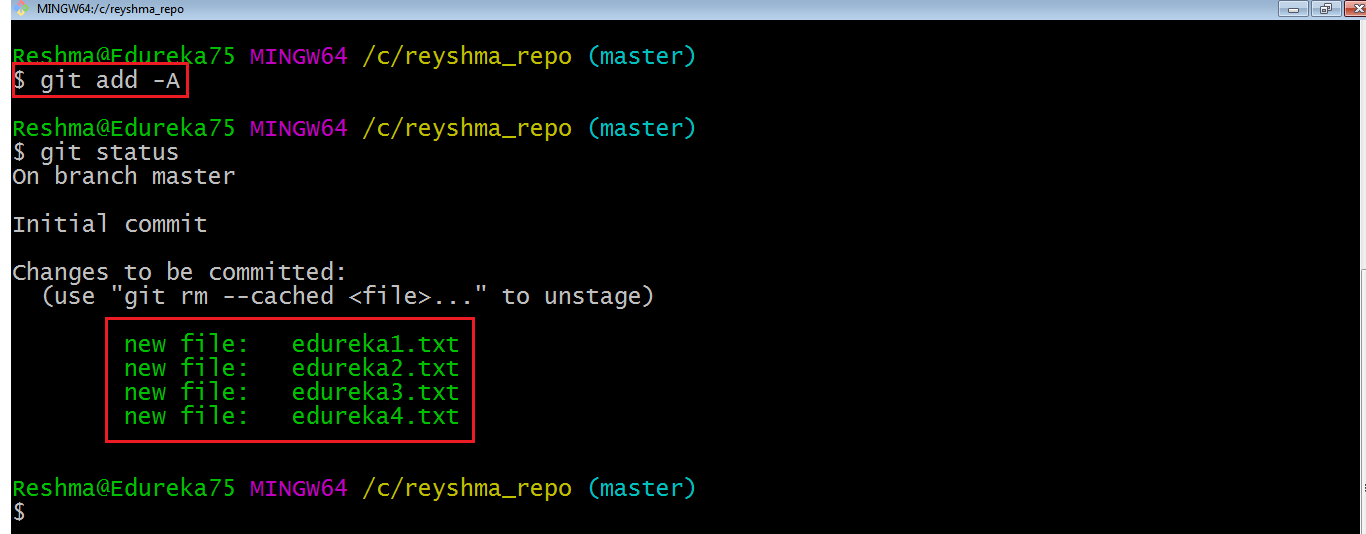
Now that the new files are added to the index, you are ready to commit them.
It refers to recording snapshots of the repository at a given time. Committed snapshots will never change unless done explicitly. Let me explain how commit works with the diagram below: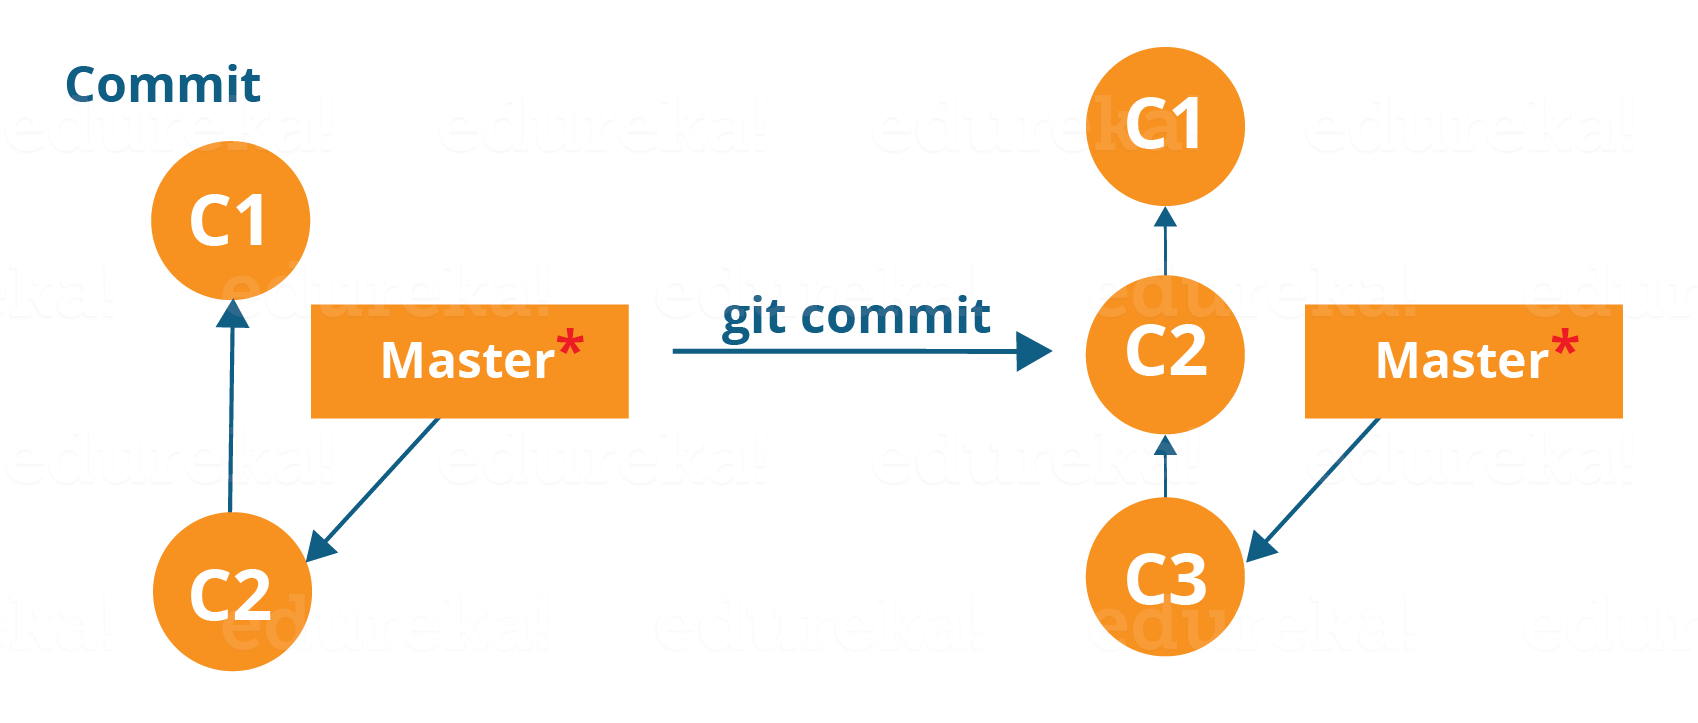
Here, C1 is the initial commit, i.e. the snapshot of the first change from which another snapshot is created with changes named C2. Note that the master points to the latest commit.
Now, when I commit again, another snapshot C3 is created and now the master points to C3 instead of C2.
Git aims to keep commits as lightweight as possible. So, it doesn’t blindly copy the entire directory every time you commit; it includes commit as a set of changes, or “delta” from one version of the repository to the other. In easy words, it only copies the changes made in the repository.
You can commit by using the command below:
git commit
This will commit the staged snapshot and will launch a text editor prompting you for a commit message.
Or you can use:
git commit -m “<message>”
Let’s try it out.
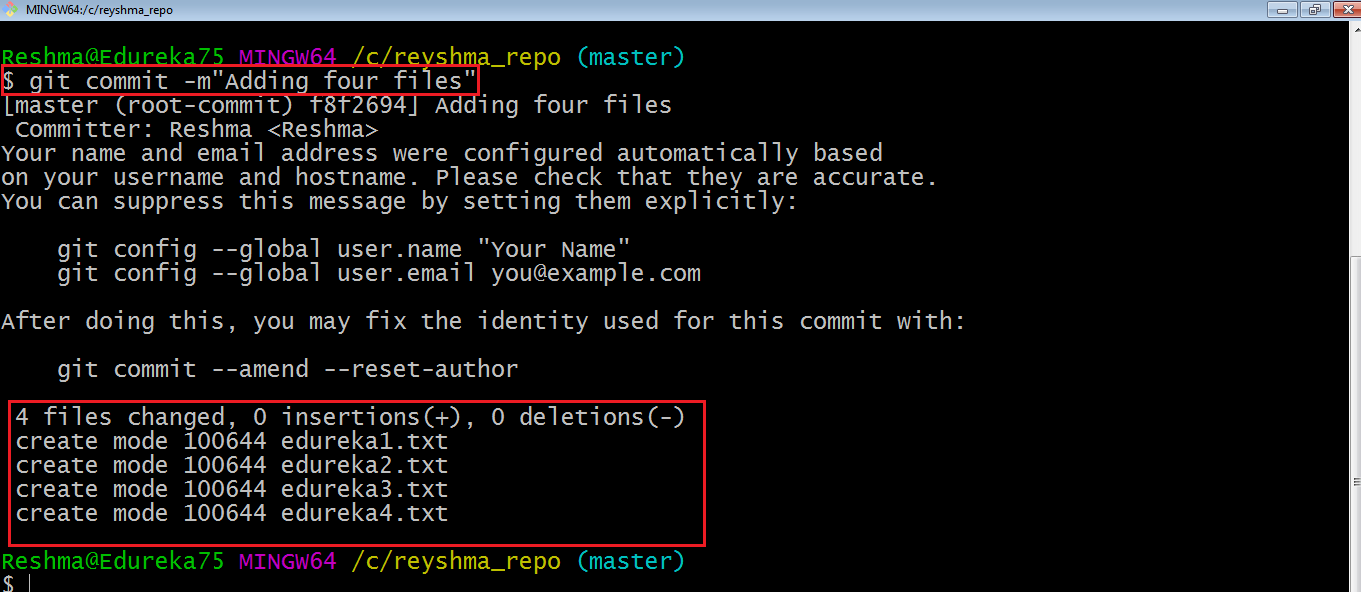
As you can see above, the git commit command has committed the changes in the four files in the local repository.
Now, if you want to commit a snapshot of all the changes in the working directory at once, you can use the command below:
git commit -a
I have created two more text files in my working directory viz. edureka5.txt and edureka6.txt but they are not added to the index yet.
I am adding edureka5.txt using the command:
git add edureka5.txt
I have added edureka5.txt to the index explicitly but not edureka6.txt and made changes in the previous files. I want to commit all changes in the directory at once. Refer to the below snapshot.
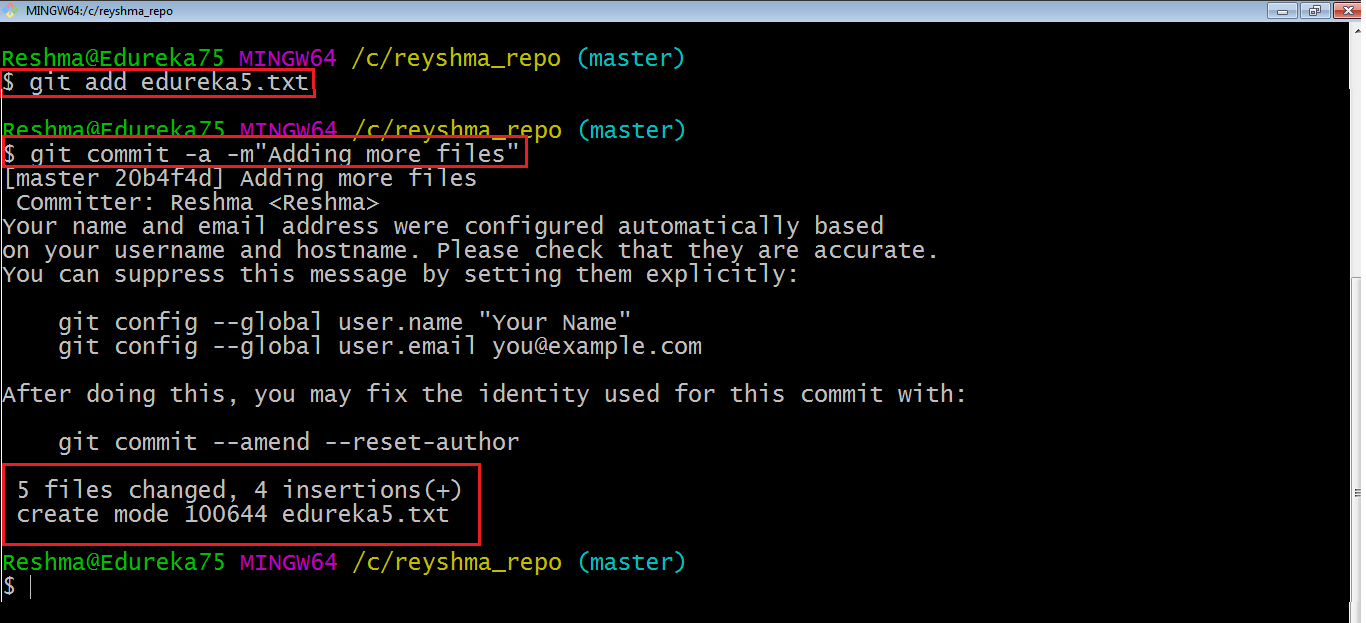
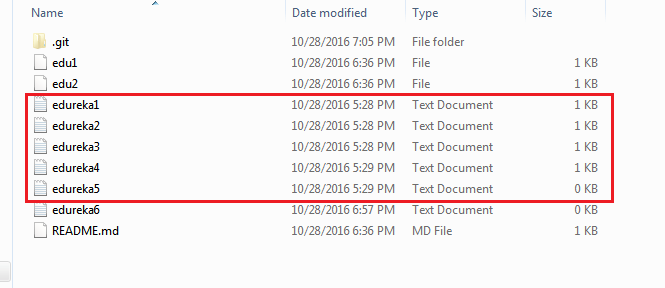
This command will commit a snapshot of all changes in the working directory but only includes modifications to tracked files i.e. the files that have been added with git add at some point in their history. Hence, edureka6.txt was not committed because it was not added to the index yet. But changes in all previous files present in the repository were committed, i.e. edureka1.txt, edureka2.txt, edureka3.txt, edureka4.txt and edureka5.txt.
Now I have made my desired commits in my local repository.
Note that before you affect changes to the central repository you should always pull changes from the central repository to your local repository to get updated with the work of all the collaborators that have been contributing in the central repository. For that we will use the pull command.
Pull
The git pull command fetches changes from a remote repository to a local repository. It merges upstream changes in your local repository, which is a common task in Git based collaborations.
But first, you need to set your central repository as origin using the command:
git remote add origin <link of your central repository>

Now that my origin is set, let us extract files from the origin using pull. For that use the command:
git pull origin master
This command will copy all the files from the master branch of remote repository to your local repository.

Since my local repository was already updated with files from master branch, hence the message is Already up-to-date. Refer to the screen shot above.
Note: One can also try pulling files from a different branch using the following command:
git pull origin <branch-name>
Your local Git repository is now updated with all the recent changes. It is time you make changes in the central repository by using the push command.
This command transfers commits from your local repository to your remote repository. It is the opposite of pull operation.
Pulling imports commits to local repositories whereas pushing exports commits to the remote repositories .
The use of git push is to publish your local changes to a central repository. After you’ve accumulated several local commits and are ready to share them with the rest of the team, you can then push them to the central repository by using the following command:
git push <remote>
Note : This remote refers to the remote repository which had been set before using the pull command.
This pushes the changes from the local repository to the remote repository along with all the necessary commits and internal objects. This creates a local branch in the destination repository.
Let me demonstrate it for you.
The above files are the files which we have already committed previously in the commit section and they are all “push-ready“. I will use the command git push origin master to reflect these files in the master branch of my central repository.
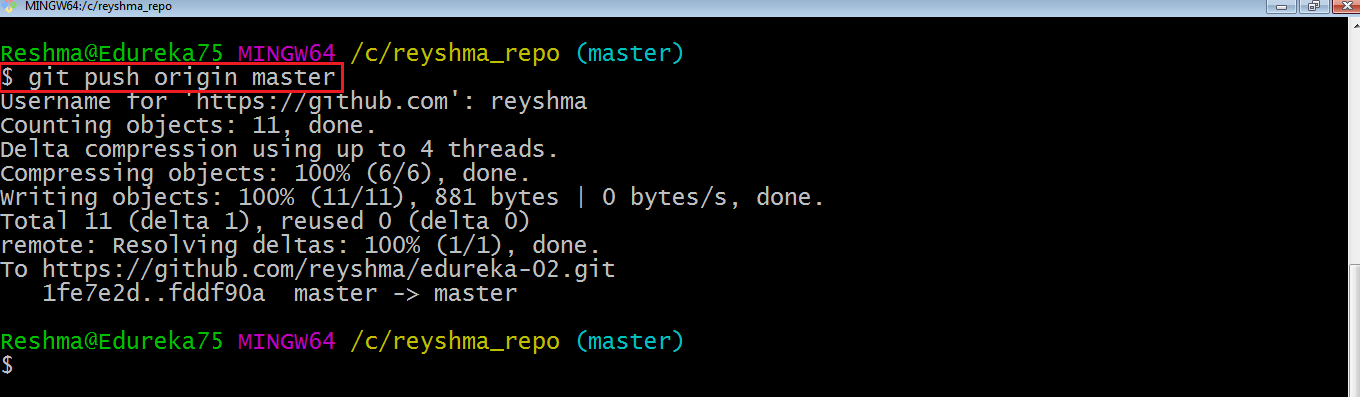
Let us now check if the changes took place in my central repository.
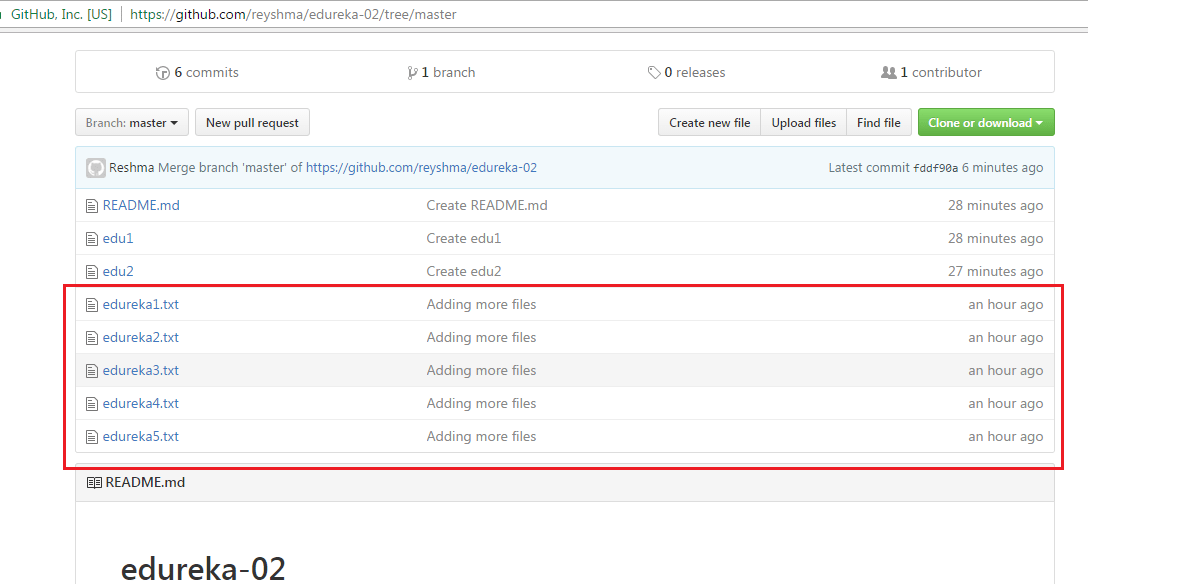
Yes, it did. :-)
To prevent overwriting, Git does not allow push when it results in a non-fast forward merge in the destination repository.
Note: A non-fast forward merge means an upstream merge i.e. merging with ancestor or parent branches from a child branch.
To enable such merge, use the command below:
git push <remote> --force
The above command forces the push operation even if it results in a non-fast forward merge.
At this point of this Git Tutorial, I hope you have understood the basic commands of Git. Now, let’s take a step further to learn branching and merging in Git.
Branches in Git are nothing but pointers to a specific commit. Git generally prefers to keep its branches as lightweight as possible.
There are basically two types of branches viz. local branches and remote tracking branches.
A local branch is just another path of your working tree. On the other hand, remote tracking branches have special purposes. Some of them are:
You can check what your current branch is by using the command:
git branch
The one mantra that you should always be chanting while branching is “branch early, and branch often”
To create a new branch we use the following command:
git branch <branch-name>
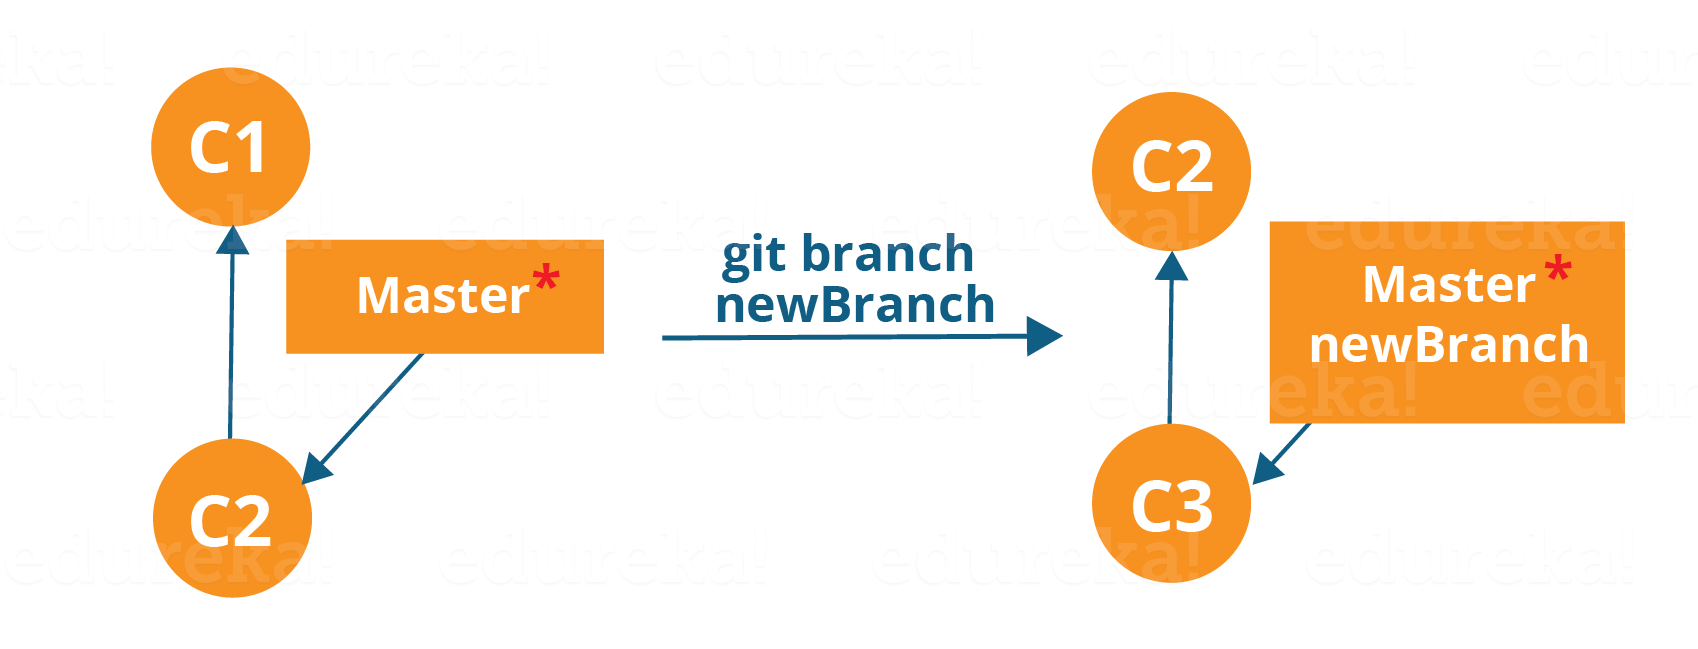
The diagram above shows the workflow when a new branch is created. When we create a new branch it originates from the master branch itself.
Since there is no storage/memory overhead with making many branches, it is easier to logically divide up your work rather than have big chunky branches.
Now, let us see how to commit using branches.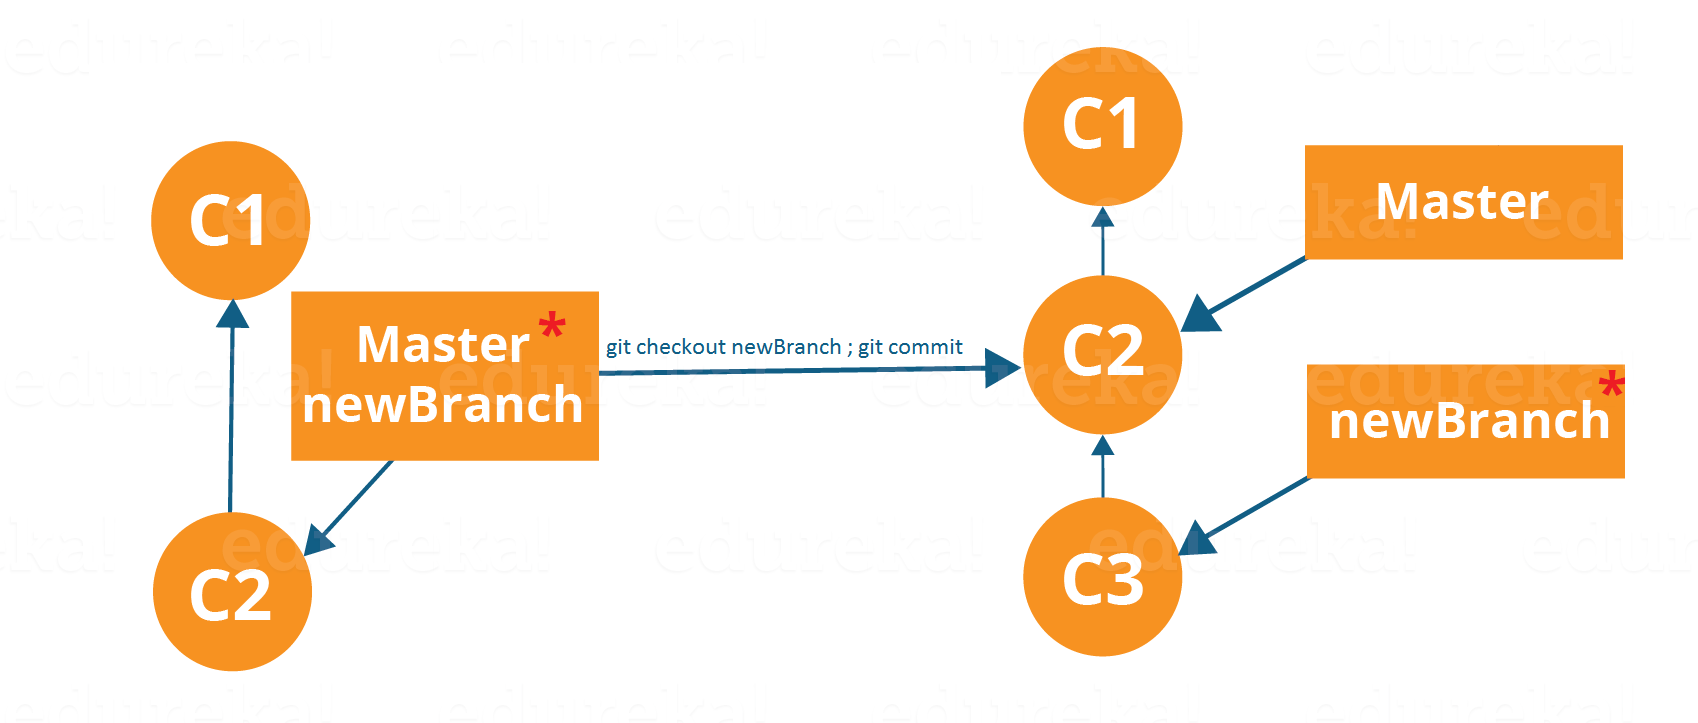
Branching includes the work of a particular commit along with all parent commits. As you can see in the diagram above, the newBranch has detached itself from the master and hence will create a different path.
Use the command below:
git checkout <branch_name> and then
git commit
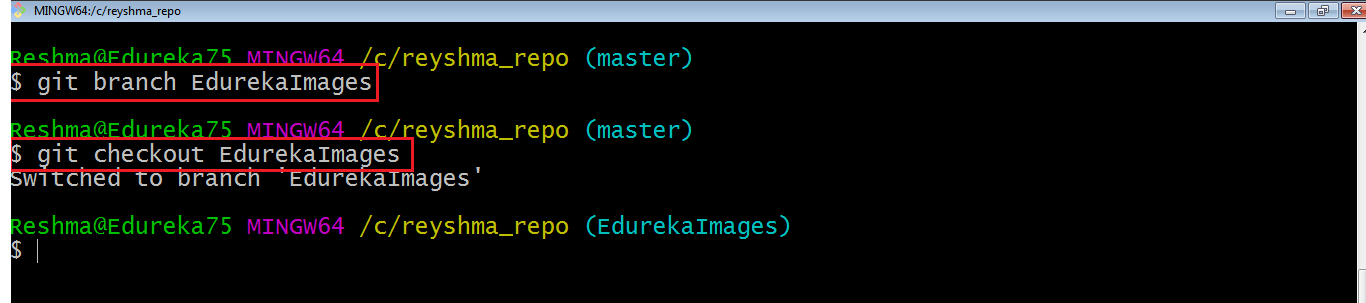
Here, I have created a new branch named “EdurekaImages” and switched on to the new branch using the command git checkout .
One shortcut to the above commands is:
git checkout -b[ branch_name]
This command will create a new branch and checkout the new branch at the same time.
Now while we are in the branch EdurekaImages, add and commit the text file edureka6.txt using the following commands:
git add edureka6.txt
git commit -m"adding edureka6.txt"
Merging is the way to combine the work of different branches together. This will allow us to branch off, develop a new feature, and then combine it back in.
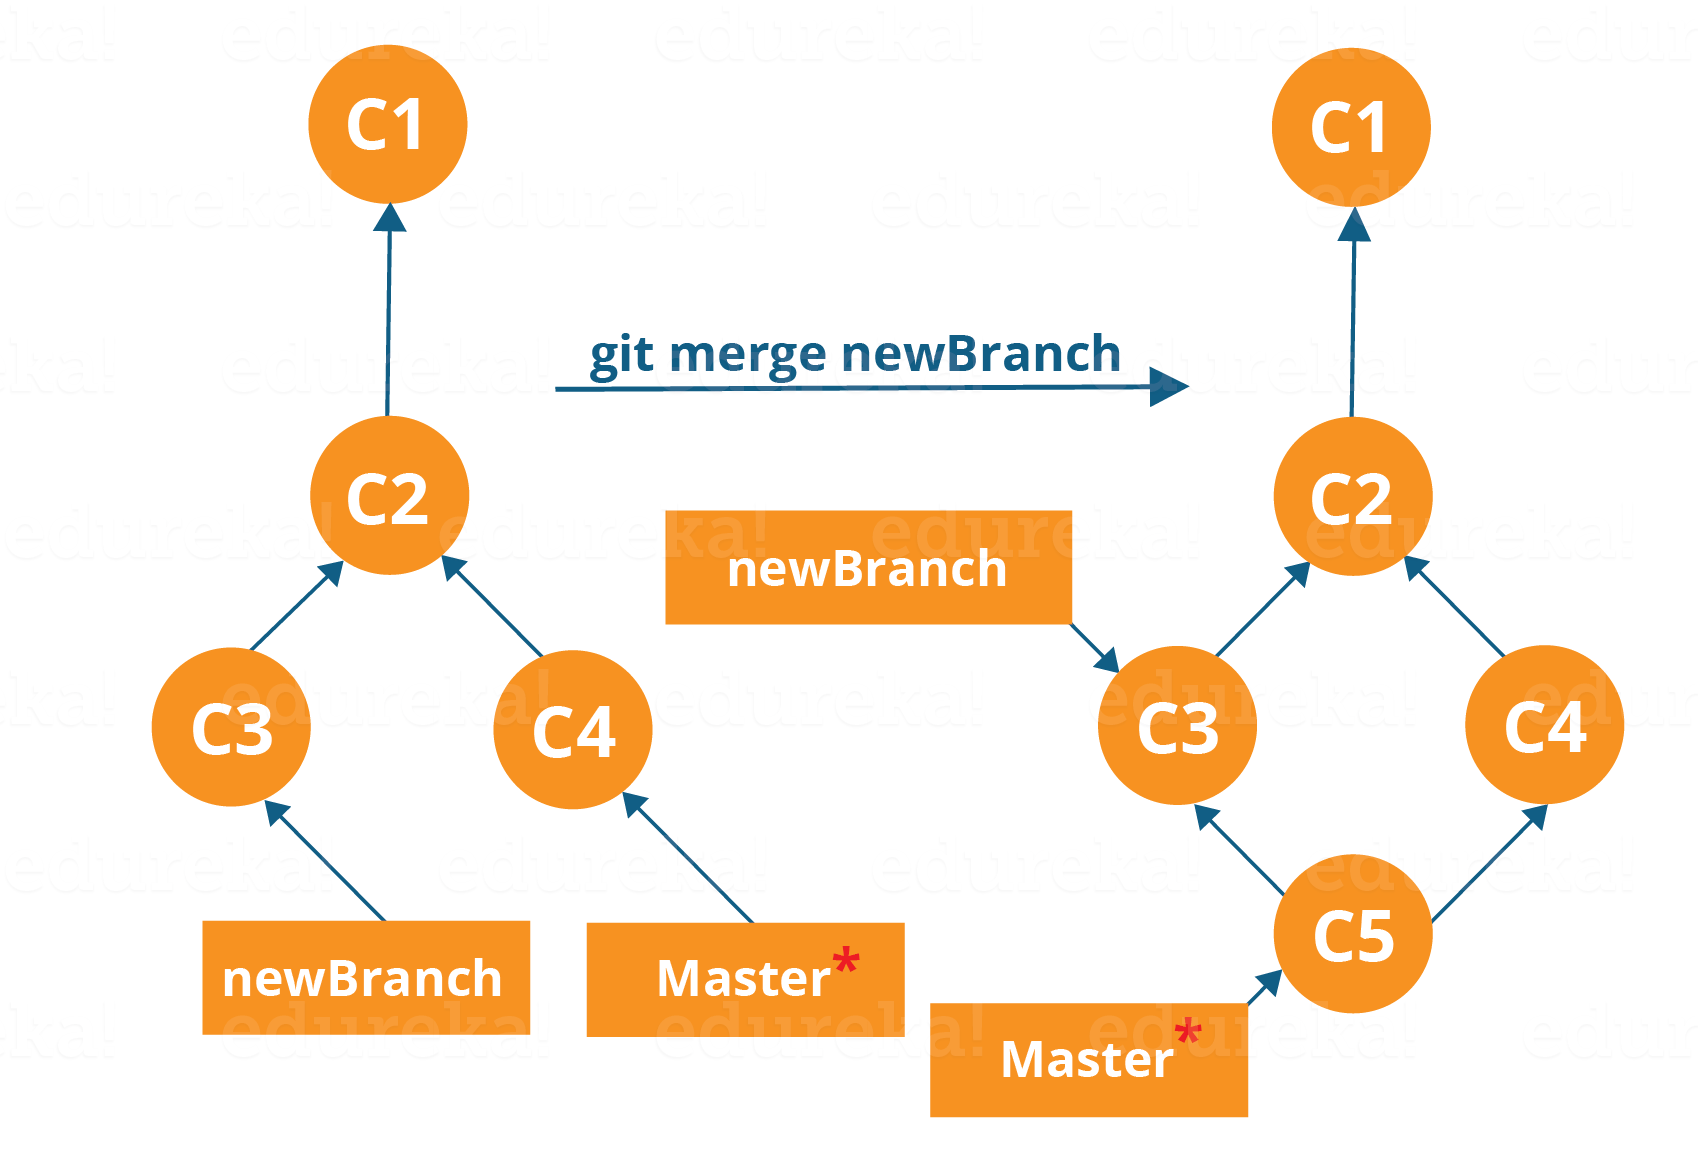
The diagram above shows us two different branches-> newBranch and master. Now, when we merge the work of newBranch into master, it creates a new commit which contains all the work of master and newBranch.
Now let us merge the two branches with the command below:
git merge <branch_name>It is important to know that the branch name in the above command should be the branch you want to merge into the branch you are currently checking out. So, make sure that you are checked out in the destination branch.
Now, let us merge all of the work of the branch EdurekaImages into the master branch. For that I will first checkout the master branch with the command git checkout master and merge EdurekaImages with the command git merge EdurekaImages

As you can see above, all the data from the branch name are merged to the master branch. Now, the text file edureka6.txt has been added to the master branch.
Merging in Git creates a special commit that has two unique parents.
This is also a way of combining the work between different branches. Rebasing takes a set of commits, copies them and stores them outside your repository.
The advantage of rebasing is that it can be used to make linear sequence of commits. The commit log or history of the repository stays clean if rebasing is done.
Let us see how it happens.
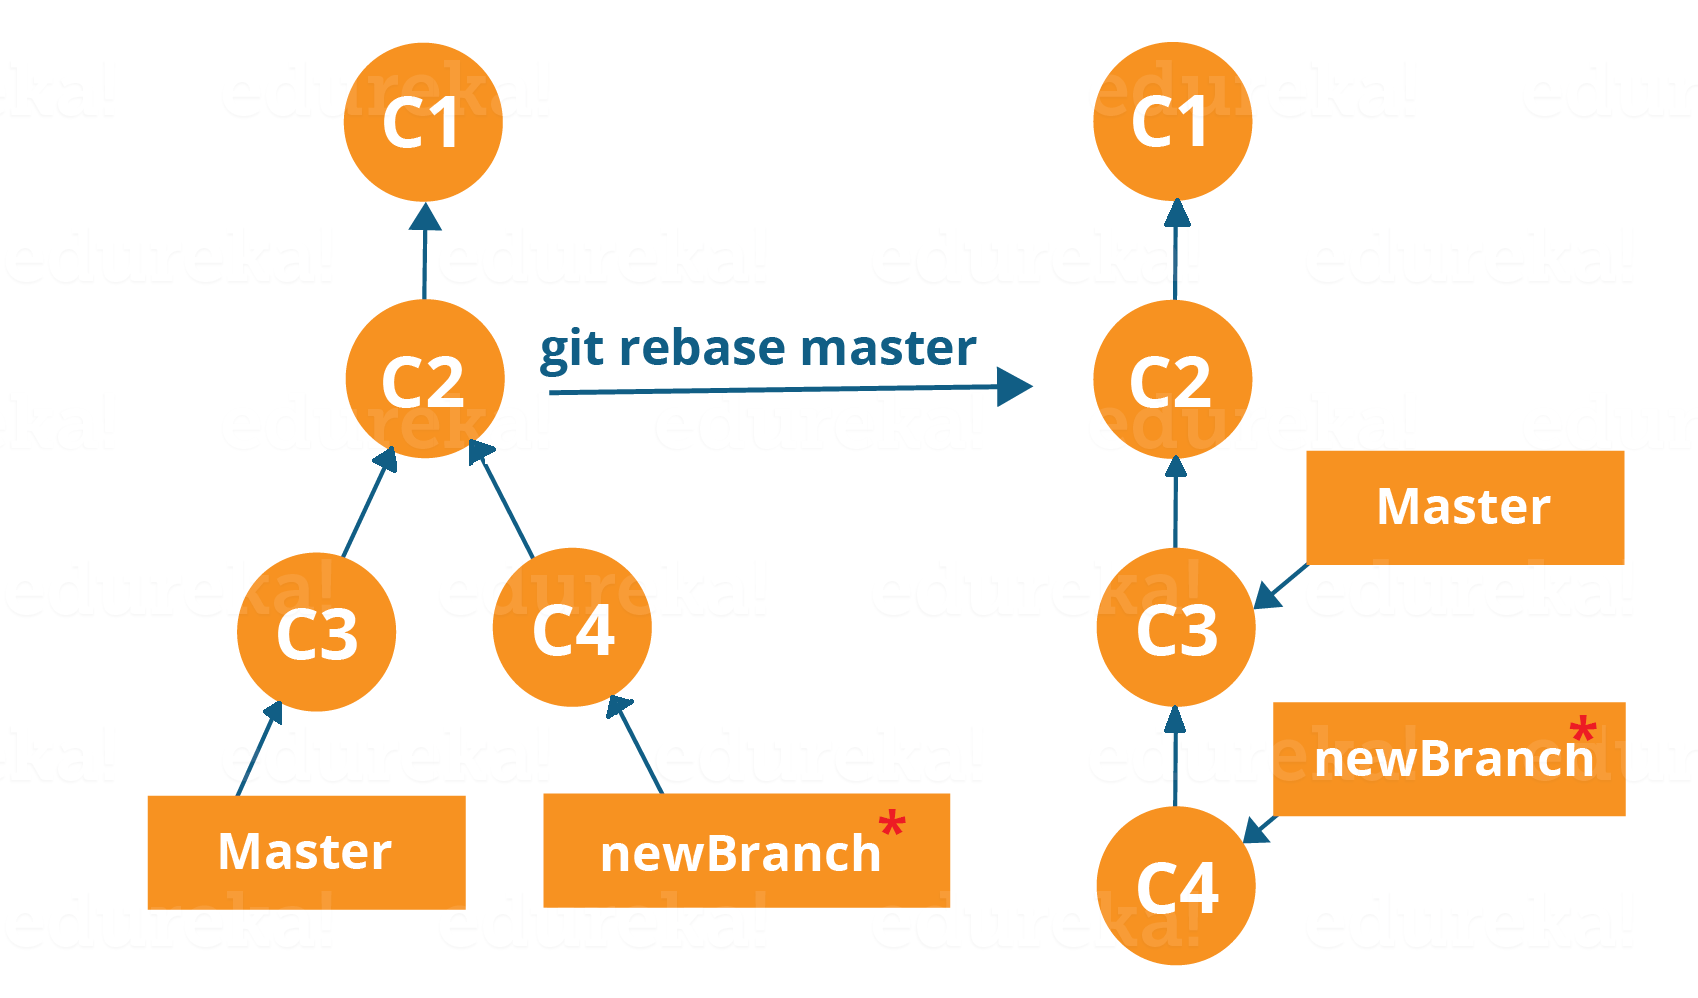
Now, our work from newBranch is placed right after master and we have a nice linear sequence of commits.
Note: Rebasing also prevents upstream merges, meaning you cannot place master right after newBranch.
Now, to rebase master, type the command below in your Git Bash:
git rebase master

This command will move all our work from current branch to the master. They look like as if they are developed sequentially, but they are developed parallelly.
Now that you have gone through all the operations in this Git Tutorial, here are some tips and tricks you ought to know. :-)
Use the following command-
git archive master --format=zip --output= ../name-of-file.zip
It stores all files and data in a zip file rather than the .git directory.
Note that this creates only a single snapshot omitting version control completely. This comes in handy when you want to send the files to a client for review who doesn’t have Git installed in their computer.
It turns a repository into a single file.
Use the following command-
git bundle create ../repo.bundler master
This pushes the master branch to a remote branch, only contained in a file instead of a repository.
An alternate way to do it is:
cd..
git clone repo.bundle repo-copy -b master
cd repo-copy
git log
cd.. /my-git-repo
When we want to undo adding a feature or any kind of added data temporarily, we can “stash” them temporarily.
Use the command below:
git status
git stash
git status
And when you want to re-apply the changes you “stash”ed ,use the command below:
git stash apply
I hope you have enjoyed this Git Bash Tutorial and learned the commands and operations in Git. Let me know if you want to know more about Git in the comments section below :-)
If you plan to interview for a DevOps career in 2023, be prepared to answer a lot of Git Interview Questions. Here are the best Git interview questions and answers to help you prepare for your next interview.
Summary: According to Atlassian, Git is a distributed version control system where every developer has a working copy of the code and full change history on their local machine, as conceptualized by Linus Torvalds.
If you found this “Git Tutorial” relevant, check out the DevOps Online Training by Edureka, a trusted online learning company with a network of more than 250,000 satisfied learners spread across the globe. The Edureka DevOps Certification Training course helps learners gain expertise in various DevOps processes and tools such as Puppet, Jenkins, Nagios and GIT for automating multiple steps in SDLC.


 Thank you for registering Join Edureka Meetup community for 100+ Free Webinars each month JOIN MEETUP GROUP
It seems every other git tutorial out there say git pull not only the local repository but also the workspace. The one that only update the local repository is git fetch. The arrow should go to the workspace line. git pull = git fetch + git merge. Am I missing something?
wonderful, loved it. just loved it.
How do you build the projects on java? I mean which tools do you use? Is there any blog on that as well?
How to do it on mac?
Really worth of reading this
@piyush_dash:disqus Thank you for appreciating our work. Do subscribe to our channel and stay connected with us. Cheers :)
can u please explain me about fork
Hey Manoj, Git (not GitHub) natively supports “forking” an entire repo (ie, cloning it) in a couple of ways: when you clone, a remote called origin is created for you by default all the branches in the clone will track their origin equivalents fetching and merging changes from the original project you forked from is trivially easy.
Hope this helps :)
Awesome awesome explanation.The best on the GIT i have ever seen.Much better than Atlassian even.I understood the concept of rebase now.Thanks a lot.
Hey Ankur! We are delighted to know that you liked our content. Keep reading our blogs and keep learning. Cheers :)
You should work on framing the sentences which beginners could understand. I hope you dont mindd good advice that comes unsolicited.
Hey Kal, thanks for checking out our blog. Feedback is always welcome at Edureka, but could you help us understand what was difficult to understand in this blog? Because, we have made it as simple as possible.
Cheers!
Wonderful explanation both in the video and description. Really helped me being a beginner to GIT and Devops.
Hey Sai Kumar, thanks for the wonderful feedback! We’re glad we could be of help.
You might also like our video tutorials; check them out here: https://www.youtube.com/edurekaIN.
Do follow our blog to stay posted on upcoming blog posts. Cheers!
Good work ?
Hey Khalid, thanks for checking out the blog! You might also like our video tutorials; check them out here: https://www.youtube.com/edurekaIN. Cheers!