
Advanced DevOps Certification Training with G ...
- 24k Enrolled Learners
- Weekend
- Live Class
(7990)


 Copy Link!
If you are in a similar situation and don’t know what change broke the code or who out of many contributors owns this bug/feature, then git bisect is your way out. So, in this article on git bisect you will learn how the ‘git bisect‘ command comes to developers rescue in detecting the first bad commit that introduces the bug using the binary search algorithm.
The topics covered in this article are as follows:
There is no doubt in the fact that you tend to create a number of commits for every minor change in Git. In such a scenario, debugging the code becomes a tedious task, as you have to manually go back in time to every single revision of the project snapshot in order to test the working code and detect the bug. Now, this gets even more complex when you have other’s work to inspect without a lead point, also to request each one to clean up their own mistakes does not sound very feasible either.
Along the way, you might also create and discard a number of ‘feature’ (or hotfix) branches in the process and end up wasting time and effort while deviating from the main line of development.
So, to avoid such scenarios, you can use the git bisect command to find the bad project revision(or snapshot) and eventually fix it with the git revert command.
This command bisects (divides) your history between the good and the bad commit range. It points your current project state to a mid-range commit snapshot. The git bisect command then moves through every commit id between this range while pausing at each snapshot to allow you to test the code. If the bug exists, you declare the commit as bad, if not as good unless the search ends.
git bisect <subcommand><options>
To understand git bisect better, let us create a project that develops the code for a simple navigation app to be used in a car.
To create a project that develops the code for a simple navigation app to be used in a car, you can follow the below steps:
Step 1: Create a new directory in your $HOME folder:
cd $HOME
mkdir my_nav_app
Step 2: Navigate to the new directory:
cd $my_nav_app
Step 3: Clone to download the project from my GitHub page:
git clone https://github.com/divyabhushan/my_nav_app.git
Now, let us understand the project directories and files layout, as printed by the command: ls -lTR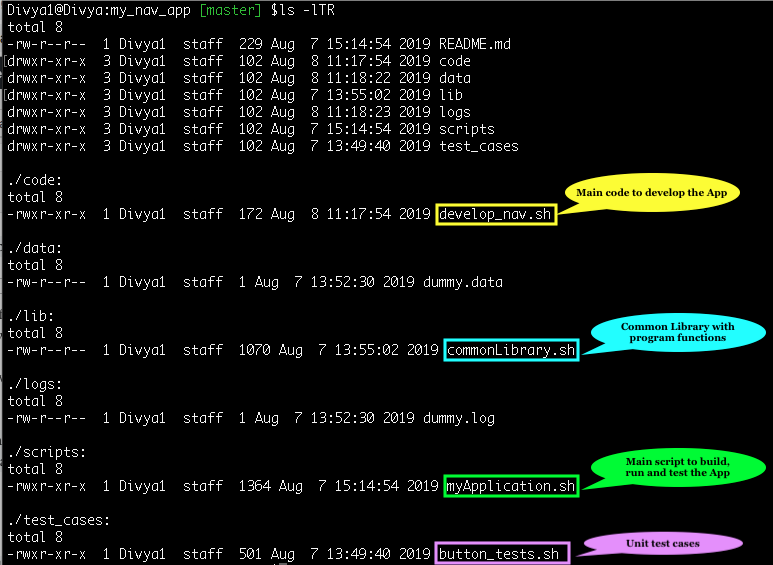
Next, let us see the project history journal to view the commits I made in order to generate this code-
For instance, a simple git log command prints the history in detail, however, I like to pretty format and customize the history. Thereby, let us set an alias name – ‘hist’ using the git alias command as shown below:
git alias.hist 'log --pretty=format:"%C(yellow)%h%Creset %ad | %C(green)%s%Creset%C(red)%d%Creset %C(blue)[%an]" --graph --decorate --date=short'
Now, I am going to carry out this bug fix feature in a separate branch, so as to not interfere with the main development on the ‘master’ branch. To do that, follow the below set of commands:
git branch devgit checkout devgit hist [Note: ‘alias’ command used here]
Further, I have highlighted the last known good commit that I know in which my script worked fine with expected test case results, this commit snapshot is tagged as v1.0.
So, now that we know our last good commit, let us go forward in this article on ‘git bisect’ and test the application.
Run the script as – $./scripts/myApplication.sh [ testing first time ]

Clearly, my present project state is in error, and I am not sure what change I made in which commit that introduced this change. So, next in this article on git bisect, let us see how to identify the bad commit.
To begin inspecting for the bad commit, you would follow the below steps:
git bisect startgit bisect bad HEAD or git bisect c5b3ca8git bisect good v1.0 or git bisect 93859d8
This bisects the commit history range roughly midway between the good and bad commits that brings us to the commit id: f61a7e8

Hence, the command has checked out the project version as it was in this commit id. Now, let us go ahead and test our application again.
Command to run the application: $./scripts/myApplication.sh [ testing second time ]

Since the application passed in this commit, this commit is certainly ain’t the bad commit. So, next, you have to inform the same to the bisect command as – $git bisect good

Now, this will further narrow down the search result into the first half of the range as shown –

Test your application again – Command: $./scripts/myApplication.sh [ testing third time ]

So, since we see an error as above, this is a bad commit.
Let the bisect command know, run $git bisect bad

That further narrows down the search and brings you to the last blue encircled middle revision: a6ac769

So, I test my application one last time using the same command: $./scripts/myApplication.sh [ testing fourth time ]

Now, since the application failed again, it is still a bad commit. So, lets run the following command:
Run the command: git bisect bad
This concludes the only last commit left which is bad-

So you know this is where the code broke. What next?
In this case, the output gives you minimal information about the commit id, author name, and the authored date along with the commit message and the path that was modified.
If you wish to debug further you need to read the commit id object.
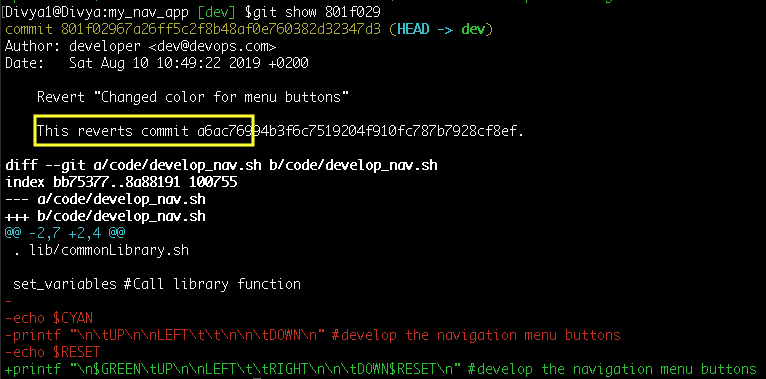
Command: git show a6ac76994b3f6c7519204f910fc787b7928cf8ef
This will read the commit object and print the log message and textual diff.
You might as well use the ‘git blame’ command to analyze how and in which commit each line was changed by which author, run the command as: git blame code/develop_nav.sh
To stop the search, use the following command:
Command: git bisect reset

Thus, the bisection process is stopped and you are back on the branch from which you started the search. Now, the next step is to fix or debug the code.
Well, there are a couple of workarounds that you could do to fix the current state of the project now that you have identified the commit that brought the bug in the first place.
However, if you are altering a commit on a shared repository it is best to revert the change using the ‘git revert‘ command.
Task: Revert the changes done by the bad commit mentioned
Command: git revert a6ac769


As a result, reverting the changes made by this commit did 2 things:
“Revert command also makes it easier to track the change you reverted from the original commit”
Use the ‘show’ command again to read the object id, like so-
Command: git show 801f029
Now, go forward and test the application. It will execute properly.
Command: $./scripts/myApplication.sh

In contrast, if you want to remove the bad commit from history:
You could use the ‘git reset‘ command with the “--hard” option(though not recommended in a shared repository).
Check out an earlier version of a single file using the ‘git checkout‘ command with the ‘-- <path/filename>‘ option.
It should be noted, this will only make changes in your local repository until you push the changes to a remote repository. Since some changes create new commit object id as in our case above in such cases a normal push to the remote repository is rejected as the history would have diverged. You must use the ‘git push‘ command with the ‘--force‘ option.
While I fixed the bug on my ‘dev’ branch, I can now merge this change with the ‘master’ branch also-
git checkout mastergit pull origingit merge devHowever, your merge may generate conflicts if there are more commits from the remote repository. Resolve conflicts and continue with the merge.
Finally, push only the stable ‘master’ branch commits to the remote repository while you get your dirty work(bug, features, enhancements) done only on the feature branches such as ‘dev’ in this example.
Moreover, it is best to adopt a logical branching strategy to streamline and secure your git workflow process.
To summarize, ‘git bisect’ is a handy and useful command that quickly identify the commit id that introduced a fault in your running code with the help of an extensive binary search by logically dividing the commit logs halfway between the good and bad commit range. To conclude, you learned to detect the faulty commit and revert the change made by it.
In addition, to the subcommands ‘good’ and ‘bad’ you can also use terms like new and old to describe the revision state. You may run the command a multiple times passing different subcommands and revision/commit ids to identify different commit (she-1) ids. Alternatively, an automated test script may also be run to build the broken code using this command. Also, find a detailed description of this command by running git bisect --help on the terminal. So, folks with this we come to an end to this article on Git Bisect.
The intention of DevOps is to create better-quality software more quickly and with more reliability while inviting greater communication and collaboration between teams. If you are intrigued by this article, check out the DevOps Certification training by Edureka, a trusted online learning company with a network of more than 250,000 satisfied learners spread across the globe. The Edureka DevOps Certification Training course helps learners to understand what is DevOps and gain expertise in various DevOps processes and tools such as Puppet, Jenkins, Nagios, Ansible, Chef, Saltstack and GIT for automating multiple steps in SDLC.
Got a question for us? Please mention it in the comments section of ”Git Bisect” article and we will get back to you ASAP.


 Thank you for registering Join Edureka Meetup community for 100+ Free Webinars each month JOIN MEETUP GROUP