
Python Scripting Certification Training
- 15k Enrolled Learners
- Weekend
- Self Paced
(5900)


 Copy Link!
Express.js is a fast and lightweight framework used majorly for web application development and the Node.js Developers all over the world are totally in love with this framework. Express.js provides all the features of web application without overshadowing the Node.js features. Through the medium of this Express.js Tutorial, I will be giving you a complete insight into the fundamentals of Express.js which will help you get started with it.
Below are the topics covered in this Express.js Tutorial:
Let’s get started with this Express.js Tutorial for beginners.
In layman terms, Express.js is a web application framework that is built on top of Node.js. It provides a minimal interface with all the tools required to build a web application. Express.js adds flexibility to an application with a huge range of modules available on npm that you can directly plug into Express as per requirement. It helps in easy management of the flow of data between server and routes in the server-side applications. It was developed by TJ Holowaychuk and was released in the market on 22nd of May, 2010. Formerly it was managed by IBM but currently, it is placed under the stewardship of the Node.js Foundation incubator.
Express is majorly responsible for handling the backend part in the MEAN stack. Mean Stack is the open-source JavaScript software stack that is heavily used for building dynamic websites and web applications in the market. Here, MEAN stands for MongoDB, Express.js, AngularJS, and Node.js.
That being said, let’s now move further with this Express.js Tutorial and find out the various features of this framework.
Below I have picked out a few of the most important features of Express.js:
These were a few of the major advantages of using Express.js in web application development. In the next section of this Express.js Tutorial article, let’s me show you how to install Express.js in your system.
In order to install Express.js in your system, first, you need to make sure that you have Node.js already installed. If not, then don’t worry, just refer to my article on Node.js Installation which will guide you in a step by step manner. Once you are done with Node.js installation, the next step is to install Express.
To install Express.js, first, you need to create a project directory and create a package.json file which will be holding the project dependencies. Below is the code to perform the same:
npm init
Now, you can install the express.js package in your system. To install it globally, you can use the below command:
npm install -g express
Or, if you want to install it locally into your project folder, you need to execute the below command:
npm install express --save
Now that you are already done with the installation process, let’s now get our feet wet with Express.js. In the next section of this Express.js Tutorial, I will be walking you through the fundamental concepts of the Express framework.
So, the first topic I will be covering under Express.js fundamentals is Routing.
Routing refers to the process of determining a specific behavior of an application. It is used for defining how an application should respond to a client request to a particular route, path or URI along with a particular HTTP Request method. Each route can contain more than one handler functions, which is executed when the user browses for a specific route. Below is the structure of Routing in Express:
app.METHOD(PATH, HANDLER)
Where:
There are four main HTTP methods that can be supplied within the request. These methods help in specifying the operation requested by the user. Below table lists down all methods along with their explanations:
| Method | Description |
| 1. GET | The HTTP GET method helps in requesting for the representation of a specific resource by the client. The requests having GET just retrieves data and without causing any effect. |
| 2. POST | The HTTP POST method helps in requesting the server to accept the data that is enclosed within the request as a new object of the resource as identified by the URI. |
| 3. PUT | The HTTP PUT method helps in requesting the server to accept the data that is enclosed within the request as an alteration to the existing object which is identified by the provided URI. |
| 4. DELETE | The HTTP DELETE method helps in requesting the server to delete a specific resource from the destination. |
Below is an example showing usage of all the HTTP methods.
var express = require('express');
const app = express();
app.use(express.json());

app.get('/', function (req, res) {
    console.log("GET Request Received");
    res.send('
<h2 style= "font-family: Malgun Gothic; color: blue; "> Welcome to Edureka's Express.js Tutorial!/h2>');
})

app.post('/addcourse', function (req, res) {
    console.log("POST Request Received");
    res.send('
<h2 style="font-family: Malgun Gothic; color: green; ">A course new Course is Added!</h2>

');
})
app.delete('/delete', function (req, res) {
    console.log("DELETE Request Received");
    res.send('
<h2 style="font-family: Malgun Gothic; color: darkred;">A Course has been Deleted!!</h2>

 ');
})
app.get('/course', function (req, res) {
    console.log("GET Request received for /course URI");
    res.send('
<h2 style="font-family: Malgun Gothic; color:blue;">This is an Available Course!</h2>

');
})

//PORT ENVIRONMENT VARIABLE
const port = process.env.PORT || 8080;
app.listen(port, () => console.log(`Listening on port ${port}..`));
In the next section of this Express.js Tutorial, I will be introducing you to Middlewares.
In express, middleware functions are the functions which have access to the request and response objects along with the next function present in the application’s request-response cycle. These functions are capable of performing the below-listed tasks:
Note that, in case, the current function doesn’t terminate the request-response cycle then it must invoke the next() function in order to pass on the control to the next available middleware function. If not done, then the request will be left incomplete. Below I have listed down the majorly used middlewares in any Express.js application:
Now, in order to understand about the middleware functions in detail, let me show you a small example of the same:
var express = require('express')
var app = express()

var requestDate = function (req, res, next) {
    req.requestDate = Date.now()
    next()
}

app.use(requestDate)

app.get('/', function (req, res) {
    var responseMsg = '
<h2 style="font-family: Verdana; color: coral;">Hello Learners!!</h2>

'
    responseMsg += '<small>Request genrated at: ' + req.requestDate + '</small>'
    res.send(responseMsg)
})

//PORT ENVIRONMENT VARIABLE
const port = process.env.PORT || 8080;
app.listen(port, () => console.log(`Listening on port ${port}..`));Cookies in Express.js are the small files of information which are stored within a user’s computer. They hold a decent amount of data specific to a particular user and the websites he visits. Each time a client loads a website on his browser, the browser will implicitly send the locally stored data back to the website/server, in order to recognize the user. A cookie generally consists of the following:
Now in order to use cookies in express, first you need to install the cookie-parser middleware through npm into the node_modules folder that is already present in your project folder. Below is the code to perform the same:
npm install cookie-parser
Once done, the next step is to import the cookie-parser into your application. Below is code to do the same:
var express = require('express');
var cookieParser = require('cookie-parser');
var app = express();
app.use(cookieParser());
Now, let me show you how to create and fetch the details of a cookie using cookie-parser.
var express = require('express');
var cookie_parser = require('cookie-parser');
var app = express();
app.use(cookie_parser());

//Setting up a Cookie
app.get('/setcookie',function(req, res){
    res.cookie('cookie_name', 'Express_Demo');
    res.cookie('organization', 'Edureka');
    res.cookie('name', 'Swatee');

    res.status(200).send('
<h4 style="font-family: Tahoma; color: coral; text-align: center;">Setting up the Cookie</h4>

');
});

//Checking cookie is set or not
app.get('/getcookie', function(req, res) {
    res.status(200).send(req.cookies);
});

//Welcome Message
app.get('/', function (req, res) {
    res.status(200).send('
<h2 style="font-family: cursive; color: lightseagreen; text-align: center; ">Welcome to Edureka's Express Tutorial!</h2>

');
});

//PORT ENVIRONMENT VARIABLE
const port = process.env.PORT || 8080;
app.listen(port, () => console.log(`Listening on port ${port}..`));
You can also check whether the cookie is set in your browser console. For that open up the browser console and type in the following command:
console.log(document.cookie);
Now that you are aware of how to use middlewares and cookies with Express, in the next section of this Express.js Tutorial lets dive deeper and learn how to create a REST API.
REST or RESTful stands for REpresentational State Transfer. It is an architectural style as well as an approach for communications purpose that is often used in various web services development. In simpler terms, it is an application program interface (API) which makes use of the HTTP requests to GET, PUT, POST and DELETE the data over WWW.
Since Express.js is developed on the middleware module of Node.js called connect, it automatically becomes the perfect choice for a server. This is because Express smoothens out the process of creating and exposing APIs for the server to further communicate as a client with the server application. Here the connect module makes use of the http module to communicate with Node.js. Thus, if you are working with any of the connect based middleware modules, then you can easily integrate with Express.js.
If you wish to learn how to create a REST API from scratch you can refer to my article on REST API with Node.js and Express.
Let’s now move further in this Express.js Tutorial and understand the concept of scaffolding.
While working with REST APIs you must have seen that you need to work with various files such as HTML, CSS, JPEGs, etc., for accomplishing any particular kind of task. But it becomes too much off of hassle to manage and maintain these files. Thus Express provides the developers an easy solution to this called Scaffolding. Scaffolding is the process of creating a proper structure for a web application and helps in managing the files in proper directories saving us from the manual work.
Thus, you can say that Scaffolding helps in creating the skeleton for our express application and lets us directly jump into the application development. Express provides various Scaffolding tools such as Yeoman and Express-generator. In this Express.js Tutorial, I will show you how to use Express-generator to create the basic structure of an application.
Using express-generator
Before you can use express-generator, you need to install this in your system. Type in the below code in the command prompt for the same:
npm install -g express-generator
Now you can use express-generator to create the project skeleton. For that you need to type in the following command:
express
Once you hit enter, your output should look like below screenshot: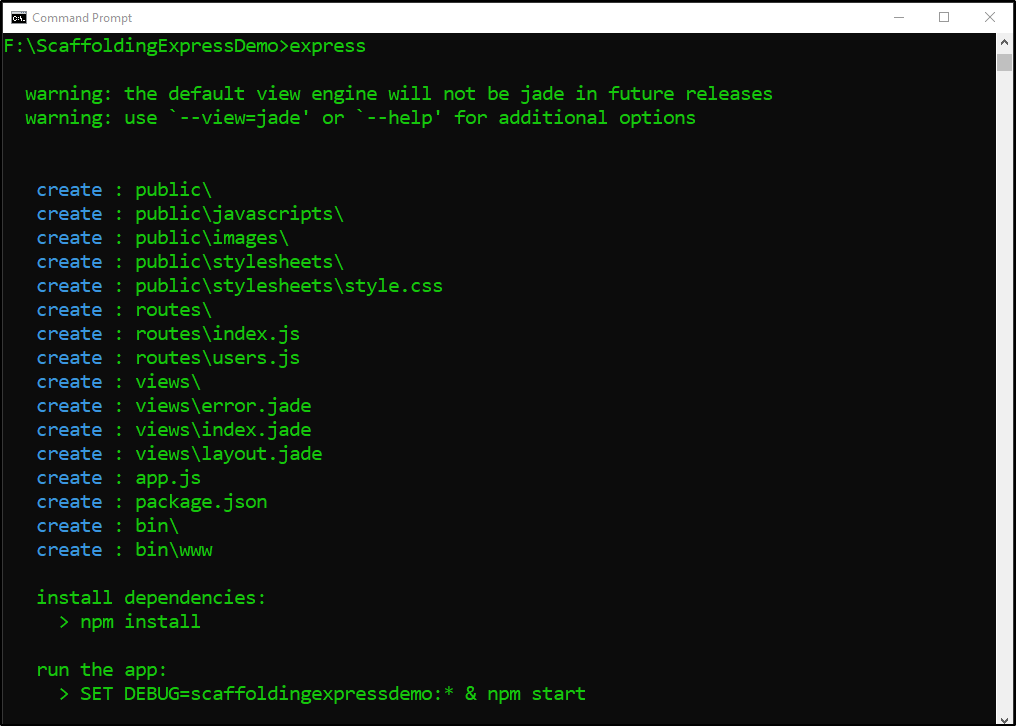
If you are getting your output similar to this, that means your skeleton has been created. Now you can go back to your project folder and check the project structure created by scaffolding. Below I have attached the screenshot of my scaffolding.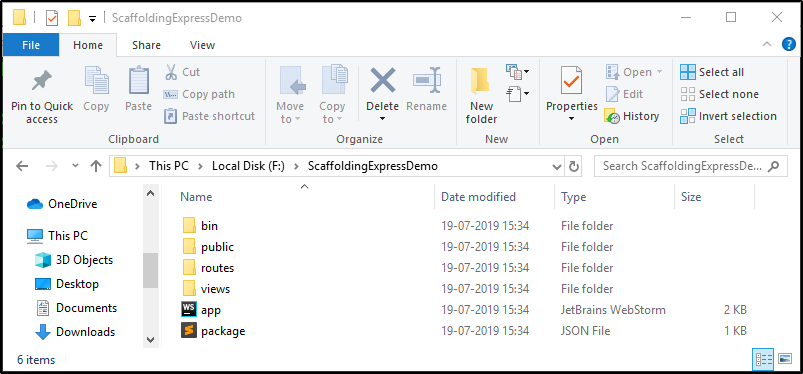
So that was all about Scaffolding in Express.js. In the next section of this Express.js Tutorial, I will tell you how to establish database connectivity from within an Express application.
There are a number of databases available in the market out of which most popular ones among front end developers are MySQL and MongoDB. I have written blogs on how to connect with each of these from scratch:
In the next section of this Express.js Tutorial, I will be introducing you to the concept of templating that is prominently used with Express and Node.js applications.
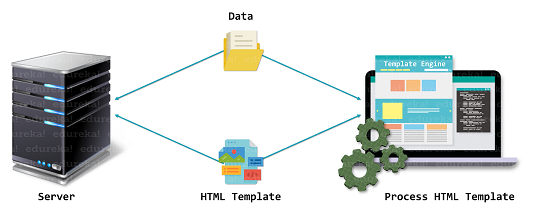
Templating engine facilitates us in creating and using the static HTML template with minimal code. When you execute them, the variables in the template file gets replaced by actual values and the entire template is converted into an HTML file by the template engine. Then, it is finally sent to the client-side where data is further injected into the actual template to produce the final HTML document. This reduces the page load time as well as the designing complexity thus is majorly used for designing the HTML pages.
Below I have listed down some of the popular template engines that work well with Express.js:
Let’s now move further in this Express.js Tutorial and see how to handle exceptions in any Express.js application.
Error Handling in Express.js is the mechanism for catching and processing the possible errors which might occur during the program execution and disrupt the normal flow. Express, takes care of errors with the help of a middleware which is further categorized in various types based on the number of arguments the middleware function takes in. Here, I will be talking specifically about the “error handling middleware” function which takes in four arguments namely, err, req, res and next. This function is invoked only if an error occurs. Below I have given an example for the same:
app.use(function (err, req, res, next) {
	console.error(err.stack);
	res.status(500).send('
<h2 style="font-family: Malgun Gothic; color: darkred;">Ooops... Cant find what you are looking for!</h2>

');
});
With this, we come to an end of this Express.js Tutorial. I hope I was able to explain the concepts of Express.js from the ground up.
If you found this “Express.js Tutorial” relevant, check out the Node.js Certification Training by Edureka, a trusted online learning company with a network of more than 250,000 satisfied learners spread across the globe.
Got a question for us? Please mention it in the comments section of this Express.js Tutorial and we will get back to you.


 Thank you for registering Join Edureka Meetup community for 100+ Free Webinars each month JOIN MEETUP GROUP