


In the fourth blog of the series (Ethereum – Smart Contract Interaction using Web3), we looked into how web3 can be used to interact with a smart contract deployed the local Ethereum blockchain (Ganache). We were introduced to the key elements that are required to get started with programming. We looked at how all the interactions can be divided into two categories.
- Reading the data from the smart contract using call.
- Writing the data to the contract using sendTransaction.
Today, we are going to talk about how can we deploy a smart contract using web3js. We are going to build on top of the knowledge, from the previous blogs. So let us get started.
What are we going to do today?
- We are going to look at the building blocks, required to deploy a smart contract using Web3.js.
- Why do we need to deploy the smart using code?
If we look at the real-world scenarios, Smart Contracts are like a template definition.
For example, insurance policy type is a template, when you buy the policy, an instance is created which has data like policyholder, policy amount and policy condition.
Similarly, smart contract definition is a template, when you deploy the smart contract you instantiate the smart contract with the data. Once deployed, then you can interact with it. - When we are going to build a real-world application, each time you want to create a smart contract object, you are not going to do it manually, this needs to be done as a part of the code.
- Hence, we need to know how this can be done and what are the elements required to do this. This is what we are going to do in this blog.
What will be the takeaway?
At the end fo this blog, we will be able to clearly define the following.
- The key elements required to achieve this?
- Getting these key elements
- We will be building up the transaction object for deployment.
- Finally, we will have the code, which can be reused in other projects.
Index
- Prerequisites
- Initial Checklist
Prerequisites
We are going to need the following prerequisites installed, you must have already available on your system as they were required for hands-on in previous blogs. In case you do not have the prerequisite installed. Please install the following.
- Visual Studio Code
- Ganache
- NodeJS (version 10.16.3), can be installed directly from the installer or can be done using NVM (Node Version Manager).
Steps for NVM have been shared in the previous blog. - We are going to reuse the Purchase Order contract, which was created as part of the first blog in the series.
Project SetUp
We have installed the prerequisites. Now we are going to set up the project in Visual Studio Code.
- First of all, we are going to create a new project folder “Smart_Contract_Web3_Deployment”.
- Next, we are going to run Ganache, a local blockchain node. We are going to interact with this.
- Initialize the project to use node. We are going to run the following command.
npm init
- Next, we need to add a few dependencies. For this, we are going to run the following commands.
npm install web3 --save
npm install ethereumjs-tx  --save
- Now, we have installed dependencies, we are going to add the code. Lets us add a new file to project server.js
- Finally, the project structure should look like this.
The Code
Now, we are going to add the relevant code. Let us get started.
Dependency Objects
- We are going to add the following dependency objects.
const Web3 = require('web3'); const EthereumTx = require('ethereumjs-tx').Transaction; - These objects provide functions, which we are going to use to set up the connection, sign transactions, build transaction objects and other utility functions.
Initializing Connection
- We are going to set up a connection with our local Ethereum blockchain.
const rpcURL = 'http://127.0.0.1:7545';
const web3 = new Web3(rpcURL);
- In this case, the local Ethereum node is providing following rpc endpoint http://127.0.0.1:7545
Setting up the data
- We are going to need, the following data elements
- ABI
- Bytecode
- In short, contract abi is the schema of the contract. Just like the index of a book, listing down the chapters and content.
- We are writing contracts in a high-level language, Solidity in this case. On the Ethereum blockchain, the contract resides in a compiled format.
- EVM (Ethereum Virtual Machine) understands the contract in its compiled form which is called bytecode.
- We are going to retrieve, both the details from RemixIDE, after compiling our Purchase Order smart contract in RemixIDE.
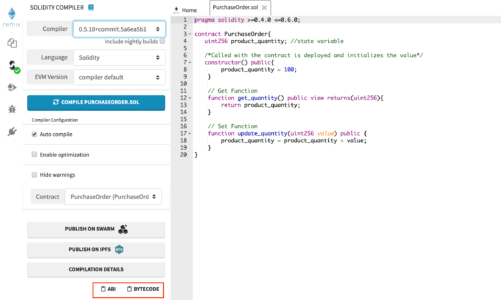
- Let us add these details to code.
let abi = '[{"constant":false,"inputs":[{"name":"value","type":"uint256"}],"name":"update_quantity","outputs":[],"payable":false,"stateMutability":"nonpayable","type":"function"},{"constant":true,"inputs":[],"name":"get_quantity","outputs":[{"name":"","type":"uint256"}],"payable":false,"stateMutability":"view","type":"function"},{"inputs":[],"payable":false,"stateMutability":"nonpayable","type":"constructor"}]'
let bytecode = '608060405234801561001057600080fd5b50606460008190555060ca806100276000396000f3fe6080604052348015600f57600080fd5b506004361060325760003560e01c806380219655146037578063ed0109a5146062575b600080fd5b606060048036036020811015604b57600080fd5b8101908080359060200190929190505050607e565b005b6068608c565b6040518082815260200191505060405180910390f35b806000540160008190555050565b6000805490509056fea265627a7a7230582002f975dfd70c1b1f649671805826a83fc9b92457fe7dd245527f56b7776d043464736f6c634300050a0032';

Contract Object
- Next, we are going to create a contract object.
- In order to create the contract object, we will use the contract abi.
// Contact ABI
let deploy_contract = new web3.eth.Contract(JSON.parse(abi));
- We are going to need an Ethereum account for contract deployment.
- For account information, we are going to use one of the accounts in Ganache.
- Next, we are going to add this to our code.
// address from Ganache
let account = '0xd935580Ce80986aD46D31e2dA55564Eb93A09318';
Functions Parameters
- In order to deploy the contract, the bytecode of the contract is one of the send function arguments.
let payload = { data: bytecode } - Next, we also need to provide metadata for contract deployment.
- First of all, from: The account which will be used to deploy the contract. The account needs to have ether, in order to deploy the contract.
- Next, gas: The max limit on the cost, the account is willing to incur for contract deployment. If the cost goes above this value. The contract deployment will be reverted.
- Finally, gasPrice: The price of each unit of gas the account is willing to pay. The transactions get prioritized Based on the gasPrice.
let parameter = {
    from: account,
    gas: web3.utils.toHex(800000),
    gasPrice: web3.utils.toHex(web3.utils.toWei('30', 'gwei'))
}
Deploying the Smart Contract
- Now, we have all the bits and pieces required.
- Finally, the last piece of the puzzle, let us add the last piece of code.
deploy_contract.deploy(payload).send(parameter, (err, transactionHash) => { console.log('Transaction Hash :', transactionHash); }).on('confirmation', () => {}).then((newContractInstance) => { console.log('Deployed Contract Address : ', newContractInstance.options.address); }) - In this final piece, we are doing the following.
- We are using the contract object, which we created earlier deploy_contract.
- Next, the deploy()function is called by the contract object, passing the bytecode (payload) as an object.
- The previous step creates the complete transaction object, but the object has note be sent over the blockchain network.
- Finally, we call the send() function, passing the details required by the transaction e.g. the account sending the transaction, gas.
- After the transaction is sent, the transaction hash (the unique identifier of transaction on the network) is generated.
- Next, we are listening for the confirmation event of the transaction, which means
- The transaction, which we initiated has become part of the block.
- Secondly, the contract gets deployed on the blockchain.
Find out our Blockchain Training in Top Cities/Countries
| India | Other Cities/Countries |
| Bangalore | New York |
| Hyderabad | UK |
| Kerala | USA |
| Chennai | Canada |
| Mumbai | Australia |
| Pune | Singapore |
Putting it all together
- This is how our server.js file looks, after putting all the individual pieces together.
// Library Imports const Web3 = require('web3'); const EthereumTx = require('ethereumjs-tx').Transaction; // Connection Initialization const rpcURL = "http://127.0.0.1:7545"; const web3 = new Web3(rpcURL); // Data set up let abi = '[{"constant":false,"inputs":[{"name":"value","type":"uint256"}],"name":"update_quantity","outputs":[],"payable":false,"stateMutability":"nonpayable","type":"function"},{"constant":true,"inputs":[],"name":"get_quantity","outputs":[{"name":"","type":"uint256"}],"payable":false,"stateMutability":"view","type":"function"},{"inputs":[],"payable":false,"stateMutability":"nonpayable","type":"constructor"}]' let bytecode = '608060405234801561001057600080fd5b50606460008190555060ca806100276000396000f3fe6080604052348015600f57600080fd5b506004361060325760003560e01c806380219655146037578063ed0109a5146062575b600080fd5b606060048036036020811015604b57600080fd5b8101908080359060200190929190505050607e565b005b6068608c565b6040518082815260200191505060405180910390f35b806000540160008190555050565b6000805490509056fea265627a7a7230582002f975dfd70c1b1f649671805826a83fc9b92457fe7dd245527f56b7776d043464736f6c634300050a0032'; //Contract object and account info let deploy_contract = new web3.eth.Contract(JSON.parse(abi)); let account = '0xd935580Ce80986aD46D31e2dA55564Eb93A09318'; // Function Parameter let payload = { data: bytecode } let parameter = { from: account, gas: web3.utils.toHex(800000), gasPrice: web3.utils.toHex(web3.utils.toWei('30', 'gwei')) } // Function Call deploy_contract.deploy(payload).send(parameter, (err, transactionHash) => { console.log('Transaction Hash :', transactionHash); }).on('confirmation', () => {}).then((newContractInstance) => { console.log('Deployed Contract Address : ', newContractInstance.options.address); }) - In order to execute this code, run this from the terminal window
node server.js
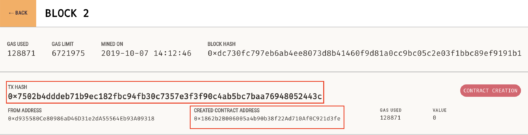
- As a result, the transaction hash is generated and the contract is deployed, returning the address of the contract.

- Next, we can validate the transaction hash and newly created contract in Ganache.
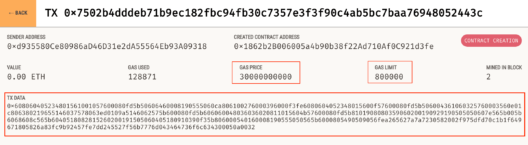
- Lastly, when we look at the details of the transaction in Ganache, we see the Gas Limit and Gas Price. They show the same value, as we had passed in the function.


Conclusion and Next Steps
As has been mentioned, the key take away of this blog has been the complete hand-on for deploying a smart contract. Subsequently looking at what are the building block of information to achieve the deployment. To conclude we have just scratched the surface with Web3 in this blog series. Next, we are going to look at few more components of the Ethereum ecosystem in the next blog. In case, you are looking to explore web3 further do check out the documentation of web3.js. Stay tuned for more.
If you wish to learn Ethereum and build a career in Blockchain Technologies, then check out our Blockchain online course which comes with instructor-led live training and real-life project experience. This training will help you understand What is Ethereum Blockchain in depth and help you achieve mastery over the subject.
Got a question for us? Please mention it in the comments section of this “Smart Contract Deployment using Web3” blog and we will get back to you.