In the previous Truffle Ethereum Tutorial, you learnt about Truffle Suite and developed an Ethereum DApp. To develop a complex ethereum application, you will want to run it on a private network to see how it works before deploying it. So, in this Ethereum Private Network tutorial, you will learn how to create a Private Ethereum Network and how to make a transaction between two accounts.
Interested in Ethereum Development? Check out the Live Ethereum Developer Training.
Ethereum Private Network Tutorial
These are the topics I will be covering in this tutorial:
- What is Ethereum Private Network?
- Why is Ethereum Private Network used?
- Features of Ethereum Private Network
- Installing Ethereum on Ubuntu
- Demo: Creating Ethereum Private Network and making a Transaction
What is Ethereum Private Network?
An Ethereum Private Network is a completely private Blockchain which is isolated from the Main Ethereum network. Ethereum Private Network is mainly created by organizations to restrict the read permissions of the Blockchain. Only the nodes with the right permissions will be able to access this Blockchain. The nodes in this network are not connected to the main network nodes and their reach is restricted only to this private Blockchain.

Why is Ethereum Private Network used?
Ethereum Private Network is used by organizations to store private data which should not be visible to people outside their organization. Ethereum Private Network is also used for testing and experimenting the Blockchain if someone doesn’t want to use the public test networks.
Features of Ethereum Private Network
As mentioned in the previous section, Ethereum Private Network is used for testing purpose. But why would someone take the trouble of creating a new network when there are already public testing networks available? Well, Ethereum Private Network has its own set of features as listed below:
- It acts as a Distributed Database
- Blockchain in the Ethereum Private Network can contain private data (because the network is not public)
- Access can be permission-based
- Making transactions can be free
- Accounts can be allocated with ethers by ourselves which does not even require buying virtual ethers
Moving on, let’s get to the hands-on part of this Ethereum Private Network tutorial.
Installing Ethereum on Ubuntu
To create an Ethereum Private Network, we first need to have Ethereum installed in our system. In this section of Ethereum Private Network Tutorial, you will learn how to install Ethereum on Ubuntu.
To install Ethereum, run the following commands in a terminal:
$ sudo apt-get install software-properties-common
$ sudo add-apt-repository -y ppa:ethereum/ethereum
$ sudo apt-get update
$ sudo apt-get install ethereum
Done! This will install Ethereum on your system.
Let’s start with the Private Network creation.
Demo: Creating Ethereum Private Network and making a Transaction
In this Ethereum Private Network Tutorial, we will send ethers from one account to another and so, we need accounts. Let’s now see how to create accounts for our Blockchain.
Creating Accounts For Ethereum Private Network
Before creating new accounts, let us create a new directory for our workplace. Refer to the below commands to do this:
$ mkdir private-ethereum
$ cd private-ethereum
To make a transaction, we need at least two accounts: A receiver and a sender.
To create two accounts, run the following command twice:
$ geth --datadir ./datadir account newEnter the passphrase for each account when asked. Do not forget this passphrase!
Once these commands run successfully, two accounts will be created and the account address will be displayed on the screen.

Save these addresses somewhere because we will be using these further.
Creating Genesis File
A Genesis file contains the properties that define the Blockchain. A Genesis file is the start-point of the Blockchain and so, it is mandatory to create the Genesis file to create a Blockchain. Now, let’s create the Genesis file.
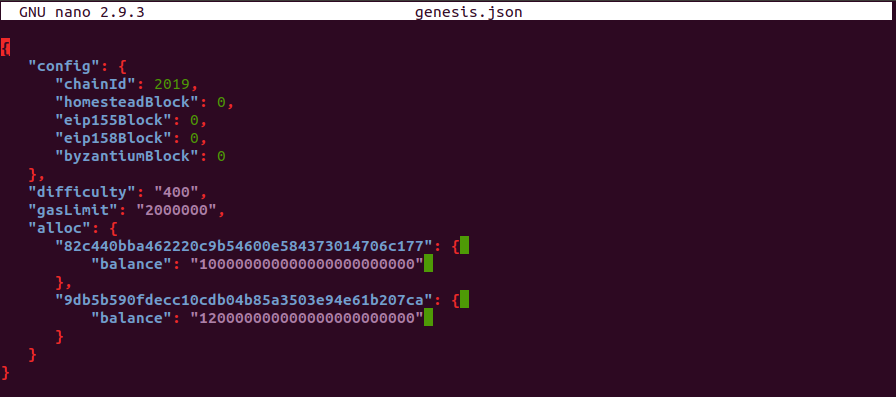
First, create a file named genesis.json
$ nano genesis.jsonAnd now copy and paste the following code in that file:
{
  "config": {
    "chainId": 2019,
    "homesteadBlock": 0,
    "eip155Block": 0,
    "eip158Block": 0,
    "byzantiumBlock": 0
  },
  "difficulty": "400",
  "gasLimit": "2000000",
  "alloc": {
    "82c440bba462220c9b54600e584373014706c177": {
    "balance": "100000000000000000000000"
    },
    "9db5b590fdecc10cdb04b85a3503e94e61b207ca": {
    "balance": "120000000000000000000000"
    }
  }
}
Note: In the above code, replace the address under alloc section with the address of the accounts that you created in the previous step.
Save it and exit.
Let me explain the contents of the Genesis file in brief:
chainId – This is the chain identification number that is used to distinguish between Blockchains
homesteadBlock, eip155Block, eip158Block, byzantiumBlock – these properties are related to chain forking and versioning. We don’t need these for our tutorial, so let’s set them to 0.
difficulty – This number decides how difficult the blocks will be to mine. For Private networks, it’s good to set a lower number as it lets you mine blocks quickly, which results in fast transactions.
gasLimit – This number is the total amount of gas that can be used in each block. We don’t want our network to hit the limit, so we have set this high.
alloc – This part is used to allocate ethers to already created accounts.
The Genesis file is ready. Now, it’s time to start the Blockchain.
Instantiating Data Directory
Before starting the Blockchain, we have to instantiate the data directory. The Data Directory is the directory where the data related to the Blockchain is stored. To instantiate the data directory, run the following command:
$ geth --datadir ./myDataDir init ./genesis.jsonOn successful instantiation, you should see the following output:
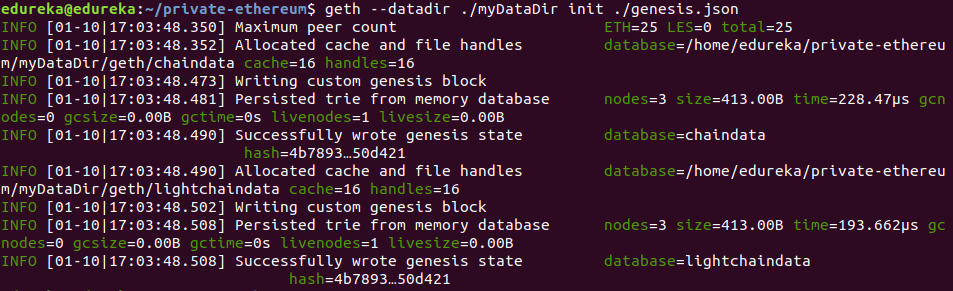
With the Data Directory instantiated, we can now start the Blockchain.
Starting Ethereum Private Blockchain
To start the Blockchain, run the following command:
$ geth --datadir ./myDataDir --networkid 1114 console 2>> Eth.logDone! Your private Ethereum Blockchain is up and running.
In the above command, we are sending all the logs in a separate file called Eth.log. Geth will automatically create a new file if it is not found.
The output of this code should look something like this:

Now, we have entered into the geth console where we can run commands for our Blockchain.
Reading Logs
In the previous section, I mentioned that we are storing the logs in another file. In this section, I will tell you how to read the logs from this file.
We will read the logs from a separate terminal, so first let’s open a new terminal. First, switch to the private-ethereum directory and then run the following command to read the logs:
$ tail -f Eth.log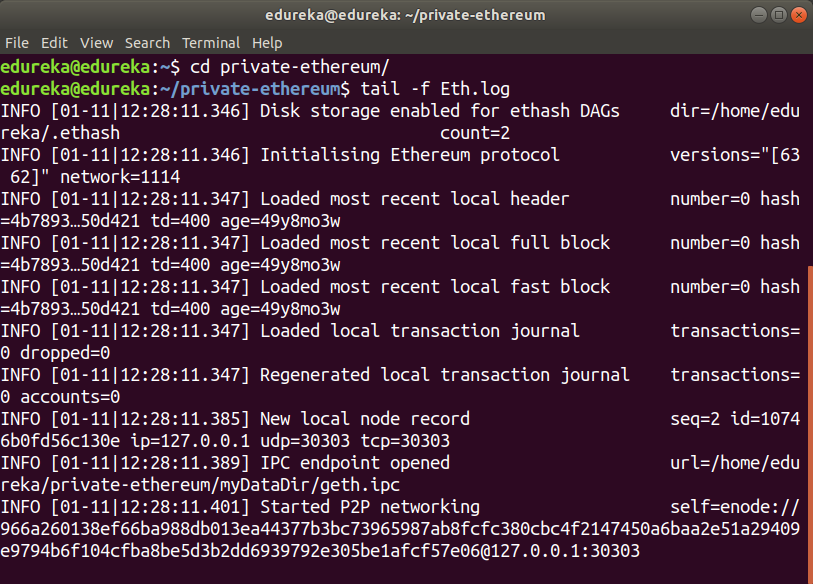
You can now see the logs in the terminal. These logs get dynamically updated whenever there is some activity in the Blockchain.
Importing accounts to Private Network
You may remember that we created two accounts to make transactions. But, we didn’t add these accounts to our network. So, in this section of Ethereum Private Network tutorial, I will tell you how to import the accounts.
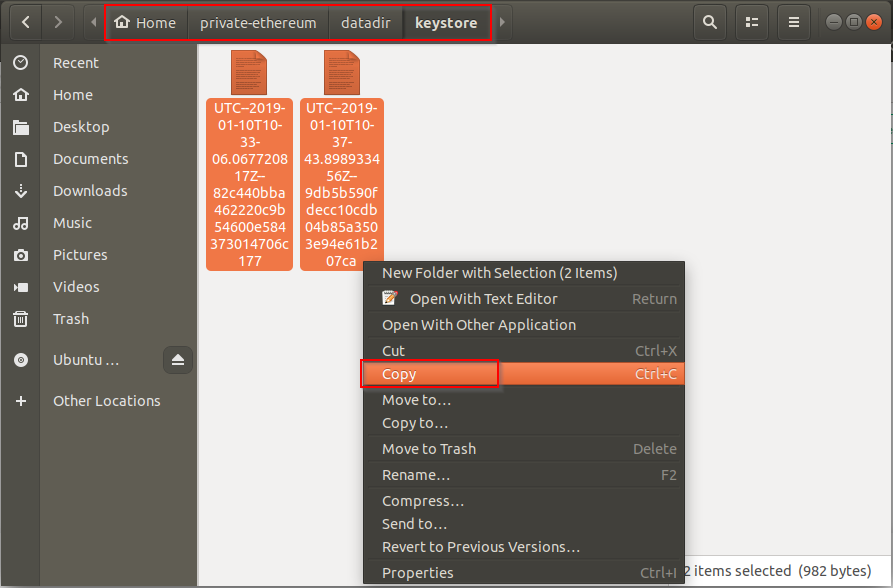
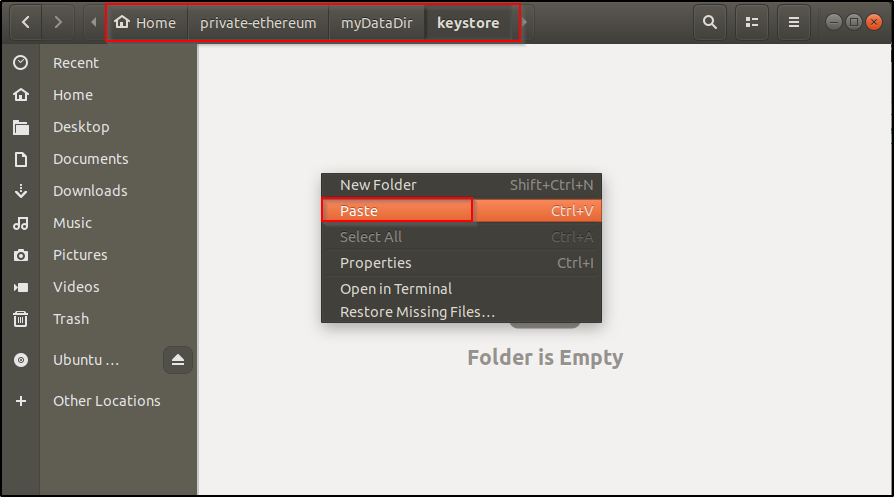
When we create an account, all the details of the account is stored in a UTC file in the directory mentioned during account creation (path: ./datadir/keystore). To import the accounts, we need to copy these files and paste in the keystore directory under the Data Directory (path: ./myDataDir/keystore)
That’s all! The accounts are imported. Simple, isn’t it? To verify the import, we will run the following command in the geth console.
> eth.accountsThis will show a list of all accounts available.
To check the balance of these accounts, we will use the following command:
> web3.fromWei(eth.getBalance(<address_of_account>), "ether")
We are ready with everything required to make a transaction. Why wait? Let’s do it!
Making A Transaction
In this Ethereum Private Network tutorial, we will send some ethers from one account to another.
The syntax to send ethers is as follows:
> eth.sendTransaction({from:”address”, to:”address”, value: web3.toWei(amount, "ether")})We will send 1000 ethers from account 1 to account 2 using the following command:
> eth.sendTransaction({from:eth.accounts[0], to:eth.accounts[1], value: web3.toWei(1000, "ether")})Didn’t work? Don’t worry. Didn’t work for me too. This is because the account is locked by default and doesn’t allow transactions.

So, first, we need to unlock the sender account. Remember the passphrase you used while creating the account? Well, you must, because you will have to use that to unlock the account. We will unlock the account with the following command:
personal.unlockAccount(eth.accounts[0], "<password>")Now we will send ethers successfully:
> eth.sendTransaction({from:eth.accounts[0], to:eth.accounts[1], value: web3.toWei(1000, "ether")})This should return a Transaction ID.

Done! You have successfully made a transaction!
To verify the transaction, let’s check the balance in both the accounts.
> web3.fromWei(eth.getBalance("0x82c440bba462220c9b54600e584373014706c177"), "ether")> web3.fromWei(eth.getBalance("0x9db5b590fdecc10cdb04b85a3503e94e61b207ca"), "ether")
Yay! We can see that 1000 ethers were sent from one account to another!
Congratulations! You have created an Ethereum Private Network and made a transaction. I hope this Ethereum Private Network tutorial was informative and helped you understand about Ethereum Private Network. Now, go ahead and try experimenting with the newly created Private network.
Got a question for us? Please post it on Edureka Community and we will get back to you.
If you wish to learn Blockchain and build a career in Blockchain Technologies, then check out our Blockchain Course which comes with instructor-led live training and real-life project experience. This training will help you understand what is Blockchain in an exhaustive manner and help you achieve mastery over the subject.