


Jenkins is certainly one of the most popular tools in DevOps. It can automate building and testing the code at a faster rate and because of this software companies can speed up their development processes. Jenkins provides you with an email notification service through which you can report the build status and testing results to the team. In this article on Email Notifications in Jenkins the pointers that we are going to cover are as follows:
Before I begin with this post on email notification in Jenkins, here are a few blogs covering the basics of Jenkins:
So let us begin with our first topic.
Why do we need email notification in Jenkins?
Problem Statement:
Suppose the release of the application is scheduled at midnight. Now there is a problem with the application on the test server or the production servers. Also, there might be a case where the application is released and it goes down after a few hours. If the application, say for example Netflix is down even for a few minutes, this can result in the loss of millions of dollars. Also due to such errors, the project deadline might get extended.
Solution
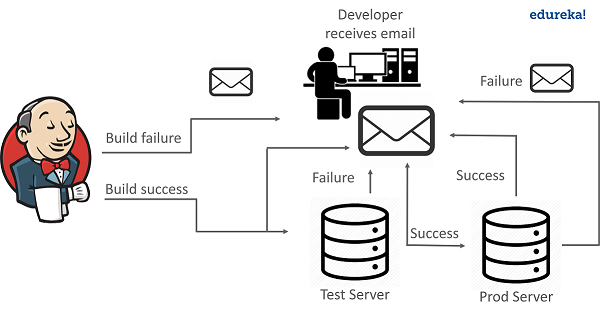

This problem was solved by an automation tool called Jenkins. Jenkins has a service of Email Notifications to handle such situations.
If the build is not successful then the team of developers is notified about the status of the build. This can be done with the help of an Email plugin in Jenkins. Plugins are the primary means of enhancing the functionality of a Jenkins environment to suit organization- or user-specific needs.
Using the email plugin, you configure the email details of the concerned person who should be notified in case of build failure.
Once the developer is notified about the error, he then fixes it and again commits the code to the GitHub. After this Jenkins again pulls the code from GitHub and prepares a fresh build.
Similarly, Jenkins can solve the problem of application going down after the release, by notifying the concerned team, via email.
Now let us see how to send Email Notifications in Jenkins.
How To Send Email Notification In Jenkins?
There are basically two ways to configure email notifications in Jenkins.
Using Email Extension Plugin – This plugin lets you configure every aspect of email notifications. You can customize things such as when to send the email, who receives it, and what the email says.
Using Default Email Notifier – This comes with Jenkins by default. It has a default message consisting of a build number and status.
Email Extension Plugin
Step 1: Log in to the Jenkins Homepage
Go to Jenkins home page using the URL localhost:8080. The port number by default is 8080. In my case, it is 9191. Sign in using your username and password.
Step 2: Install Email Extension Plugin
After that on the Jenkins homepage click on Manage Jenkins-> Manage Plugins. In the available tab search for Email Extension Plugin. If it is found there, install it. If it is not found there, check for it in the installed tab.

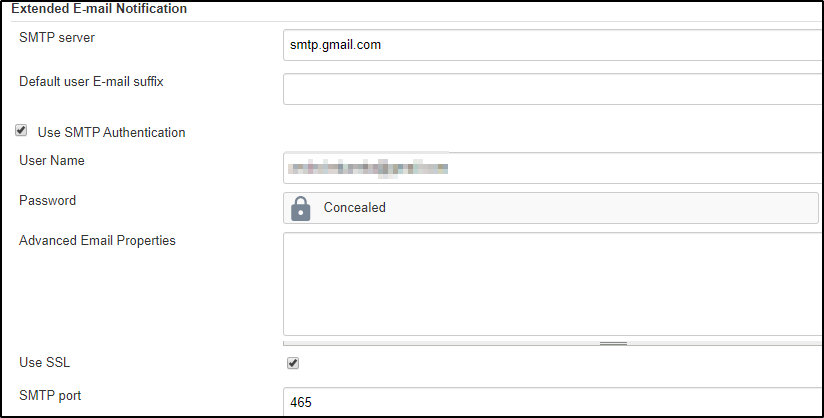
Step 3: Configure System
Now go to Manage Jenkins-> Configure System. Here scroll down to the email notification section. If you are using Gmail then type smtp.gmail.com for the SMTP server. Click on Advanced and select Use SMTP authentication. Enter your Gmail username and password. Select the Use SSL option and enter the port number as 465. Click on Apply and then Save.

Step 4: Create Jenkins Pipeline Job
Now go to Jenkins homepage and create a new job. Name the job with whatever name that you want and select pipeline. Click on OK.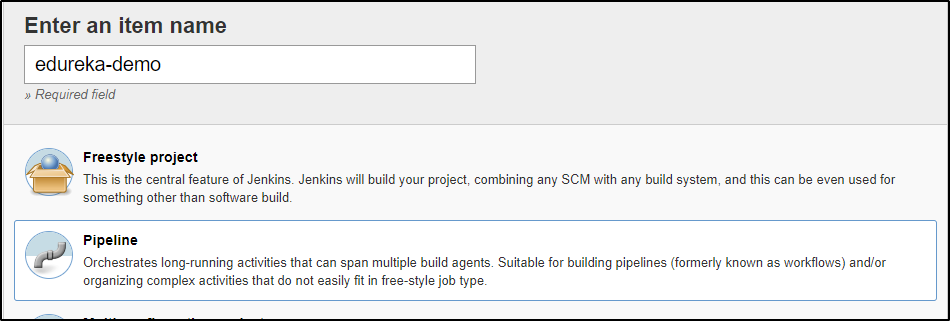

Now in the pipeline section type the following code.
pipeline {
    agent any

    stages {
        stage('Ok') {
            steps {
                echo "Ok"
            }
        }
    }
    post {
        always {
            emailext body: 'A Test EMail', recipientProviders: [[$class: 'DevelopersRecipientProvider'], [$class: 'RequesterRecipientProvider']], subject: 'Test'
        }
    }
}
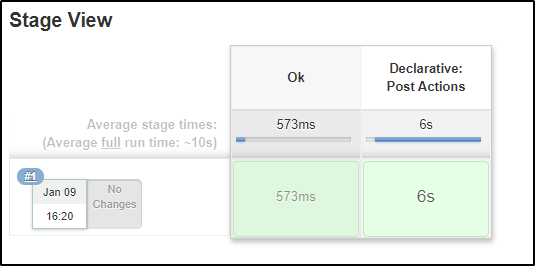
This pipeline runs in any Jenkins agent. It has a stage to sample. In the post step, you can run any script you want. We have the mail sender in it. Save it and run clicking in “Build Now” on job menu. The build will appear in the stage view.

Step 5: View Console Output
Click on Build Number “#1” and click on “Console Output” on the build menu. The output will be like this:

Step 6: Check Email.
After this go to your Gmail inbox and should be able to see an email like this.

Default Email Notifier
Step 1: Log in to the Jenkins Homepage
Go to Jenkins homepage.
Step 2: Configure System
Click on Manage Jenkins->Configure System. Here scroll down to the Email Notification section. Now enter the details as the following image 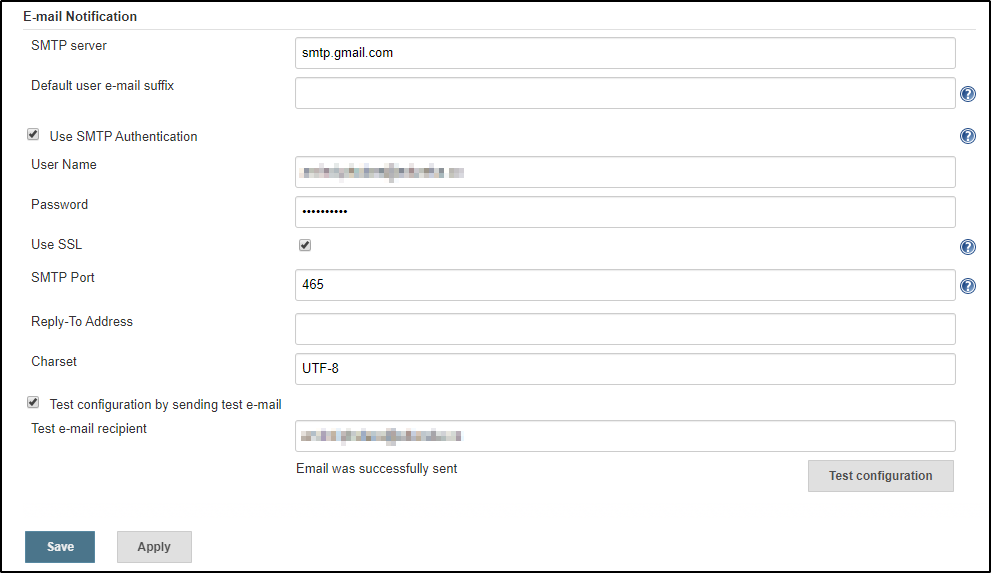

Once the mail configurations are set, you can test whether it is working fine or not by checking Test configuration by sending a test email.
Step 3: Add post-build action in your project
To allow your projects to send an email, you need to add Post Build Action and select “Email Notification from the drop-down list. This will provide you the below interface, where you can add a list of email addresses that the email is required to be sent to. 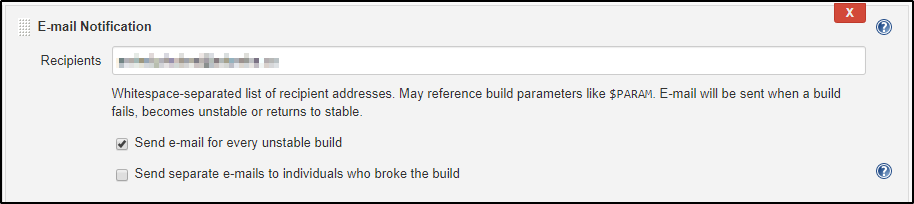

Step 4: Build the project and check your email
Now try running the project where you have added the email. If the build fails you will get an email regarding the build failure.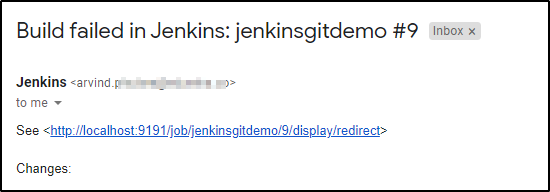

So this is how you set up Email notifications in Jenkins. This is it from my side in this article. I hope you liked it and understood whatever that I have explained here.
If you found this “Email Notifications in Jenkins” relevant, check out the DevOps training by Edureka, a trusted online learning company with a network of more than 250,000 satisfied learners spread across the globe. The Edureka DevOps Certification Training course helps learners gain expertise in various DevOps processes and tools such as Puppet, Jenkins, Nagios and GIT for automating multiple steps in SDLC.
Got a question for us? Please mention it in the comments section and we will get back to you.