


While predicting the required computing power, there can be two scenarios, you may over-estimate the requirement, and buy stacks of servers that will not be of any use, or you may under-estimate the usage, which will lead to the crashing of your application. In this AWS EC2 Tutorial we will understand all the key concepts and instance creation in the following sequence:
AWS EC2 tutorial: Introduction to AWS EC2
Amazon Elastic Compute Cloud, EC2 is a web service from Amazon that provides re-sizable compute services in the cloud. They are re-sizable because you can quickly scale up or scale down the number of server instances you are using if your computing requirements change.

An instance is a virtual server for running applications on Amazon’s EC2. It can also be understood like a tiny part of a larger computer, a tiny part that has its own Hard drive, network connection, OS etc. But it is actually all virtual. You can have multiple “tiny” computers on a single physical machine, and all these tiny machines are called Instances.

AWS EC2 tutorial: Why AWS EC2?

Suppose you are a developer, and since you want to work independently you buy some servers, you estimated the correct capacity, and the computing power is enough. Now, you have to look after the updation of security patches every day, you have to troubleshoot any problem which might occur at a back-end level in the servers, and so on.
But if you buy an EC2 instance, you don’t have to worry about any of these things as it will all be managed by Amazon; you just have to focus on your application. That too, at a fraction of the cost that you were incurring earlier! Isn’t that interesting?
Check out the difference between Amazon EC2 and AWS Elastic Beanstalk.
How to run systems in EC2?
- Login to your AWS account and click on AWS EC2.
- Under create an instance, click on launch instance.
Now you have to select an Amazon Machine Image (AMI), AMIs are templates of OS and they provide the information needed to launch an instance.
When we want to launch an instance we have to specify which AMI we want to use. It could be Ubuntu, windows server, etc.
- The AMIs could be preconfigured or you can configure it on your own according to your requirements.
- For preconfigured AMIs you have to select it from the AWS marketplace.
- For setting up your own, go to quick-start and select one.
- While configuring you will reach a point where you have to select an EBS storage option. Elastic Block Storage (EBS) is a persistent block-level storage volume which are used with EC2.
Next in this AWS EC2 tutorial, let us learn the various types.
AWS EC2 tutorial: Features of EC2
Amazon EC2 has lots of features. Some of them are listed below:
- Amazon EC2 provides virtual computing environments also known as instances.
- AWS EC2 has preconfigured templates for your instances, also called Amazon Machine Images or AMIs, that package the operating system as well as some additional software.
- EC2 offers multiple configurations of CPU, memory, storage, and networking capabilities for your instances.
- With Amazon EC2, you can securely log in to your instances using key pairs that keep the instances safe from unwanted access.
- Amazon EC2 has various storage volumes for temporary data that is deleted when you stop, hibernate, or terminate your instance. This is also known as instance store volumes.
- Amazon EC2 has Persistent storage volumes for your data using Amazon Elastic Block Store (Amazon EBS).
- Amazon EC2 has multiple physical locations for your resources, such as instances and Amazon EBS volumes
Amazon EC2 Tutorial for Beginners
AWS EC2 tutorial: Types of EC2 Computing Instances
Computing is a very broad term. The nature of your task decides what kind of computing you need. Therefore, AWS EC2 offers 5 types of instances which are as follows:
- General Instances
- For applications that require a balance of performance and cost.
- E.g email responding systems, where you need a prompt response as well as the it should be cost-effective, since it doesn’t require much processing.
- For applications that require a balance of performance and cost.
- Compute Instances
- For applications that require a lot of processing from the CPU.
- E.g analysis of data from a stream of data, like Twitter stream
- For applications that require a lot of processing from the CPU.
- Memory Instances
- For applications that are heavy in nature, therefore, require a lot of RAM.
- E.g when your system needs a lot of applications running in the background i.e multitasking.
- For applications that are heavy in nature, therefore, require a lot of RAM.
- Storage Instances
- For applications that are huge in size or have a data set that occupies a lot of space.
- E.g When your application is of huge size.
- For applications that are huge in size or have a data set that occupies a lot of space.
- GPU Instances
- For applications that require some heavy graphics rendering.
- E.g 3D modelling etc.
- For applications that require some heavy graphics rendering.
Now, every instance type has a set of instances which are optimized for different workloads:
| General Instances | Compute Instances | Memory Instances | Storage Instances | GPU Instances |
|
|
|
|
|
Now that you know about the different types of instances, let’s learn about the steps involved in instance creation in this AWS EC2 Tutorial.
AWS EC2 tutorial: Advantages of Amazon EC2
- You only pay for what you use
- Easily to scale up or down as needed
- No need to own or maintain physical servers
- Amazon EC2 instances are highly secure and you can log in securely
- Ability to access EC2 instances from any location in the world
Also Read AWS NAT Gateway
AWS EC2 tutorial: Amazon EC2 Pricing
You can get started with Amazon EC2 for free. With a free tier account, you can use 750 hours of Windows and Linux t2.micro instances for up to one year. It is recommended to use only micro instances for free users, as you may be charged for other instances. There are multiple methods for paying for Amazon EC2 instances. These are On-demand, Savings Plan, Reserved Instances, and Spot instances. Let’s look at the pricing structures of these.
On-Demand Pricing
The EC2 on-demand instances are charged on either a second (minimum 60 seconds) or hourly basis. This includes no long-time commitment so you don’t have to think much about planning, buying, or maintaining hardware.
Here is the included pricing for instance types
| Instance name | On-demand hourly rate |
| a1.medium | $0.0255 |
| a1.4xlarge | $0.408 |
| t3.nano | $0.0052 |
| t3.medium | $0.0416 |
| t3.large | $0.0832 |
| t3.2xlarge | $0.3328 |
Savings Plan
Savings Plans are a flexible pricing model that offers low prices on Amazon EC2, Amazon Lambda, and AWS Fargate usage. This is in exchange for a commitment of 1 to 3 years while you consistently use the service.
Spot Instances
You can request spare EC2 computing using Spot Instances. This is recommended for applications with flexible start and end times. Some Spot Instances pricings are provided below, but you can refer to the official website to learn more about it.
| Instance Type | Linux/ UNIX Usage | Windows Usage |
| t2.micro | $0.0035 per Hour | $0.0081 per Hour |
| t2.small | $0.0069 per Hour | $0.0159 per Hour |
| t2.medium | $0.0139 per Hour | $0.0319 per Hour |
| t2.large | $0.0278 per Hour | $0.0558 per Hour |
| t2.xlarge | $0.0557 per Hour | $0.0967 per Hour |
AWS EC2 Tutorial: Steps for Instance Creation
Next in this AWS EC2 Tutorial, let’s understand the whole EC2 instance creation process through a use case in which we’ll be creating an Ubuntu instance for a test environment.
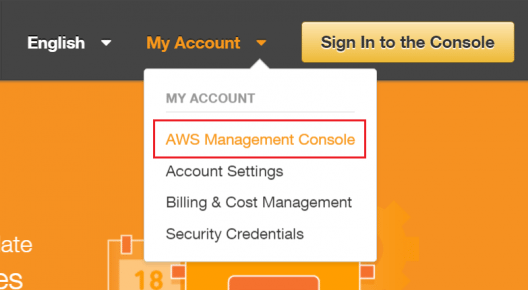
- Login to AWS Management Console.
- Select your preferred Region. Next, Select a region from the drop down, the selection of the region can be done on the basis of the criteria discussed earlier in the blog.

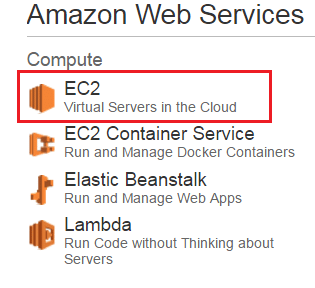
- Select EC2 Service Click EC2 under Compute section. This will take you to EC2 dashboard.
- Click Launch Instance.
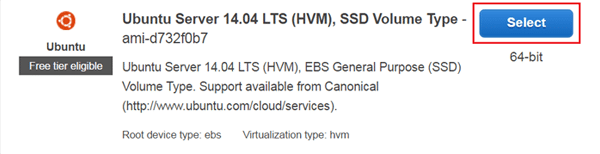
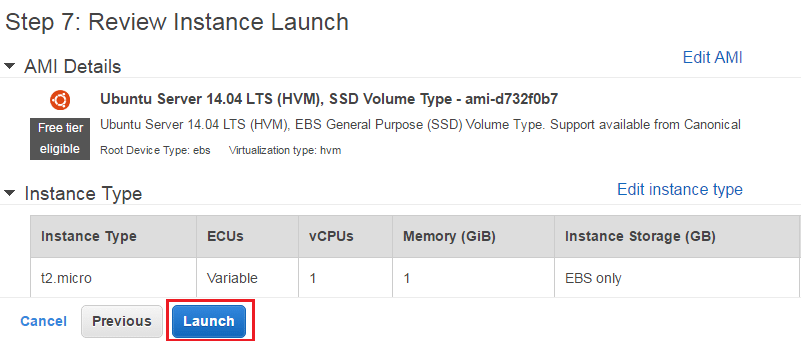
- Select an AMI : because you require a Linux instance, in the row for the basic 64-bit Ubuntu AMI, click Select.
- Choose an Instance
Select t2.micro instance, which is free tier eligible.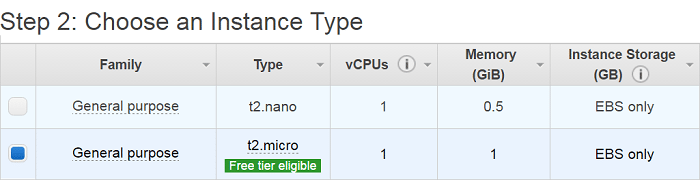
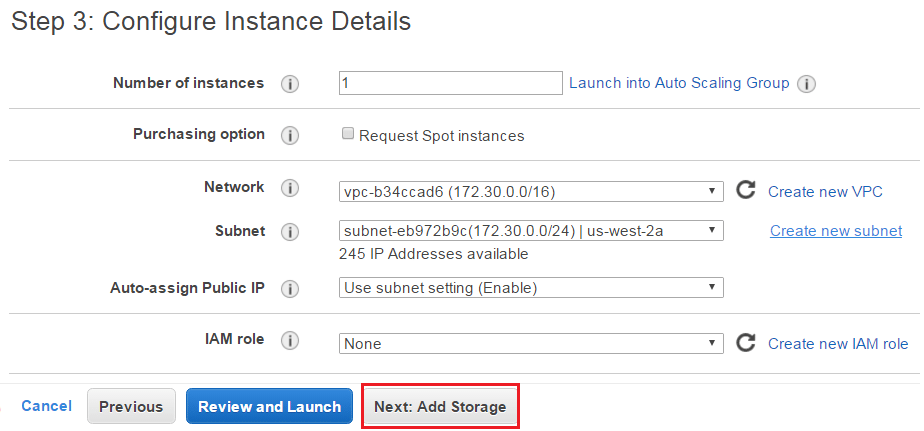
- Configure Instance Details.
Configure all the details and then click on add storage
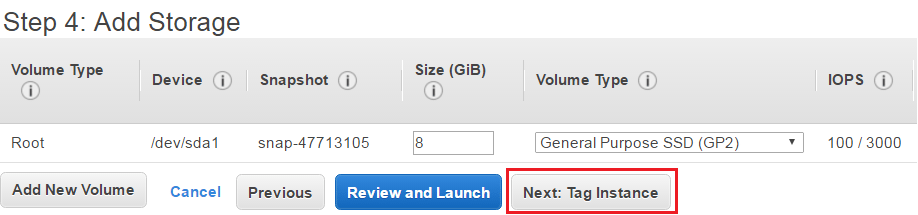
- Add Storage
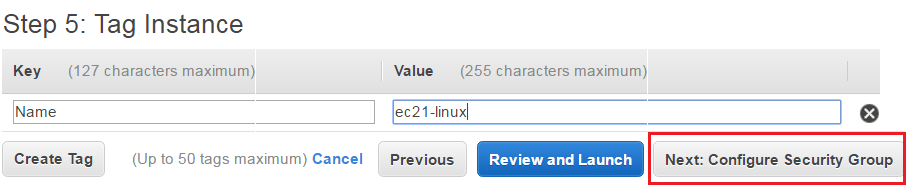
- Tag an Instance
Type a name for your AWS EC2 instance in the value box. This name, more correctly known as tag, will appear in the console when the instance launches. It makes it easy to keep track of running machines in a complex environment. Use a name that you can easily recognize and remember.
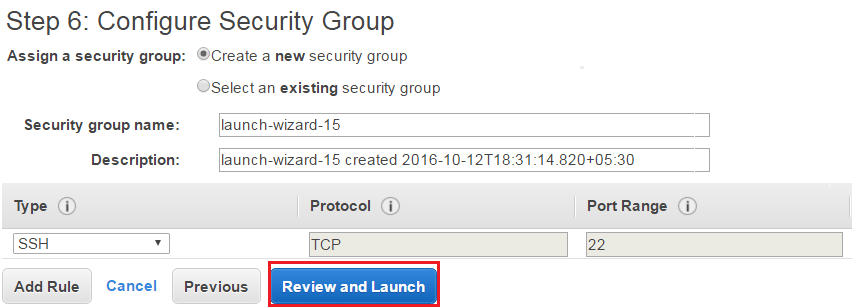
- Create a Security Group
- Review and Launch an Instance
Verify the details that you have configured to launch an instance.
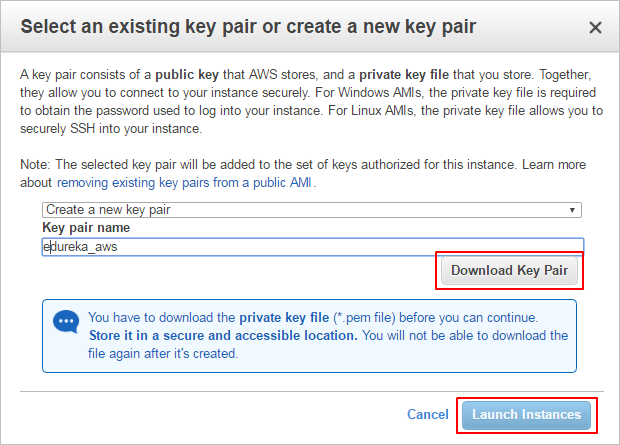
- Create a Key Pair & launch an Instance
Next in this AWS EC2 Tutorial, select the option ‘Create a new key pair’ and give a name of a key pair. After that, download it in your system and save it for future use.
- Check the details of a launched instance.
- Converting Your Private Key Using PuTTYgen
PuTTY does not natively support the private key format (.pem) generated by Amazon EC2. PuTTY has a tool called PuTTYgen, which can convert keys to the required PuTTY format (.ppk). You must convert your private key into this format (.ppk) before attempting to connect to your instance using PuTTY.
- Click Load. By default, PuTTYgen displays only files with the extension .ppk. To locate your .pem file, select the option to display files of all types.

- Select your.pem file for the key pair that you specified when you launch your instance, and then click Open. Click OK to dismiss the confirmation dialog box.
- Click Save private key to save the key in the format that PuTTY can use. PuTTYgen displays a warning about saving the key without a passphrase. Click Yes.
- Specify the same name for the key that you used for the key pair (for example, my-key-pair). PuTTY automatically adds the. ppk file extension.
- Connect to EC2 instance using SSH and PuTTY
- Open PuTTY.exe
- In the Host Name box, enter Public IP of your instance.
- In the Category list, expand SSH.
- Click Auth (don’t expand it).
- In the Private Key file for authentication box, browse to the PPK file that you downloaded and double-click it.
- Click Open.
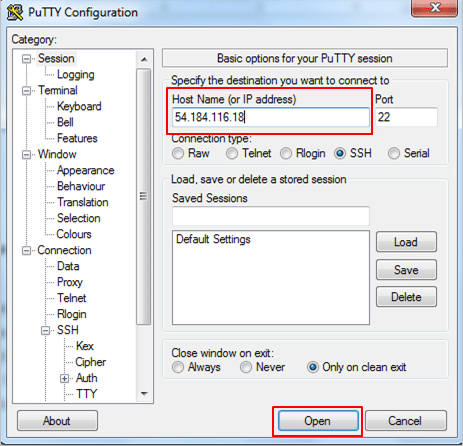
- Type in Ubuntu when prompted for login ID.
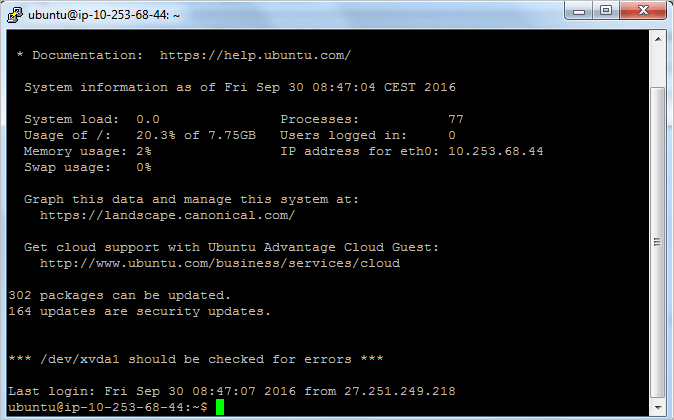
Congratulations! You have launched an Ubuntu Instance successfully.
Shape your future in the cloud and transform businesses with our Cloud Computing Certification Program.
Conclusion:
Now that you have created your own Amazon EC2 instance, you can start your cloud journey.To learn more about EC2, you can check out the AWS Solution Architect Certification Training by Edureka which is co-created by industry practitioners.
Here, you will not only learn how to set up your own cloud infrastructure but also how you can build solutions for enterprise-level projects. This is a comprehensive course on how you can utilize the full capabilities of Amazon Web Services to deploy, manage, and maintain clouds.
If you’re exploring how cloud services like GCP support modern development practices, consider enrolling in comprehensive DevOps Certification to learn how to automate deployment, manage infrastructure, and streamline CI/CD workflows on platforms like Google Cloud.
Here’s a short AWS EC2 tutorial Video that explains Amazon AMI EC2, Demo on AMI creation, Security groups, Key pairs, Elastic IP vs Public IP and a Demo to launch an EC2 Instance etc. It is very important for those who want to become AWS Certified Solutions Architects.
AWS EC2 Tutorial For Beginners | AWS Certified Solutions Architect Tutorial | AWS Training | Edureka
From cloud basics to advanced architecture—our Cloud Architect Training Course has you covered!
I hope you enjoyed this deep dive into AWS EC2 Tutorial. It is one of the most sought-after skills sets that recruiters look for in an AWS Solution Architect Professional. Here’s a collection of AWS interview questions and answers to help you prepare for your next AWS job interview. Another interesting read which you can check out is AWS S3 Tutorial and for a broader perspective of AWS, check out our Amazon AWS Tutorial.
Unlock your potential as an AWS Developer by earning your AWS Developer Certification. Take the next step in your cloud computing journey and showcase your expertise in designing,


I Am very much Interested to learn AWS. But I don’t have any idea about Linux and servers.is it possible for me to learn this course.
And I have my own website and i know how to host domains,and basic website customization’s. is this skills are helpful or not?
Hi edsureka,
Thank you for giving such a useful info.
AWS provides some AMI templates like RHEL ,ubuntu,Windows and suse .
It doesn’t not support centos,mac,fedora …
there is any possibility use this os’s.
I have recently signed up on aws and verified my payment methods, too. I do not understand why I am getting this message when i click on Services > EC2. Please help..!
Your service sign-up is almost complete!
Thanks for signing up with AISPL. Your services may take up to 24 hours to fully activate. If you’re unable to access AWS services after that time, here are a few things you can do to expedite the process:
1. Make sure you provided all necessary information during signup. Complete your AWS registration.
2. Check your email to see if you have received any requests for additional information. If you have, please respond to those emails with the information requested.
3. Verify your credit card information is correct.
If the problem persists, please contact Support:
Hey Jebbs, thanks for checking out the blog. The Activation for an AWS account takes around 24 hours from the time you provide all your information, so relax, it’s Ok to get this message. If the same message is showing up even after 24 hours, please let us know! Otherwise you can also drop a mail to AWS Support.They are awesome too. Hope this helps. Cheers!