


Installing Linux distros as dual boot is tough in pre-installed Windows Laptops due to certain features and restrictions. But that doesn’t take away the requirement to do the same for a Linux Admin and a beginner, alike. So, I bring to you a brief guide to help you Dual Boot Ubuntu and Windows 10 in your system.
By following a few simple steps you should be able to Dual Boot Windows 10 and Ubuntu in no time!
- Prerequisites to Dual Boot Ubuntu and Windows 10
- Backup and Recovery
- Create a Partition for Ubuntu
- Install Ubuntu
- Login to Ubuntu
You should know that the instructions below are specific to a configuration. However, it should work for most of the Laptops despite the varying mileage of different hardware, obviously.
This tutorial is performed on a fairly new HP348 G4 Notebook which has Core i5, 7th generation processor with 1 TB HDD, 16 GB RAM and built-in Intel HD graphics 620.
I’ll be using Ubuntu as an example here but the steps that follow are applicable to other Linux distributions such as Linux Mint and Elementary OS as well.
Now, let’s cut the small talk and see How to dual boot Ubuntu and Windows 10.
Step 1: Prerequisites to Dual Boot Ubuntu and Windows 10
There are some requirements that you have to take care of, prior to the installation. You’ll need the following.
- A Laptop with OEM installed Windows 10.
- A USB stick min 16 GB for Windows 10 recovery.
- A USB stick with the latest bootable Ubuntu.
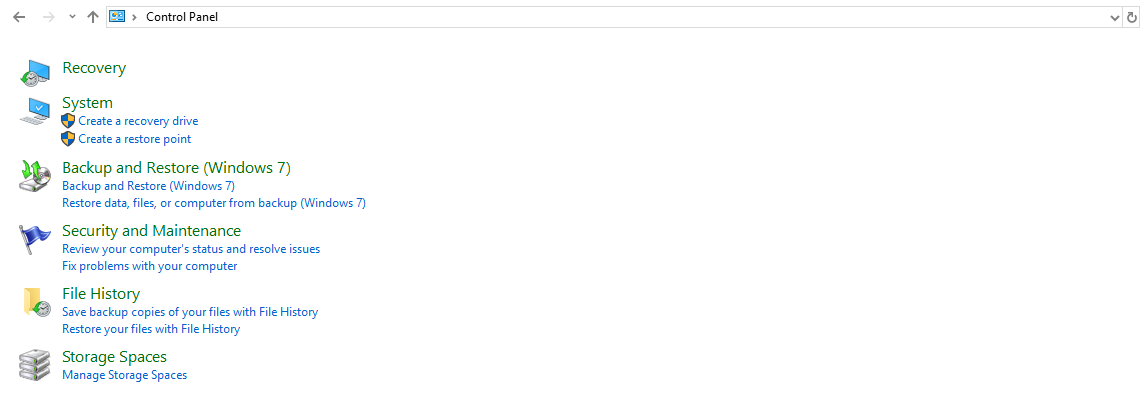
Step 2: Backup and Recovery
Before you proceed with the instructions below, make sure you have taken a backup and created a recovery USB stick for Windows 10 because you may end up with a broken system. Also, I’d reckon you create a recovery stick, for Windows 10 system files.
To create a recovery USB, you can follow the given steps.
Insert an empty 16 GB+ USB stick to Windows 10 machine
Click on Create a recovery drive under System.
Wait till the recovery is completed. Once done, you can safely remove the USB stick from the machine.

Note: Just to be safe you could check whether the recovery stick works via booting from it. A little safety has never harmed anybody!
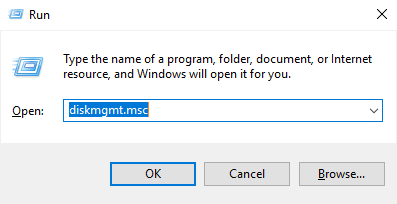
Step 3: Create a Partition for Ubuntu
If you have a partition already, which you can use to it install Ubuntu, you may want to skip this step.
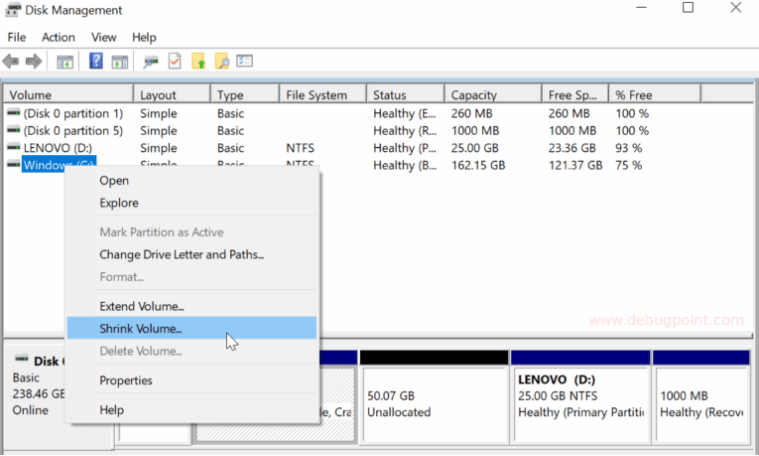
Original Equipment Manufacturer(OEM) installed machines with Windows 10, typically come with two basic partitions excluding the recovery partitions. C drive and D drive. The C Drive contains Windows 10 system files and the D Drive is reserved for user data. Ubuntu 18.04 needs a minimum of 25 GB of storage space partition which we need to create by shrinking our C drive (which typically contains the majority of the space).
To create a partition for Linux, you need to follow these given steps.
Open Partition Editor/Disk Management Console. To do so, open run prompt (by pressing Windows Key + R or by typing ‘run’ in search bar) & type diskmgmt.msc.
Right click on the C Drive. Click on Shrink Volume.


In the window, that appears next, you can see the available size in MB. Enter the amount of space you want to shrink (MB).
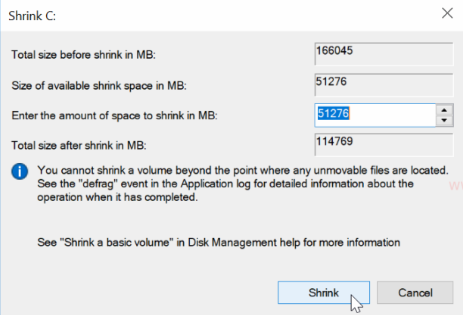

Note: If you need 50 GB for partition – you’ll have to enter 50*1024= 51200 MB.
Click on Shrink and wait till it’s done.
You will see an unallocated space, created in a graphical display of your storage. You will use this space to install Ubuntu.
Note: Do not format now as the Ubuntu installer will give you the option to format during installation.
Step 4: Install Ubuntu
Insert the Ubuntu USB stick. Reboot.
If everything works well till now, Ubuntu installer should start from the USB stick. You can get the entire installation process of Ubuntu here.

Continue to follow the on-screen instructions till you reach the the Installation Type window.
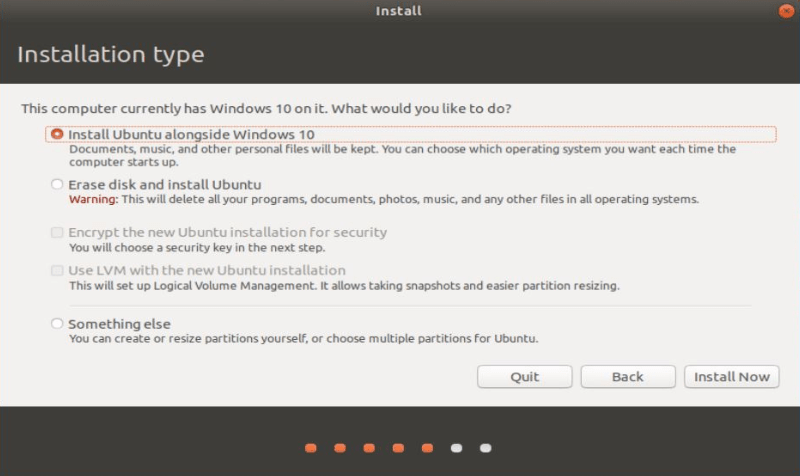
Since we are dual booting with Windows 10, select the first option Install Ubuntu alongside Windows 10, rest options can be chosen when we are installing Ubuntu afresh.
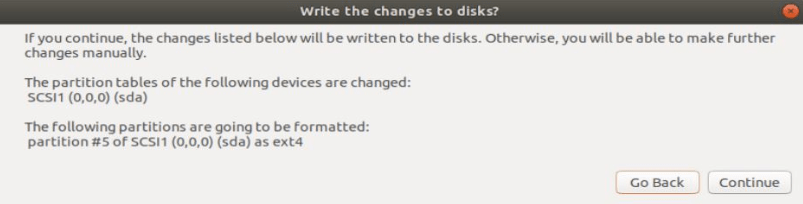
On the following screen, select Write changes to disk to proceed further with the installation.
After completion of the installation, the installer would reboot the system.
Remove the bootable USB stick before reboot.


Step 5: Login to Ubuntu
You should be greeted with the GRUB screen with Windows boot loader and Ubuntu.
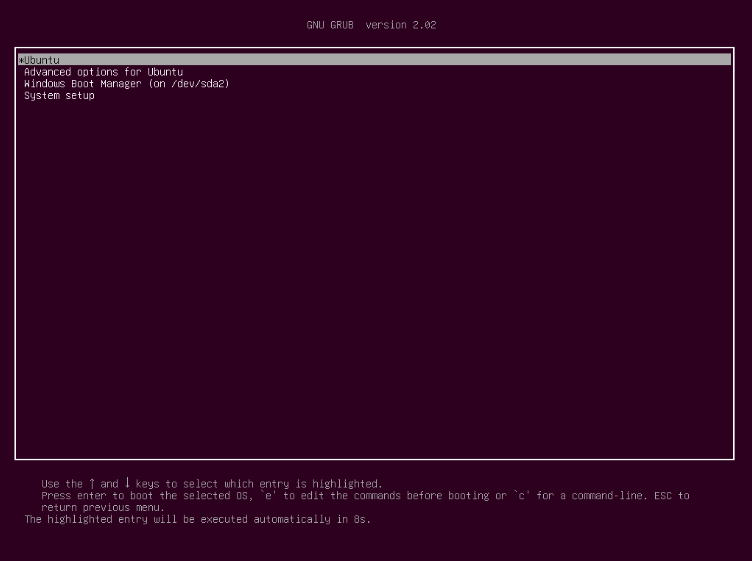

Choose your desired Operating System and proceed.
Now, you will see the login screen. Select the User & enter the password to log in.
I hope you found this guide useful. If you want, you may change the boot order to make Ubuntu your default OS. For now, you can go ahead, experiment and enjoy this beautiful, user-friendly Linux distribution.