
Advanced DevOps Certification Training with G ...
- 22k Enrolled Learners
- Weekend
- Live Class
(7990)


 Copy Link!
What is the most important feature of any web-based application? There are many, but for me high availability is the most important. That is what Docker Swarm helps us achieve! It helps in the application being highly available.
In my previous blog, I explained how Docker Compose works. This blog on Docker Swarm is a continuation to the former and here the benefits of using Docker Swarm for containerizing any multi-container application has been explained.
In this blog’s case, it is only an Angular application which will be Docker Swarm’ed.
Note: The method to containerize the MEAN Stack app is the same.
Docker Swarm is a technique to create and maintain a cluster of Docker Engines. The Docker engines can be hosted on different nodes, and these nodes which are in remote locations form a Cluster when connected in Swarm mode.
For reasons mentioned already! Achieving high availability without any downtime is a priority for every service provider out there. Will high availability impress your clients? Well, they won’t be impressed if they face downtime. That is a no-brainer.
Like a lot of other services, Docker Swarm does auto load-balancing for us. Hence, there is no need for DevOps engineers to route processing requests to other nodes when one fails. The cluster’s manager will automatically perform load balancing for us.
Decentralized access is another benefit. What does that mean? It means all nodes can be accessed easily from the manager. The manager will also prompt the nodes on a regular basis, and keep a track of its health/ status to cope with downtime. However, nodes cannot access or track the services running in other nodes/ managers.
You can check the no. of containers running in a node, scale-up the no. of containers or scale-down the no. based on our requirement, by just executing a single command.
Even after an application has been deployed, we can issue rolling-updates and make sure that CI (Continuous Integration) is achieved. Rolling updates are issued to one node after the other thus making sure there is no downtime and load is distributed between other nodes in the cluster.
So, what next? To do the obvious. Get started with Docker Swarm if you have already worked on Docker or if your organization wishes to containerize a reliable web service.
Note: Docker engines are installed on independent hosts/ servers or in multiple VMs in a host.
Getting Started With Swarm Mode
Docker Swarm is initiated by the manager, or let me put it this way, the instance which starts the Swarm cluster becomes the manager. The command to start the cluster is:
$ docker swarm init --advertise-addr ip-address
Here, the ‘–advertise-addr’ flag is used for advertising itself to other nodes who want to join the cluster. The IP address of the manager needs to be specified along with the flag. Below is the sample screenshot.
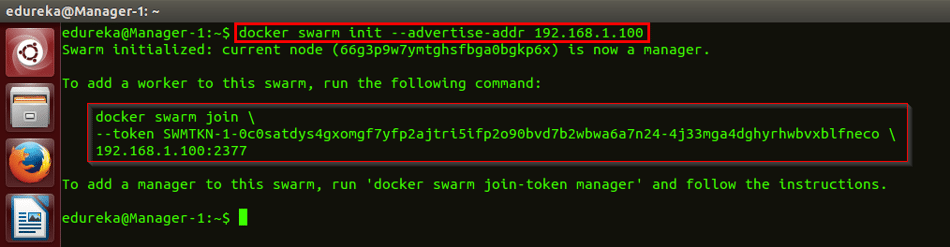
When the Swarm cluster is initiated, a token is generated at the manager’s end. This token needs to be used by other nodes to join the swarm cluster.
How is it exactly? Copy the entire token generated at the manager’s docker engine, paste it at the node’s docker engine and execute it. The highlighted portion of the screenshot above is a token. When the token is executed at a worker node, it will look like the below screenshot.

Any node that joins the cluster can be later promoted to a manager. In case you want a docker engine to join as a manager, execute the below command at the manager’s end:
$ docker swarm join-token manager

And at a later point in time, if you want the token for a node to join the cluster, run the below command:
$ docker swarm join-token node
Go ahead, and execute the token at every node you want, to join the cluster. When all that is done, you can run a docker node list command to check how many nodes have joined the cluster along with their status. The command is:
$ docker node ls
The screenshot is below:

If all is well, then we can start our Swarm service, provided the Docker Image is built. The Docker image can be built from the Dockerfile. The Dockerfile used to build the applications is below:
FROM node:6
RUN mkdir -p /usr/src/app
WORKDIR /usr/src/app
COPY package.json /usr/src/app
RUN npm cache clean
RUN npm install
COPY . /usr/src/app
EXPOSE 4200
CMD ["npm","start"]
The Dockerfile is used to execute a set of commands together for building a custom Docker image from a base image. As you can see, the base image I have used is ‘Node:6’. NodeJS is the image I from Docker Hub which is tagged with version 6.
I am then creating a new Docker directory inside the container and making it the working directory inside my container.
I am the copying the ‘package.json’ file from my local machine to the container’s working directory. I am then specifying ‘RUN npm cache clean’ and ‘RUN npm install’ commands. npm install command downloads the version of dependencies mentioned in the package.json file.
I am then copying all the project codes from the local machine to the container, exposing port number 4200 for accessing the Angular application on the browser and finally, I am specifying the npm start command which containerizes the application.
Now, to create the Docker image based on this Dockerfile, run the below command:
$ docker build -t angular-image .

Note: The Docker Images need to be built in all the nodes in the cluster. Without it, containers cannot be spun in other Docker engines.
Given that our Docker Image is built, we can spin a container out of this image. But, we will do something better: create a Docker Swarm service out of it. Command to create a swarm service is:
$ docker service create --name "Angular-App-Container" -p 4200:4200 angular-image

Here, the ‘name’ flag is used to give a name to my service and ‘p’ flag is used to expose the container port to the host port. In the package.json file, I have specified the container port on which the Angular app should be hosted. And the 4200 in this command helps map the container’s port 4200 to host’s port 4200. ‘angular-image’ is the name of the image I earlier built.
Remember: When we create a service, it can be hosted on any docker engine in the cluster. The manager of the swarm will decide where it will be hosted. But, no matter in which node it is hosted, the application can be accessed on localhost:4200 from any of the nodes connected in the cluster.
How is that possible? Because Swarm internally exposes the port numbers to be accessible by every other node in the cluster. That means, port no. 4200 on any node/ manager in the cluster would render the Angular application.
Now what? Is the container active?
You can verify if the service is containerized by running the docker service list command. But, it may take a minute for the container to be deployed. Below is the command:
$ docker service ls
This command will list down all the services managed by the Swarm cluster. In our case, it should display one active container. Look at the below screenshot for reference.

Here, “REPLICAS=1/1” indicates that there is one single ‘service’ of that container, in the cluster. And “MODE=replicated” indicates that the service is replicated on all the nodes in the cluster.
Now, to identify on which the node/ manager, the app is hosted, we can run the command docker service ps command followed by the container name. The command is:
$ docker service ps Angular-App-Container
The screenshot for the same is below.

This mentions details about the node on which the application is hosted along with the command used to start withe service.
The ‘docker ps’ command throws light on the details about the active container. The command is:
$ docker ps
Look at the below screenshot for reference.

But, this command will only work on the cluster manager and the node where the service is actually hosted.
To check how many nodes are running, run the node list command. Command is:
$ docker node ls
To check the containers running in a particular host, run the node ps command. Command is:
$ docker node ps

If you remember, I earlier mentioned that the service is currently running in replicated MODE. This means the service is replicated across all the nodes in the clusters. Do you think there is an alternative?
Absolutely! There is something called as Global MODE. In this mode, there is a service of this container running at every single/ manager in the cluster. Remember to stop the current service/ container before to spinning another set of containers.
The command for that is:
$ docker service rm Angular-App-Container
The command to spin the container in Global mode is:
$ docker service create --name "Angular-App-Container" -p 4200:4200 --mode global angular-image

This would create 3 services on the 3 nodes in our cluster. You can verify it by running the docker service list command. The screenshot of this is below.

When the docker service ps command is executed, you will see something like this:

As you can see, it says the mode is replicated and the replicas of this container is 3. Now comes the best part of this blog.
To have 2 replicas of the services running between the three containers, we can use the replicas flag. Look at the command below:
$ docker service create --name "Angular-App-Container" -p 4200:4200 --replicas=2 angular-image

You will notice that these 2 services are load balanced between the three nodes in the cluster. Run the docker service process command to verify, in which nodes the containers are active. Look at the below screenshot for reference. The containers are active in one manager node and one worker node.

From the Worker node, you can verify the container is running by executing the ‘docker ps’ command.

Now to actually verify that there is high availability in our cluster, we need to experience a scenario where one of the nodes goes down and other nodes in the cluster make up for it. We can bring about that scenario by manually stopping the container from one of the nodes using this command:
$ docker stop Angular-App-Container
Run the above command on the node: Worker-1 where the container is running. From the manager, run the command:
$ docker service ps Angular-App-Container
You will now notice that the container is now running in node: Worker-2 and Manager. However, it has been shutdown from node: Worker-1. The same is visible from the below screenshot.

This is how Docker High Availability is achieved. In spite of the container being inactive in Worker-1, the application can be rendered at port number 4200 on that worker node. This is because it is internally connected to other nodes in the cluster and it is able to render the application in the browser.
Be it in replicated mode or global mode, we can scale up the number of services running in our cluster. And even after scaling up, we will be able to retain high availability. Awesome isn’t it?
But getting back to our point, let us see how easy it is to scale up the number of services in our cluster. Assuming that we have either 2 or 3 replicas in our cluster, let us scale up the services to 5 by just running a single command. The command is:
$ docker service scale Angular-App-Container=5
The screenshot of this is below.

By running the docker service list command, you can notice that the number of replicas is now 5. And by running the docker service ps command along with the service name, you can see how the 5 services are load balanced and distributed on the 3 nodes. Commands are:
$ docker service ls
$ docker service ps Angular-App-Container

And finally, in a Docker Swarm setup if you do not want your manager to participate in the proceedings and keep it occupied for only managing the processes, then we can drain the manager from hosting any application. Because this is how it works in the world, isn’t it? The managers are only for managing other workers. Anyway, the command to do that is:
$ docker node update --availability drain Manager-1

You can verify if the manager is now taking part in the cluster by running the docker node list command and docker service ps command:
$ docker node ls
$ docker service ps Angular-App-Container

You can now notice that the container services have been divided between Worker nodes and the Manager node has actually been drained from containerizing any service. The screenshot is below.

So, that brings an end to this blog on Docker Swarm. I hope this blog explained how important it is to implement Swarm mode for achieving high availability. Stay tuned for more blogs in this Docker tutorial series.
You can alternatively watch the video below to understand how Docker Swarm works. All the concepts explained above have been covered in the video.
Now that you have learnt about Docker, check out the Docker Training Course by Edureka, a trusted online learning company with a network of more than 250,000 satisfied learners spread across the globe. This Edureka Docker Certification Training course helps learners gain expertise in implementing Docker and mastering it.
Got a question for us? Please mention it in the comments section and we will get back to you.


 Thank you for registering Join Edureka Meetup community for 100+ Free Webinars each month JOIN MEETUP GROUP
what if the docker master server goes down?