
Advanced DevOps Certification Training with G ...
- 22k Enrolled Learners
- Weekend
- Live Class
(7990)


 Copy Link!
In today’s world, enterprises have become keen in containerization which requires strong networking skills to properly configure a container architecture, and thus, this introduces the concept of Docker Networking.
In this blog on Docker Networking, you will go through the following topics:
To understand Docker, you need to know about the history of how applications were deployed before and then how applications are being deployed using containers now.
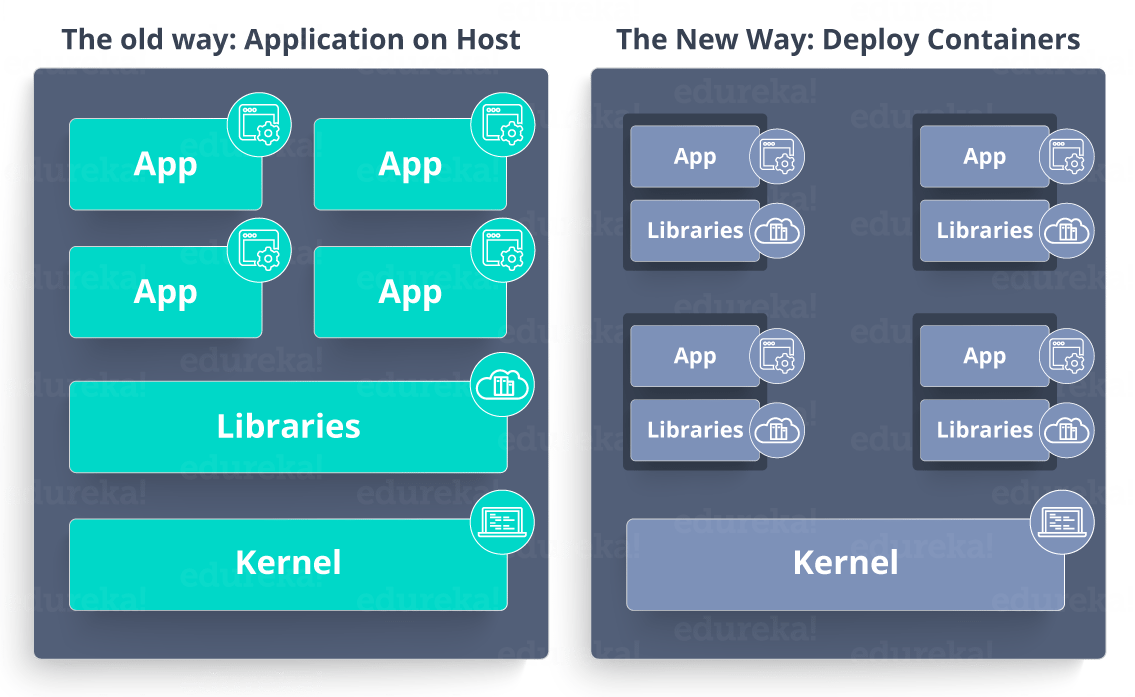
As you can see in the above diagram, the old way had applications on the host. So, n number of applications share the libraries present in that operating system. But, with containerization, the operating system will have a kernel which is the only thing that’s going to be common between all the applications. So, applications cannot access each other’s libraries.
So, Docker in simple terms is an open platform for developing, shipping, and running applications, enabling the user to separate applications from infrastructures with the help of containers to deliver software quickly.
So, how do these containers communicate with each other in various situations?
Well, that comes through Docker Networking.
Before I deep dive into Docker Networking let me show you the workflow of Docker.
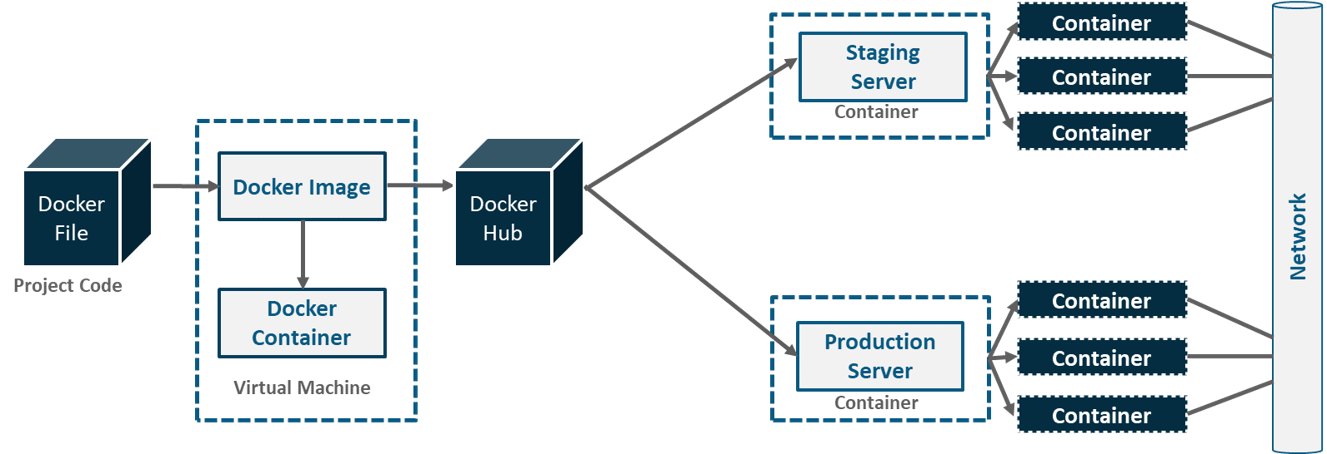
As you can see in the above diagram. A developer writes a code that stipulates application requirements or the dependencies in an easy to write Docker File and this Docker File produces Docker Images. So, whatever dependencies are required for a particular application are present in this image.
Now, Docker Containers are nothing but the runtime instance of Docker Image. These images are uploaded onto the Docker Hub(Git repository for Docker Images) which contains public/private repositories.
So, from public repositories, you can pull your image as well and you can upload your own images onto the Docker Hub. Then, from Docker Hub, various teams such as Quality Assurance or Production teams will pull that image and prepare their own containers. These individual containers, communicate with each other through a network to perform the required actions, and this is nothing but Docker Networking.
So, you can define Docker Networking as a communication passage through which all the isolated containers communicate with each other in various situations to perform the required actions.
Explore more about Docker Networking from this Online Docker Course.
What do you think are the goals of Docker Networking?
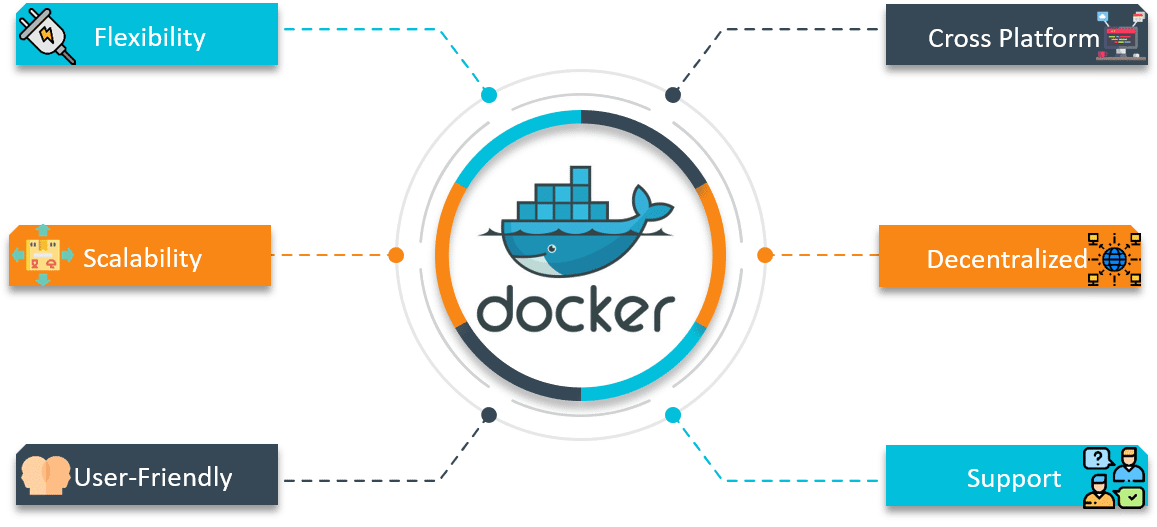
Flexibility – Docker provides flexibility by enabling any number of applications on various platforms to communicate with each other.
Cross-Platform – Docker can be easily used in cross-platform which works across various servers with the help of Docker Swarm Clusters.
Scalability – Docker is a fully distributed network, which enables applications to grow and scale individually while ensuring performance.
Decentralized – Docker uses a decentralized network, which enables the capability to have the applications spread and highly available. In the event that a container or a host is suddenly missing from your pool of resource, you can either bring up an additional resource or pass over to services that are still available.
User – Friendly – Docker makes it easy to automate the deployment of services, making them easy to use in day-to-day life.
Support – Docker offers out-of-the-box supports. So, the ability to use Docker Enterprise Edition and get all of the functionality very easy and straightforward, makes Docker platform to be very easy to be used.
To enable the above goals, you need something known as the Container Network Model.
Before I tell you what exactly is a Container Network Model, let me brief you about Libnetwork that is needed before you understand CNM.
Libnetwork is an open source Docker library which implements all of the key concepts that make up the CNM.
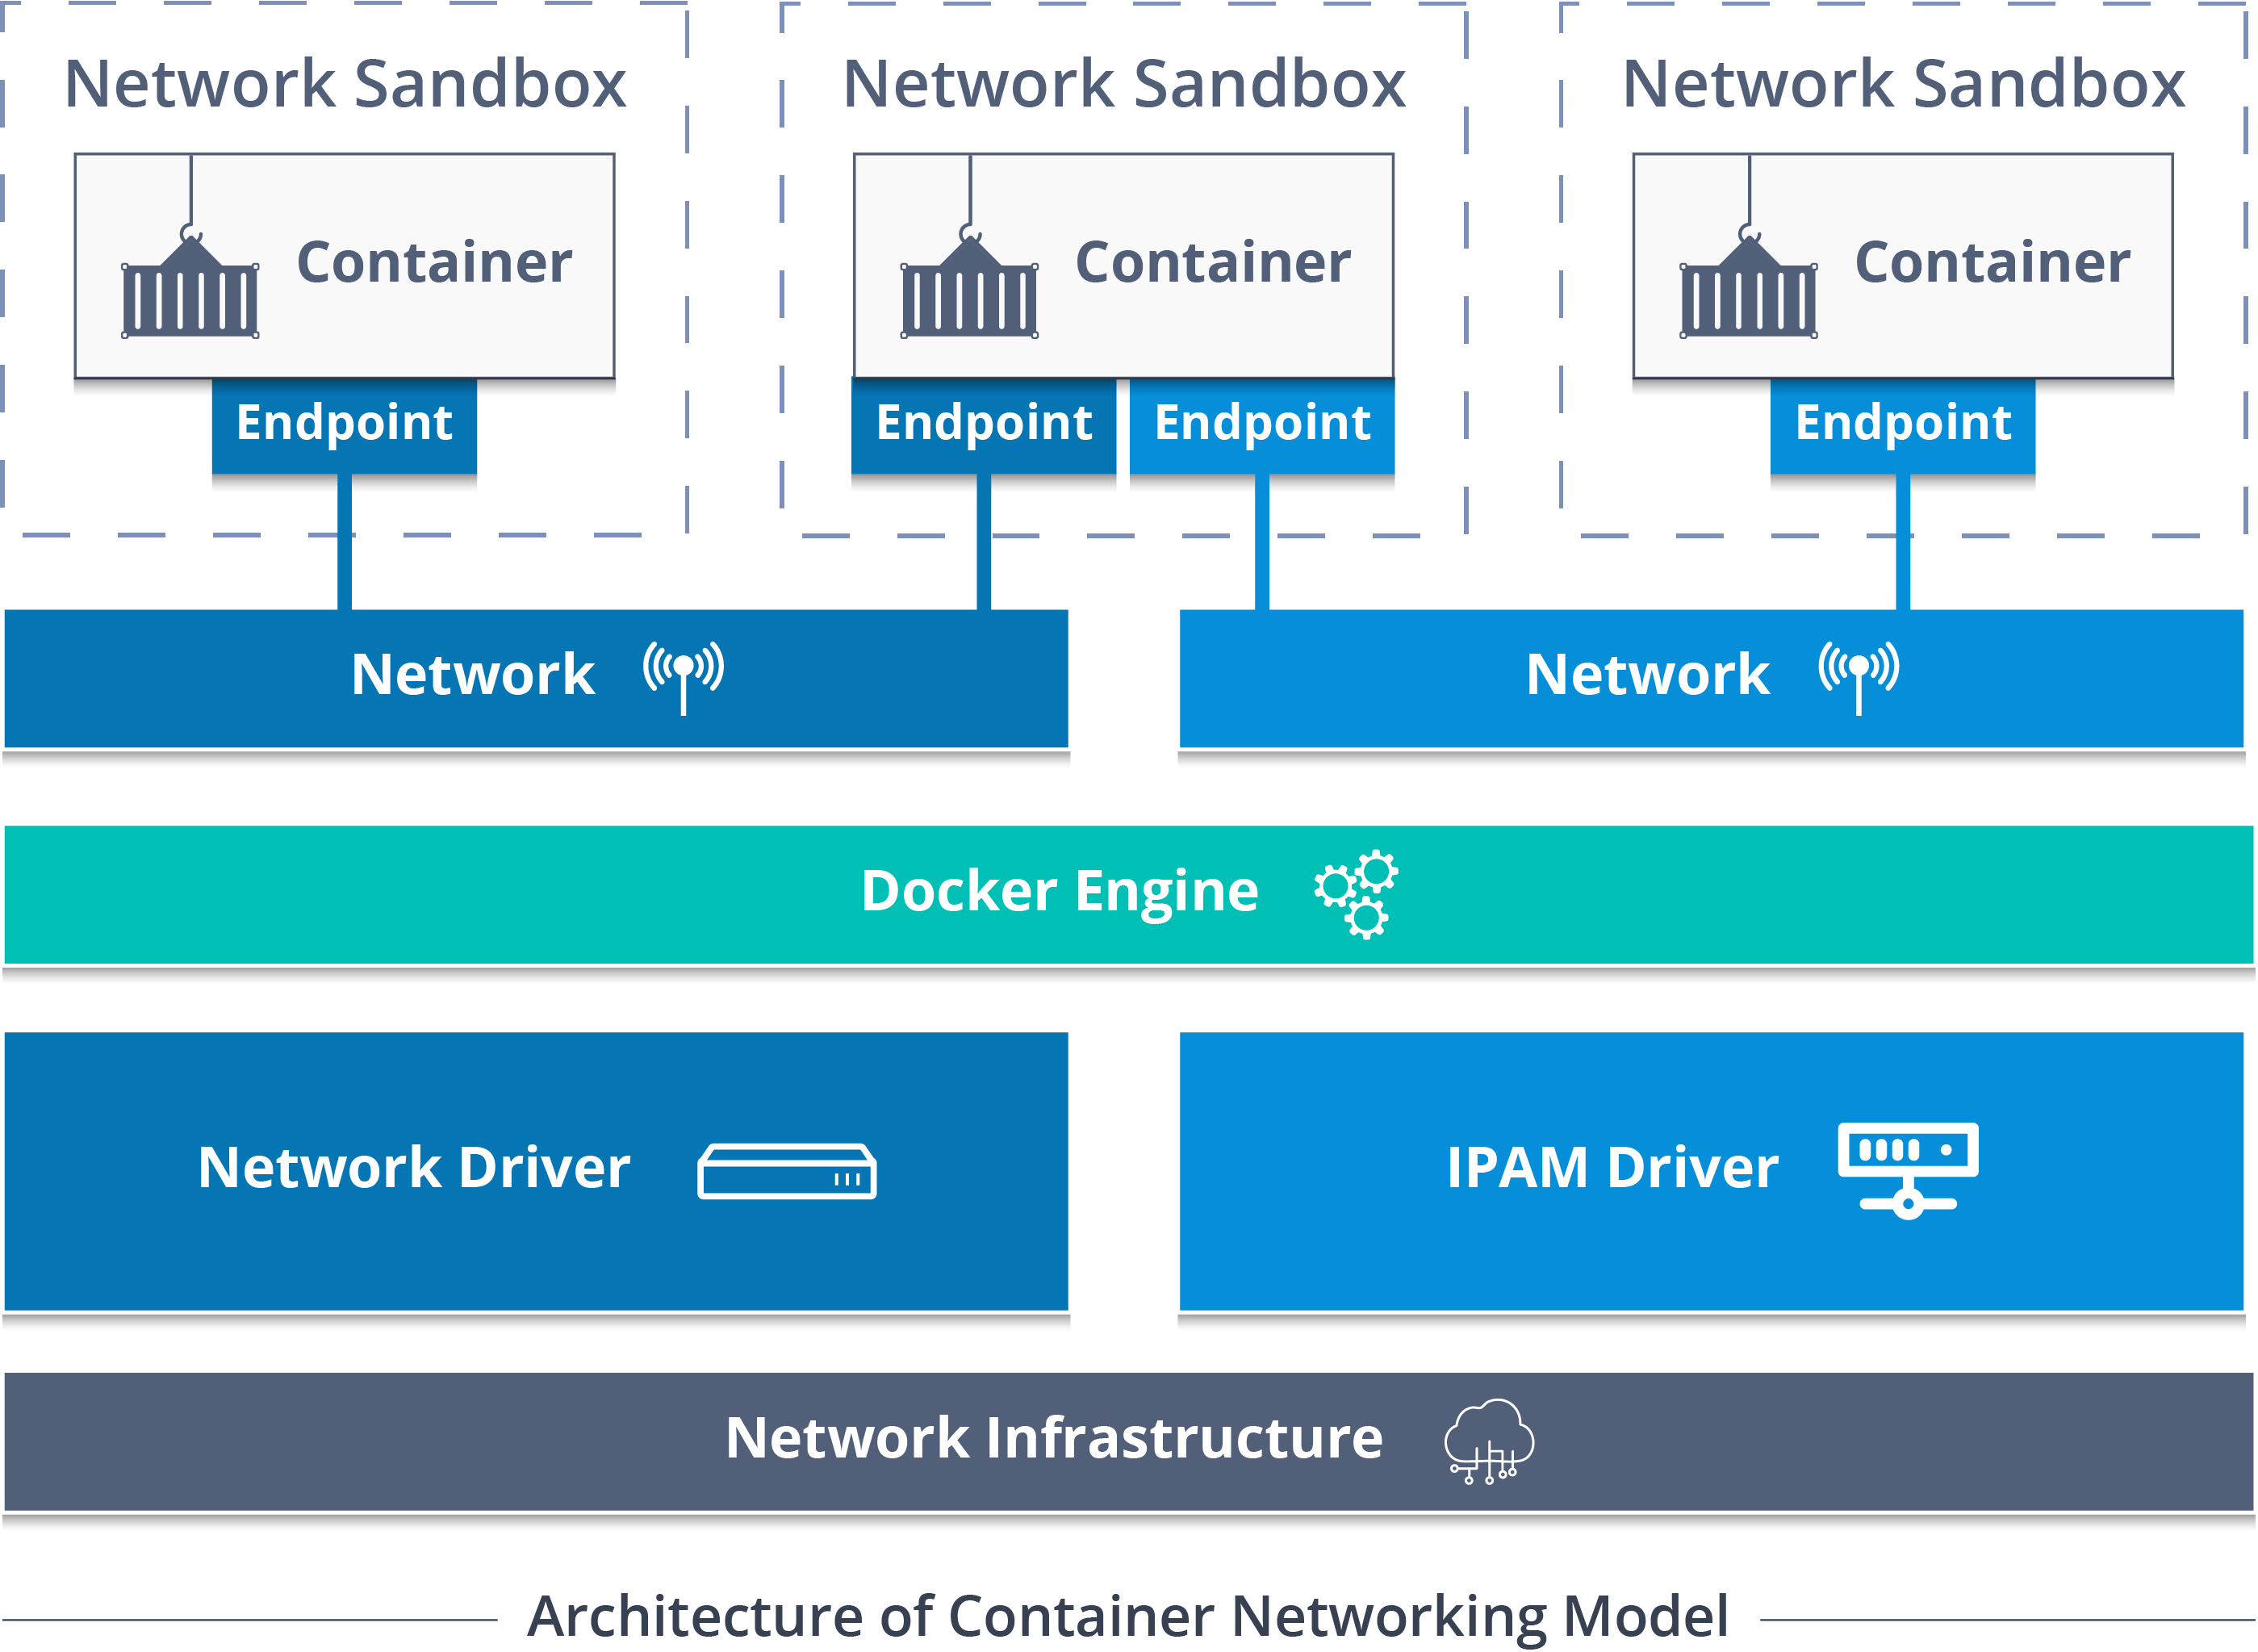
So, Container Network Model (CNM) standardizes the steps required to provide networking for containers using multiple network drivers. CNM requires a distributed key-value store like console to store the network configuration.
The CNM has interfaces for IPAM plugins and network plugins.
The IPAM plugin APIs are used to create/delete address pools and allocate/deallocate container IP addresses, whereas the network plugin APIs are used to create/delete networks and add/remove containers from networks.
A CNM has mainly built on 5 objects: Network Controller, Driver, Network, Endpoint, and Sandbox.
Network Controller: Provides the entry-point into Libnetwork that exposes simple APIs for Docker Engine to allocate and manage networks. Since Libnetwork supports multiple inbuilt and remote drivers, Network Controller enables users to attach a particular driver to a given network.
Driver: Owns the network and is responsible for managing the network by having multiple drivers participating to satisfy various use-cases and deployment scenarios.
Network: Provides connectivity between a group of endpoints that belong to the same network and isolate from the rest. So, whenever a network is created or updated, the corresponding Driver will be notified of the event.
Endpoint: Provides the connectivity for services exposed by a container in a network with other services provided by other containers in the network. An endpoint represents a service and not necessarily a particular container, Endpoint has a global scope within a cluster as well.
Sandbox: Created when users request to create an endpoint on a network. A Sandbox can have multiple endpoints attached to different networks representing container’s network configuration such as IP-address, MAC-address, routes, DNS.
So, those were the 5 main objects of CNM.
Now, let me tell you the various network drivers involved in Docker networking.
There are mainly 5 network drivers: Bridge, Host, None, Overlay, Macvlan
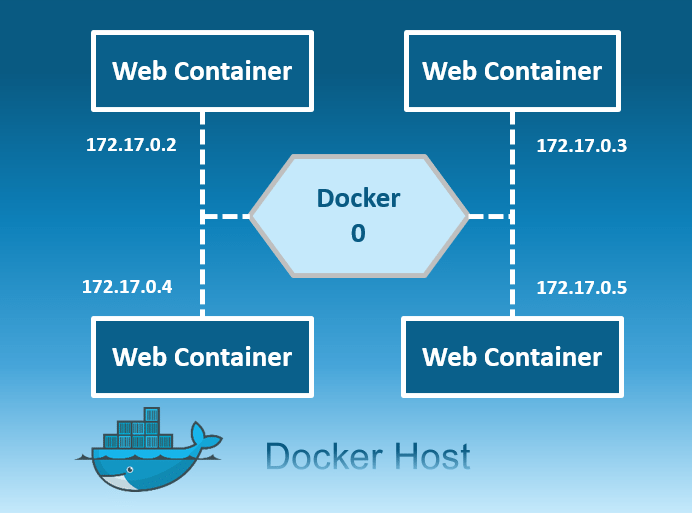
Bridge: The bridge network is a private default internal network created by docker on the host. So, all containers get an internal IP address and these containers can access each other, using this internal IP. The Bridge networks are usually used when your applications run in standalone containers that need to communicate.
Host: This driver removes the network isolation between the docker host and the docker containers to use the host’s networking directly. So with this, you will not be able to run multiple web containers on the same host, on the same port as the port is now common to all containers in the host network.

None: In this kind of network, containers are not attached to any network and do not have any access to the external network or other containers. So, this network is used when you want to completely disable the networking stack on a container and, only create a loopback device.
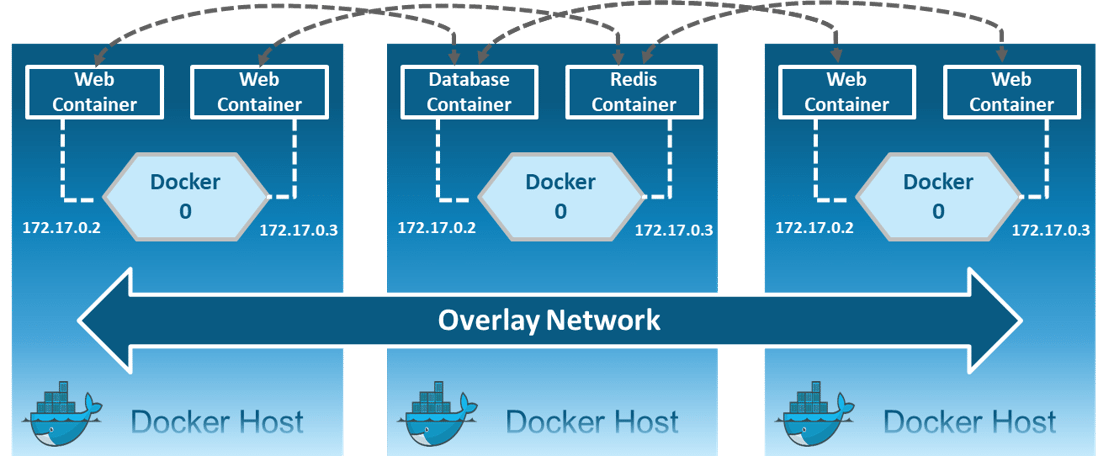
Overlay: Creates an internal private network that spans across all the nodes participating in the swarm cluster. So, Overlay networks facilitate communication between a swarm service and a standalone container, or between two standalone containers on different Docker Daemons.
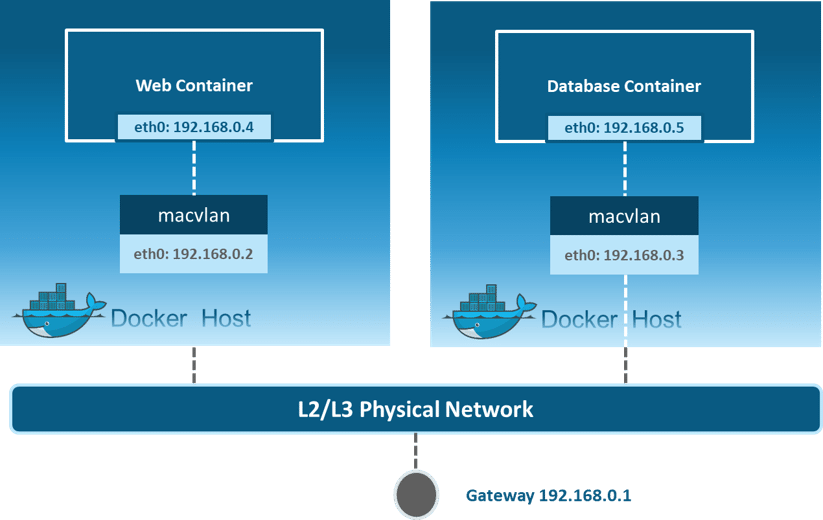
Macvlan: Allows you to assign a MAC address to a container, making it appear as a physical device on your network. Then, the Docker daemon routes traffic to containers by their MAC addresses. Macvlan driver is the best choice when you are expected to be directly connected to the physical network, rather than routed through the Docker host’s network stack.
Alright, so that was all the theory required to understand Docker Networking. Now, let me move on and show you practically how the networks are created and containers communicate with each other.
So, with an assumption that all of you have installed Docker on your systems, I have a scenario to showcase.
Suppose you want to store courses name and courses ID, for which you will need a web application. Basically, you need one container for web application and you need one more container as MySQL for the backend, that MySQL container should be linked to the web application container.
How about I execute the above-stated example practically.
Let’s get started!
Step 1: Initialize Docker Swarm on the machine.
docker swarm init --advertise-addr 192.168.56.101
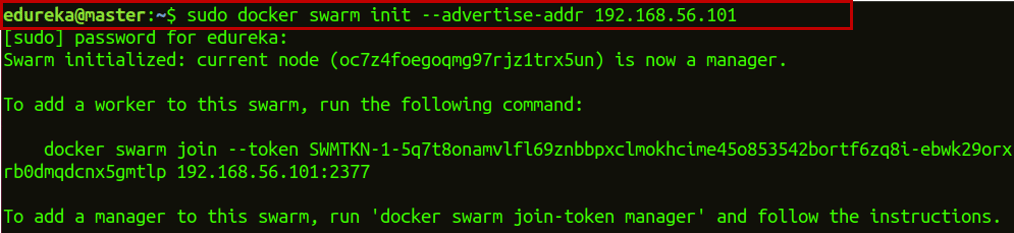
The –advertise-addr flag configures the manager node to publish its address as 192.168.56.101. The other nodes in the swarm must be able to access the manager at the IP address.
Step 2: Now, if you want to join this manager node to the worker node, copy the link that you get when you initialize swarm on the worker node. Step 3: Create an overlay network.
docker network create -d overlay myoverlaynetwork
![]()
Where myoverlay is the network name and -d enables Docker Daemon to run in the background.
Step 4.1: Create a service webapp1 and use the network you have created to deploy this service over the swarm cluster.
docker service create --name webapp1 -d --network myoverlaynetwork -p 8001:80 hshar/webapp
![]()
Where -p is for port forwarding, hshar is the account name on Docker Hub, and webapp is the name of the web application already present on Docker Hub.
Step 4.2: Now, check if the service is created or not.
docker service ls

Step 5.1: Now, create a service MySQL and use the network you have created to deploy the service over the swarm cluster.
docker service create --name mysql -d --network myoverlaynetwork -p 3306:3306 hshar/mysql:5.5
![]()
Step 5.2: Now, check if the service is created or not.
docker service ls

Step 6.1: After that, check which container is running on your master node and go into the hshar/webapp container.
docker ps

Step 6.2: So, you can see that only the webapp service is on the manager node. So, get into the webapp container.
docker exec -it container_id bash
nano var/www/html/index.php
![]()
The docker ps command will list both your containers with their respective container id. The second command will enable that container in an interactive mode.
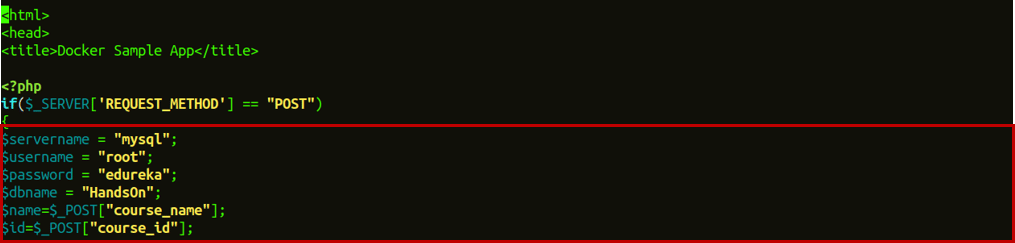
Step 7: Now, change the $servername from localhost to mysql and $password from “”” to “edureka”, and also change all fill in the database details required and save your index.php file by using the keyboard shortcut Ctrl+x and after that y to save, and press enter.
Step 8: Now, go into the mysql container which is running on another node.
docker exec -it container_id bash
![]()
Step 9: Once you go inside the mysql container, enter the below commands to use the database in MySQL.
Step 9.1: Get an access to use the mysql container.
mysql -u root -pedureka
Where -u represents the user and -p is the password of your machine.
Step 9.2: Create a database in mysql which will be used to get data from webapp1.
CREATE DATABASE HandsOn;
![]()
Step 9.3: Use the created database.
USE HandsOn;
![]()
Step 9.4: Create a table in this database which will be used to get data from webapp1.
CREATE TABLE course_details (course_name VARCHAR(10), course_id VARCHAR(11));
![]()
Step 9.5: Now, exit MySQL and container as well using the command exit.
Step 10: Go to your browser and enter the address as localhost:8001/index.php. This will open up your web application. Now, enter the details of courses and click on Submit Query.

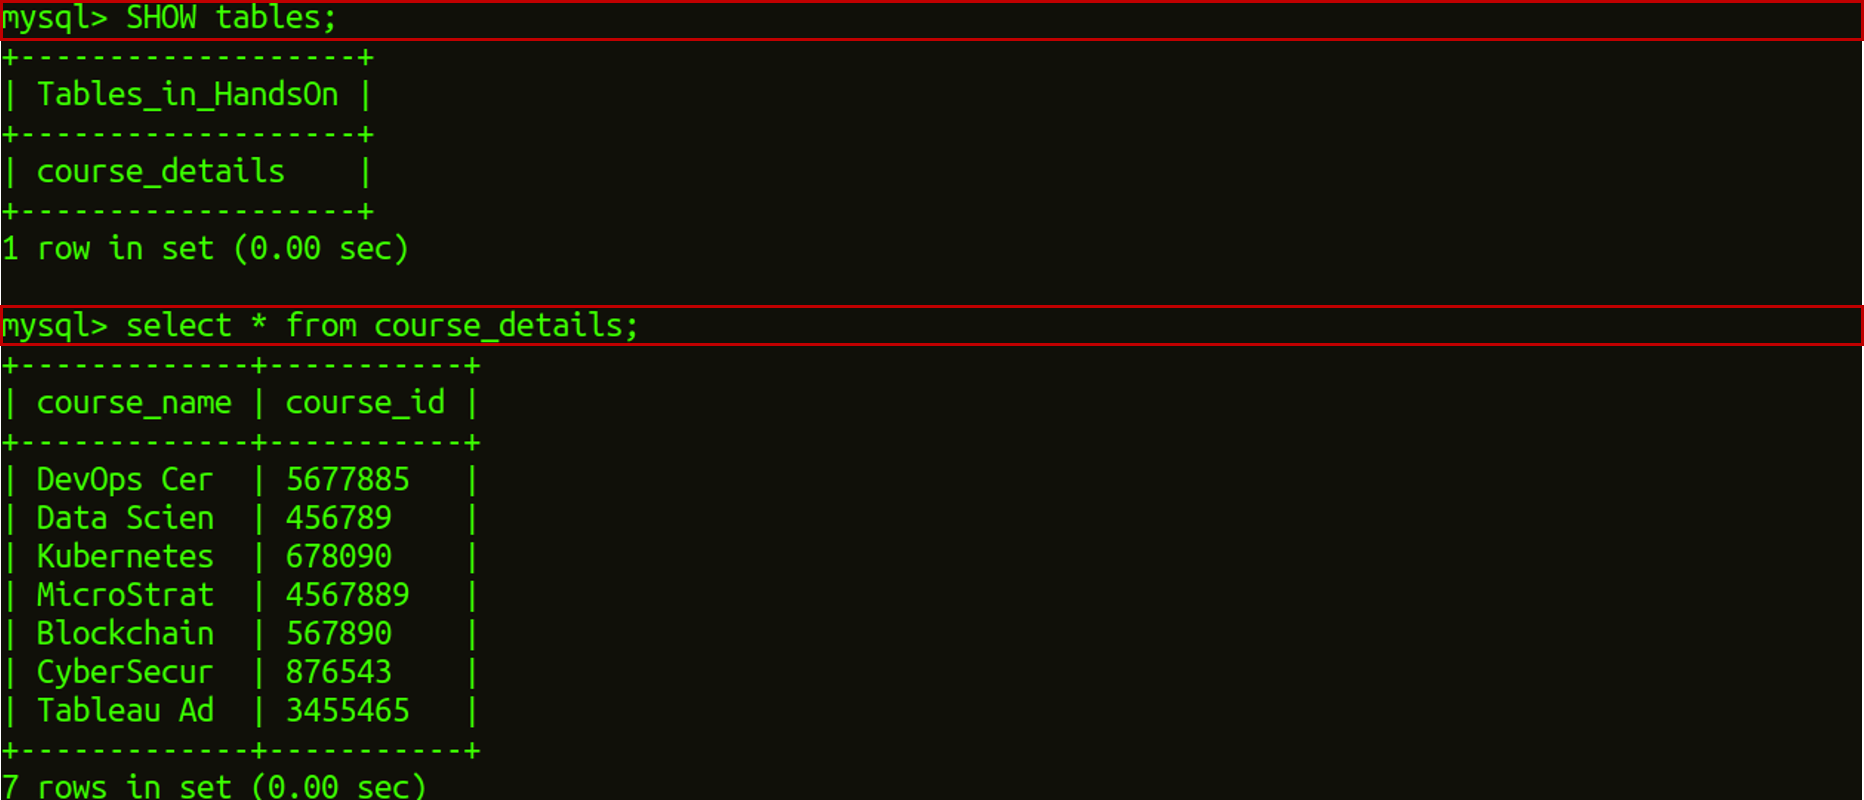
Step 11: Once you click on Submit Query, go to the node in which your MySQL service is running and then go inside the container.
docker exec -it container_id bash
mysql -u root -pedureka
USE HandsOn;
SHOW tables;
select * from course_details;
This will show you the output of all the courses, of which you have filled in the details.
Here, I end my Docker Networking blog. I hope you have enjoyed this post. You can check other blogs in the series too, which deal with the basics of Docker.
If you found this Docker Container blog relevant, check out the DevOps training by Edureka, a trusted online learning company with a network of more than 450,000 satisfied learners spread across the globe. The Edureka DevOps Certification Training course helps learners gain expertise in various DevOps processes and tools such as Puppet, Jenkins, Docker, Nagios, Ansible, and GIT for automating multiple steps in SDLC.
Got a question for me? Please mention it in the comments section and I will get back to you.


 Thank you for registering Join Edureka Meetup community for 100+ Free Webinars each month JOIN MEETUP GROUP