
Advanced DevOps Certification Training with G ...
- 24k Enrolled Learners
- Weekend
- Live Class
(7990)


 Copy Link!
Well, I am hoping you have read my previous blogs on Docker where I have covered the basics of Docker. Here, in this Docker Container blog I will be discussing about what are Docker Containers and how it works. Mostly, we will be focusing on Hands-on and use-cases of Docker.
I have listed down the topics for this Docker Container blog:
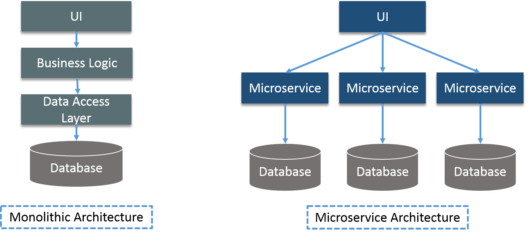
I still remember it correctly, I was working on a project. In that project we were following the microservice architecture. For those of you who don’t know what is microservice, don’t worry I will give you an introduction to it.
The idea behind microservices is that certain types of applications become easier to build and maintain when they are broken down into smaller, composable pieces which work together. Each component is developed separately, and the application is then simply the sum of its constituent components.
Consider the example below:
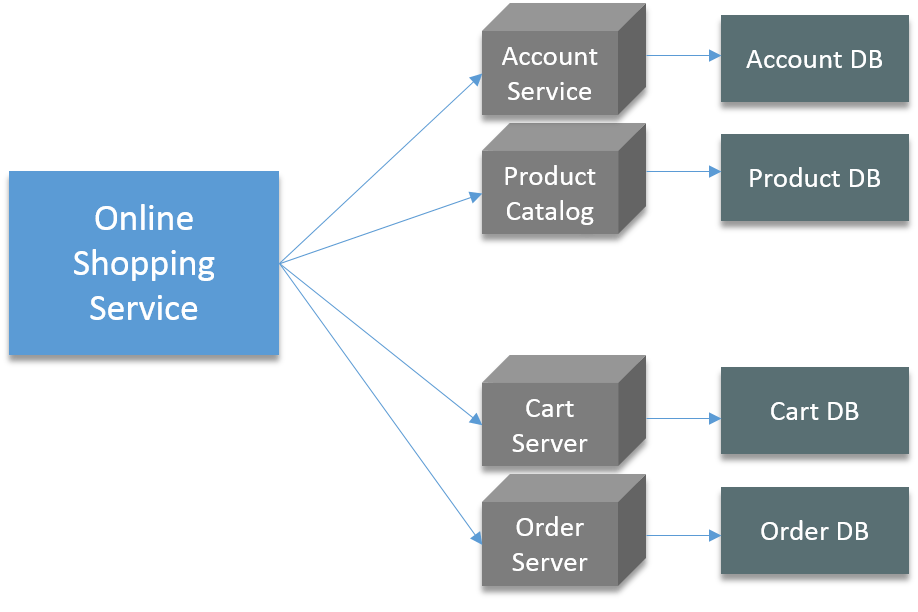
In the above diagram there is an online shop with separate microservices for user-account, product catalog, order processing and shopping carts.
Well, this architecture has a lot of benefits:
There are many other benefits as well, I won’t go into much detail about microservices in this post. But, soon I will be coming up with a couple of blogs on microservices as well.
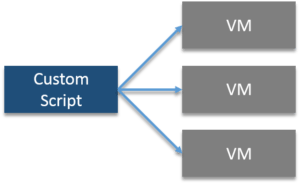
In this architecture, we were using CentOS Virtual Machines. Those Virtual Machines were configured by writing long scripts. Well, configuring those VMs was not the only problem.
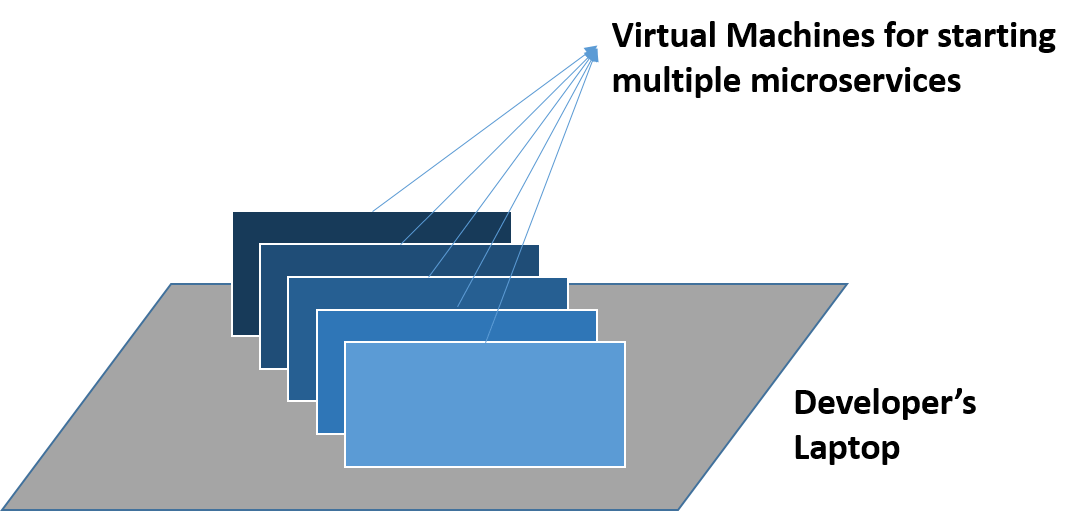
Developing such applications requires starting of several of microservices in one machine. So if you are starting five of those services you require five VMs on that machine. Consider the diagram below:
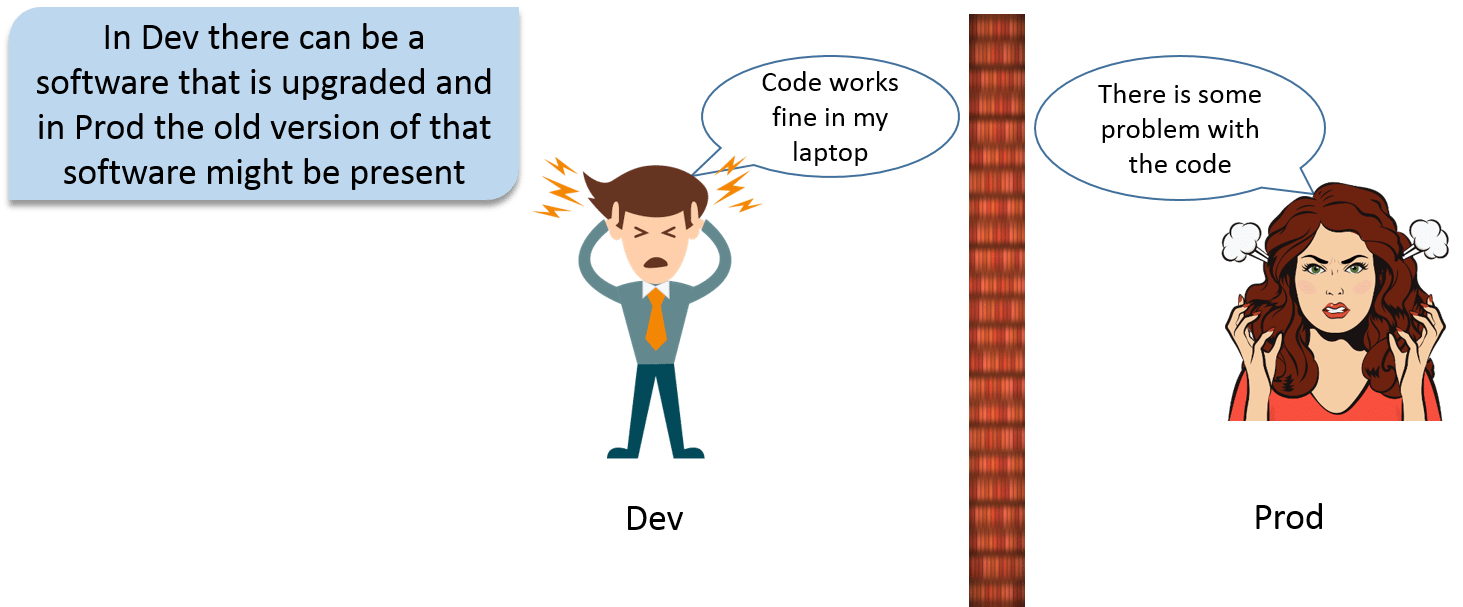
The other problem is pretty common, I know a lot of you can relate to it. The application works in a developer’s laptop but not in testing or production. This can be because of not keeping a consistent computing environment. Consider the diagram below:
There were many other problems apart from this as well, but I feel, these problems are enough for me to explain you the need of Docker Containers.
Learn How Docker Containers Are Better Than Virtual Machines
So, imagine if I am giving 8 GB of RAM to all my VMs, and I have 5 microservices running on different Virtual Machines. In that case, these VMs will require 40 GB of RAM. Well, now I require the configurations of my host machine to be very high, almost 44 GB of RAM should be there in my host machine. Obviously, this is not a sustainable solution for such an architecture because, I am wasting a lot of resources here.
Fine, I have a lot of resources to waste, but still I have a problem of inconsistency in my software delivery life-cycle (SDLC). I have to configure these VMs in test as well as in prod environment. Somewhere in that process, some software was not updated in the test server, and the Dev team is using the updated version of the software. This leads to conflicts.
What if I am using 100 VMs, then configuring each VM will take a lot of time, and at the same time it is prone to error as well.
Now, let us understand what is Docker Container and how it works, and how it solved my problem.
Docker is a tool designed to make it easier to create, deploy and run applications by using containers.
You can create Docker Containers, these containers will contain all the binaries and libraries required for your application or microservice in my case. So your application is present in a container, or you have containerized your application. Now, that same container can be used in the Test and Prod environment.
 Docker Containers are a lightweight solution to Virtual Machines, and it uses the host OS. The best part, you don’t have to pre-allocate any RAM to the Docker Container, it will take it as and when required. So, with Docker Container I don’t have to worry about wastage of resources.
Let’s understand now, how a Docker Container works.
The below diagram is basically, a way to use Docker. And I am assuming that, you have an idea about Docker Image and Dockerfile.
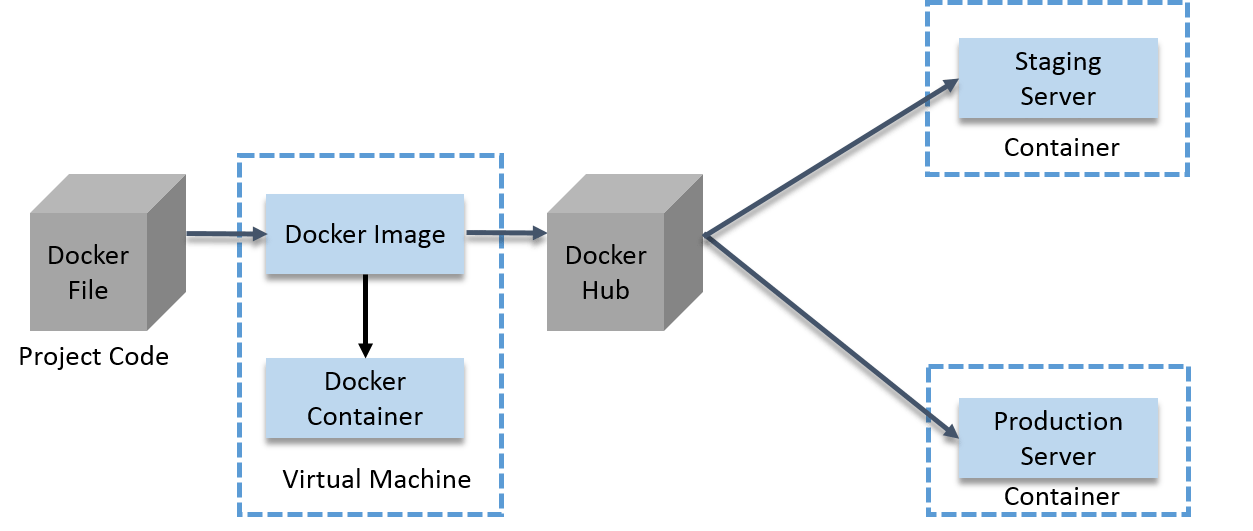
Guys, I know the diagram looks a bit complex, but trust me it ain’t that complex. Below is the explanation of the diagram, even after that you feel it is tough to understand, you can comment your doubt, I will address those questions ASAP.
This not only prevents the wastage of resources, but also makes sure that the computing environment that is there in a Developer’s laptop is replicated in other teams as well. I feel now, I don’t have to tell you why we need Docker.
This was one way to use it, I am guessing you guys must be curious to know how I used Docker to solve my problem of microservices. Let me give you an overview on the same.
Explore more about Docker Container from this Online Docker Certification Course.
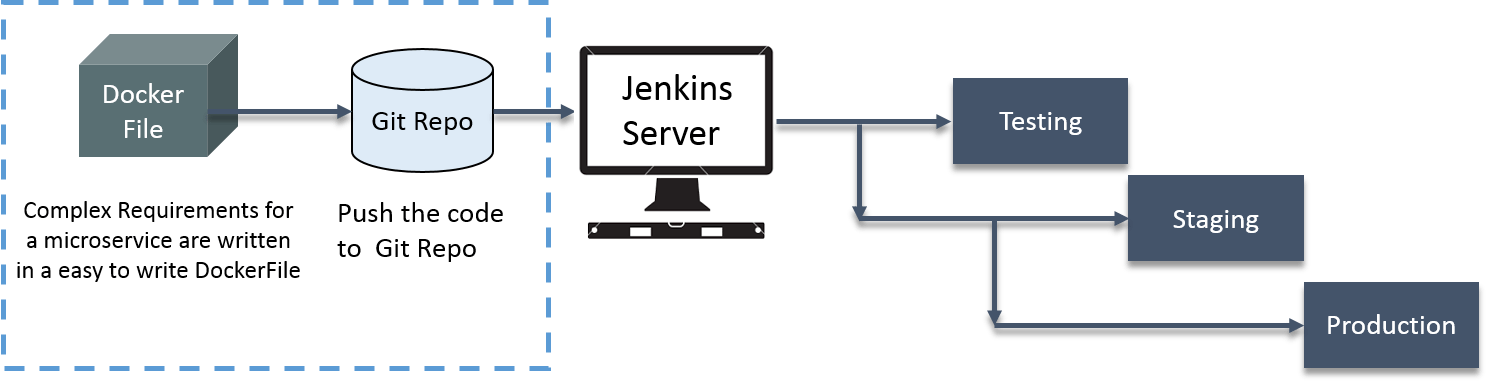
Below is the explanation of the diagram:
It will be actually fair to say that, Docker made my life easy.
Well, that was the story of my company, let’s look at the case-study of Indiana University. How Docker solved their problems.
Indiana University is a multi-campus public university system in the state of Indiana, United States.
They were using custom scripts to deploy the applications in the VM.
Their environment was optimized for their legacy Java-based applications. Their growing environment involves new products that aren’t solely java based. In order to give their students the best experience possible, the University needed to begin modernizing the applications.
The University wanted to improve the way they architect applications, by moving to a microservices based architecture for their applications.
Security was needed for student’s data such as SSNs and student health data.
All the problems were addressed by Docker Data Center (DDC), consider the diagram below:
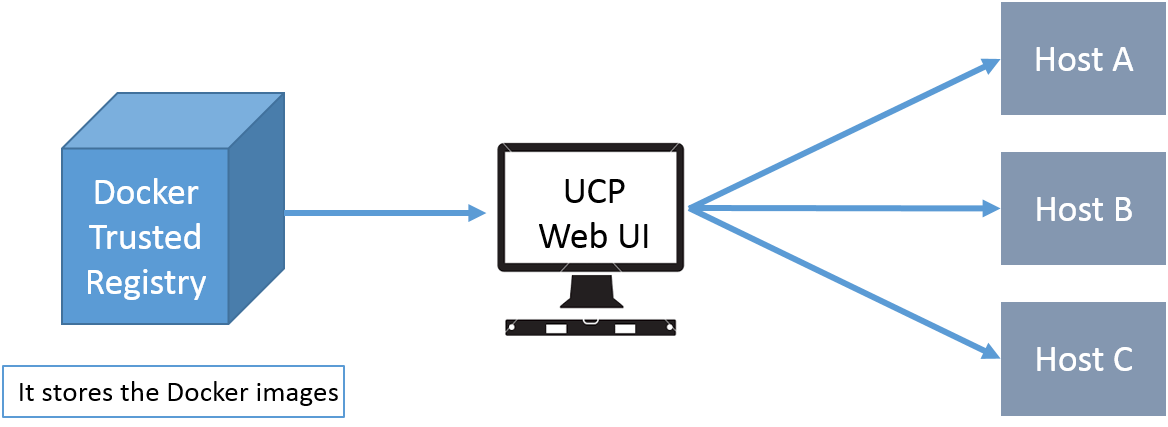
Docker Trusted Registry – It stores the Docker Images.
UCP (Universal Control Plane) Web UI – Helps in managing whole cluster from a single place. Services are deployed using UCP web UI, using Docker images that are stored in DTR (Docker Trusted Registry).
IT ops teams leverages Universal Control Plane to provision Docker installed software on hosts, and then deploy their applications without having to do a bunch of manual steps to set up all their infrastructure.
UCP and DTR integrates with their LDAP server to quickly provision access to their applications.
I am hoping you guys have read the previous blogs to learn the basics of Docker.
Now, I will explain you how we can use Docker Compose for multi container application.
I am assuming you have installed Docker. I will be using Docker Compose in this post, below I have given a small introduction to Docker Compose.
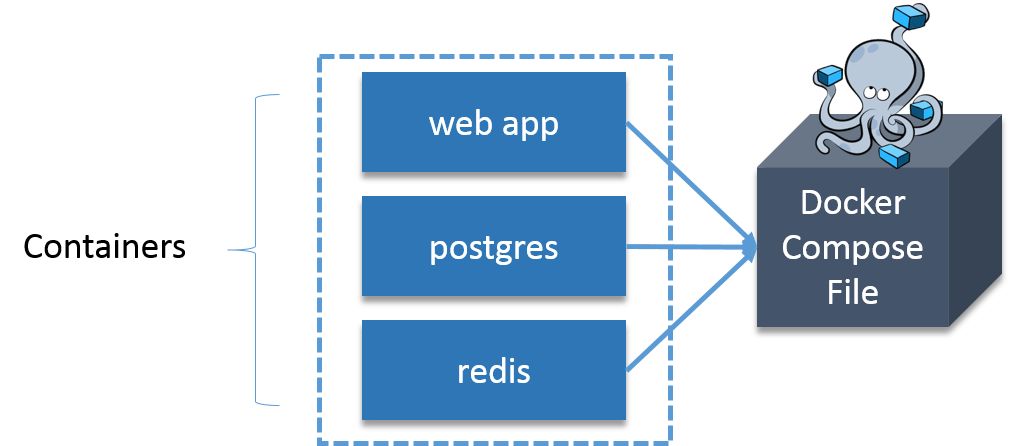
Docker Compose: It is a tool for defining and running multi-container Docker applications. With Docker Compose, you can use a Compose file to configure your application’s services. Then, using a single command, you can create and start all the services from your configuration.
Suppose you have multiple applications in various containers and all those containers are linked together. So, you don’t want to execute each of those containers one by one. But, you want to run those containers with a single command. That’s where Docker Compose comes in to the picture. With it you can run multiple applications in various containers with a single command. i.e. docker-compose up.
Example: Imagine you have different containers, one running a web app, another running a postgres and another running redis, in a YAML file. That is called docker compose file, from there you can run these containers with a single command.
 Let us take one more example:
Suppose you want to publish a blog, for that you will use CMS (Content Management System), and wordpress is the most widely used CMS. Basically, you need one container for WordPress and you need one more container as MySQL for back end, that MySQL container should be linked to the wordpress container. We also need one more container for Php Myadmin that will be linked to MySQL database, basically, it is used to access MySQL database.
How about I execute the above stated example practically.
Let’s get started!
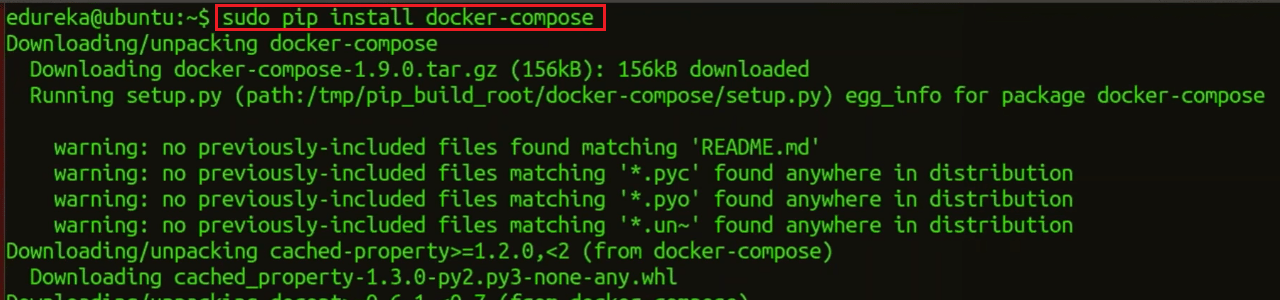
Install Python Pip first:
sudo apt-get install python-pip

Now, you can install Docker Compose:
sudo pip install docker-compose
Create a wordpress directory:
mkdir wordpress
Enter this wordpress directory:
cd wordpress/

In this directory create a Docker Compose YAML file, then edit it using gedit:
sudo gedit docker-compose.yml
![]()
Paste the below lines of code in that yaml file:
wordpress:

image: wordpress

links:

- wordpress_db:mysql

ports:

- 8080:80

wordpress_db:

image: mariadb

environment:

MYSQL_ROOT_PASSWORD: edureka

phpmyadmin:

image: corbinu/docker-phpmyadmin

links:

- wordpress_db:mysql

ports:

- 8181:80

environment:

MYSQL_USERNAME: root

MYSQL_ROOT_PASSWORD: edureka
I know you want me to explain this code, so what I will do, I will take small sections of this code and explain you what’s happening.
wordpress_db:
...
 environment:
    MYSQL_ROOT_PASSWORD: edureka
...
This will set an environment variable inside the wordpress_db container called MYSQL_ROOT_PASSWORD with your desired password. The MariaDB Docker image is configured to check for this environment variable when it starts up and will take care of setting up the DB with a root account with the password defined as MYSQL_ROOT_PASSWORD.
wordpress:
...
 ports:
    - 8080:80
...
The first port number is the port number on the host, and the second port number is the port inside the container. So, this configuration forwards requests on port 8080 of the host to the default web server port 80 inside the container.
phpmyadmin:
  image: corbinu/docker-phpmyadmin
  links:
    - wordpress_db:mysql
  ports:
    - 8181:80
  environment:
    MYSQL_USERNAME: root
    MYSQL_ROOT_PASSWORD: edureka
This grabs docker-phpmyadmin by community member corbinu, links it to our wordpress_db container with the name mysql (meaning from inside the phpmyadmin container references to the hostname mysql will be forwarded to our wordpress_db container), exposes its port 80 on port 8181 of the host system, and finally sets a couple of environment variables with our MariaDB username and password. This image does not automatically grab the MYSQL_ROOT_PASSWORD environment variable from the wordpress_dbcontainer’s environment, the way the wordpress image does. We actually have to copy the MYSQL_ROOT_PASSWORD: edureka line from the wordpress_db container, and set the username to root.
Now start the application group:
docker-compose up -d

That’s all you have to do. You can add as many containers as you like this way, and link them all up in any way you please.
Now, in the browser go to port 8080, using your public IP or host name, as shown below:
localhost:8080
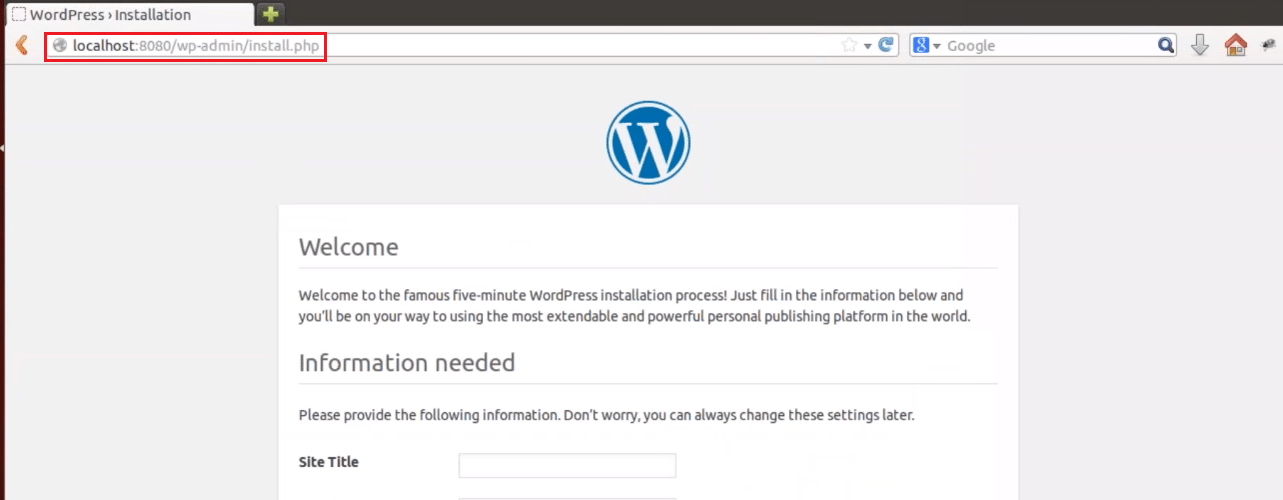
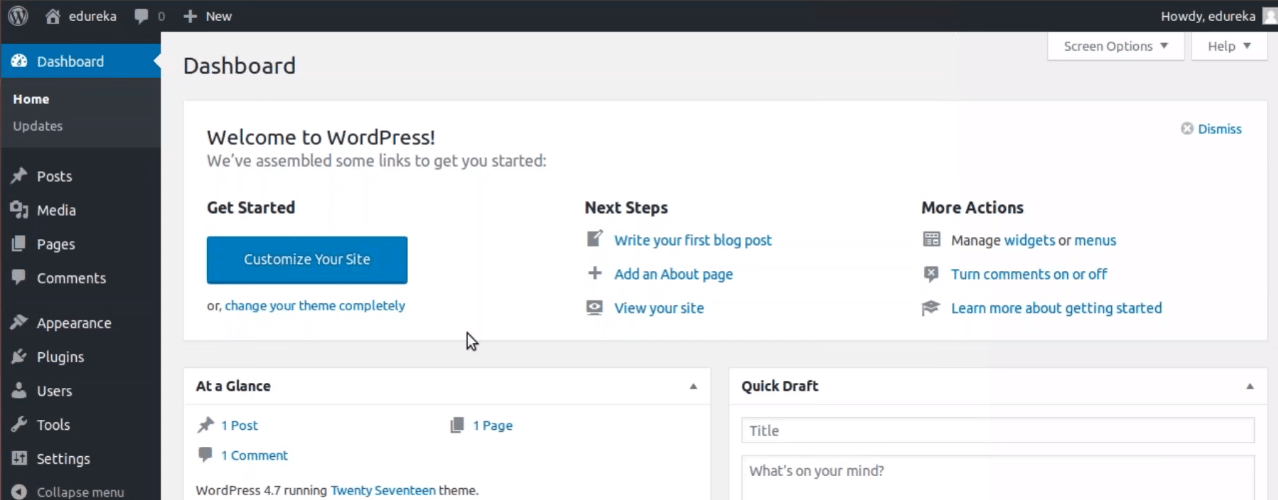
Fill this form and click on install WordPress.
Once it is finished, visit your server’s IP address again (this time using port 8181, e.g. localhost:8181). You’ll be greeted by the phpMyAdmin login screen:
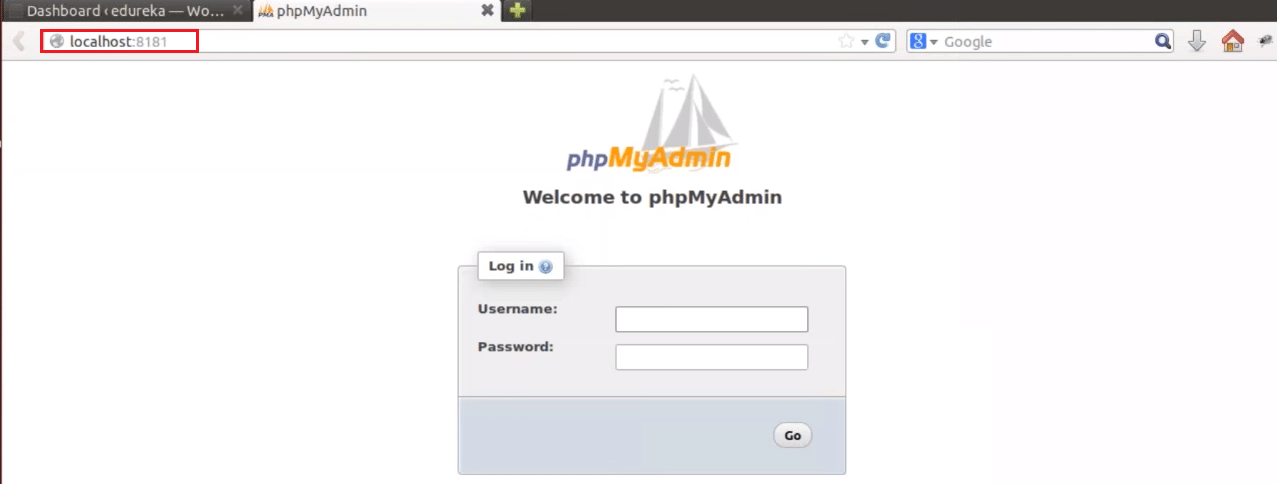
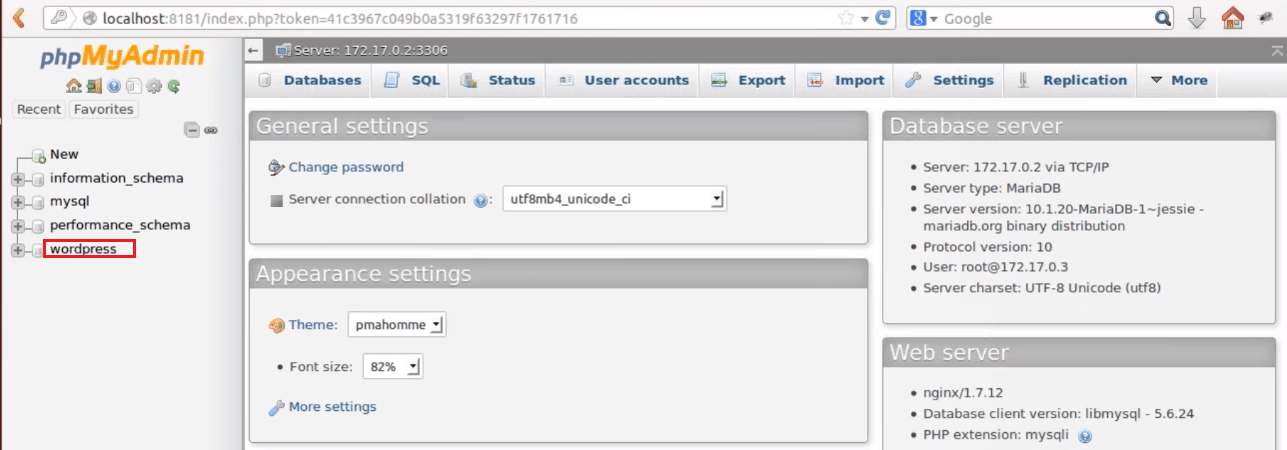
Go ahead and login using username root and password you set in the YAML file, and you’ll be able to browse your database. You’ll notice that the server includes a wordpress database, which contains all the data from your WordPress install.
Here, I end my Docker Container blog. I hope you have enjoyed this post. You can check other blogs in the series too, which deal with the basics of Docker.
If you found this Docker Container blog relevant, check out the DevOps Training by Edureka, a trusted online learning company with a network of more than 250,000 satisfied learners spread across the globe. The Edureka DevOps Certification Training course helps learners gain expertise in various DevOps processes and tools such as Puppet, Jenkins, Docker, Nagios, Ansible, Chef, Saltstack and GIT for automating multiple steps in SDLC.
Got a question for me? Please mention it in the comments section and I will get back to you.


 Thank you for registering Join Edureka Meetup community for 100+ Free Webinars each month JOIN MEETUP GROUP
ERROR: In file ‘./docker-compose.yml’, service ‘image’ must be a mapping not a string.