
Advanced DevOps Certification Training with G ...
- 23k Enrolled Learners
- Weekend
- Live Class
(7990)


 Copy Link!
In the previous blogs on Docker, you would have read about what are Docker images, Docker containers and what is the need for them. If you have not read about them, then I request you to read What Is Docker, before continuing with this blog on Docker Compose.
After exploring the possibilities that come with Docker, it is certainly very exciting to learn more. Isn’t it? Well at-least I was when I stumbled into a challenge.
Containerizing a single service application was easy for me. But when I had to containerize multiple services in separate containers, I ran into a roadblock. My requirement was to containerize and host a MEAN stack application.
Yup, you read it right. A full stack application. Initially, I thought it was not possible. But after I heard about Docker Compose, I knew all my problems would be solved.
Docker Compose can be used to create separate containers (and host them) for each of the stacks in a MEAN stack application. MEAN is the acronym for MongoDB Express Angular & NodeJs. The demo I will be showing in this blog is also on the same topic.
By using Docker Compose, we can host each of these technologies in separate containers on the same host and get them to communicate with each other. Each container will expose a port for communicating with other containers.
The communication and up-time of these containers will be maintained by Docker Compose.
So you may ask, how to setup this whole infrastructure? Well then, let me give you a more detailed explanation.
Explore more about Docker Compose from this Docker Course Online.
Similar to how we spin any single-application container by writing a dockerfile, we will have to write a separate dockerfile for building each of the single-container applications. Additionally, we will have to also write a Docker Compose File which will do the actual work. Docker Compose File will execute the different dockerfiles to create the different containers and let them interact with each other.
In our case, we have a full stack application which comprises of MongoDB, ExpressJS, Angular and NodeJS. MongoDB takes care of the back end database, NodeJS and ExpressJS are for server side rendering, and Angular is for front end.
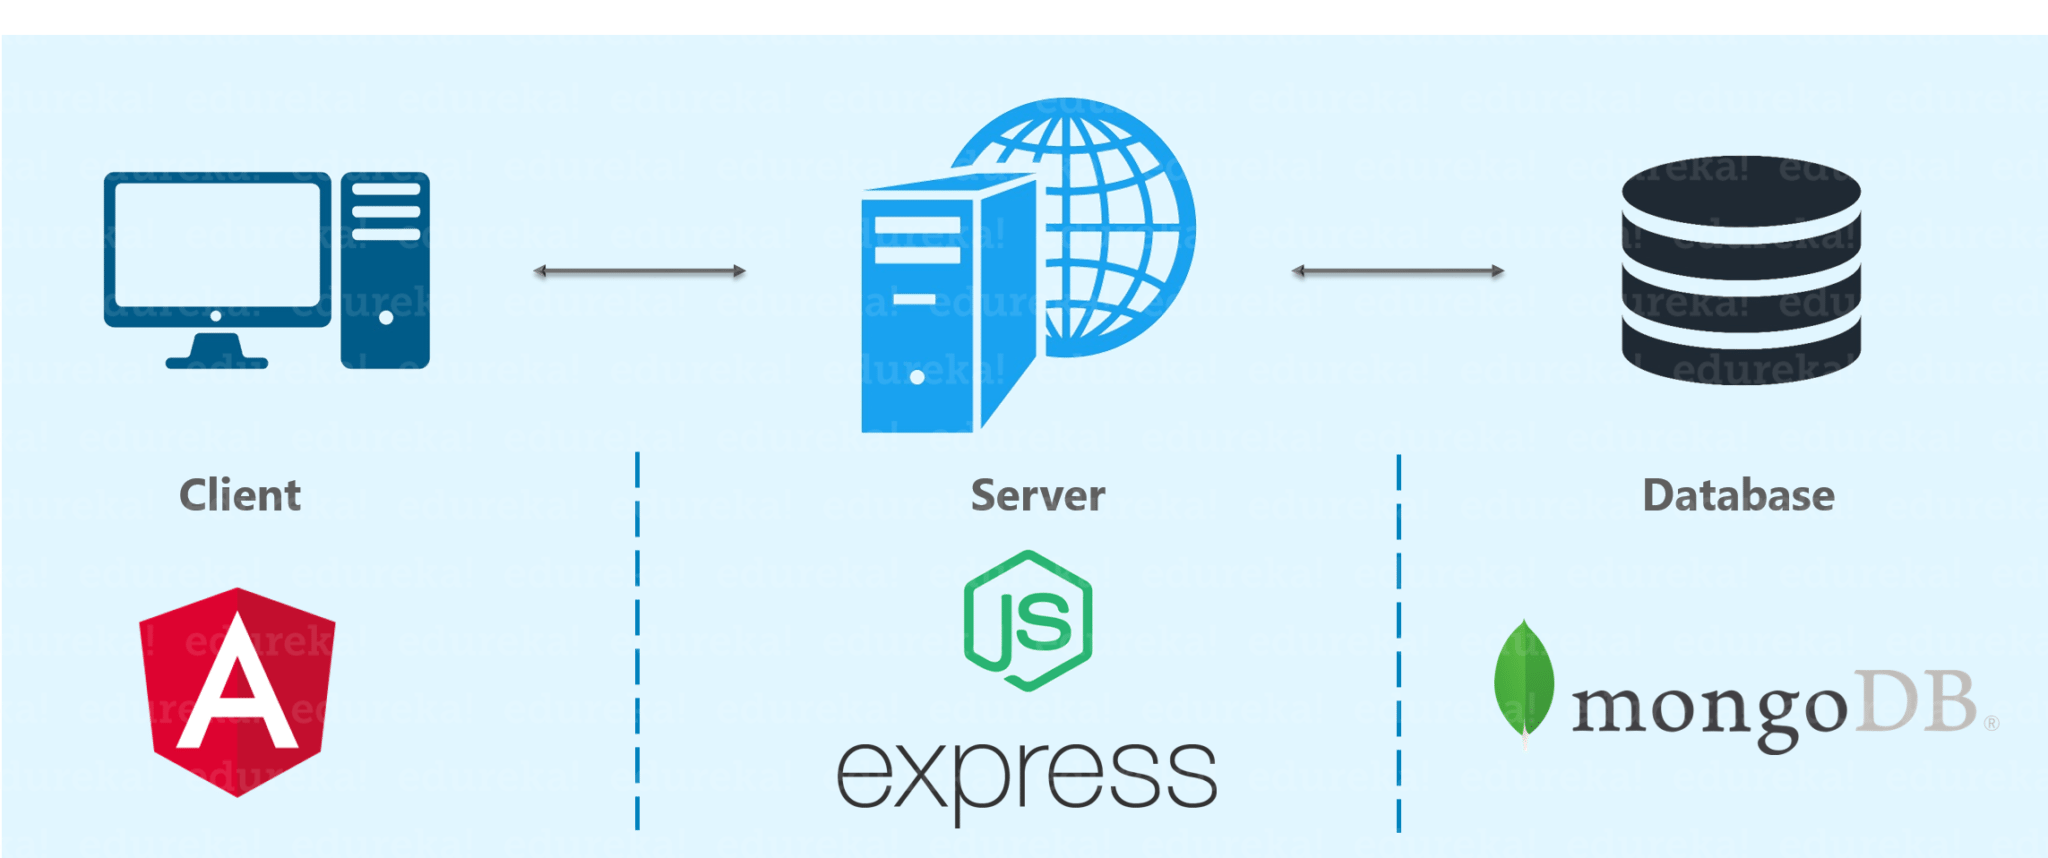
Since there are three components, we have to spin containers for each of the components. We have to spin the containers in the following way:
As the first step to dockerize the mean application, let’s write the dockerfile for building each of the components, starting from Angular’s container. This dockerfile will have to be present inside the project directory along with the ‘package.json’ file. The ‘package.json’ contains the details about which version of dependencies need to be used by ‘NPM’ for building the angular application.
FROM node:6
RUN mkdir -p /usr/src/app
WORKDIR /usr/src/app
COPY package.json /usr/src/app
RUN npm cache clean
RUN npm install
COPY . /usr/src/app
EXPOSE 4200
CMD ["npm","start"]
As always, our first command is to pull a base image, and we are pulling a base ‘node:6’ image.
The next two commands are about creating a new directory ‘/usr/src/app’ inside the Docker Container for storing Angular codes and making this the working directory inside the Container.
We are then copying the ‘package.json’ file from our project directory to inside the container.
We then run the ‘npm cache clean’ command which cleans the npm cache.
After that, we run the ‘npm install’ command which starts downloading the boiler plates required for hosting the Angular app. It starts downloading the boiler plates based on the versions of dependencies specified in ‘package.json’.
The next ‘RUN’ command run is to copy all the codes, folders present from the project directory to inside the container.
The above command asks the container to expose port number 4200 for communicating with back end server to send requests made by users accessing the front end client via the Web UI.
Finally the last command is, ‘RUN’ command to start ‘npm’. This starts executing the codes for building our Angular app.
The Angular app is now ready, but it will not be hosted properly because of its dependency on a back end server and a database. So let’s go further and write a dockerfile for containerizing the back end server.
Even this dockerfile will be present in a project directory. This directory will also contain the ‘package.json’ file for defining the dependencies of the Express server and other requirements of NodeJS. But most importantly, it contains the project code to support the back end server.
FROM node:6
RUN mkdir -p /usr/src/app
WORKDIR /usr/src/app
COPY package.json /usr/src/app
RUN npm cache clean
RUN npm install
COPY . /usr/src/app
EXPOSE 3000
CMD ["npm","start"]
As you can see, there are a lot of similarities between the two dockerfiles. We use the same ‘node:6’ as the base image layer, create a new directory inside the container, make it the working directory, and run ‘npm install’ command among others. But the only difference is the port number exposed for communication. In this case, port number 3000 is defined. This is where the server will be hosted and will look for requests from the client.
You might be wondering why I have not mentioned ‘dockerfile For Database’ in the heading. The reason is, we actually do not have any need for make customization. We can straight away pull a ‘MongoDB’ base image for storing our data and just expose the port number on which it can be accessed.
Now the question on your mind would be, where would I do that? Well we can do that in the Docker Compose File.
Docker Compose File is a YAML file which contains details about the services, networks and volumes for setting up the Docker application.
Run the below command to find the version of your Docker Engine.
docker -v
Executing the command will return the version running at your host. Based on the version of Docker Engine at your host, download an appropriate version Docker Compose. You can look for the appropriate version to download, from Docker’s official documentation.

Since I am running Docker Engine version 17.05.0-ce, I have used Docker Compose version 3.
To download Compose, run the below set of commands.
sudo curl -L https://github.com/docker/compose/releases/download/1.16.1/docker-compose-`uname -s`-`uname -m` -o /usr/local/bin/docker-compose
sudo chmod +x /usr/local/bin/docker-compose
Note that the version number in the command will change based on the Docker Engine version you are running.
Below are the commands which are a part of my Docker Compose File.
version: '3.0' # specify docker-compose version

# Define the services/ containers to be run
services:
 angular: # name of the first service
  build: angular-app # specify the directory of the Dockerfile
  ports:
  - "4200:4200" # specify port mapping

 express: # name of the second service
  build: express-server # specify the directory of the Dockerfile
  ports:
  - "3000:3000" #specify ports mapping
  links:
  - database # link this service to the database service

 database: # name of the third service
  image: mongo # specify image to build container from
  ports:
  - "27017:27017" # specify port forwarding
I’m pretty sure the commands in the above file make no sense to you. So, let’s get that problem solved.
In the first line of code, I have defined the version of Docker Compose I am using. This is a very important step if you want Compose to function properly without throwing any error. Make sure to download the Docker Compose version according to the version of your Docker Engine.
After that, I defined three containers by using the keyword ‘services’. These services refer to the three components of my stack, front end, back end and database. So in this case, the name of my containers will be the name of my services, i.e ‘angular’, ‘express’ and ‘database’.
The keyword ‘build’ is used to indicate that the dockerfile for spinning that container is present in that directory. Wait, are you confused how?
It’s simple. The path needs to be specified after ‘build:’. In our case, ‘angular-app’ and ‘express-server’ are paths to two directories that can be reached from the directory where the Docker Compose File is present. For our database container, I have simply said use a base ‘image: mongo’ instead of a path to dockerfile.
For each of these services, I have also specified the port numbers which can be used to receive/ send requests from other containers(services). 4200 in case of angular, 3000 in case of express and 27017 in case of mongo.
Additionally, the express container has a ‘link:’ to database container, indicating that whatever data is received at the server side will be sent to the database where it will be stored.
Now finally, we are at the conclusion of setting up a Compose. To start a Docker Compose and spin the three containers with three services, we need to simply execute the below two commands from the directory where the Docker Compose File (YAML file) is present:
docker-compose build
docker-compose up
The ‘docker-compose build’ command is used to build/ rebuild the services whereas, ‘docker-compose up’ command is used to create/ start the containers. Go ahead! Try it for yourself.
Below are screenshots of Docker images being built and then being executed. You can notice that Angular image is being built and then tagged with name as ‘angular:latest’.
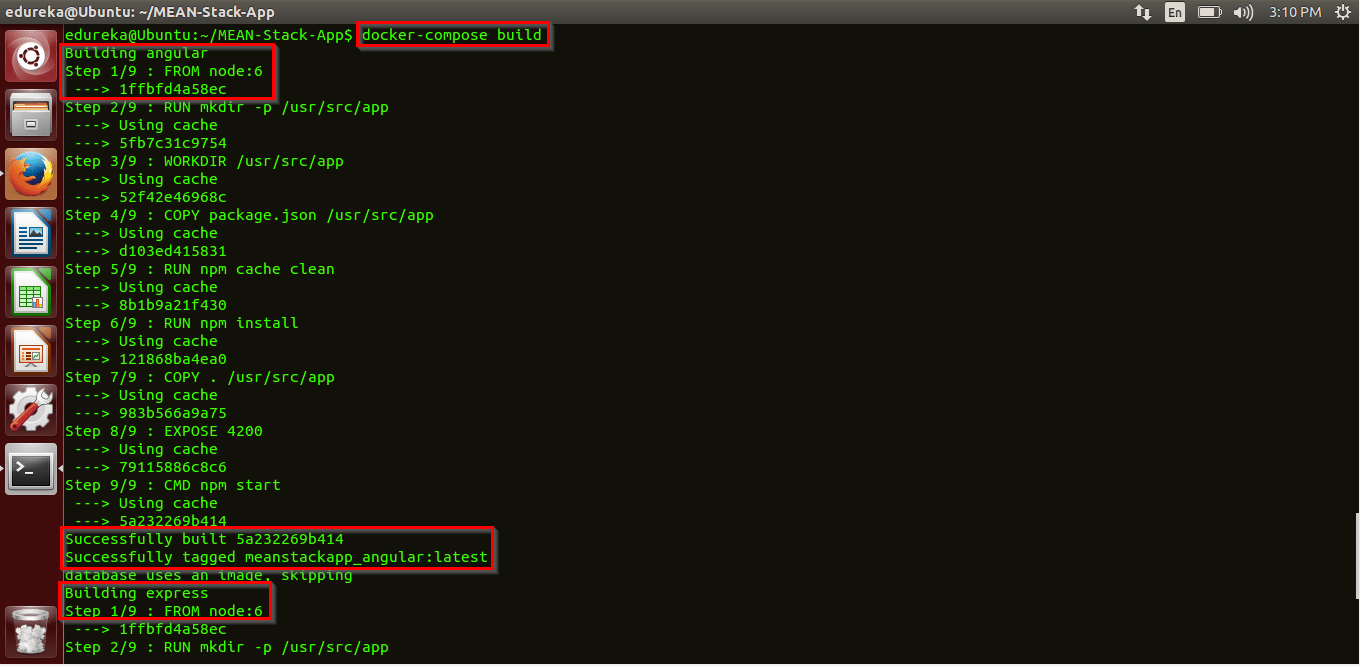
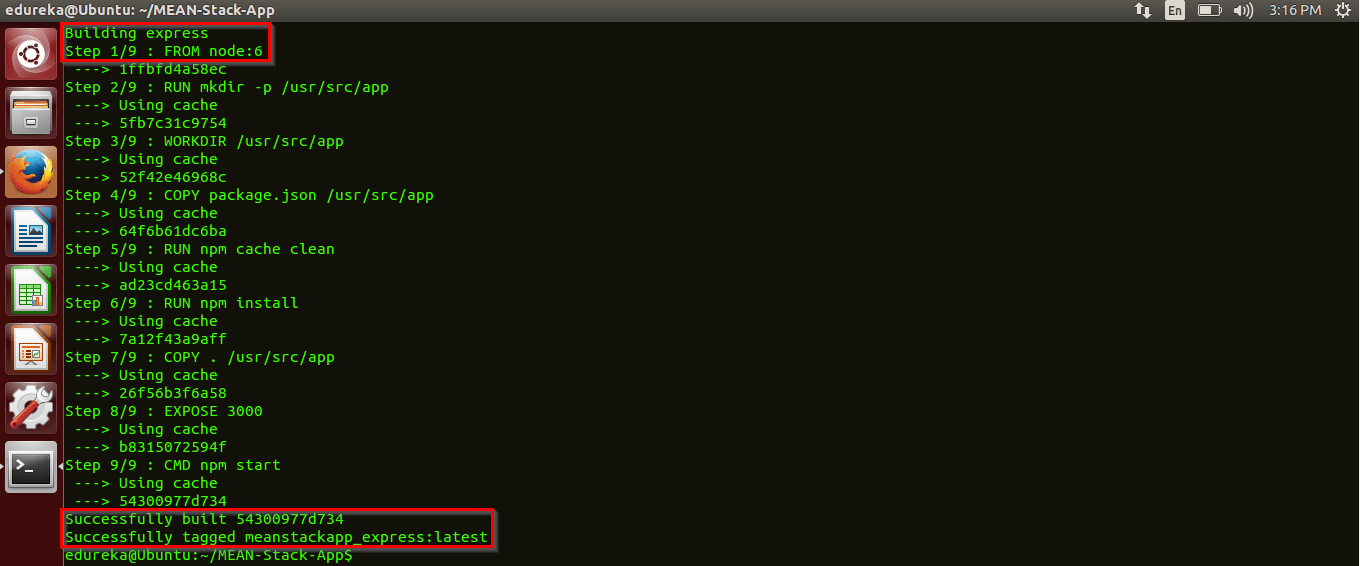
Also, an image for Express is built with name and tag as ‘express:latest’.
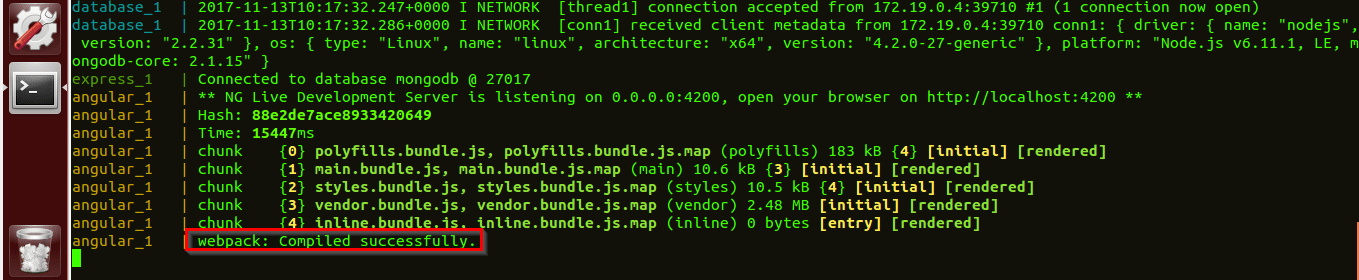
Now that the image is built, let’s try running it and thus spinning a container in the process. Below is that screenshot.

Below is the screenshot which says ‘webpack: compiled successfully’ which means that the three services are containerized successfully by Docker.
Now that the containers are hosted, you can see the services active on their respective ports. Go type the following port numbers in your web browser to interact with the GUI of the MEAN app.
localhost:4200 – Angular App (Front-end)
localhost:3000 – Express Server & NodeJS (Back-end/ Server-side)
localhost:27017 – MongoDB (Database)
Impressed yet? Wait, because Docker is not done yet! We can use the “docker-compose scale=’x'” command to easily scale up/ down the number of deployments. In other words, we can create that many number of containers for a service. Below is the complete command to scale a particular service to ‘5’ containers:
docker-compose scale=5
Scaling up the services at such ease, packaging and containerizing them in such a cost effective manner is what makes Docker one of the best deployment tools and my personal favorite.
If you still have doubts on this concept, then you can watch the below video where I have explained the same concept with a practical hands-on of how to setup a Docker Compose.
Now that you have learnt about Docker, check out the Docker Training by Edureka, a trusted online learning company with a network of more than 250,000 satisfied learners spread across the globe. This Edureka Docker Certification Training course helps learners gain expertise in implementing Docker and mastering it.
Got a question for us? Please mention it in the comments section and we will get back to you.


 Thank you for registering Join Edureka Meetup community for 100+ Free Webinars each month JOIN MEETUP GROUP
Hello,, Thanks for sharing this post. its a nice information.
Could you please share the app code (Angular and back-end code)? Thanks
Please share your code used for mean stack application in Github, i enjoyed listening about docker-compose.