


No doubt that Selenium is one of the fantastic tools in the field of Automation Testing, but it might seem a little hard for a non-technical person to understand its working due to the complexity of the code. To ease this task, Cucumber comes into play, which makes the complex code simple and easy to understand. But, how exactly it does that? I will be telling you all about it through this article on Cucumber Selenium Tutorial. To learn more, check out the Selenium Training.
Introduction to Cucumber

Cucumber is a testing approach/tool that supports Behaviour Driven Development (BDD). It provides a way to write tests that anybody can understand, regardless of their extent of technical knowledge.
It explains the behavior of the application in a simple English text using Gherkin language. I hope that you got a glimpse about what is Cucumber. Now, let’s move further and understand some of the facts that depict the need for Cucumber in a testing framework.
Why Cucumber?
Well, Cucumber is one of the most popular tools because of the reasons listed below:
- Cucumber is open source and hence, its free to use.
- On using Cucumber, you can write your test scripts in multiple languages such as Java, Ruby, .NET, Python, etc.
- It also integrates with Selenium, Ruby on Rails, Watir and other web-based testing tools.
- Cucumber is one of the most widely used BDD tools.
These are some of the unique features that make Cucumber helpful for testing a website. Now that you know what is Cucumber and why do you need it, let’s understand one of the unique features of Cucumber that makes it easy for a non-techie to understand the test cases.
Behavior Driven Development(BDD)
In very simple terms, BDD or Behavior-Driven Development is a technique where your specifications or test cases are written in plain English like sentences. With this approach, the non-technical team members find it easy to understand the flow and collaborate more in the process of software development.
Let’s understand this with the help of a simple example. Consider a scenario where you want to test the Twitter website. One of the test scenarios is to verify the login credentials. With BDD, you can write this test scenario in this format:
Feature: Test Twitter smoke scenario

Scenario: Test login with valid credentials
Given Open the firefox and start application
When I enter valid username and valid password
Then user should be able to login successfully
In the above example, I have just written a few statements in simple English for defining the scenarios. I will be providing more insights into this scenario and its implementation in the later part of this article. For now, let’s move further in Cucumber Selenium Tutorial article and learn the fundamentals of Selenium.
Introduction to Selenium

Selenium is the preferred tool when it comes to automating the tests which are carried out on web browsers. It is useful only for testing of web applications. Any desktop (software) application or mobile application cannot be tested using Selenium. It is very helpful in writing functional test cases. It also provides reliable performance with ‘n’ number of test cases and it is obviously the best suitable automation tool for web applications.
Now that you know what is Selenium, let’s move further in this article on Cucumber Selenium Tutorial and understand why use Cucumber with Selenium?
Why use Cucumber with Selenium?
Many organizations use Selenium for functional and regression testing. Selenium and Cucumber are a great combination when it comes to web application automation, as Cucumber allows you to write your tests quickly in English-like language and Selenium allows you to run on various combinations of browsers.
 Cucumber tool is based on the Behavior Driven Development framework that acts as the bridge between the Software Engineer and Business Analyst and also between Manual Tester and Developers.
When using Selenium with Cucumber for test automation, tests are written in feature files that can be understood by various stakeholders in an agile environment such as Business Analysts. Cucumber also comes with its ability to support multiple scripts and programming languages and JUnit is used to execute these scripts and generate the output.
Find out our Selenium Training in Top Cities/Countries
| India | Other Cities/Countries |
| Bangalore | US |
| Hyderabad | UK |
| Pune | Canada |
| Chennai | Australia |
| Mumbai | Singapore |
| Kolkata | Edinburgh |
Having understood this, let’s now see the various steps to create Cucumber application and run the test cases.
Steps to create Cucumber Application
The various steps involved in creating a Cucumber application are as follows:
- Download the Jar files of Cucumber and Selenium and configure the build path.
- Add Cucumber Plugin from Eclipse Marketplace.
- Create a feature file and add scenarios.
- Implement the steps for the scenarios.
- Write the runner class and execute the code.
Now, let’s understand each of these steps in detail.
Step1: Download Cucumber and Selenium Jar files
Cucumber doesn’t actually interact with the browser and performs actions on the website under test. Interacting with the website is the action that is performed by Selenium WebDriver. Due to this reason, you will need to download Cucumber as well as Selenium Webdriver jar files. If you wish to know how to install Selenium on your system, you can check this article on Selenium Installation. Below is the list of jar files for Cucumber.
- Cucumber-core
- Cucumber-html
- cobertura code coverage
- Cucumber-java
- Cucumber-junit
- Cucumber-jvm-deps
- Cucumber-reporting
- Hamcrest-core
- Gherkin
- Junit
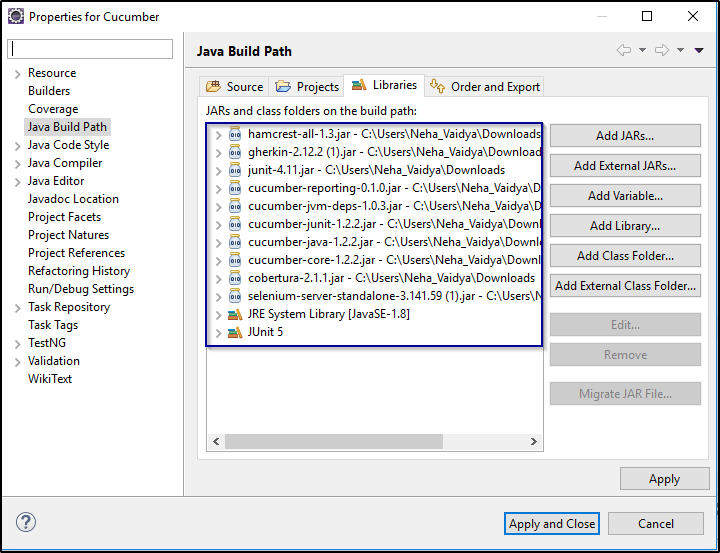
Once you download these jar files from Maven Repository, you can configure the build path of your project and add all the .jar files and libraries as shown in the below snapshot.
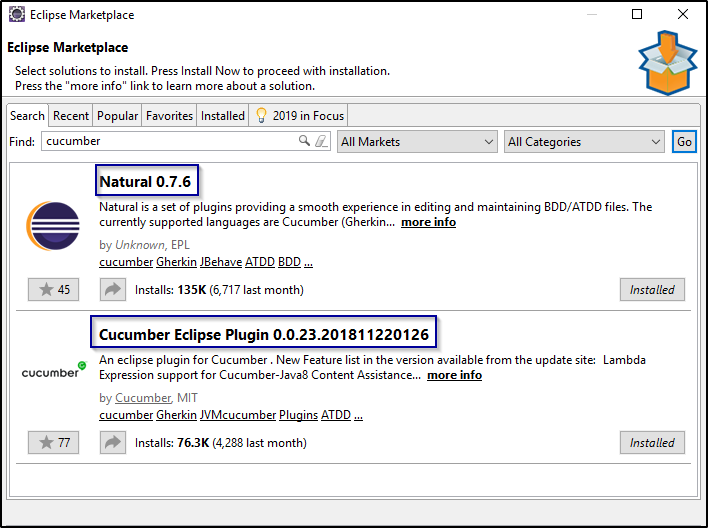
Step 2: The next step is to install Cucumber on your Eclipse. For that, you need to go to Help -> Eclipse Marketplace -> Search Cucumber and install Cucumber and Naturals on your eclipse. Below snapshot depicts the same.
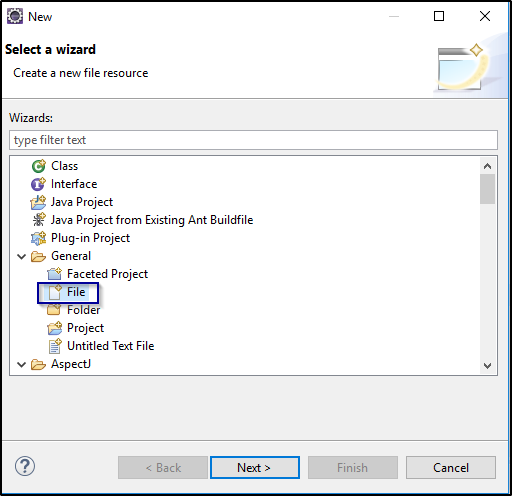
Step 3: Once you configure Cucumber, the next step is to create a feature file. First, you have to create a new source folder and then add a feature file as shown below.
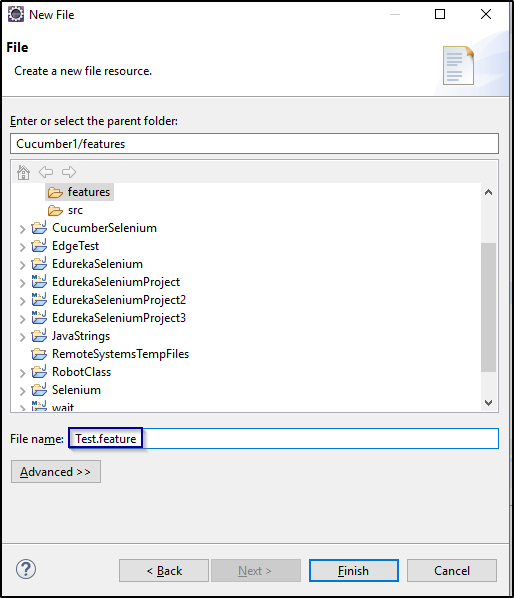
Next, you need to specify the name of the feature file as shown below.
Once you create the feature file, you can write the scenarios as shown in the below code.
Test Scenario I:
Feature: Reset functionality on login page of Application

Scenario: Verification of Reset button
Given Open the Firefox and launch the application
When Enter the Username and Password
Then Reset the credential
Step 4: After that, you need to implement the scenarios with the help of step definitions. In the below code, I have implemented the methods for the scenario that I have written in the feature file.
package stepDefinitions;

import cucumber.api.java.en.Given;
import cucumber.api.java.en.Then;
import cucumber.api.java.en.When;

public class Steps {
@Given("^Open the Firefox and launch the application$")
public void open_the_Firefox_and_launch_the_application() throws Throwable
{
System.out.println("This Step open the Firefox and launch the application.");
}

@When("^Enter the Username and Password$")
public void enter_the_Username_and_Password() throws Throwable
{
System.out.println("This step enter the Username and Password on the login page.");
}

@Then("^Reset the credential$")
public void Reset_the_credential() throws Throwable
{
System.out.println("This step click on the Reset button.");
}
}
Step 5: Now, the last step is to create the ‘runner class’ and execute the program. Basically, your project structure should look like as depicted in the below snapshot.
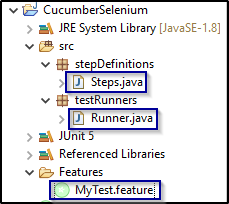
In the above snapshot, ‘Runner.java’ is an executable file. Let’s now code this file and understand how it works.
package Runner;
import org.junit.runner.RunWith;
import cucumber.api.CucumberOptions;
import cucumber.api.junit.Cucumber;

@RunWith(Cucumber.class)
@CucumberOptions(features="features",glue={"stepD"})
public class Runner
{
}
In the above code, I have ‘@CucumberOptions’ and specify the package name of both feature file and Runner file. So that it will implement the methods and run the code. When you run the program, it will display the methods from the step definition. Your output should look like as shown below:
This Step open the Firefox and launch the application.
This step enter the Username and Password on the login page.
This step click on the Reset button.

1 Scenarios (32m1 passed)
3 Steps (32m3 passed)
0m0.185s
So, this is how you need to write all the files and execute the program.
Test Scenario II:
Now, let’s understand one more scenario wherein I have integrated Selenium with Cucumber. Consider a scenario where you want to test the Twitter website. One of the test scenarios will verify the login credentials. With BDD, you can write this test scenario in this format:
Feature: Test Twitter smoke scenario

Scenario: Test login with valid credentials
Given Open the firefox and start application
When I enter valid username and valid password
Then user should be able to login successfully
Next, let’s write the Step definition class to implement all the scenarios.
package stepD;
import java.util.concurrent.TimeUnit;
import org.openqa.selenium.By;
import org.openqa.selenium.WebDriver;
import org.openqa.selenium.firefox.FirefoxDriver;
import cucumber.api.java.en.Given;
import cucumber.api.java.en.Then;
import cucumber.api.java.en.When;
public class SmokeTest {
WebDriver driver;
@Given("^Open the firefox and start application$")
public void open_the_firefox_and_start_application() throws Throwable {
System.setProperty("webdriver.gecko.driver", "C:geckodriver-v0.23.0-win64geckodriver.exe");
driver = new FirefoxDriver();
driver.manage().timeouts().implicitlyWait(10, TimeUnit.SECONDS);
driver.get("https://twitter.com/login");
}
@When("^I enter valid username and valid password$")
public void I_enter_valid_username_and_valid_password() throws Throwable {
driver.findElement(By.xpath("//input[@placeholder='Phone, email or username']")).sendKeys("your_username");
driver.findElement(By.xpath("//div[@class='clearfix field']//input[@placeholder='Password']")).sendKeys("your_password");
}
@Then("^user should be able to login successfully$")
public void user_should_be_able_to_login_successfully() throws Throwable {
driver.findElement(By.xpath("//button[@class='submit EdgeButton EdgeButton--primary EdgeButtom--medium']")).click();
}
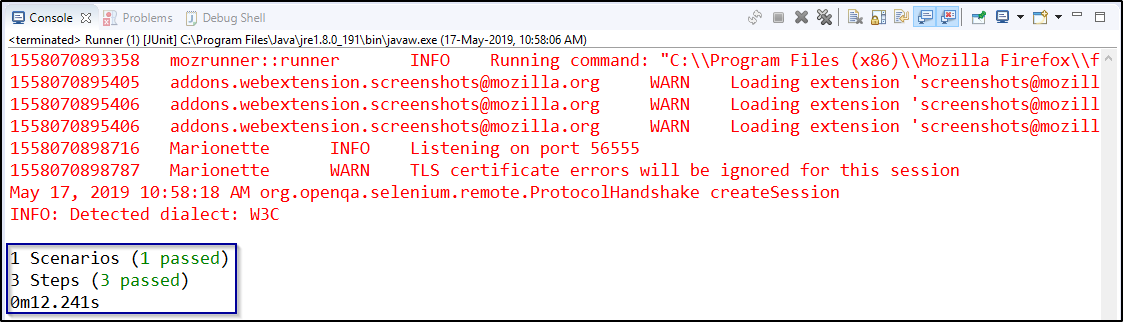
}In the above program, I have used GeckoDriver to launch firefox browser and using driver.get() it will navigate through the Twitter log in page. Further, it will locate the username and password text box using XPath locator and enter the valid credentials. Finally, it will log in successfully and run the test cases. You have to execute the runner as a JUnit test to know whether the tests are passed or failed.
Below snapshot shows the output of the program.
This is how you need to write all the files and execute the program. So, that was all about Cucumber Selenium Tutorial. I hope you understood the concepts and helped in adding value to your knowledge. Now, if you want to get more insights into Selenium, you can check out our other articles on Selenium.
Got a question for us? Please mention it in the comments section of Cucumber Selenium Tutorial article and we will get back to you.


it is good article thanks for sharing it