This article brings forth an interesting and an important topic known as CSS Selectors and follows it up with a supporting practical demonstration. Following pointers will be covered in this article,
Styling HTML Elements
Let’s understand what CSS is before we get to CSS selectors. If HTML is to be considered as a skeleton, then CSS (Cascading Style Sheets) is like the muscles and the skin. The brain is JavaScript. So, for a web page, CSS styles are essentially the layout and design. Right from the positioning of the images and text to the font size and background colour, CSS controls how the HTML elements look in a browser.
You can understand CSS better, if you have a good grasp on what CSS selectors are. These selectors let you target specific HTML elements so that you can apply the right style to them.
 Let’s us understand how we can select HTML elements,
How to Select Elements?
Say, you want a certain heading to be styled different from the rest of the content in a web page. Now, using CSS selectors you can target that HTML element to style it differently. CSS selectors help in defining the elements for which a certain set of CSS rules apply. There are various types of CSS selectors that let you precisely choose the elements you want to style. You could give the entire web page a general styling, and then work your way to style other elements of the page.
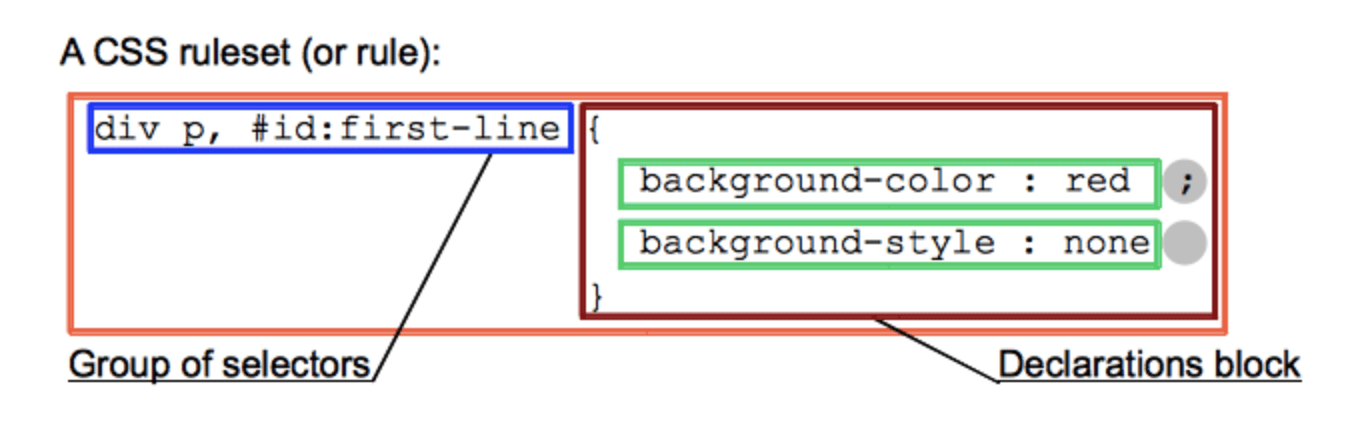
Selectors are a part of a CSS rule, and these selectors come just before the declaration of CSS blocks. For a better understanding, you can refer to the image below.
Moving on with CSS Selectors article
CSS Selectors
This selector lets you select an HTML element by its name.
Consider the code below:
<!DOCTYPE html>
<html>
<head>
<style>
p{
text-align: center;
color: magenta;
}
</style>
</head>
<body>
<p>This style will be applied on every paragraph.</p>
<p>Paragraph 1</p>
<p>Paragraph 2</p>
</body>
</html>
This code will give you the following output:
This style will be applied on every paragraph
Paragraph 1
Paragraph 2
In the above code, the HTML elements have been center-aligned and have the colour “magenta”.
Moving on with CSS Selectors article
API Project for Beginners
CSS Id Selector
By selecting the id attribute of an HTML element, you can select that specific element. Since the id is unique to a page, you can select the right element by using the id attribute.
You can select the HTML element using “#” followed by the id of that element. For instance, “#firstname” selects the element where the id is “firstname”.
Consider the following code:
<!DOCTYPE html>
<html>
<head>
<style>
#para1{
text-align: center;
color: orange;
}
</style>
</head>
<body>
<p id="para1">Hello World</p>
<p>This paragraph will not be affected.</p>
</body>
</html>
The output for the above code is:
Hello World
This paragraph will not be affected.
As you can see in the above output, by including id=”para1″, we were able to change the colour of that element to orange. The other element that does not have this remains unaffected.
Moving on with CSS Selectors article
CSS Class Selector
Using the class selector, you can select HTML elements that have a specific class attribute. You can define the selector using a period (full-stop symbol) followed by the class name. For instance, .intro selects the elements where the class is “intro”. One thing to keep in mind is that you can never begin a class name with a number.
Consider the following code:
<!DOCTYPE html>
<html>
<head>
<style>
.center {
text-align: center;
color: pink;
}
</style>
</head>
<body>
<h2 class="center">This heading is pink and center-aligned.</h1>
<p class="center">This paragraph is pink and center-aligned.</p>
</body>
</html>
The output of the above code is:
This heading is pink and center-aligned.
This paragraph is pink and center-aligned.
You can use CSS class selectors for a specific element. If you want only one specific element to be styled, then you can use the element name along with the class selector.
For instance, consider the following code:
<!DOCTYPE html>
<html>
<head>
<style>
p.center {
text-align: center;
color: pink;
}
</style>
</head>
<body>
<h2 class="center">This heading is not affected</h1>
<p class="center">This paragraph is pink and center-aligned.</p>
</body>
</html>
The output of the above code is:
This heading is not affected
This paragraph is pink and center-aligned.
As you can see in the output, the heading h2 is not affected by the style. Since we have specified “p.center”, only the paragraph is affected by the style.
Moving on with this CSS Selectors article,
CSS Universal Selector
This type of selector can be considered as a wildcard character that selects all the elements in the page. It selects all the elements on the page, and it is specified by “*”.
For instance, consider the below code:
<!DOCTYPE html>
<html>
<head>
<style>
*{
color: darkgreen;
font-size: 30px;
}
</style>
</head>
<body>
<h1>This is the heading</h2>
<p>This style will be applied to every paragraph.</p>
<p>Paragraph 1</p>
<p>Paragraph 2</p>
</body>
</html>
The output for the above code is:
This is the heading
This style will be applied to every paragraph.
Paragraph 1
Paragraph 2
As you can see in the output, anything that is defined under “*” is applied to every HTML element that is specified.
Moving on with this CSS Selectors article,
CSS Group Selectors
This type of selector is used to select the elements that have the same style definitions. The main purpose of a group selector is to minimise the code used. You can use commas to separate the selectors in the grouping.
Let’s see how group selectors minimise the code usage.
The below code snippet does not comprise any group selectors:
h1 {
text-align: center;
color: blue;
}
h2{
text-align: center;
color: blue;
}
p{
text-align: center;
color: blue;
}
The code snippet above applies the same style definitions for the elements h1, h2 and p. You can group them using commas as shown in the following code snippet:
h1,h2,p
{
text-align: center;
color: blue;
}
As you can see, the amount of code written is significantly reduced. You won’t have to write redundant code to apply the same style definitions for different HTML elements.
Let’s see how we can implement CSS group selectors using an example:
<!DOCTYPE html>
<html>
<head>
<style>
h1, h2, p {
text-align: center;
color: cyan;
}
</style>
</head>
<body>
<h1>Hello World</h1>
<h2>This is a test (smaller font)</h2>
<p>This is a paragraph.</p>
</body>
</html>
The output for the above code is:
Hello World
This is a test (smaller font)
This is a paragraph.
As you can see in the output, all the elements that are defined using the group selector have the same style definition – they are center-aligned and the font color is cyan.
This brings us to the end of this article.
Check out our Full Stack Web Developer Training which comes with instructor-led live training and real-life project experience. This training makes you proficient in skills to work with back-end and front-end web technologies. It includes training on Web Development, jQuery, Angular, NodeJS, ExpressJS, and MongoDB.
Got a question for us? Please mention it in the comments section of article and we will get back to you.