


Advanced DevOps Certification Training with G ...
- 23k Enrolled Learners
- Weekend
- Live Class
(7990)


 Copy Link!
C++ is a general-purpose programming language created by Bjarne Stroustrup as an extension of the C programming language. It is considered as the most important and basic requirement to understand the object-oriented style of programming. In this C++ Tutorial, we shall understand the important concepts as described below.
History of C++
C++ programming language is developed in the year 1980 by Mr.Bjarne Stroustrup at the well established Bell Laboratories of the American Telephone & Telegraph (AT&T) company positioned in the United State of America.

Bjarne Stroustrup is the founder of the C++ Programming Language.
He developed C++ Programming Language in order to integrate the Object-Oriented style of programming into C Language without having it to make any significant change to the C Fundamentals.
Features of C++
C++ Programming Language is loaded with many performance-oriented features which are mentioned as follows:
C++ language incorporates multiple built-in arithmetic and logical functions along with many built-in libraries which make development faster and convenient.
C++ Programming Language is designed to be an object-oriented programming language. OOPS feature makes development and maintenance easier whereas in Procedure-oriented programming language it is not easy to manage if code grows as project size grows.
C++ Programming Language is a compiler-based programming language, it means without compilation no C++ program can be executed. First, we need to compile our program using the compiler and then we can execute our program.
C++ provides the best in class memory management. It can both allocate and deallocate memory dynamically at any instance of time.
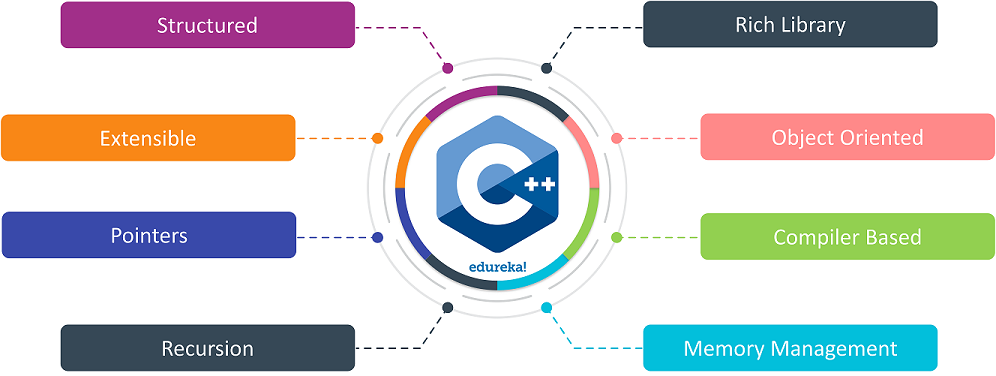
C++ Language supports function back-tracking which involves recursion. In the process of recursion, a function is called within another function for multiple numbers of times.
C++ enables users to directly interact with memory using the pointers. We use pointers in memory, structure, functions, arrays, stack and many more.
C++ Programming Language is highly extensible because of its easily adaptable features.
C++ Language supports structured programming which includes the use of functions. Functions reduce the code complexity and are totally reusable.
C++ Installation
Let us follow the steps below in order to install C++ in our local systems.
C++ can be used using various Text editors like TurboC, CodeBlocks, Dev.C++, Visual Studio, Eclipse and many more.
After selecting your text editor, you need a compiler to interpret your code to the computer system. We need MinGW for the same. Once you download MinGW,
you need to set the environment variables for the same.

Execute your first C++ Program
After installing C++ compiler and a Text Editor of your choice, you can directly go ahead and execute your first basic C++ Program, The Hello World Program.
#include <iostream.h>
#include<conio.h>
void main()
{
      clrscr();
      cout << "Hello World..! Welcome to C++ Programming.";
      getch();
}
//Output:
Hello World..! Welcome to C++ Programming.
Structure of a C++ Program
The Basic Structure of a C++ program is as follows:
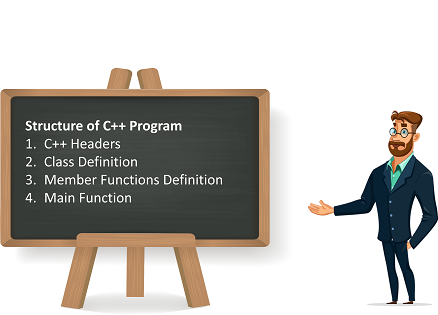
The lines starting with Hash Symbol(#) are considered as Header Files. All the Header Files used in a program have their own unique meaning. for example, the header file #include <iostream.h> instructs the preprocessor to perform standard input and output operations, such as writing the output of our first program (Hello World) to the screen.
A namespace allows grouping of various members like classes, objects, functions and various C++ tokens under a single name. various users can create separate namespaces and thus can use similar names of the members. This avoids the compile-time error that may exist due to identical-name conflicts.
The class is a user-defined data structure declared with keyword class. It includes data and functions as its members whose access is governed by the three access specifiers namely, private, protected and public. By default access to members of a C++ class are private.
Member functions are the operators and functions that are declared as members of a particular class. Member Functions are also called as friends of main class.
main() function is known as the entry point for every C++ program. When a C++ program is executed, the execution control goes directly to the main() function.
Identifiers
Identifiers in C++ Language are none other than the names assigned to variables and functions used in a C++ Program. The valid identifiers in a C++ program are declared using the alphabets from A to Z, a to z and 0 to 9. The Identifiers cannot include special symbols and white spaces, but, it can include underscores(_)
Some basic examples of valid Identifiers are as follows:
int A;float x;char Edureka_Happy_Learning;
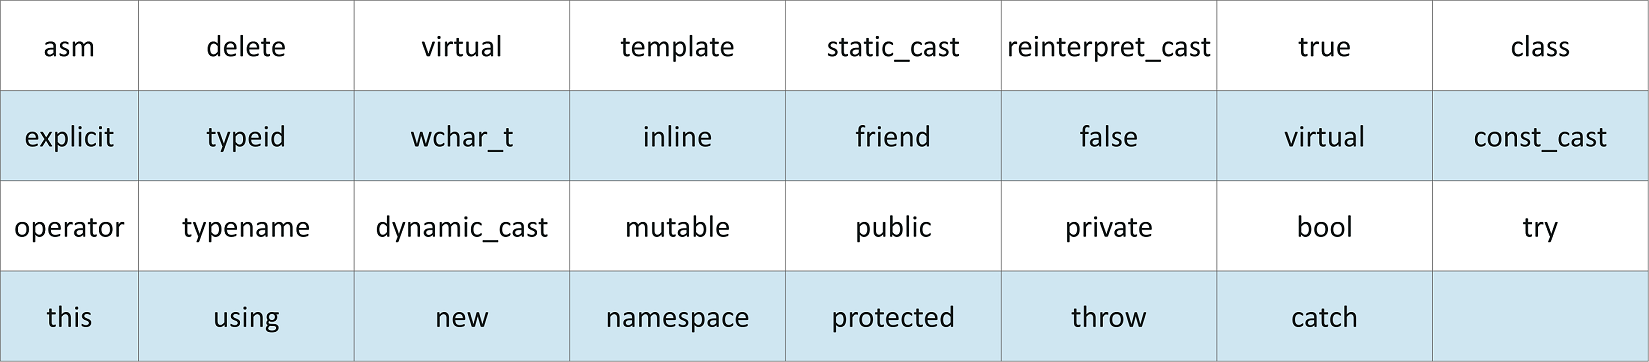
Keywords
Similar to Identifiers, we do have some special and reserved words in a C++ Program which have special meaning. Such words are called Keywords. Some of the Keywords used in C++ Programming Language are as follows.

New Keywords Introduced from C++ Language
White Space
Whitespace can be defined as the term used in C++ to define blank spaces, tab spaces, newline characters and comments. Whitespace separates one statement from another and enables the compiler to identify where one element in a statement, such as an int, ends and the beginning of the next element.
Example:
char Edureka_Happy_Learning;vehicles = cars + bikes + busses; // Get the total number of vehicles
Comments
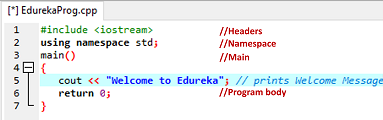
C++ Program comments are user-written statements that are included in the C++ code for explanation purpose. These comments help anyone reading the source code. All programming languages allow for some form of comments. C++ supports single-line and multi-line comments.
Single-Line Comments:
#include <iostream>
using namespace std;
main() {
   cout << "Welcome to Edureka"; // prints Welcome Message
   return 0;
}
Multi-Line Comments:
/* Comment out printing of Happy Learning
cout << "Happy Learning"; // prints Happy Learning Message
*/
Next, we will discuss Datatypes
Datatypes
Types of Datatypes available in C++ Language are as follows:
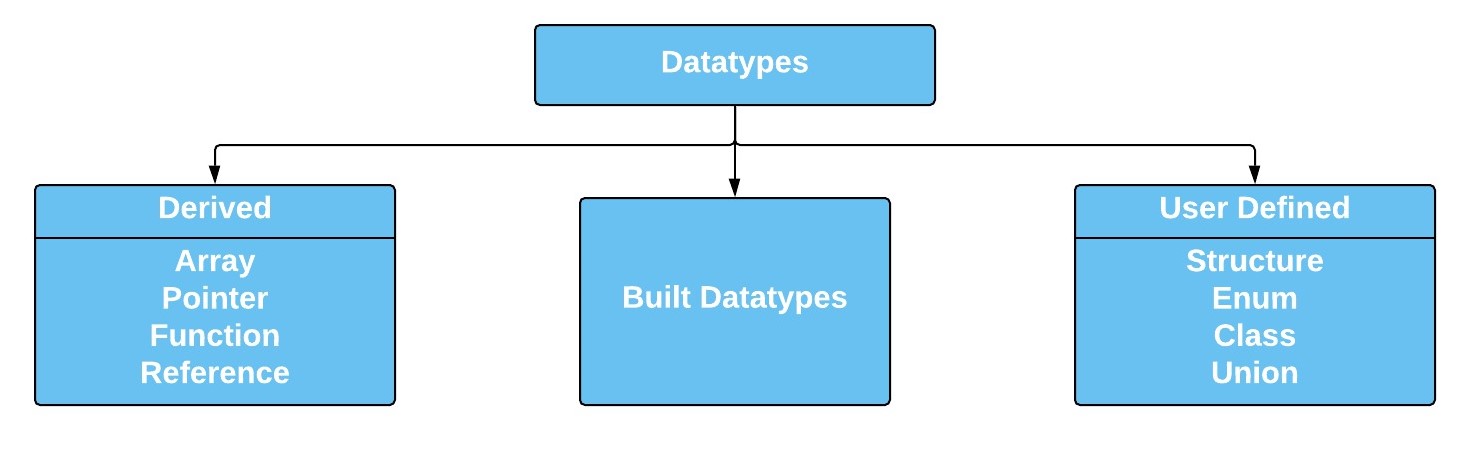
Derived Datatypes
The following table shows the derived datatype
Array
The Array is a set of elements of the same data type that is referred to by the same name with index. The elements in an array are stored in contiguous memory locations and each element is accessed by its index. The index value indicates the position of a particular element in an array.
Example:
#include <iostream>
using namespace std;
int main() {
     int arr[5];
     arr[0] = 1;
     arr[1] = 2;
     arr[2] = 3;
     arr[3] = 4;
     arr[4] = 5;
     cout << arr[3] " ";
     return 0;
}
//Output:
1 2 3 4 5
Further, you can find detailed documentation on Arrays in the following Article.
Function
The Function is a subdivided program of the main program that performs a specific pre-defined task. In C++, every program contains one or more functions which can be invoked from other sections of a program.
Example:
#include <iostream>
using namespace std;
sum(int a, int b){
      int add = a+b; return add;
}
int main(){
      cout<<sum(25,50);
      return 0;
}
//Output:
75
Reference
The reference is an alias for a variable in a program. A variable and its reference can be used interchangeably in a program as both refer to the same memory location. Hence, changes made to any of them are reflected in the other.
Example:
#include<iostream>
using namespace std;
int main()
{
      int x = 10;
      int& ref = x;
      ref = 20;
      cout << "x = " << x << endl ;
      x = 30;
      cout << "ref = " << ref << endl ;
      return 0;
}
//Output:
x = 20ref = 30
Further, you can find detailed documentation on Reference in the following Article.
Pointer
The pointer is a variable that can store the memory address of another variable. Pointers allow using the memory dynamically. That is, with the help of pointers, memory can be allocated or de-allocated to the variables at run-time, thus, making a program more efficient.
Example:
#include <bits/stdc++.h>
using namespace std;
void Edureka()
{
	int var = 20;
	int *ptr;
	ptr = &var;
	cout << "Value at ptr = " << ptr << "n";
	cout << "Value at var = " << var << "n";
	cout << "Value at *ptr = " << *ptr << "n";
}
int main()
{
	Edureka();
}
//Output:
Value at ptr = 0x6ffdd4Value at var = 20Value at *ptr = 20
Further, you can find detailed documentation on Pointers in the following Article.
Strings
The term string means an ordered sequence of characters. A sequence of characters can be represented using an object of a class in C++.
Example:
#include <iostream>

using namespace std;
int main () {

   char ch[12] = {'H', 'e', 'l', 'l', 'o', ' ', 'w','o','r','l','d'};
   string st = "Welcome to Edureka";
   std::string std_st = "Happy Learning";
   cout << ch << endl;
   cout << st << endl;
   cout << std_st << endl;
   return 0;
}
//Output:
Hello worldWelcome to EdurekaHappy Learning
Further, you can find detailed documentation on Strings in the following Article.
Built-in Datatypes
The following table shows the built-in datatype and the maximum and minimum value which can be stored in the designated variables.
| Type | Bit Width | Typical Range |
| char | 1 byte | -127 to 127 or 0 to 255 |
| signed char | 1 byte | -127 to 127 |
| unsigned char | 1 byte | 0 to 255 |
| short int | 2 bytes | -32768 to 32767 |
| signed short int | 2 bytes | -32768 to 32767 |
| unsigned int | 2 bytes | 0 to 65535 |
| int | 4 bytes | -2147483648 to 2147483647 |
| signed int | 4 bytes | -2147483648 to 2147483647 |
| unsigned int | 4 bytes | 0 to 4294967295 |
| long int | 4 bytes | -2,147,483,648 to 2,147,483,647 |
| signed long int | 4 bytes | -2,147,483,648 to 2,147,483,647 |
| unsigned long int | 4 bytes | 0 to 4,294,967,295 |
| float | 4 bytes | +/- 3.4e +/- 38 |
| double | 8 bytes | +/- 1.7e +/- 308 |
| long double | 8 bytes | +/- 1.7e +/- 308 |
| wchar_t | 4 bytes | 1 wide character |
User-Defined Datatypes
The following table shows the User-Defined datatypes.
Structure
The Structure is known as a collection of variables of different datatype under a single name. It is completely similar to a normal class that holds a collection of data of different data types.
Example:
#include <iostream>
using namespace std;
struct Point {
      int a, b;
};

int main()
{
      struct Point p1 = { 0, 10 };
      p1.a = 25;
      cout << "a = " << p1.a << ", b = " << p1.b;
      return 0;
}
//Output:
a = 25, b = 10
Enum
The enumeration in C++ is a user-defined datatype. It is designed to assign names to integral constants, the names increase the readability of a program and also the program becomes easy to maintain.
Example
#include<stdio.h>
     enum week{Mon, Tue, Wed, Thur, Fri, Sat, Sun};
int main()
{
     enum week day;
     day = Wed;
     printf("%d",day);
     return 0;
}
//Output:
2
Class
A class in C++ is actually a user-defined datatype. it’s declared with the keyword class at the side of its members with personal, protected or public access specifiers. By default access to members of a C++ class is private.
Example:
#include <iostream>
using namespace std;
class Student {
   public:
      int ID;
      string Name;
};
int main() {
    Student s1;
    s1.ID = 12012009;
    s1.Name = "Arjun";
    cout<<s1.ID<<endl;
    cout<<s1.Name<<endl;
    return 0;
}
//Output:
12012009Arjun
Further, you can find detailed documentation on Strings in the following Article.
Union
The Union is completely similar to a structure in terms of declaration and usage but all the members of a union occupy the same space in memory that is, the memory location is shared among the union members.
#include<iostream>
using namespace std;
typedef union type {
    int a;
    float b;
}
my_type;

int main()
{
    my_type x;
    x.a = 5;
    cout << "a : " << x.a << endl;
    x.b = 7.3;
    cout << "a : " << x.a << endl;
    cout << "b : " << x.b << endl;
    return 0;
}
//Output:
Variables
The variable in C++ is a user-defined name for a particular memory in the computer reserved to store data and process it. The variables in C++ are divided into two types based on their scopes.
Global variables are defined outside of all the functions. The global variables will hold their value throughout the lifetime of your program. That is, a global variable is available for use throughout your entire program after its declaration.
Example:
#include <iostream>
using namespace std;

int g;

int main () {
   int a, b;
   a = 10;
   b = 20;
   g = a + b;
   cout << g;
   return 0;
}
//Output:
30
Local variables are declared inside a function. They can be used only by statements that are inside that function or block of code. Local variables are not known to functions outside their own.
Example:
#include <iostream>
using namespace std;

int main () {
   int a, b;
   int c;
   a = 10;
   b = 20;
   c = a + b;
   cout << c;
   return 0;
}
//Output:
Modifiers in C++
Modifiers in C++ allows the char, int, and double data types to have modifiers preceding them. A modifier is used to alter the meaning of the base type so that it more precisely fits the needs of various situations.
The datatype modifiers available in C++ are:
To understand the functionality of a Modifier, Let us execute the following program.
#include <iostream>
using namespace std;

int main() {
   short int i;
   short unsigned int j;
   j = 50000;
   i = j;
   cout << i << " " << j;
   return 0;
}
//Output:
-15536 50000
The above result is because the bit pattern that represents 50,000 as a short unsigned integer is interpreted as -15,536 by a short.
Type Qualifiers in C++
The type qualifiers provide additional information about the variables they precede. There are three different Type Qualifiers in C++ Language.
Objects of type const cannot be changed by your program during execution.
The modifier volatile tells the compiler that a variable’s value may be changed in ways not explicitly specified by the program.
A pointer qualified by restrict is initially the only means by which the object it points to can be accessed. Only C99 adds a new type qualifier called restrict.
Operators in C++
An operator is a special symbol that is used to take up a specific operation. C++ language consists of many types of operations like arithmetic, logical, bit-wise and many more. The following are the types of operators in C++ language.
Arithmetic Operators
There are following arithmetic operators supported by C++ language. Assume variable A holds 20 and variable B holds 40, then
| Operator | Description | Example |
| + | Checks if the values of two operands are equal or not, if yes then condition becomes true. | A + B will give 60 |
| – | Checks if the values of two operands are equal or not, if values are not equal then condition becomes true. | A – B will give -20 |
| * | Checks if the value of the left operand is greater than the value of right operand, if yes then condition becomes true. | A * B will give 800 |
| / | Checks if the value of the left operand is less than the value of right operand, if yes then condition becomes true. | B / A will give 2 |
| % | Checks if the value of the left operand is greater than or equal to the value of right operand, if yes then condition becomes true. | B % A will give 0 |
| ++ | Checks if the value of the left operand is greater than or equal to the value of right operand, if yes then condition becomes true. | A++ will 21 |
| — | Checks if the value of the left operand is less than or equal to the value of right operand, if yes then condition becomes true. | A– will give 19 |
Relational Operators
| Operator | Description | Example |
| == | Checks if the values of two operands are equal or not, if yes then condition becomes true. | (A == B) is not true. |
| != | Checks if the values of two operands are equal or not, if values are not equal then condition becomes true. | (A != B) is true. |
| > | Checks if the value of the left operand is greater than the value of right operand, if yes then condition becomes true. | (A>B) is not true. |
| < | Checks if the value of the left operand is less than the value of right operand, if yes then condition becomes true. | (A<B) is true. |
| >= | Checks if the value of the left operand is greater than or equal to the value of right operand, if yes then condition becomes true. | (A>=B) is not true. |
| <= | Checks if the value of the left operand is less than or equal to the value of right operand, if yes then condition becomes true. | (A<= B) is true. |
Logical Operators
| Operator | Description | Example |
| && | Called Logical AND operator. If both the operands are non-zero, then condition becomes true. | (A && B) is false. |
| || | Called Logical OR Operator. If any of the two operands is non-zero, then condition becomes true. | (A || B) is true. |
| ! | Called Logical NOT Operator. Use to reverses the logical state of its operand. If a condition is true, then Logical NOT operator will make false. | !(A && B) is true. |
Bitwise Operators
| A | B | A&B | A||B | A^B |
| 0 | 0 | 0 | 0 | 0 |
| 0 | 1 | 0 | 1 | 1 |
| 1 | 1 | 1 | 1 | 0 |
| 1 | 0 | 0 | 1 | 1 |
The Bitwise operators supported by C++ language are listed in the following table. Assume variable A holds 60 and variable B holds 13, then the results will be as shown below
| Operator | Description | Example |
| & | Binary AND Operator copies a bit to the result if it exists in both operands. | (A & B) will give 12 which is 0000 1100 |
| | | Binary OR Operator copies a bit if it exists in either operand. | (A | B) will give 61 which is 0011 1101 |
| ^ | Binary XOR Operator copies the bit if it is set in one operand but not both. | (A ^ B) will give 49 which is 0011 0001 |
| ~ | Binary Ones Complement Operator is unary and has the effect of ‘flipping’ bits. | (~A ) will give -61 which is 1100 0011 in 2’s complement form due to a signed binary number. |
| << | Binary Left Shift Operator. The left operands value is moved left by the number of bits specified by the right operand. | A << 2 will give 240 which is 1111 0000 |
| >> | Binary Right Shift Operator. The left operands value is moved right by the number of bits specified by the right operand. | A >> 2 will give 15 which is 0000 1111. |
Assignment Operators
There are following assignment operators supported by C++ language.
| Operator | Description | Example |
| = | Simple assignment operator, Assigns values from right side operands to left side operand. | C = A + B |
| += | Add AND assignment operator, It adds right operand to the left operand and saves the result to the left operand. | C += A is C = C + A |
| -= | Subtract AND assignment operator, It subtracts right operand from the left operand and saves the result to the left operand. | C -= A is C = C – A |
| *= | Multiply AND assignment operator, It multiplies right operand with the left operand and saves the result to the left operand. | C *= A is C = C * A |
| /= | Divide AND assignment operator, It divides left operand with the right operand and saves the result to the left operand. | C /= A is C = C / A |
| %= | Modulus AND assignment operator, It takes modulus using two operands and saves the result to the left operand. | C %= A is C = C % A |
| <<= | Left shift AND assignment operator. | C <<= 2 is C = C << 2 |
| <<= | Right shift AND assignment operator. | C >>= 2 is C = C >> 2 |
| &= | Bitwise AND assignment operator. | C &= 2 is C = C & 2 |
| ^= | Bitwise exclusive OR and assignment operator. | C ^= 2 is C = C ^ 2 |
| |= | Bitwise inclusive OR and assignment operator. | C |= 2 is C = C | 2 |
C++ Operators according to their Precedence
Conditional Statements
Conditional statements are used to execute statement or group of statements based on some conditon. If the condition is true then C++ statements are executed other wise next statement will be executed.
Different types of Conditional Statements in C++ Language are as follows:
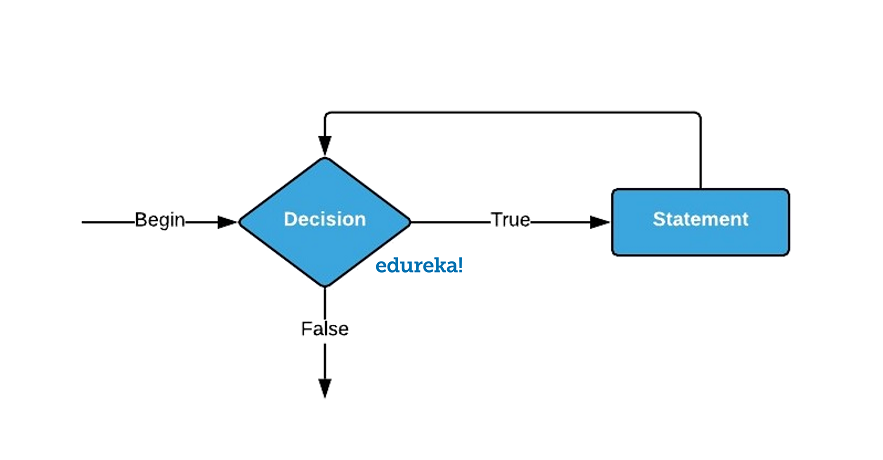
If statement
The single if statement in C++ language is used to execute the code if a condition is true. It is also called one-way selection statement.
Syntax
if(boolean_expression) {
   // statement(s) will execute if the boolean expression is true
}
Flowchart

Example:
#include <iostream>
using namespace std;

int main () {
   int a = 100;
   if( a < 200 )
   {
      cout << "a is less than 200" << endl;
   }
   cout << "value of a is: " << a << endl;
   return 0;
}
//Output:
a is less than 200value of a is: 100
If-Else statement
The if-else statement in C language is used to execute the code if the condition is true or false. It is also called two-way selection statement.
Syntax
if(boolean_expression) {
   // statement(s) will execute if the boolean expression is true
} else {
  // statement(s) will execute if the boolean expression is false
}
Flowchart

Example:
#include <iostream>
using namespace std;

int main()
{
     int a = 100, b = 200;
     if (b > a)
     {
           cout << "b is greater" << endl;
     }
     else
     {
           cout << "a is greater" << endl;
      }
      system("PAUSE");
}
//Output:
b is greaterPress any key to continue . . .
Nested If-else statement
The nested if-else statement is used when a program requires more than one test expression. It is also called a multi-way selection statement. When a series of the decision are involved in a statement, we use if-else statement in nested form.
Syntax
if( boolean_expression 1) {
   // Executes when the boolean expression 1 is true
   if(boolean_expression 2) {
      // Executes when the boolean expression 2 is true
   }
}
Flowchart

Example:
#include <iostream>
using namespace std;

int main ()
{
   int a = 1000;
   int b = 2500;
   if( a == 100 )
   {
      if( b == 200 )
      {
         cout << "Value of a is 1000 and b is 2500" << endl;
      }
   }
   cout << "The Exact value of a is: " << a << endl;
   cout << "The Exact value of b is: " << b << endl;
   return 0;
}
//Output:
The exact value of a is: 1000The exact value of b is: 2500
Else-if Ladder
The if-else-if statement is used to execute one code from multiple conditions. It is also called multipath decision statement. It is a chain of if..else statements in which each if statement is associated with else if statement and last would be an else statement.
Syntax
if(boolean_expression 1)
{
   // When expression 1 is true
}
else if( boolean_expression 2)
{
   // When expression 2 is true
}
else if( boolean_expression 3)
{
   // When expression 3 is true
}
else
{
   // When none of expression is true
}
Flowchart

Example:
#include <iostream>
using namespace std;

int main(){
    int score;
    cout << "Enter your score between 0-100n"; cin >> score;
    if(score >= 90)
    {
        cout << "YOUR GRADE: An"; } else if (score >= 50 && score < 90)
    {
        cout << "YOUR GRADE: Bn"; } else if (score >= 35 && score < 50)
    {
        cout << "YOUR GRADE: Cn";
    }
    else
    {
        cout << "YOUR GRADE: Failedn";
    }
    return 0;
}
//Output:
Enter your score between 0-10060YOUR GRADE: B
Switch statement
Switch statement acts as a substitute for a long if-else-if ladder that is used to test a list of cases. A switch statement contains one or more case labels which are tested against the switch expression. When the expression match to a case then the associated statements with that case would be executed.
Syntax
switch(expression) {
   case constant-expression  :
      statement(s);
      break; //optional
   case constant-expression  :
      statement(s);
      break; //optional

   // you can have any number of case statements.
   default : //Optional
      statement(s);
}
Flowchart

Example:
#include <iostream>
using namespace std;

int main() {
    int x = 3;
    switch (x)
    {
        case 1:
        cout << "Choice is 1";
        break;
        case 2:
        cout << "Choice is 2";
        break;
        case 3:
        cout << "Choice is 3";
        break;
        default:
        cout << "Choice other than 1, 2 and 3";
        break;
    }
return 0;
}
//Output:
Choice is 3
A loop statement is used for executing a block of statements repeatedly until a particular condition is satisfied. The C++ Language consists of the following Loop Statements.
For Loop
The for loop is used to execute a particular code segment for multiple times until the given condition is satisfied.
Syntax
for(initialization; condition; incr/decr){
//code to be executed
}
Flowchart
 Example:
#include <iostream>
using namespace std;
int main() {
         for(int i=1;i<=10;i++){
            cout<<i <<"n";
          }
    }
//Output:
12345678910
While Loop
The While loop is used to execute a code segment for multiple numbers of times until a specific condition is satisfied.
Syntax
while(condition){
//code to be executed
}
Flowchart
Example:
#include <iostream>
using namespace std;
int main()
{
    int number, i = 1, factorial = 1;
    cout << "Enter a positive integer: "; cin >> number;

    while ( i <= number) {
        factorial *= i;
        ++i;
    }
    cout<<"Factorial of "<< number <<" = "<< factorial;
    return 0;
}
//Output:
Enter a positive integer: 10Factorial of 10 = 3628800
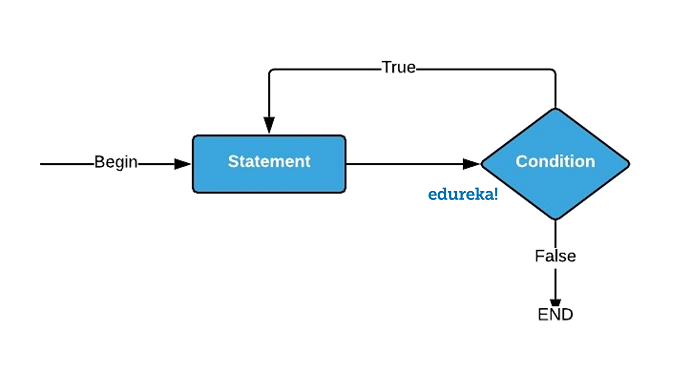
Do While Loop
Do while loop is completely similar to While Loop but the only difference is that the condition is placed at the end of the loop. Hence, the loop is executed at least for once.
Syntax
do
{
   statement(s);
} while(condition);
Flowchart
Example:
#include <iostream>
using namespace std;
int main(){
   int num=1;
   do{
      cout<<"Value of num: "<<num<<endl;
      num++;
   }while(num<=6);
   return 0;
}
//Output:
Value of num: 1Value of num: 2Value of num: 3Value of num: 4Value of num: 5Value of num: 6
Object-Oriented Programming
Object-oriented programming System is a programming paradigm based on the concept of objects that contain data members and methods related to them. The primary purpose of object-oriented programming is to increase the flexibility and maintainability of programs
Encapsulation
Encapsulation can be defined as wrapping up of data and information under a single unit. In Object-Oriented Programming, Encapsulation is defined as binding together the data and the functions that manipulate them. In other words, wrapping the data together and the functions that manipulate them.
We can implement Encapsulation using three access specifiers.
Types of Encapsulation
There are basically three types of Encapsulation
Example:
#include<iostream>
using namespace std;
class test
{
      private:
      int x;
      public:
      test(int a)
     {
           x =a;
     }
     int get()
     {
           return x;
      }
};
int main()
{
      test a(7);
      cout<<"The Number is: "<<a.get();
      return 0;
}
//Output:
Abstraction
Data Abstraction is a programming technique for separating the interface and implementation details. this provides only the important details and hiding the complicated code segments of the program.
There are three main access specifiers for implementing Abstraction
There are basically three ways to apply Abstraction in C++ Language
Example:
#include<iostream>
using namespace std;
class test
{
      private:
      int x;
      public:
      test(int a)
     {
           x =a;
     }
     int get()
     {
           return x;
      }
};
int main()
{
      test a(10);
      cout<<"The Number is: "<<a.get();
      return 0;
}
//Output:
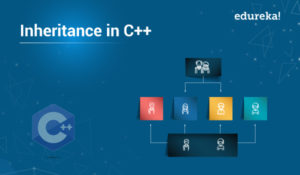
Inheritance
Inheritance is defined as a process of acquiring all the properties and behaviours into the child object from its parent object automatically.
There are 5 types of Inheritances available in C++ Language.
C++ uses access specifiers to limit the access of base class attributes to the derived class. There are a total of 3 types of access specifiers in C++
Example:
#include <iostream>

using namespace std;

class Train{
    int Numberofwheels;
     int Numberofcoaches;
    public:
     void Traininfo(int n, int m){
        Numberofwheels = n;
        Numberofcoaches = m;
        }
        void showinfo(){
            cout<<Numberofcoaches<<"n"<<Numberofwheels<<"n";
        }
    };
    class BulletTrain : public Train{
        int flux;
        public:
         BulletTrain(int b){
             flux = b;
             }

        void Magneticfield(){
            cout<<" The Magnetic field is turned ON with flux = "<<flux ;
        }
        };
int main()
{
    BulletTrain bullettrain(10);
    bullettrain.Traininfo(0, 20);  //accessing member function of base class
    bullettrain.showinfo();         //accessing member function of base class
    bullettrain.Magneticfield(); //Using member function of derived class
    return 0;
}
//Output:
200The magnetic field is turned ON with flux = 10
Overloading
When we create two or more members of a class having the same name but different in number or type of parameters then the process is known as overloading. In C++, we can overload:
There are two types of overloading:
Example:
#include <iostream>
 using namespace std;

int add(int a, int b)
{
    cout << a+b <<endl;
    return 0;
}
int add(int a, int b, int c)
{
    cout << a+b+c <<endl;
    return 0;
}
int main()
{
    add(20, 40);
    add(40, 20, 30);
}
//Output:
Overriding
When a derived class has a function with the same name as a function of the base class, it is called Function Overriding. Both functions must have the same parameters in both classes.
Example:
#include <iostream>
using namespace std;
class BaseClass
{
    public:
    void disp()
    {
         cout<<"Parent Class Function";
    }
};
class DerivedClass: public BaseClass
{
    public:
    void disp()
    {
         cout<<"Child Class Function";
    }
};
int main()
{
    DerivedClass obj = DerivedClass();
    obj.disp();
    return 0;
}
//Output:
Interface
The interface is a solution to implement the behaviour and functionalities of a parent class into the child class from its parent class, without the actual involvement the members from the parent class.
Syntax
__interface InterfaceName
{
	//group of functions declarations
}
Example:
#include <iostream>
using namespace std;

class Shape
{
   public:
      virtual int getArea() = 0;
      void setWidth(int w)
	  {
         width = w;
      }
      void setHeight(int h)
	  {
         height = h;
      }
   protected:
      int width;
      int height;
};
class Rectangle: public Shape
{
   public:
      int getArea()
	  {
         return (width * height);
      }
};
class Triangle: public Shape
{
   public:
      int getArea()
	  {
         return (width * height)/2;
      }
};

int main(void)
{
   Rectangle Rect;
   Triangle  Tri;
   Rect.setWidth(10);
   Rect.setHeight(25);
   cout << "Total Rectangle area: " << Rect.getArea() << endl;
   Tri.setWidth(20);
   Tri.setHeight(50);
   cout << "Total Triangle area: " << Tri.getArea() << endl;
   return 0;
}
//Output:
Total Rectangle area: 250Total Triangle area: 500
Friend
A friend function of a class is outlined outside that class’ scope however it’s proper to access all private and protected members of the class.
Syntax
class class_name
{
    friend data_type function_name(argument/s);
};
Example:
#include <iostream>
using namespace std;

class Box
{
   double width;
   public:
      friend void printWidth( Box box );
      void setWidth( double wid );
};
void Box::setWidth( double wid )
{
   width = wid;
}
void printWidth( Box box )
{
   cout << "Width of box: " << box.width <<endl;
}
int main() {
   Box box;
   box.setWidth(200.0);
   printWidth( box );
   return 0;
}
//Output:
Width of box: 200
Enumeration
Enum may be a user-defined data type in C. it’s in the main used to assign names to integral constants, the names create a program straightforward to read and maintain.
Syntax
enum{constant 1, constant2, constant3};
Example:
#include<stdio.h>
      enum week{Mon, Tue, Wed, Thur, Fri, Sat, Sun};
int main()
{
      enum week day;
      day = Fri;
      printf("%d",day);
      return 0;
}
//Output:
Constructor and Destructor
A Constructor is a member function of a class. It is mainly used to initialize the objects of the class. It has the same name as the class. When an object is created, the constructor is automatically called. It is a special kind of member function of a class.
Difference Between Constructor and Other Member Functions:
1. The Constructor has the same name as the class name.
2. The Constructor is called when an object of the class is created.
3. A Constructor does not have a return type.
4. When a constructor is not specified, the compiler generates a default constructor which does nothing.
5. There are 3 types of constructors:
Destructors are another type of member function that is responsible for destroying or deleting the object. It frees up space occupied by the object after it is no longer needed. A Destructor is called automatically when the object is out of scope and no longer needed. A Destructor has the name same as the class name, but the only difference is that the name is preceded by a tile(~).
~test()
There has to be only one Destructor in a class. A Destructor has no return type and no parameters. If we do specify a destructor in class then, the compiler creates a default destructor. The default destructor works fine unless memory is dynamically allocated or pointer is declared in the class.
The Destructor is called when,
STL(Standard Template Library)
The STL stands for Standard Template Library. It is a set of C++ template classes to provide common programming data structures and functions such as lists, stacks, arrays, etc.
STL has three components
Further, you can find detailed documentation on STL in the following Article.
Advanced C++ Concepts
Files and Streams
Files are used to store data in a storage device permanently. File handling provides a mechanism to store the output of a program in a file and to perform various operations on it. A stream is an abstraction that represents a device on which operations of input and output are performed. A stream can be represented as a source or destination of characters of indefinite length depending on its usage.
In C++ we have a set of file handling methods. These include ifstream, ofstream, and fstream. These classes are derived from fstrembase and from the corresponding iostream class. These classes, designed to manage the disk files, are declared in fstream and therefore we must include fstream and therefore we must include this file in any program that uses files.
In C++, files are mainly dealt by using three classes fstream, ifstream, ofstream.
All the above three classes are derived from fstrieambase and from the corresponding iositream class and they are designed specifically to manage disk files.
C++ provides us with the following operations in File Handling:
Exception Handling
Exception handling is a phase which deals with handling errors and exceptions that arise in run time due to the mistakes in code or invalid inputs entered by the user. In the C++ programming language, we have two types of Exception Handling.
When you consider exception handling, there are three terms associated with it,
Try
The code inside this block is like a trial code, which might throw an exception. This exception is caught inside the catch block.
Catch
The code in this block is executed when the code in the try blocks throws an exception.
Throw
This keyword is used to throw an exception when it is encountered. The exception is sent to the exception handler.
Dynamic Memory Management
There are basically two ways to assign memory to a program, Dynamic Memory Allocation and Static Memory Allocation. Using Dynamic Memory Allocation, we can overcome the drawbacks to Static Memory allocation.
This enables the user to interact with the memory of the computer in the run-time and use the memory according to the requirement of the program and deallocate it as soon as the program finishes execution.
This kind of Dynamic Memory Management increases the Efficiency of the program.
Signal Handling
Signals ar the interrupts delivered to a method by the software package which may terminate a program untimely. you’ll be able to generate interrupts by pressing Ctrl+C on an operating system, LINUX, waterproof OS X or Windows system.
There are signals which may not be caught by the program however there’s the following list of signals that you’ll be able to catch in your program and may take applicable actions supported the signal. These signals are outlined in the C++ header file.
C++ signal-handling library provides perform signal to trap surprising events. Following is that the syntax of the signal() perform
Syntax
void (*signal (int sig, void (*func)(int)))(int);
Example:
#include <iostream>
#include <csignal>
using namespace std;

void signal_handler( int signal_num )
{
     cout << "The interrupt signal is (" << signal_num << "). n";
     exit(signal_num);
}
int main ()
{
      signal(SIGABRT, signal_handler);
      while(true)
      cout << "Welcome to Edureka." << endl;
      return 0;
}
//Output:
Welcome to Edureka.Welcome to Edureka.Welcome to Edureka........
Multi-Threading
Multithreading is a specialised sort of multitasking and a multitasking is that the feature that enables your pc to run 2 or additional programs at the same time. In general, their area unit 2 kinds of multitasking.
Process-based multitasking handles the execution of programs. Thread-based multitasking deals with the execution of items of identical program.
A multithreaded program contains 2 or additional elements which will run at the same time. every a part of such a program is termed a thread, and every thread defines a separate path of execution.
C++ doesn’t contain any constitutional support for multithreaded applications. Instead, it depends entirely upon the OS to produce this feature.
The C++ Programming Language has the following stages in Multi-Threading
Create Thread
The following syntax is used to create a POSIX thread
#include <pthread.h>
pthread_create (thread, attr, start_routine, arg)
Example:
#include <iostream>
#include <cstdlib>
#include <pthread.h>
using namespace std;

#define NUM_THREADS 5
void *PrintHello(void *threadid)
{
     long tid;
     tid = (long)threadid;
     cout << "Hello World! Thread ID, " << tid << endl;
     pthread_exit(NULL);
}

int main ()
{
     pthread_t threads[NUM_THREADS];
     int rc;
     int i;
     for( i = 0; i < NUM_THREADS; i++ )
     {
            cout << "main() : creating thread, " << i << endl;
            rc = pthread_create(&threads[i], NULL, PrintHello, (void *)i);
            if (rc)
            {
                   cout << "Error:unable to create thread," << rc << endl;
                   exit(-1);
            }
     }
     pthread_exit(NULL);
}
//Output:
main() : creating thread,0main() : creating thread,1main() : creating thread,2main() : creating thread,3main() : creating thread,4Welcome to Edureka! Thread ID,4Welcome to Edureka! Thread ID,3Welcome to Edureka! Thread ID,2Welcome to Edureka! Thread ID,1Welcome to Edureka! Thread ID,0
Pass Arguments to Thread
This example shows the way to pass multiple arguments via a structure. you’ll pass any data sort in an exceeding thread request as a result of it points to void as explained within the following example
Example:
#include <iostream>
#include <cstdlib>
#include <pthread.h>
using namespace std;

#define NUM_THREADS 5
struct thread_data
{
        int thread_id;
        char *message;
};

void *PrintHello(void *threadarg)
{
        struct thread_data *my_data;
        my_data = (struct thread_data *) threadarg;
        cout << "Thread ID : " << my_data->thread_id ;
        cout << " Message : " << my_data->message << endl;
        pthread_exit(NULL);
}
int main ()
{
        pthread_t threads[NUM_THREADS];
        struct thread_data td[NUM_THREADS];
        int rc;
        int i;
        for( i = 0; i < NUM_THREADS; i++ )
        {
               cout <<"main() : creating thread, " << i << endl;
               td[i].thread_id = i;
               td[i].message = "This is message";
               rc = pthread_create(&threads[i], NULL, PrintHello, (void *)&td[i]);
               if (rc)
               {
                     cout << "Error:unable to create thread," << rc << endl;
                     exit(-1);
               }
        }
        pthread_exit(NULL);
}
//Output:
main() : creating thread, 0main() : creating thread, Thread ID : 10Message : This is messagemain() : creating thread,Thread ID : 21Message : This is messageThread ID : main() : creating thread, 23Message : This is message
main() : creating thread, Thread ID : 43Message : This is messageThread ID : 4
Join/Detach Thread
The pthread_join() function blocks the career thread until the required threaded thread terminates. once a thread is formed, one in every one of its attributes defines whether or not it’s joinable or detached. solely threads that area unit created as joinable will be joined. If a thread is formed as detached, it will never be joined.
This example demonstrates a way to stay up for thread completion by exploitation the Pthread be a part of the routine.
Syntax
pthread_join (threadid, status)
pthread_detach (threadid)
Example:
#include <iostream>
#include <cstdlib>
#include <pthread.h>
#include <unistd.h>
using namespace std;
#define NUM_THREADS 5

void *wait(void *t)
{
    int i;
    long tid;
    tid = (long)t;
    sleep(1);
    cout << "Sleeping in thread " << endl;
    cout << "Thread with id : " << tid << " Thread exiting " << endl;
    pthread_exit(NULL);
}

int main ()
{
    int rc;
    int i;
    pthread_t threads[NUM_THREADS];
    pthread_attr_t attr;
    void *status;
    pthread_attr_init(&attr);
    pthread_attr_setdetachstate(&attr, PTHREAD_CREATE_JOINABLE);
    for( i = 0; i < NUM_THREADS; i++ )
    {
         cout << "main() : creating thread, " << i << endl;
         rc = pthread_create(&threads[i], &attr, wait, (void *)i );
         if (rc)
         {
                cout << "Error:unable to create thread," << rc << endl;
                exit(-1);
          }
    }
    pthread_attr_destroy(&attr);
    for( i = 0; i < NUM_THREADS; i++ )
    {
          rc = pthread_join(threads[i], &status);
          if (rc)
          {
                cout << "Error:unable to join," << rc << endl;
                exit(-1);
          }
          cout << "Main: completed thread id :" << i ;
          cout << " exiting with status :" << status << endl;
     }
     cout << "Main: program exiting." << endl;
     pthread_exit(NULL);
}
//Output:
main() : creating thread, 0main() : creating thread, 1main() : creating thread, 2main() : creating thread, 3main() : creating thread, 4Sleeping in threadThread with id : 0 Thread exitingSleeping in threadThread with id : 1 Thread exitingSleeping in threadThread with id : 2 Thread exitingSleeping in threadThread with id : 3 Thread exitingSleeping in threadThread with id : 4 exitingMain: completed thread id :0 exiting with status :0Main: completed thread id :1 exiting with status :0Main: completed thread id :2 exiting with status :0Main: completed thread id :3 exiting with status :0Main: completed thread id :4 exiting with status :0Main: program exiting.
Terminate Thread
The following syntax is used to terminate the Thread
#include <pthread.h>
pthread_exit (status)
Containers
Associative containers that store elements in a mapped fashion are called Maps. All the elements in a map are stored in a key-value pair where each key is unique. Sorting is done with the help of keys and the values are associated with each key. Values can be inserted and deleted as and when required.
Syntax
map<key_type , value_type> map_name;
Example:
#include <iostream>
#include <iterator>
#include


<map>

using namespace std;

int main()
{
        map<int, int> Edureka1;
        Edureka1.insert(pair<int, int>(1, 40));
        Edureka1.insert(pair<int, int>(2, 30));
        Edureka1.insert(pair<int, int>(3, 60));
        Edureka1.insert(pair<int, int>(4, 20));
        Edureka1.insert(pair<int, int>(5, 50));
        Edureka1.insert(pair<int, int>(6, 50));
        Edureka1.insert(pair<int, int>(7, 10));
        map<int, int>::iterator itr;
        cout << "nThe map Edureka1 is : n";
        cout << "tKEYtELEMENTn";
        for (itr = Edureka1.begin(); itr != Edureka1.end(); ++itr)
        {
                cout << 't' << itr->first << 't' << itr->second << 'n';
        }
        cout << endl;
        map<int, int> Edureka2(Edureka1.begin(), Edureka1.end());
        cout << "nThe map Edureka2 after"<< " assign from Edureka1 is : n";
        cout << "tKEYtELEMENTn";
        for (itr = Edureka2.begin(); itr != Edureka2.end(); ++itr)
        {
                cout << 't' << itr->first << 't' << itr->second << 'n';
        }
        cout << endl;
        cout << "nEdureka2 after removal of" " elements less than key=3 : n";
        cout << "tKEYtELEMENTn";
        Edureka2.erase(Edureka2.begin(), Edureka2.find(3));
        for (itr = Edureka2.begin(); itr != Edureka2.end(); ++itr)
        {
                cout << 't' << itr->first<< 't' << itr->second << 'n';
        }
        int num;
        num = Edureka2.erase(4);
        cout << "nEdureka2.erase(4) : ";
        cout << num << " removed n";
        cout << "tKEYtELEMENTn";
        for (itr = Edureka2.begin(); itr != Edureka2.end(); ++itr)
        {
                cout << 't' << itr->first << 't' << itr->second << 'n';
        }
        cout << endl;
        cout << "Edureka1.lower_bound(5) : "<< "tKEY = ";
        cout << Edureka1.lower_bound(5)->first << 't';
        cout << "tELEMENT = "<< Edureka1.lower_bound(5)->second << endl;
        cout << "Edureka1.upper_bound(5) : "<< "tKEY = ";
        cout << Edureka1.upper_bound(5)->first << 't';
        cout << "tELEMENT = "<< Edureka1.upper_bound(5)->second << endl;
        return 0;
}
//Output:
The map Edureka1 is :KEY ELEMENT 1 40 2 30 3 60 4 20 5 50 6 50 7 10
The map Edureka2 after assign from Edureka1 is :KEY ELEMENT 1 40 2 30 3 60 4 20 5 50 6 50 7 10
Edureka2 after removal of elements less than key=3 :KEY ELEMENT 3 60 4 20 5 50 6 50 7 10
Edureka2.erase(4) : 1 removedKEY ELEMENT 3 60 5 50 6 50 7 10
Edureka1.lower_bound(5) : KEY = 5 ELEMENT = 50Edureka1.upper_bound(5) : KEY = 6 ELEMENT = 50
The following Questions are the most frequently asked Interview Questions based on C++ Language
What is Type Conversion in C++
With this, we come to an end of this “C++ Tutorial” article. I hope you have understood the importance of Data Structures, Syntax, functionality, and operations performed using them. Now that you have understood the basics of Programming in C++, check out the java training provided by Edureka on many technologies like Java, Spring and many more, a trusted online learning company with a network of more than 250,000 satisfied learners spread across the globe got a question for us? Mention it in the comments section of this “C++ Tutorial” blog and we will get back to you as soon as possible.


can u give the code for the stack and others structures