Advanced DevOps Certification Training with G ...
- 22k Enrolled Learners
- Weekend
- Live Class
(7990)


 Copy Link!
Releasing software isn’t an art, but it is an engineering discipline. Continuous Deployment can be thought of as an extension to Continuous Integration which makes us catch defects earlier.
In this blog on Continuous Deployment, you will go through the following topics:
So, before we deep dive into continuous Deployment, let me brief you about DevOps first!
It is an approach of releasing software on the production servers continuously in an automated fashion. So, once a code passes through all the stages of compiling the source code, validating the source code, reviewing the code, performing unit testing & integration testing, packaging the application continuously, it will then be deployed onto the test serves to perform User Acceptance tests. Once that is done, the software will be deployed onto the production servers for release and this is said to be Continuous Deployment.
This Edureka video on “What is Continuous Deployment” will explain to you all concepts of Continuous Deployment you need to know with the help of case studies, use-cases and a hands-on.
Now, often people get confused between the terms, Continuous Delivery & Continuous Deployment. So let me clarify the confusion for you!
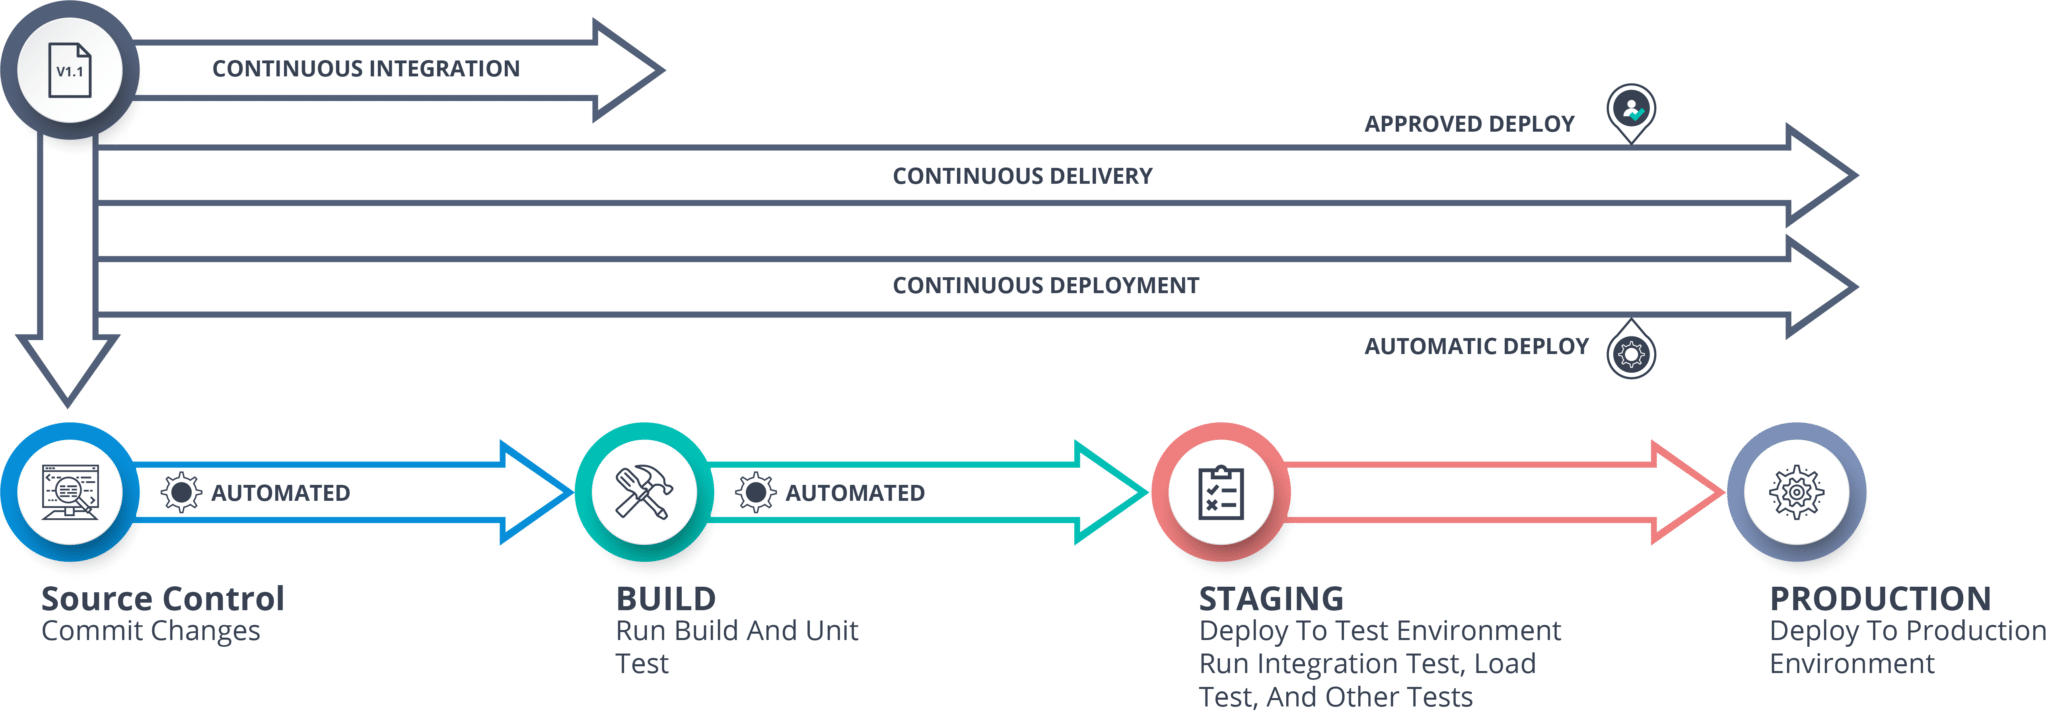
Continuous Delivery does not involve deployment to production on every change that occurs. You just need to ensure that the code is always in a deployable state, so you can deploy it easily whenever you want.
On the other hand, Continuous Deployment requires every change to be deployed automatically, without human intervention.
So, as you can see in the diagram once Continuous Integration stages are completed, the newly built application is automatically deployed to production then it is Continuous Deployment. On the other hand, if we manage to automate everything, but decide to require a human approval in order to proceed with the deployment of the new version, then we are taking into account Continuous Delivery. Well, the difference is very much subtle, but it has enormous implications, making each technique appropriate for various situations.
This Edureka video on Continuous Delivery vs Continuous Deployment will explain to you the major differences between these two terms in the world of DevOps.
So, now that you have an understanding of Continuous Deployment, let’s see a case study on Continuous Deployment.
LinkedIn is an employment-oriented service that is mainly used for professional networking. LinkedIn’s prior system before implementing Continuous Deployment was more traditional.
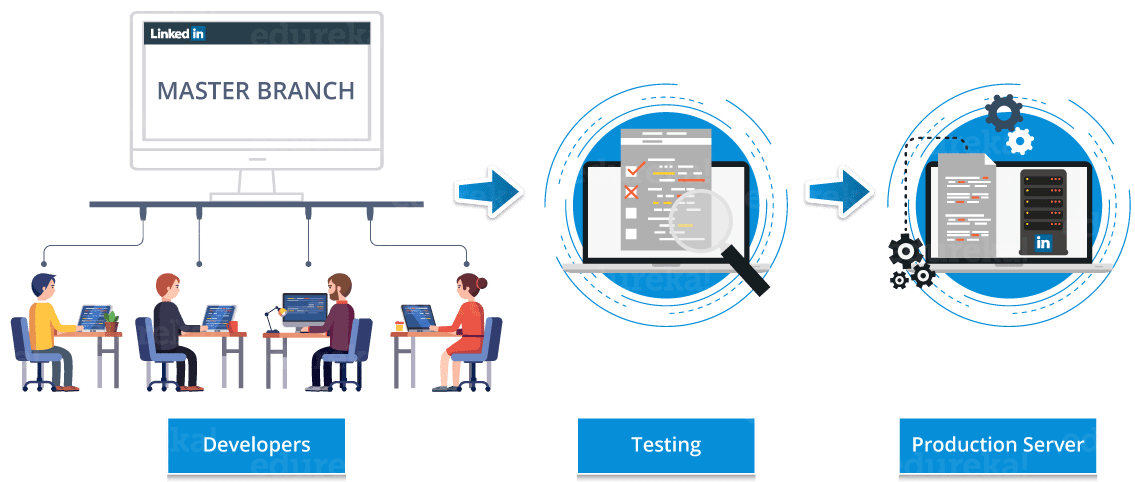
The system included various branches diverging from a single trunk developed in a parallel manner. So, a developer would write big batches of code with respect to various features and then wait for this feature branch to be merged into the trunk i.e. the master branch.
Once the feature was merged into the master branch, it had to be again tested to make sure that it did not break into any other code of a different feature at the same instance.
Since this system included several batches of code written in isolation by various teams, and then once written are merged into a single branch, this system was known as a feature branch system. This kind of system limited the scope and number of features, thus slowing down the company’s development life cycle.
Looking at the above conditions, Linkedln thus decided to move from its traditional feature-based development lifecycle to new Continuous deployment.
This required migrating the old code and built out the automated tools to make the new system work, thus halting Linkedln’s development for months.

LinkedIn’s framework after using continuous deployment included developers writing code in tidy, distinct chunks, and checking each chunk into the trunk shared amongst all LinkedIn developers. The newly-added code is then subjected to a series of automated tests to remove bugs.
Once the code passes the tests it is merged into trunk and listed out in a system that shows managers what features are ready to go live on the site or in newer versions of LinkedIn’s apps.
So, that was Linkedln’s success story!
Now, let me continue this discussion by telling you the basic benefits of Continuous Deployment.
The benefits that Continuous Deployment offers are as follows:
Subscribe to our youtube channel to get new updates..!
Problem Statement: Deploy an application in headless mode through Jenkins server, using selenium test files.
Solution: Follow the steps below to deploy the application in a headless mode.
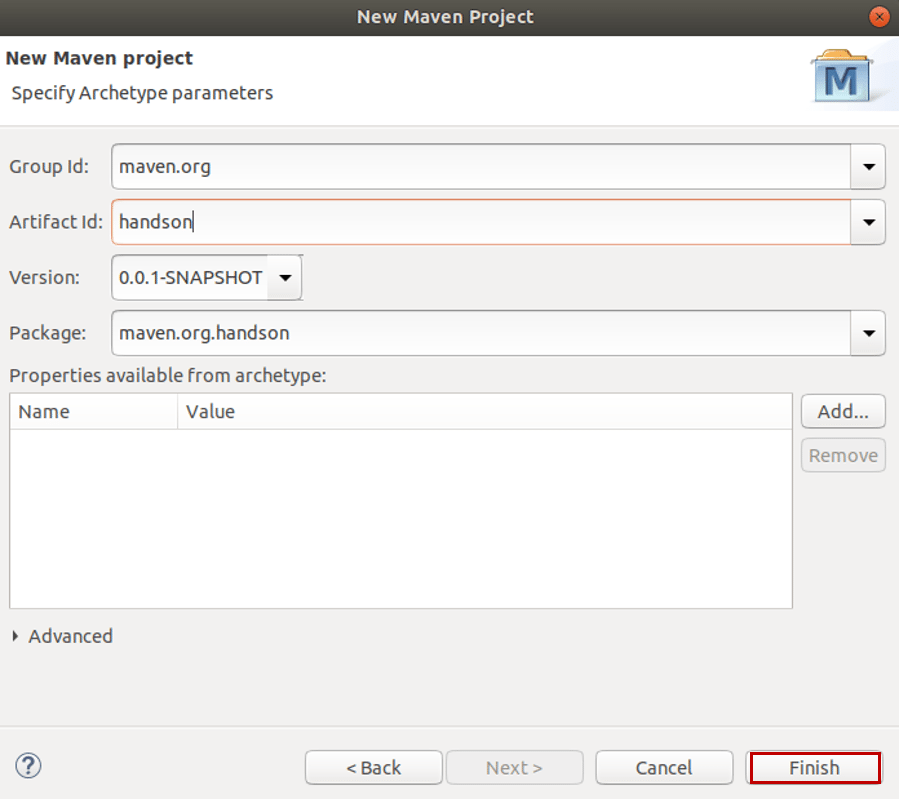
Step 1: Open your Eclipse IDE and create a Maven Project. To create a maven project go to File -> New -> Maven Project. In the dialog box that opens up, mention the Group Id and the Artifact Id and then click on Finish.
Step 2: Once you create your maven project, include the code of Selenium App in the main Java file and make sure you have inserted the argument to deploy it in the headless mode.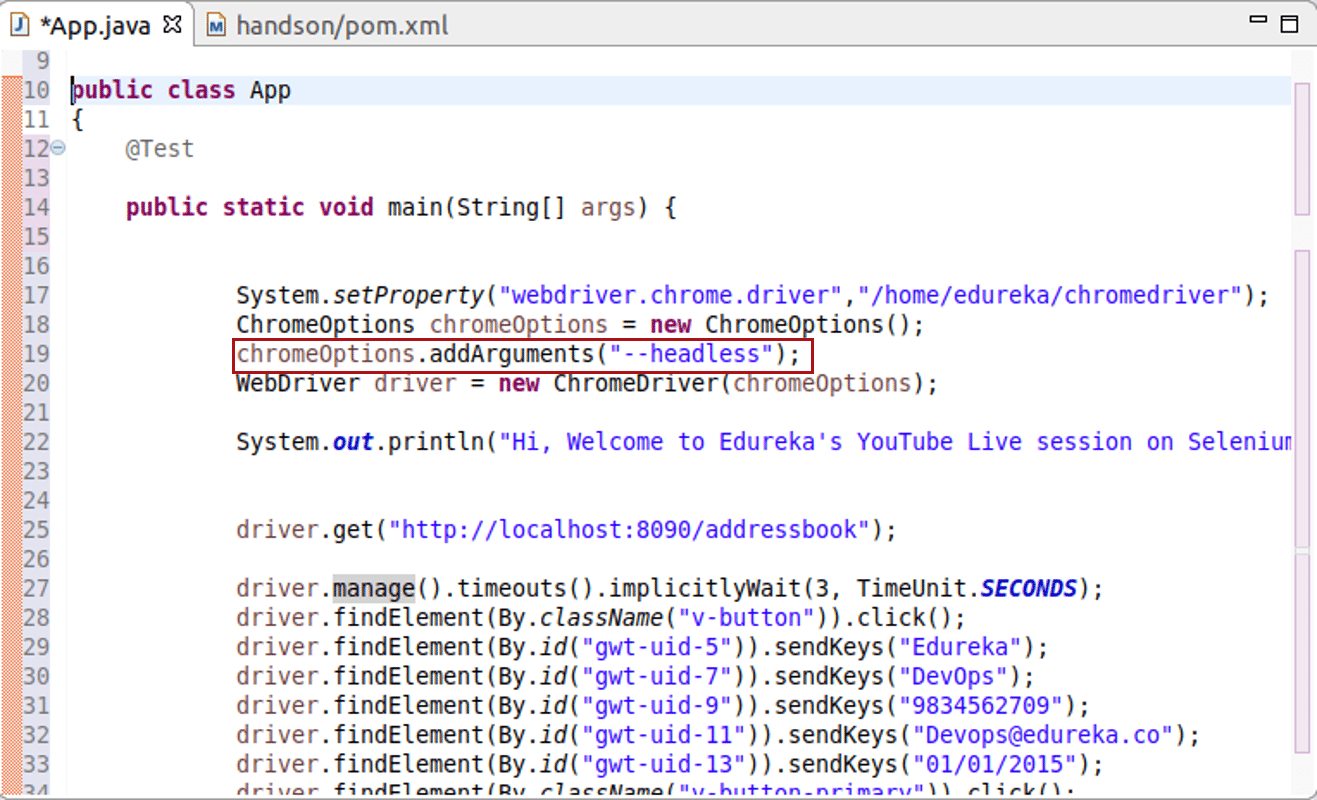
Step 3: After that include the required dependencies in the pom.xml file.
Step 4: After this, your project is ready to run. Since we want to run it in headless mode, we have to deploy this application in the Jenkins Server.
Step 5: So, you have to export your project as a JAR file. To do that, go to File -> Export -> choose Runnable JAR file. After that click on Next.
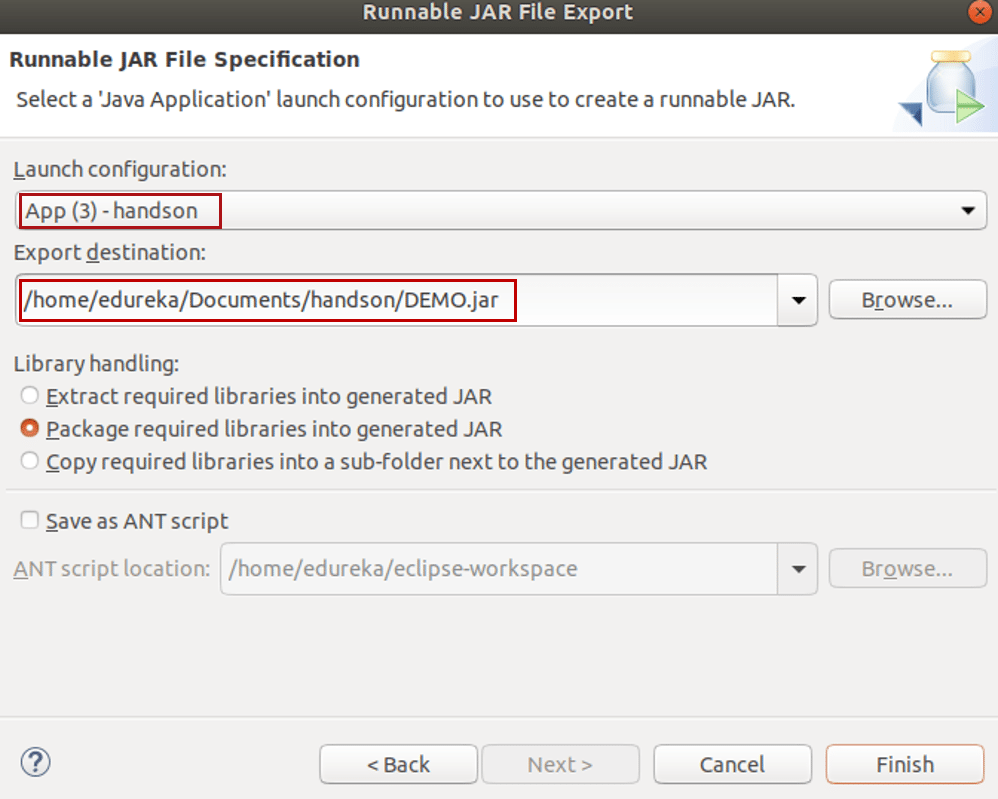
Step 6: In the next dialog box, choose the App you want to launch configuration and then choose the directory where you want to export and then click on Finish.
Step 7: After you export your project as a JAR file, you have to push it to a GitHub repository. To push it to the GitHub repository, first, create a new repository in your GitHub account.
Step 7.1: To do that, go to the Repositories tab and choose the option New.

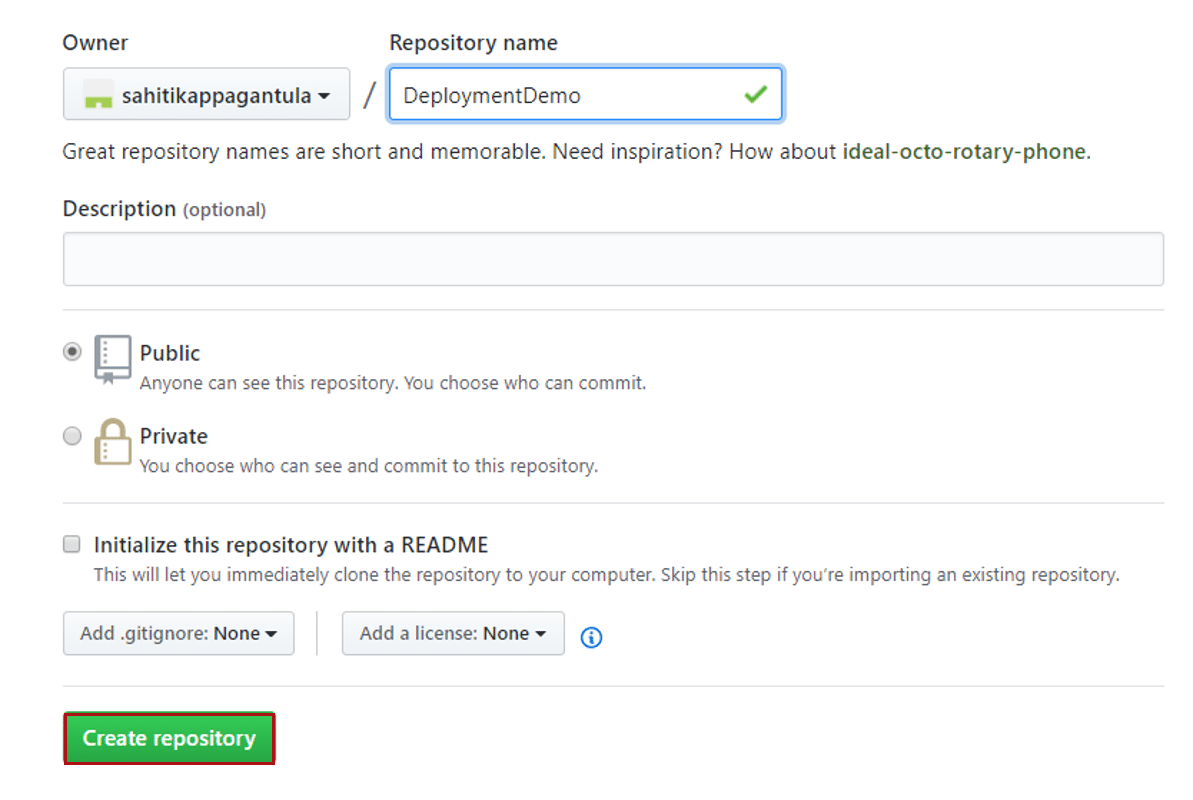
Step 7.2: After that mention the repository name, and choose if you wish your project to be private or public and then finally click on Create Repository.
Step 8: To push your project to this repository. Follow the below steps:
Step 8.1: Go to the directory where your jar file is present and initialize git using the command git init.
Step 8.2: After that, perform the git add operation using the command git add.
Step 8.3: Once you are done with that, commit the operation using the command git commit -m ‘Type in your message here’.
Step 8.4: Now connect your GitHub repository to local repository by using the command git remote add origin ‘Link of your repository’(Don’t include quotations)
Step 8.5: Now push your repository by using the command git push -u origin master
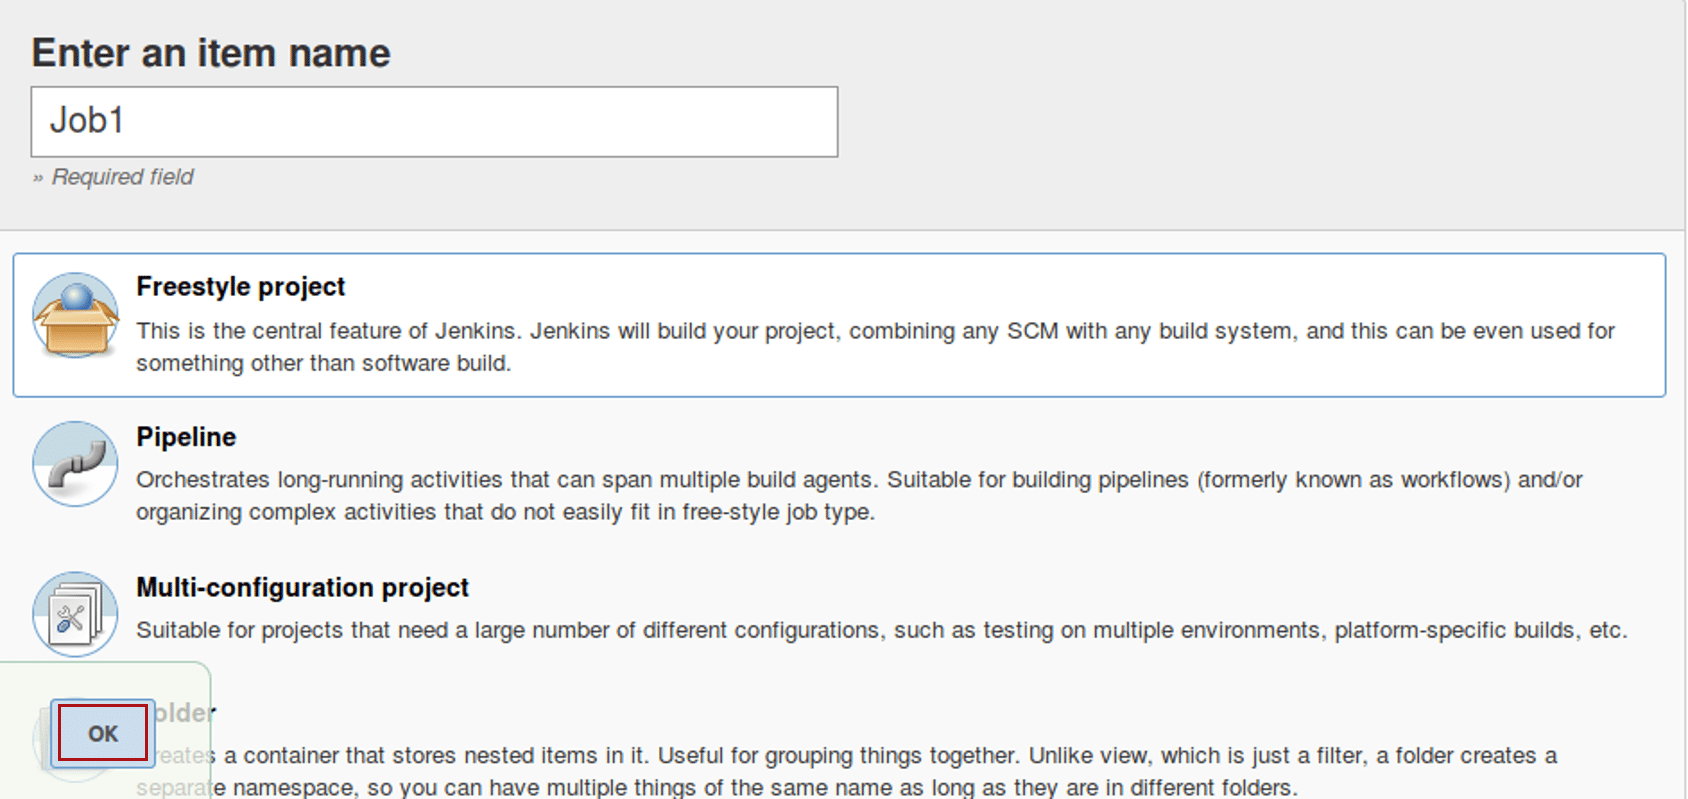
Step 9: Once the JAR file has been pushed to the local repository, you have to create a new Job in the Jenkins server. To do that, open your Jenkins Dashboard, and then go to New Item -> Type in the item name -> Click on OK.
Step 10: Once your job is created, click on the job and go to configure option.
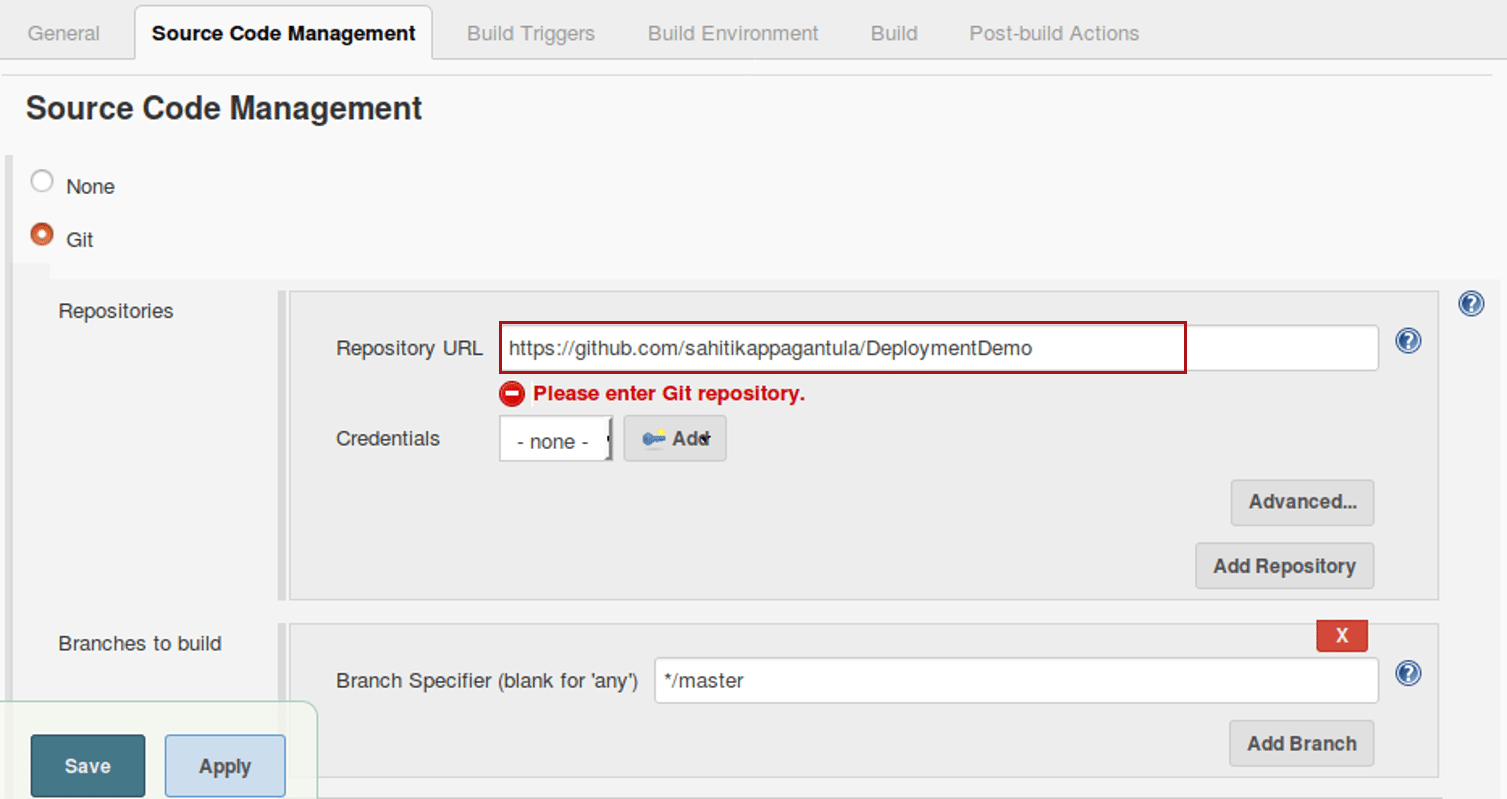
Step 10.1: Go to Source Code Management tab -> Choose Git -> Mention the Repository URL.
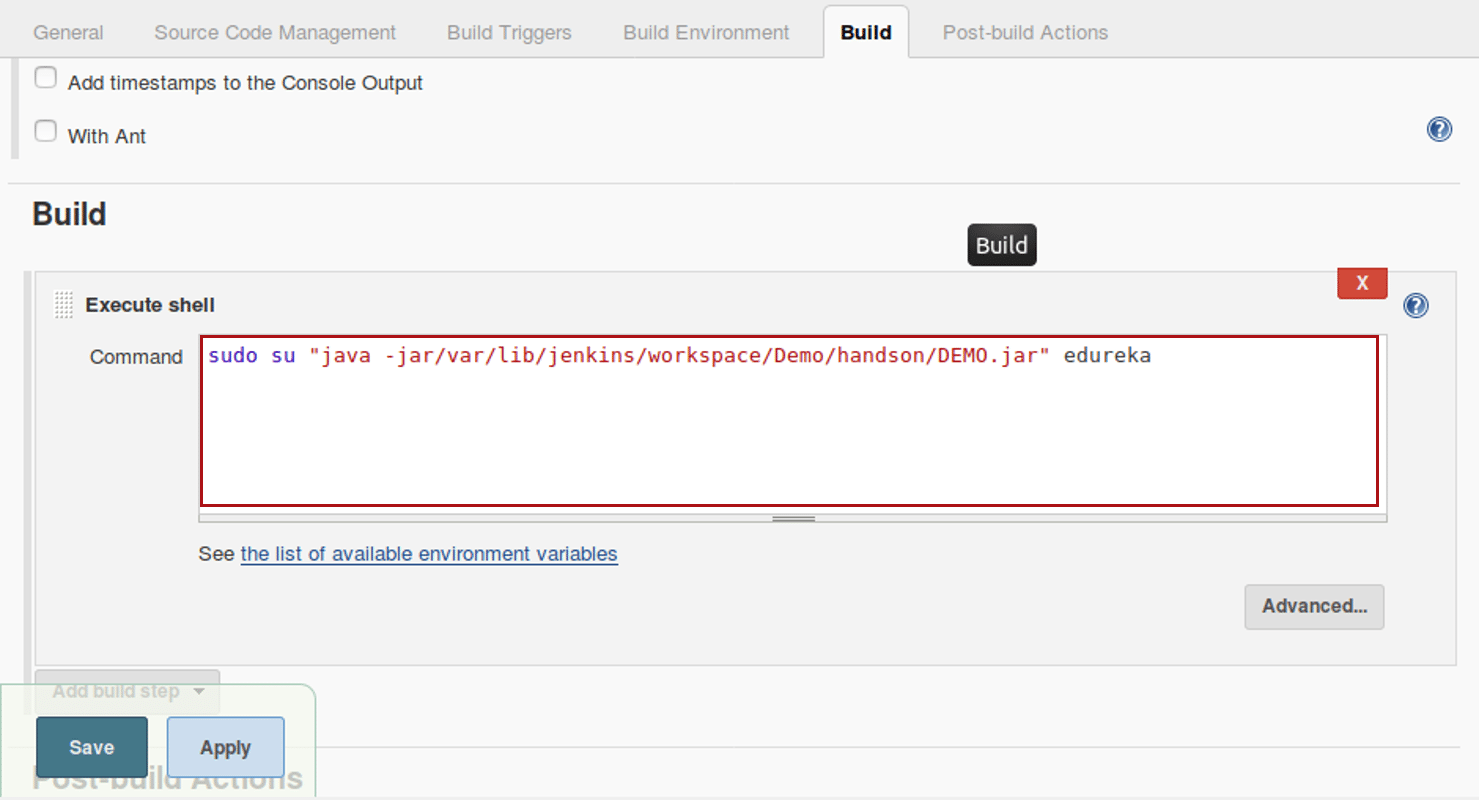
Step 10.2: After that, go to the Build tab and choose the option Execute shell. In this mention the path of the jar file in your Jenkins workspace.
Step 10.3: Once you’re done with the above two steps, save the changes.
Step 11: Click on Build Now, to build the project and see the output.
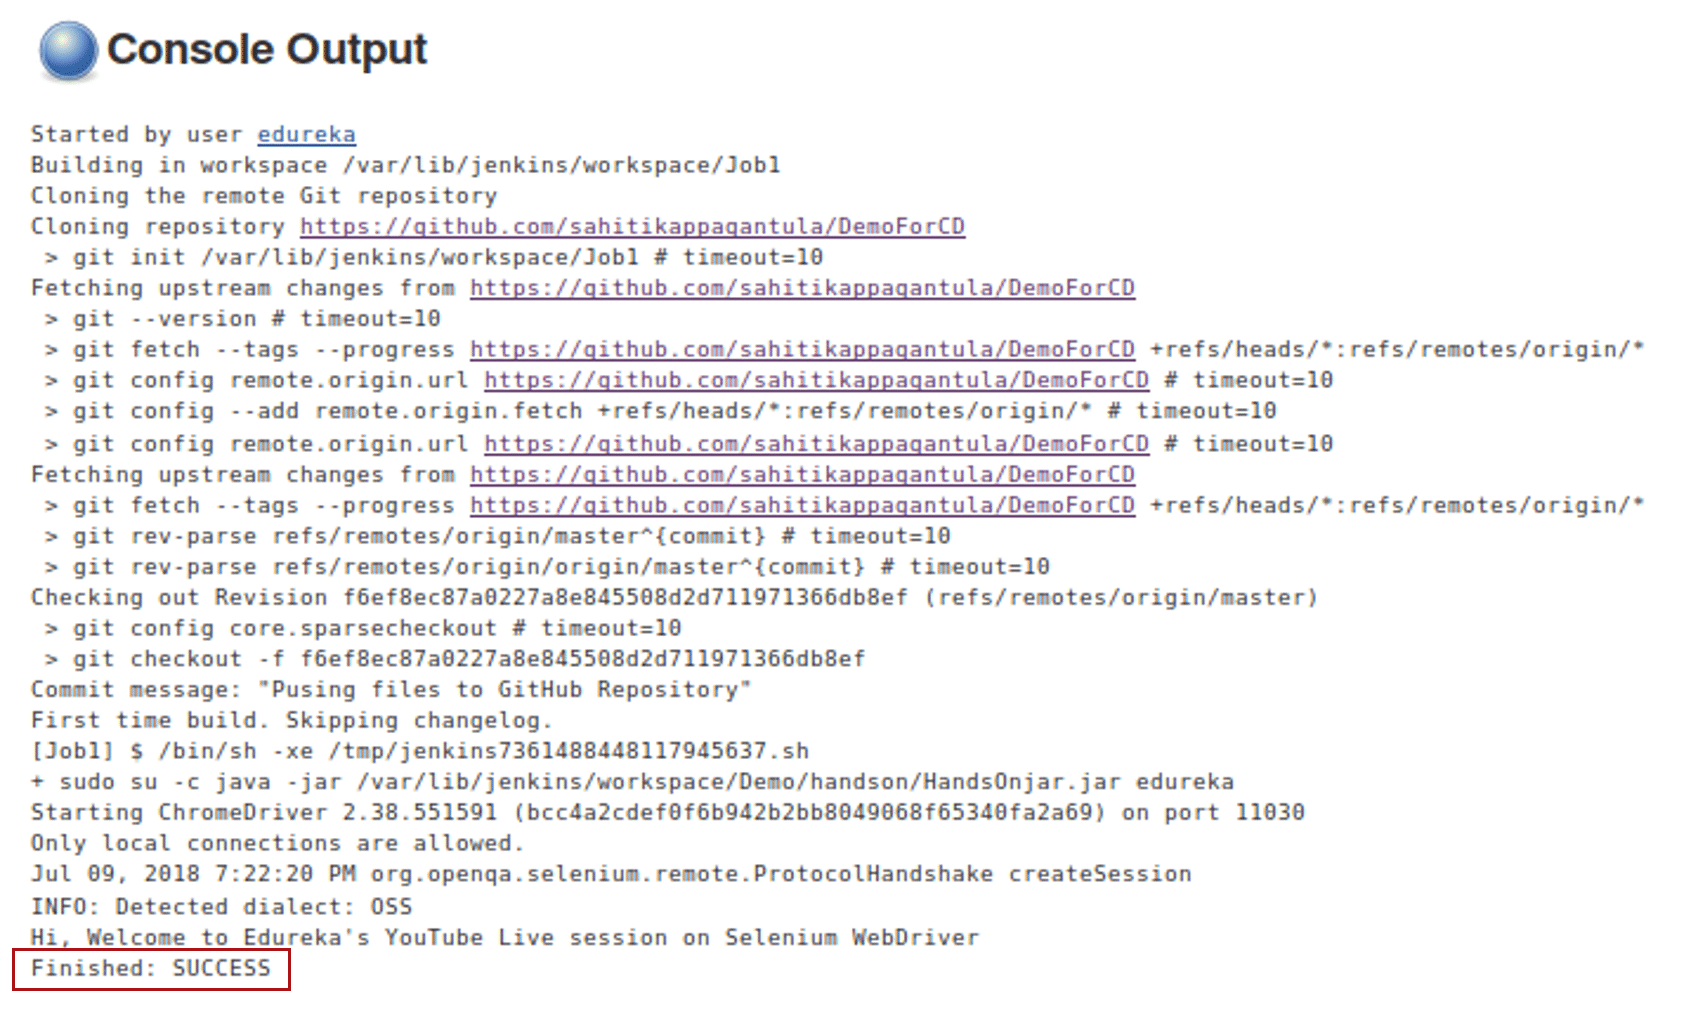
Since it is continuous deployment, that is the case where this program can be deployed by any person working in the team and the others can only see the output that something has been, changed. They will not know who has deployed it directly onto the production servers.
But, if you run the same project in eclipse then it will run on the browsers which we don’t want in our case presently as in Jenkins we cannot open other browsers!
If you want the source code of the example shown, please comment out in the comments section.
If you found this Continuous Deployment blog relevant, check out the DevOps training by Edureka, a trusted online learning company with a network of more than 250,000 satisfied learners spread across the globe. The Edureka DevOps Certification Training course helps learners gain expertise in various DevOps processes and tools such as Puppet, Jenkins, Nagios, Ansible, Docker, Kubernetes and GIT for automating multiple steps in SDLC.
Unlock the potential of Continuous Testing in DevOps. Gain expertise in quality assurance, accelerated delivery, and seamless collaboration for successful software development.
Got a question for me? Please mention it in the comments section and I will get back to you.


 Thank you for registering Join Edureka Meetup community for 100+ Free Webinars each month JOIN MEETUP GROUP