If you have been creating any type of applications till now, you are already aware of the huge significance that a checkbox holds. Not only does it makes the input of data easier to any platform, but it also facilitates the quick sorting of data as it often comes packaged with the list feature. In this article, we will see how to create a checkbox in angular8 in the following sequence:
Create Checkbox in Angular8
To explain the steps of creating a checkbox in Angular8, let us take an example where we have a list of orders to choose from and we must this to the user in the form of a checkbox. In order to this, follow the code below.
const ordersData = [
{ id: 1, name: 'order 1' },
{ id: 2, name: 'order 2' },
{ id: 3, name: 'order 3' },
{ id: 4, name: 'order 4' }
];
In this case, the data is already present with us and therefore we have made use of the code shared above. In a real world scenario, this data would most likely be imported via an API. For more check out this Full Stack Developer Course today.
In this example, we can also make use of reactive forms to make the end result cleaner and efficient. In order to understand how to do this, take a look at the example below.
import { Component } from '@angular/core';
import { FormBuilder, FormGroup } from '@angular/forms';

@Component({
selector: 'my-app',
templateUrl: './app.component.html',
styleUrls: ['./app.component.css']
})
export class AppComponent {
form: FormGroup;
ordersData = [];

constructor(private formBuilder: FormBuilder) {
this.form = this.formBuilder.group({
orders: []
});
}

submit() { ... }
}
In the above code, we have made use of the following.
- FormGroups: which represents a single form.
- FormControl: which represents a single entry into a single form.
- FormArray: which is used to represent a collection of all the FormControls.
In the above example we can also make use of the FormBuilder service to create the form; it will look something like this.
<form [formGroup]="form" (ngSubmit)="submit()">
<!-- our form array of checkboxes will go here -->
<button>submit</button>
</form>
In the above example, we have binded the form with form element by using [formGroup]=”form”.
Now that the basic form has been created, let us add some dynamicity to the same via the use of FormArray as shown below.
import { Component } from '@angular/core';
import { FormBuilder, FormGroup, FormArray, FormControl, ValidatorFn } from '@angular/forms';

@Component({
selector: 'my-app',
templateUrl: './app.component.html',
styleUrls: ['./app.component.css']
})
export class AppComponent {
form: FormGroup;
ordersData = [
{ id: 100, name: 'order 1' },
{ id: 200, name: 'order 2' },
{ id: 300, name: 'order 3' },
{ id: 400, name: 'order 4' }
];

constructor(private formBuilder: FormBuilder) {
this.form = this.formBuilder.group({
orders: new FormArray([])
});

this.addCheckboxes();
}

private addCheckboxes() {
this.ordersData.forEach((o, i) => {
const control = new FormControl(i === 0); // if first item set to true, else false
(this.form.controls.orders as FormArray).push(control);
});
}

submit() {
const selectedOrderIds = this.form.value.orders
.map((v, i) => v ? this.orders[i].id : null)
.filter(v => v !== null);
console.log(selectedOrderIds);
}
}
In the above example, after every loop iteration we have created a new FormControl and taken our orders from FormArray. We have set the first control to be true and thus the first order has been checked off the list by default.
After this we need to bind the FormArray element to this template in order to get the specific order information that needs to be displayed to the user.
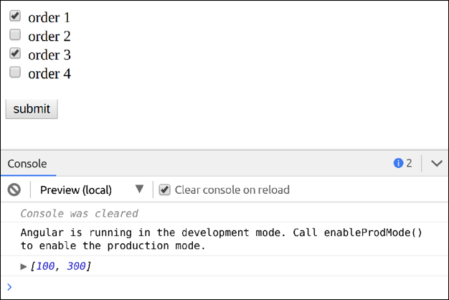
<form [formGroup]="form" (ngSubmit)="submit()">
<label formArrayName="orders" *ngFor="let order of form.controls.orders.controls; let i = index">
<input type="checkbox" [formControlName]="i">
{{ordersData[i].name}}
</label>

<button>submit</button>
</form>
Output:
Also Read: React Vs. Angular
Validating the Checkbox in Angular8
Take a look at the example below to learn how to validate a checkbox.
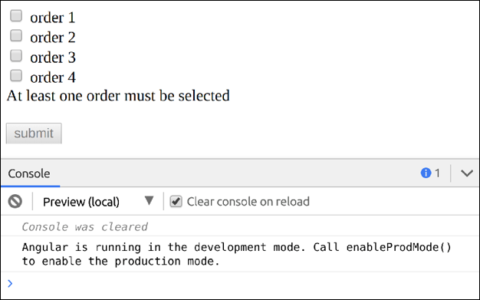
<form [formGroup]="form" (ngSubmit)="submit()">
<label formArrayName="orders" *ngFor="let order of form.controls.orders.controls; let i = index">
<input type="checkbox" [formControlName]="i">
{{ordersData[i].name}}
</label>

<div *ngIf="!form.valid">At least one order must be selected</div>
<button>submit</button>
</form>

...
export class AppComponent {
form: FormGroup;
ordersData = [...];

constructor(private formBuilder: FormBuilder) {
this.form = this.formBuilder.group({
orders: new FormArray([], minSelectedCheckboxes(1))
});

this.addCheckboxes();
}

...
}

function minSelectedCheckboxes(min = 1) {
const validator: ValidatorFn = (formArray: FormArray) => {
const totalSelected = formArray.controls
// get a list of checkbox values (boolean)
.map(control => control.value)
// total up the number of checked checkboxes
.reduce((prev, next) => next ? prev + next : prev, 0);

// if the total is not greater than the minimum, return the error message
return totalSelected >= min ? null : { required: true };
};

return validator;
}
Output:
Adding ASync Form Controls
Now that you know how to add dynamic checkboxes, let us see how we can add ASync to these forms.
import { Component } from '@angular/core';
import { FormBuilder, FormGroup, FormArray, FormControl, ValidatorFn } from '@angular/forms';
import { of } from 'rxjs';

@Component({
selector: 'my-app',
templateUrl: './app.component.html',
styleUrls: ['./app.component.css']
})
export class AppComponent {
form: FormGroup;
ordersData = [];

constructor(private formBuilder: FormBuilder) {
this.form = this.formBuilder.group({
orders: new FormArray([], minSelectedCheckboxes(1))
});

// synchronous orders
this.ordersData = this.getOrders();
this.addCheckboxes();
}

private addCheckboxes() {
this.ordersData.forEach((o, i) => {
const control = new FormControl(i === 0); // if first item set to true, else false
(this.form.controls.orders as FormArray).push(control);
});
}

getOrders() {
return [
{ id: 100, name: 'order 1' },
{ id: 200, name: 'order 2' },
{ id: 300, name: 'order 3' },
{ id: 400, name: 'order 4' }
];
}

submit() {
const selectedOrderIds = this.form.value.orders
.map((v, i) => v ? this.ordersData[i].id : null)
.filter(v => v !== null);
console.log(selectedOrderIds);
}
}

...

import { of } from 'rxjs';
...
constructor(private formBuilder: FormBuilder) {
this.form = this.formBuilder.group({
orders: new FormArray([], minSelectedCheckboxes(1))
});

// async orders (could be a http service call)
of(this.getOrders()).subscribe(orders => {
this.ordersData = orders;
this.addCheckboxes();
});

// synchronous orders
// this.ordersData = this.getOrders();
// this.addCheckboxes();
}
With this, we have come to the end of our article. Now that you know how to add a checkbox to your angular8, we hope that you will make use of it in your day to day coding.
Now that you know the building blocks of Angular, check out Angular Training by Edureka. Angular is a JavaScript framework which is used to create scalable, enterprise, and performance client-side web applications. With Angular framework adoption being high, performance management of the application is community-driven indirectly driving better job opportunities. The Angular Certification Training aims at covering all these new concepts around Enterprise Application Development. Get hands-on experience building real-world mobile apps using Flutter in a comprehensive Flutter Training Online.