


Jupyter Notebooks are a powerful way to write and iterate on your Python code for data analysis. Jupyter Notebook is built off of IPython and the Kernel runs the computations and communicates with the Jupyter Notebook front-end interface. This Jupyter Notebook Cheat Sheet will help you find your way around the well-known Notebook App, a subproject of Project Jupyter. Learn more about Hadoop Ecosystem tools and its concepts from the Online big data courses.
To get in-depth knowledge, check out our interactive, live-online Edureka Python Data Science Certification Training here, that comes with 24*7 support to guide you throughout your learning period.
Jupyter Notebook Cheat Sheet
Jupyter Notebook is an open-source web application that allows you to create and share documents that contain live code, equations, visualizations and narrative text. It is used for data cleaning and transformation, numerical simulation, statistical modeling, data visualization, machine learning, and much more.
This Jupyter Notebook Cheat Sheet is a guide to the Toolbar and the keyboard shortcuts used in Jupyter Notebook.


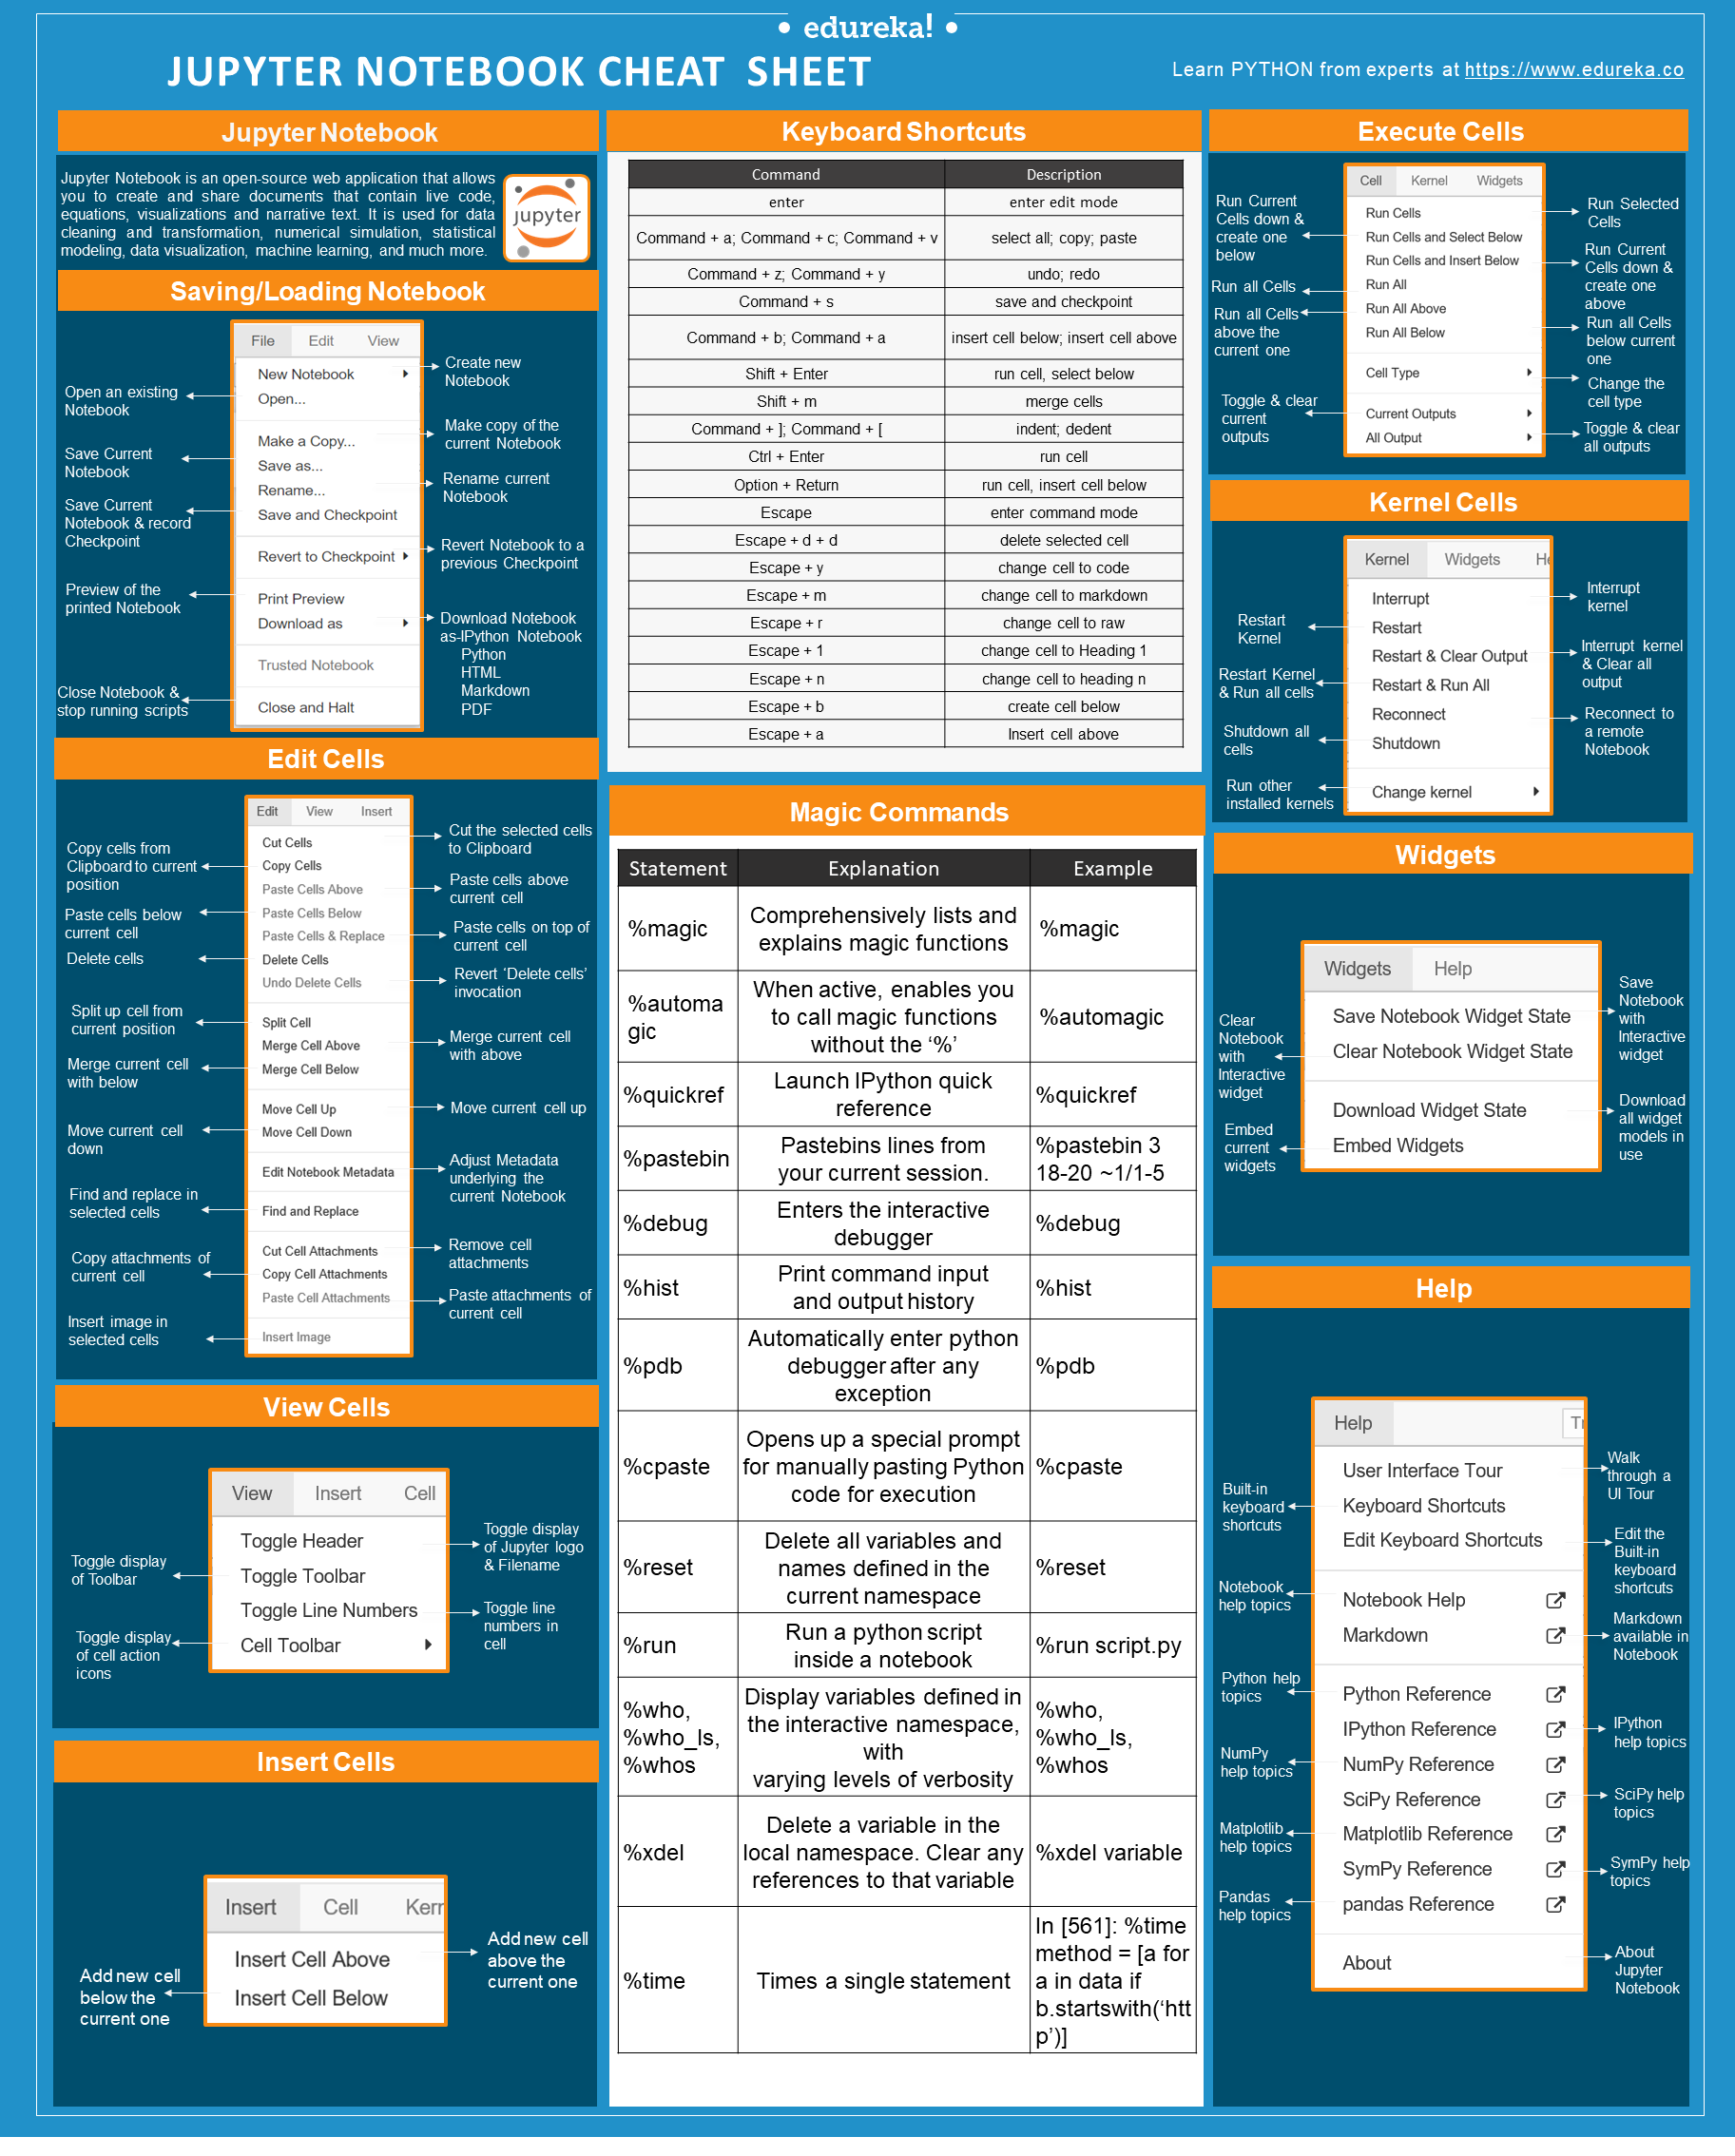
Saving/Loading Notebooks
Let’s begin with the Saving or Loading of Jupyter Notebook
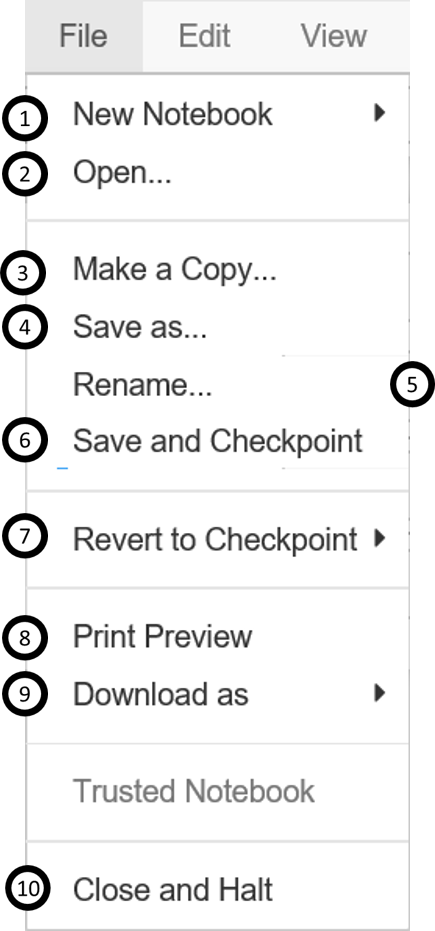

- Create new Notebook
- Open an existing Notebook
- Make a Copy of the Current Notebook
- Save current Notebook
- Rename current Notebook
- Save current Notebook and record Checkpoint
- Revert Notebook to a previous checkpoint
- Preview of the printed Notebook
- Download Notebook as-
- IPython Notebook
- Python
- HTML
- Markdown
- Close Notebook & stop running scripts
Keyboard Shortcuts
The following are the most used keyboard shortcuts for a Jupyter Notebook running the Python Kernel. This list changes frequently. Check help->keyboard shortcuts in your notebook for the latest shortcuts.
| Command | Description |
| enter | enter edit mode |
| Command + a; Command + c; Command + v | select all; copy; paste |
| Command + z; Command + y | undo; redo |
| Command + s | save and checkpoint |
| Command + b; Command + a | insert cell below; insert cell above |
| Shift + Enter | run cell, select below |
| Shift + m | merge cells |
| Command + ]; Command + [ | indent; dedent |
| Ctrl + Enter | run cell |
| Option + Return | run cell, insert cell below |
| Escape | enter command mode |
| Escape + d + d | delete selected cell |
| Escape + y | change cell to code |
| Escape + m | change cell to markdown |
| Escape + r | change cell to raw |
| Escape + 1 | change cell to Heading 1 |
| Escape + n | change cell to heading n |
| Escape + b | create cell below |
| Escape + a | Insert cell above |
Edit Cells
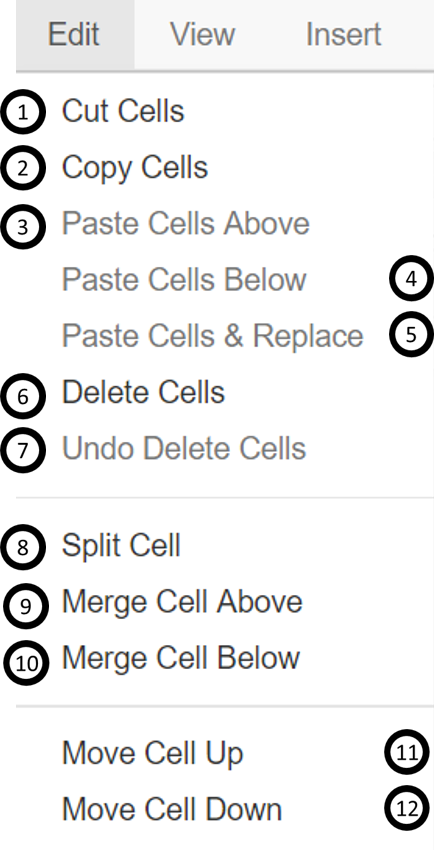

- Cut the selected Cells to clipboard
- Copy cells from clipboard to current position
- Paste cells from clipboard above current cell
- Paste cells from clipboard below current cell
- Paste cells from clipboard on top of current cell
- Delete Cells
- Revert ‘Delete cells’ invocation
- Split up a cell from current position
- Merge current cell with the one above
- Merge current cell with the one below
- Move current cell up
- Move current cell down
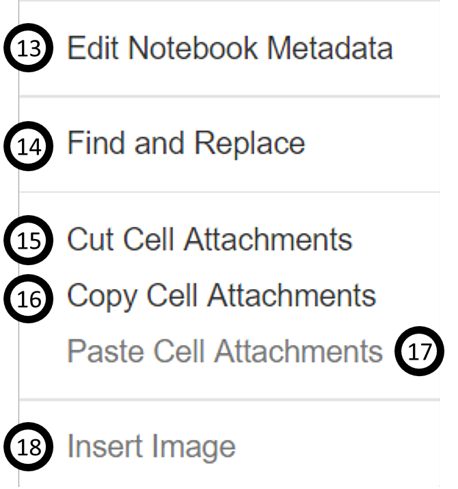

13. Adjust metadata underlying the current notebook
14. Find and replace in selected cells
15. Remove cell attachments
16. Copy attachments of current cell
17. Paste attachments of current cell
18. Insert image in selected cells
View Cells
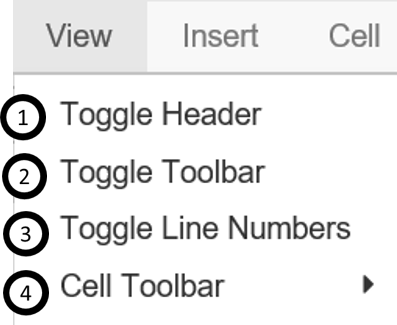

- Toggle display of Jupyter logo and filename
- Toggle display of toolbar
- Toggle line numbers in cells
- Toggle display of cell action icons:
- None
- Edit metadata
- Raw cell format
- Slideshow
- Attachments
- Tags
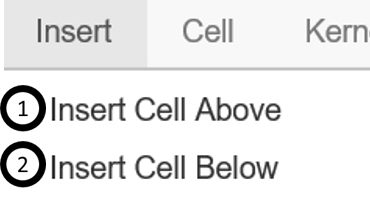
Insert Cells

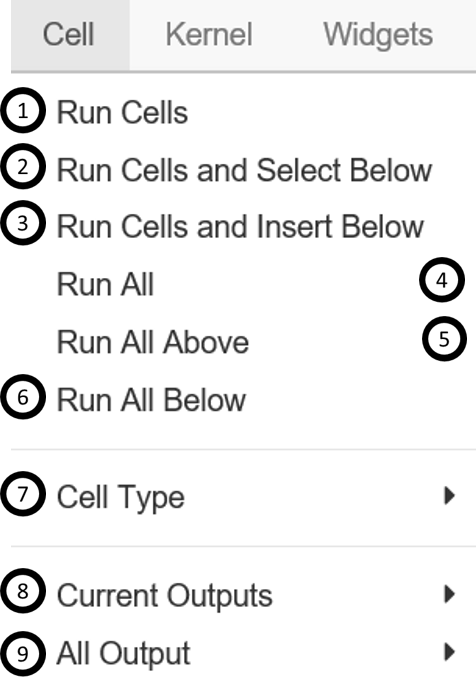
Execute Cells

- Add new cell above the current one
- Add new cell below the current one
- Run selected cells
- Run current cells down and create a new one below
- Run current cells down and create a new one above
- Run all cells
- Run all cells above the current cell
- Run all cells below the current cell
- Change the cell type of current cell
- Toggle, toggle scrolling and clear current outputs
- Toggle, toggle scrolling and clear all output
Magic Commands
Here are some of the commonly used Magic commands in jupyter Notebook.
| Statement | Explanation | Example |
| %magic | Comprehensively lists and explains magic functions | %magic |
| %automagic | When active, enables you to call magic functions without the ‘%’ | %automagic |
| %quickref | Launch IPython quick reference | %quickref |
| %time | Times a single statement | In [561]: %time method = [a for a in data if b.startswith(‘http’)] |
| %pastebin | Pastebins lines from your current session. | %pastebin 3 18-20 ~1/1-5 |
| %debug | Enters the interactive debugger | %debug |
| %hist | Print command input and output history | %hist |
| %pdb | Automatically enter python debugger after any exception | %pdb |
| %cpaste | Opens up a special prompt for manually pasting Python code for execution | %cpaste |
| %reset | Delete all variables and names defined in the current namespace | %reset |
| %run | Run a python script inside a notebook | %run script.py |
| %who, %who_ls, %whos | Display variables defined in the interactive namespace, with varying levels of verbosity | %who, %who_ls, %whos |
| %xdel | Delete a variable in the local namespace. Clear any references to that variable | %xdel variable |


Kernels provide computation and communication with front-end interfaces like the notebooks. Installing Jupyter Notebook will automatically install the IPython kernel.
- Interrupt kernel
- Restart kernel
- Interrupt kernel & clear all output
- Restart kernel & run all cells
- Connect back to a remote notebook
- Restart kernel & run all cells
- Run other installed kernels
Widgets
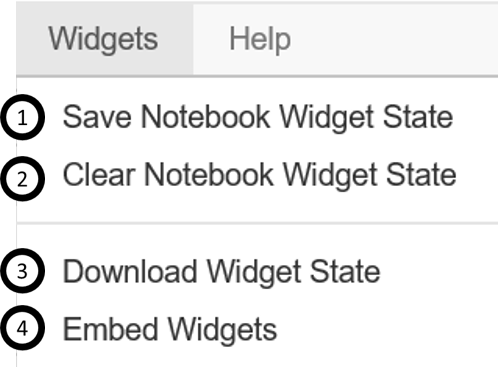

- Save notebook with interactive widget
- Clear notebook with interactive widget
- Download serialized state of all widget models in use
- Embed current widgets
Help
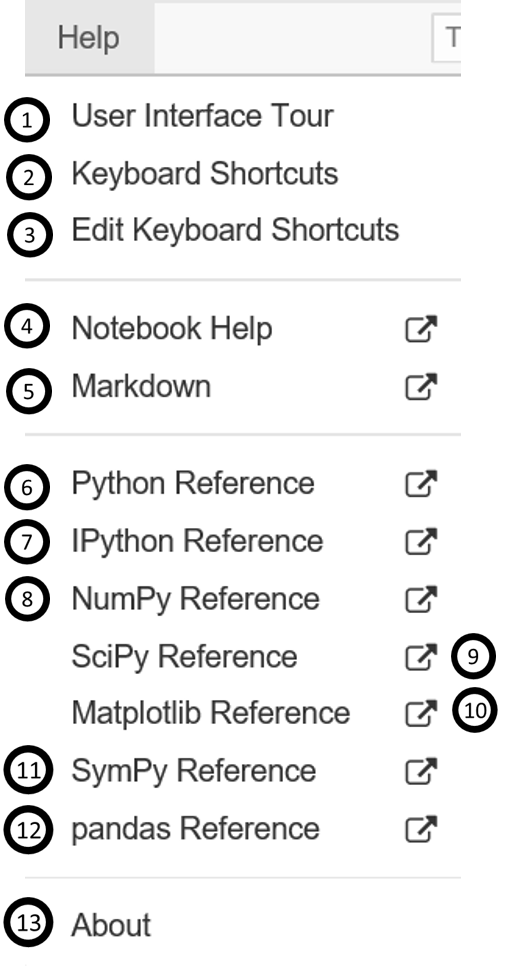

- Walk through a UI tour
- List of built-in keyboard shortcuts
- Edit the built-in keyboard shortcuts
- Notebook help topics
- Description of markdown available in notebook
- Python help topics
- IPython help topics
- NumPy help topics
- SciPy help topics
- Matplotlib help topics
- SymPy help topics
- Pandas help topics
- About Jupyter Notebook
With this, we come to an end of Jupyter Notebook Cheat Sheet. Edureka’s Python course helps you gain expertise in Quantitative Analysis, data mining, and the presentation of data to see beyond the numbers by transforming your career into Data Scientist role. You will use libraries like Pandas, Numpy, Matplotlib, Scikit and master the concepts like Python Machine Learning Algorithms such as Regression, Clustering, Decision Trees, Random Forest, Naïve Bayes and Q-Learning and Time Series.