


_1648290179.jpg)
Azure Storage is a Microsoft-managed cloud storage service, that provides highly available, durable, scalable and redundant storage, at a fraction of the cost, if you were to manage it manually. In this blog on Azure Storage, you will learn the different storage offerings from Azure such as tables, blobs, file storage and queues!
Towards the end, we have also included a demonstration of all these services in Azure. You can also refer this tutorial for an overview on Azure Storage:
Why Do We Need Storage?
Let’s understand this using an example, consider the following architecture:

This architecture is for an image processing website. We have tried to distribute the load among two classes of servers, namely website servers and backend servers. The website server’s sole job would be to handle the incoming page requests for our website. The backend servers will handle any “processing” that would be needed corresponding to an operation, which in our case would be image processing. There are two blank “entities” which are unknown.
The first entity will be needed to store the incoming jobs from our website servers. These jobs will be picked up by the backend servers to execute the job. Once a job has been completed, it has to be removed from this entity so that no other server picks it up to process again, since it’s already been processed.
You might be wondering, why can’t we just store this list on the backend servers? This is because, we will be needing multiple backend servers for our use case. So this list has to be present on each backend server, and on each successful job completion, all the servers will have to update their list. Now, this becomes a daunting task.
Hence, we needed a better solution. Therefore, we came up with a common location which is accessible to all the backend servers, where all our jobs can be stored on a first come first serve basis, this came to be known as a queue.
The second unknown entity is needed to store the processed images. We needed something which can store our images with minimum processing overhead. The obvious answer was a file system for storage.
Concluding, we needed a queue storage for our first entity, and for our second entity we needed a file system. But why do we need a file system rather than a database for storing our images or jobs?
Storage vs Database
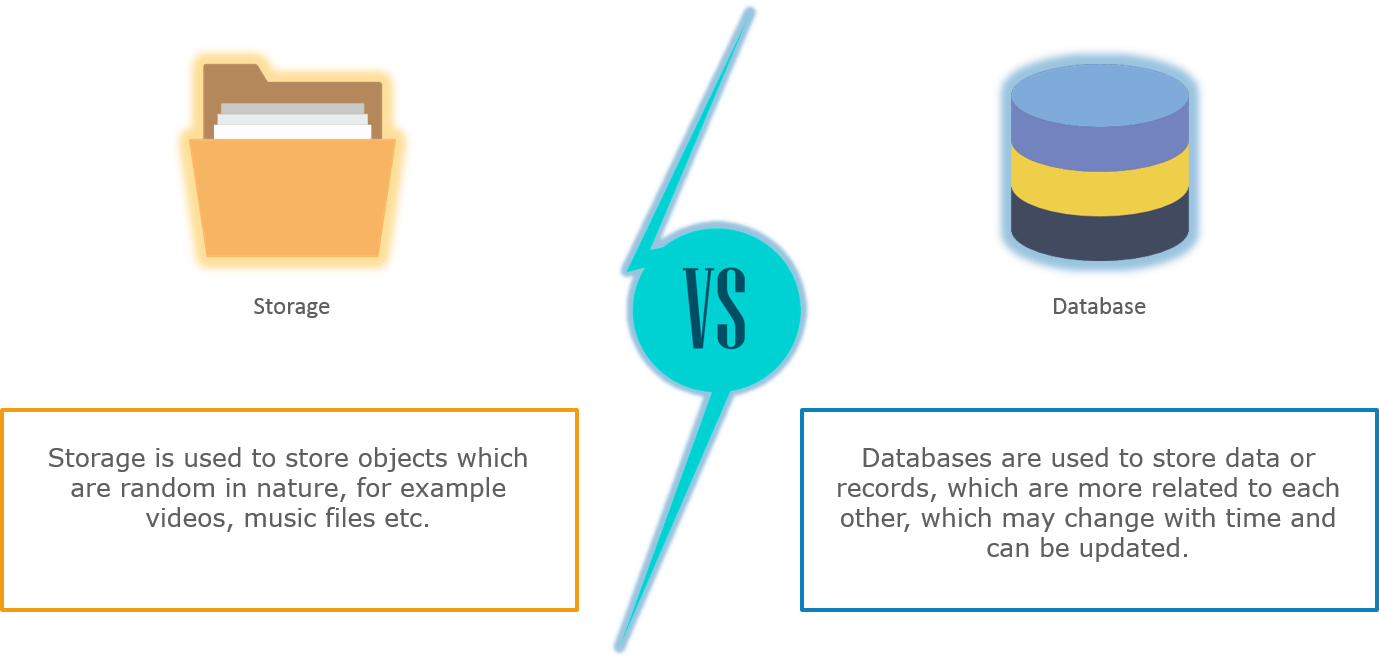
File systems not only require lower processing, they are easy to access as well. If you store images on database, you would have to do a query request to database, every time you need an image. Imagine the same case with a file system, it will not take that much processing because accessing a file is quite simple and light weight. Also, database storage is more expensive than file system storage.
Find out our Azure Architect Training in Top Cities/Countries
| India | Other Cities/Countries |
| Bangalore | Toronto |
| Hyderabad | Singapore |
| Chennai | Dubai |
| Pune | Philippines |
What is Azure Storage?
Azure Storage is the cloud storage solution for modern applications that rely on durability, availability, and scalability to meet the need of their customers.
The very first thing you need, to use storage in azure is a storage account.
Storage Accounts
![]()
To use any storage type in azure, you first have to create an account in Azure. After creating an account, you can transfer data to or from services in your storage account. Create a storage account to store up to 500 TB of data in the cloud. Use the Blob storage account and the hot or cool access tiers to optimize your costs based on how frequently your object data is accessed.
A storage account can be of two types:
- General Purpose
- Blob Storage
Let’s discuss each one of them in detail:
General Purpose Storage Account
A general purpose storage account provides a space where, it gives you access to blobs, queues, files and tables, all of these services in a unified account. A general-purpose storage account can be used to store object data, can be used as a NoSQL data store, can be used to define and use queues for message processing, and set up file shares in the cloud.
As mentioned, primarily there are 4 types of storage types in azure:
- Tables
- Blobs
- Queues
- File Storage
Tables
 The Azure Table storage service stores large amounts of structured data. The service is a NoSQL datastore which accepts authenticated calls from inside and outside the Azure cloud. Azure tables are ideal for storing structured, non-relational data.
Blobs
 Azure Blob storage is a service that stores unstructured data in the cloud as objects/blobs. Blob storage can store any type of text or binary data, such as a document, media file, or application installer. Blob storage is also referred to as object storage.
Queues

Azure Queue storage is a service for storing large numbers of messages that can be accessed from anywhere in the world via authenticated calls using HTTP or HTTPS. A single queue message can be up to 64 KB in size, and a queue can contain millions of messages, up to the total capacity limit of a storage account.
File Storage
A File Storage share is an SMB file share in Azure. All directories and files must be created in a parent share. An account can contain an unlimited number of shares, and a share can store an unlimited number of files, up to the 5 TB total capacity of the file share.
Blob Storage
Blob storage accounts are specialized in storing blob data and can also be used to choose an access tier, which allows you to specify how frequently data in the account is accessed. You can choose an access tier suitable for your storage and which suits your expenses. You can learn more from the Microsoft Azure Master Program.
There are two types of access tier:

Hot: This access tier grants us the lowest latency possible. Hence, it should be used with data which is frequently accessed. Naturally, since it offers low latency it is more expensive.

Cold: This access tier is less in performance than the “Hot” access tier i.e offers higher latency than the former access tier. That being said, it comes with a lesser price tag and hence can be used for data which is less frequently accessed.
Moving on, both these storage account types i.e blob storage and general purpose storage account are designed to be highly available. With high availability, you can be assured that your files hosted on azure will be available 24×7. And high availability is only possible using replication.
Replication
There are basically 4 types of replication in Azure:
Locally Redundant Storage
Locally Redundant Storage (LRS) replicates your data three times within a storage scale unit i.e inside a datacenter. The datacenter resides in the region where you created your storage account. A write request returns successfully only when it has been written to all three replicas. Each of these replicas reside in separate fault domains and upgrade domains within one storage scale unit.
Zone Redundant Storage
Zone-Redundant Storage (ZRS) replicates your data asynchronously across datacenters within one or two regions in addition to storing three replicas similar to LRS, thus providing higher durability than LRS. Data stored in ZRS is durable even if the primary datacenter is unavailable or unrecoverable.
Geo-Redundant Storage
Geo-redundant storage (GRS) replicates your data to a secondary region that is hundreds of miles away from the primary region. If your storage account has GRS enabled, then your data is durable even in the case of a complete regional outage or a disaster in which the primary region is not recoverable.
Read Access Geo-Redundant Storage
Read-access geo-redundant storage (RA-GRS) maximizes availability for your storage account, by providing read-only access to the data in the secondary location, in addition to the replication across two regions provided by GRS.
Alright, now you have all the information you need. Let’s go ahead and flex our fingers with the demo!
Demo
We will be doing this demo in two parts:
Part 1: We will try setting up a website which will be able to upload files to the blob service. Once a file is uploaded, the file’s details will also be added to the Azure queue, which will be used to change the background of the webpage when refreshed.
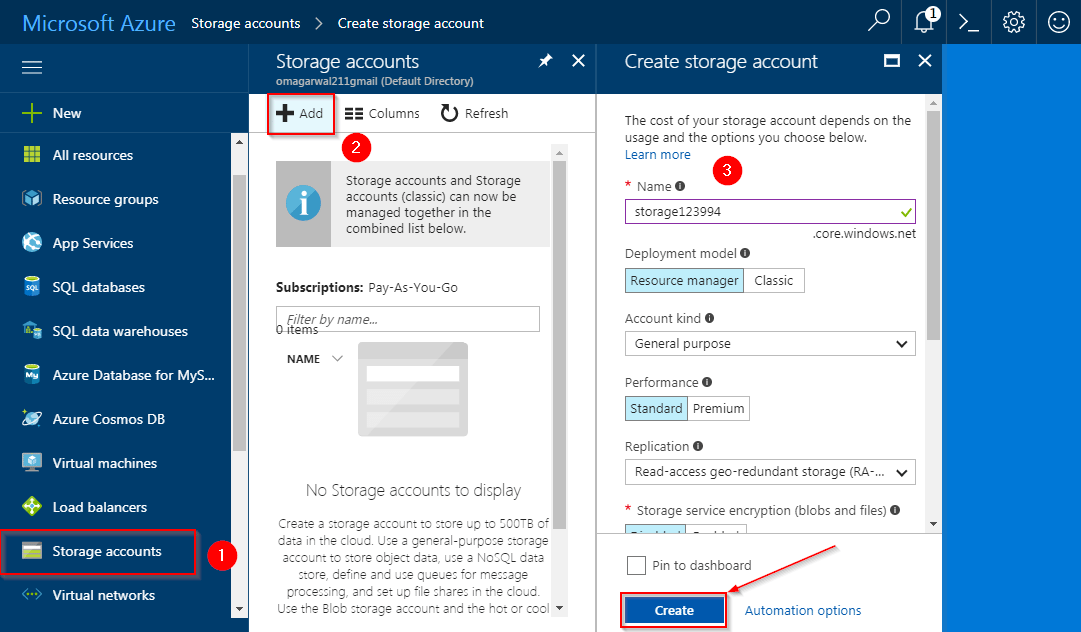
Step 1: Like we mentioned before, the first step should be creating your Storage Account. Follow the instructions in the below image to do so.
- First, in the left pane click on Storage Accounts
- Then, click on Add
- Finally, enter all the relevant fields and Click on Create.
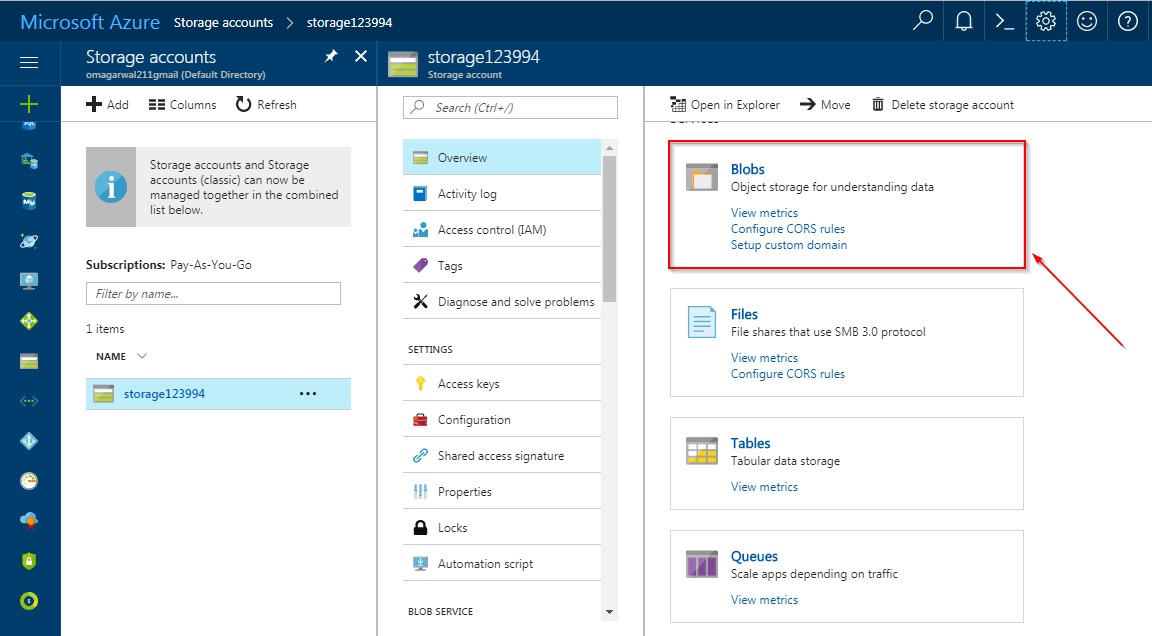
Step 2: That’s it! We have successfully created our storage account. We have four types of storage services in our account, i.e Blobs, Queues, Files and Tables. In this Azure Storage Tutorial, I’ll be demonstrating the Blob service and Queue Service in this part. Also, for an in-detail demo please refer to our video on Azure Storage Tutorial attached in the starting of this blog. Let us first configure the blob service. Go to your storage account, and click on Blobs.
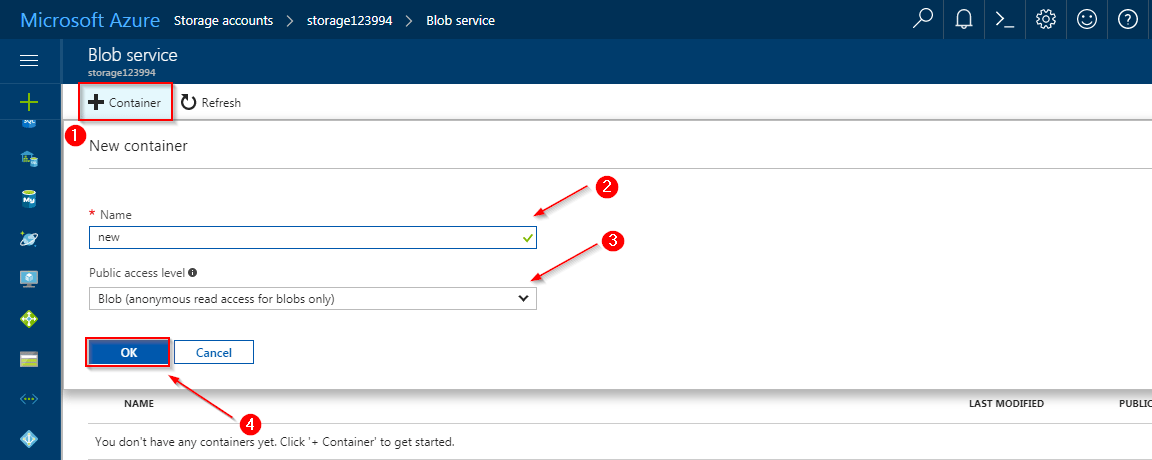
Step 3: Click on container, to create a new container. First, enter the name of the container, this should be unique to all the containers that you will be creating in this particular account. Next, assign public access level to it. Blobs are nothing but files. If you assign private access level, only you will be able to download the contents of this container. If you assign blob access level, any user with the link to the container of this account can access the files in it. With container access level, any user with a link gets access to the files and folders inside this container. We will choose the Blob access level for our demonstration. Finally, click on OK.
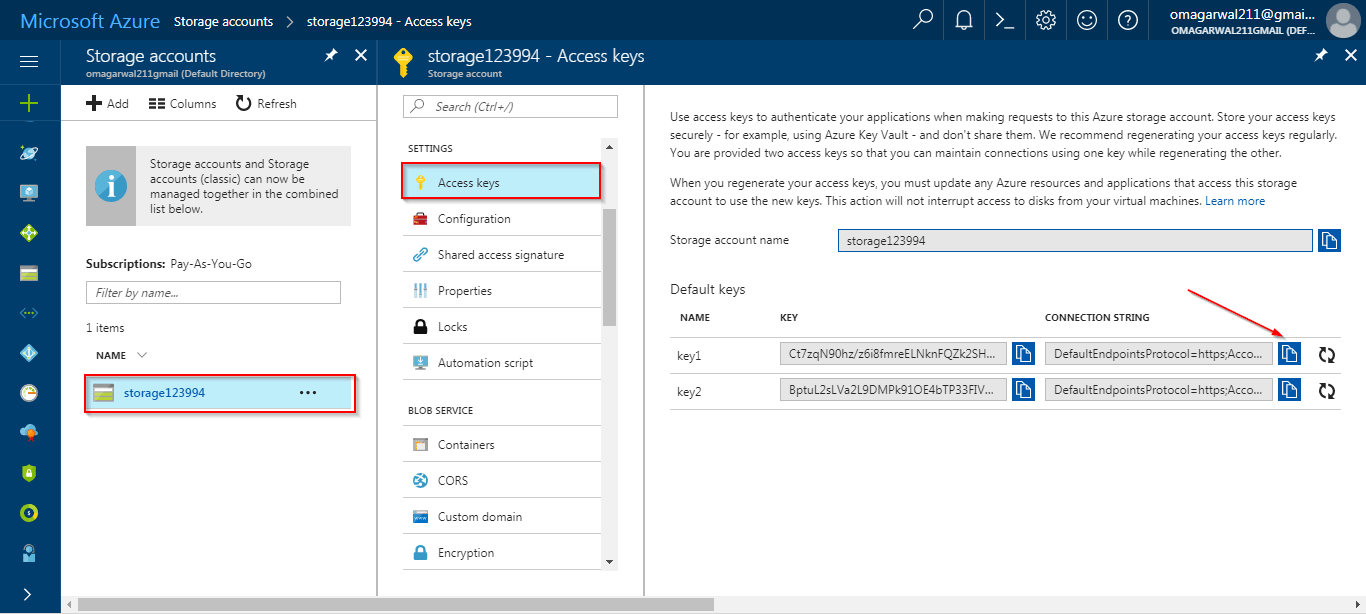
Step 4: Specify the connection string of your storage account in your website’s code. A connection string authenticates your code to interact with the specified storage account and its services. To do that simply select your storage account, then select access keys and finally copy any one of the connection strings. Paste this connection string in your website’s code and you are set!
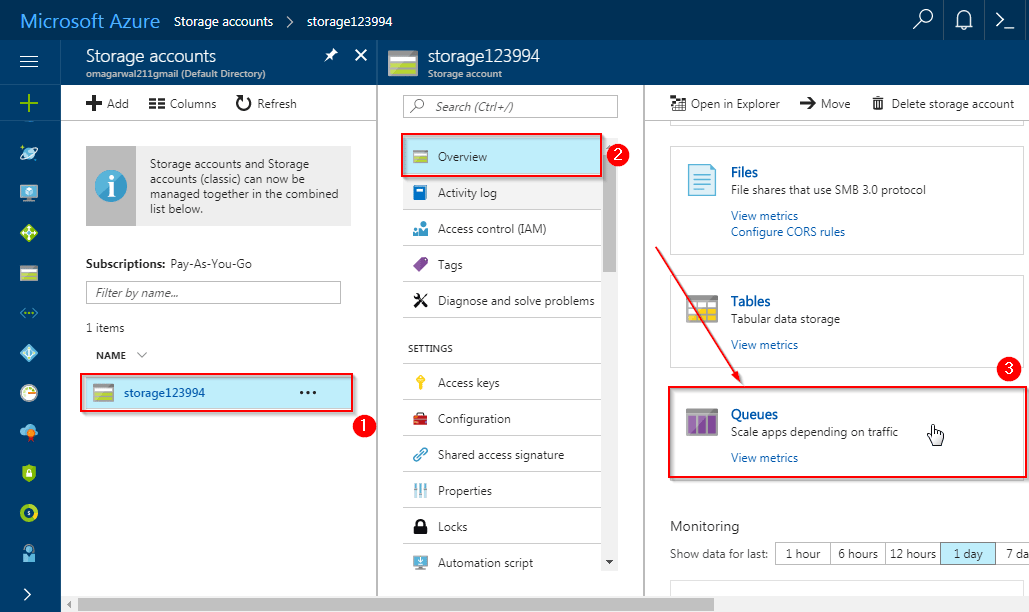
Step 5: Let’s start with the queue now. On your storage accounts overview page select queues.
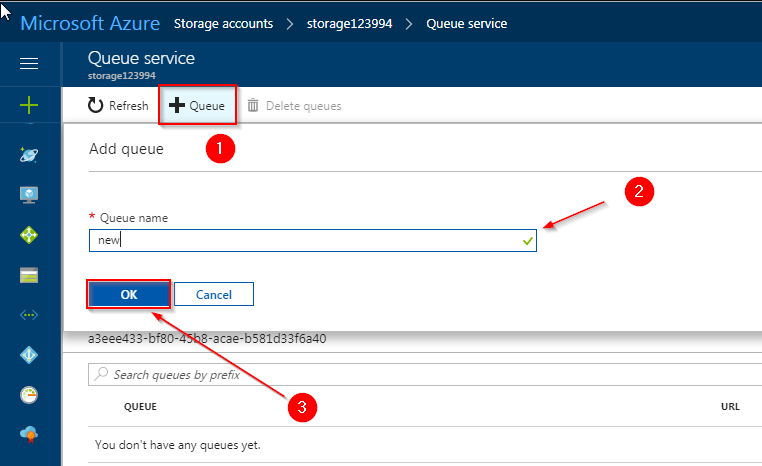
Step 6: Next, we’ll be creating a queue. To do that, Click on Add Queue, give a relevant name to the queue and click on OK. Finally, substitute the relevant information in the code.
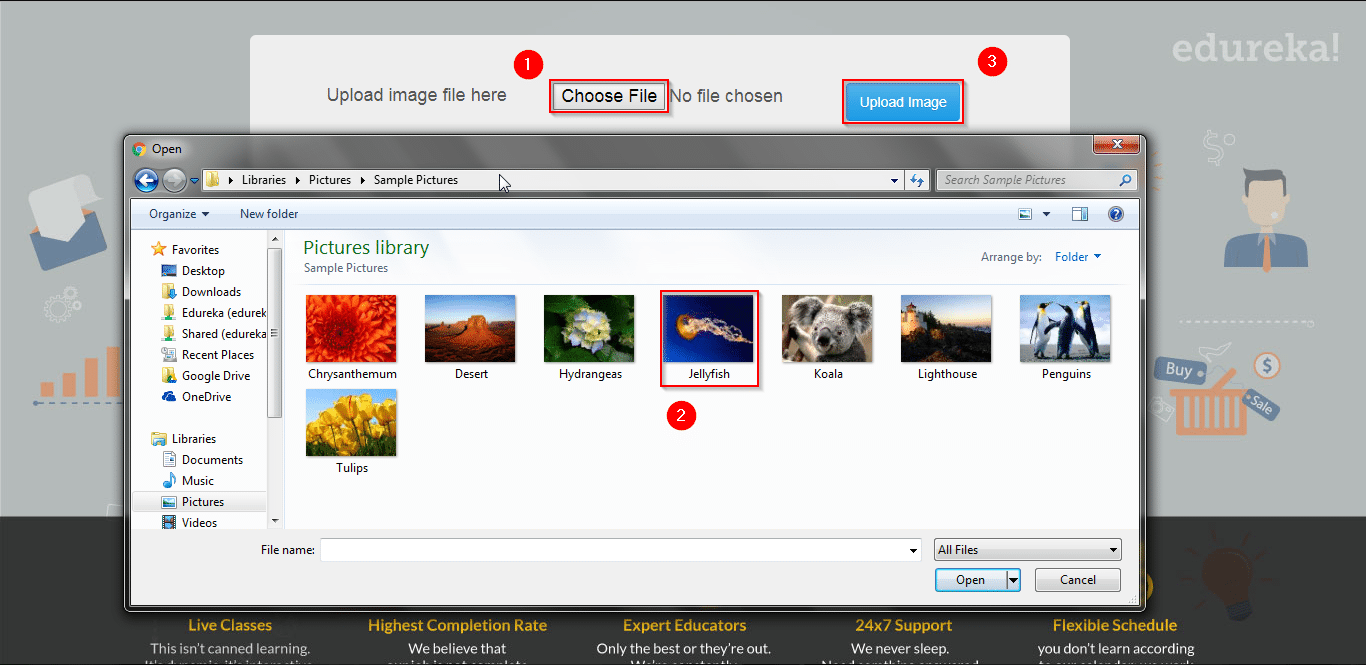
Step 7: This is the website we have made, select the file that you want to upload, and click on upload.
This is how the screen will look once the file is uploaded.
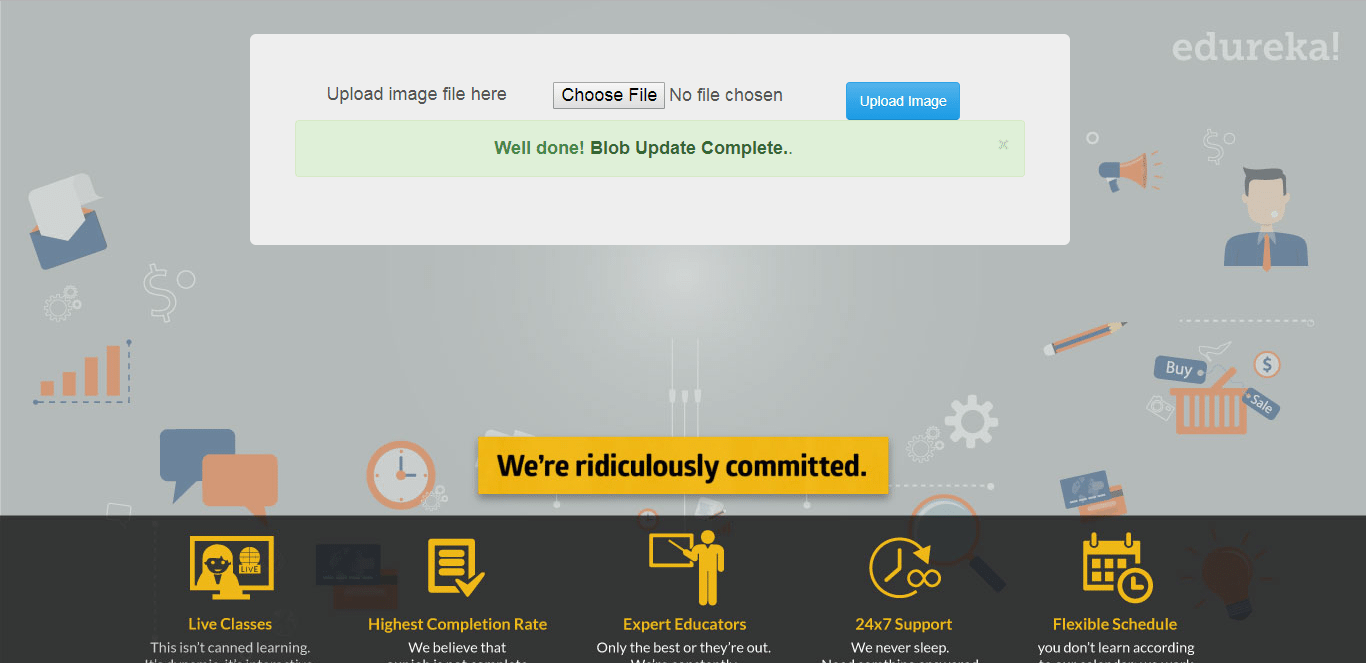
With this, we have successfully added our file in the container and the queue. You can look at the same in the screens below:
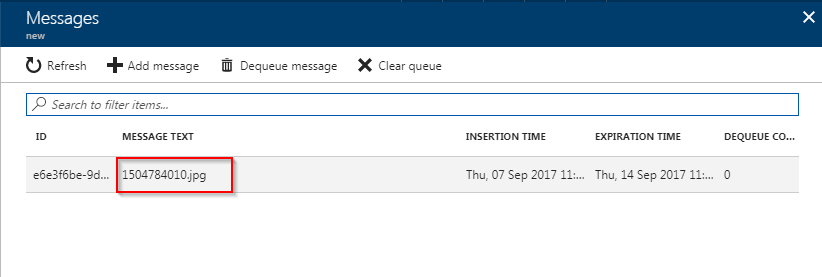
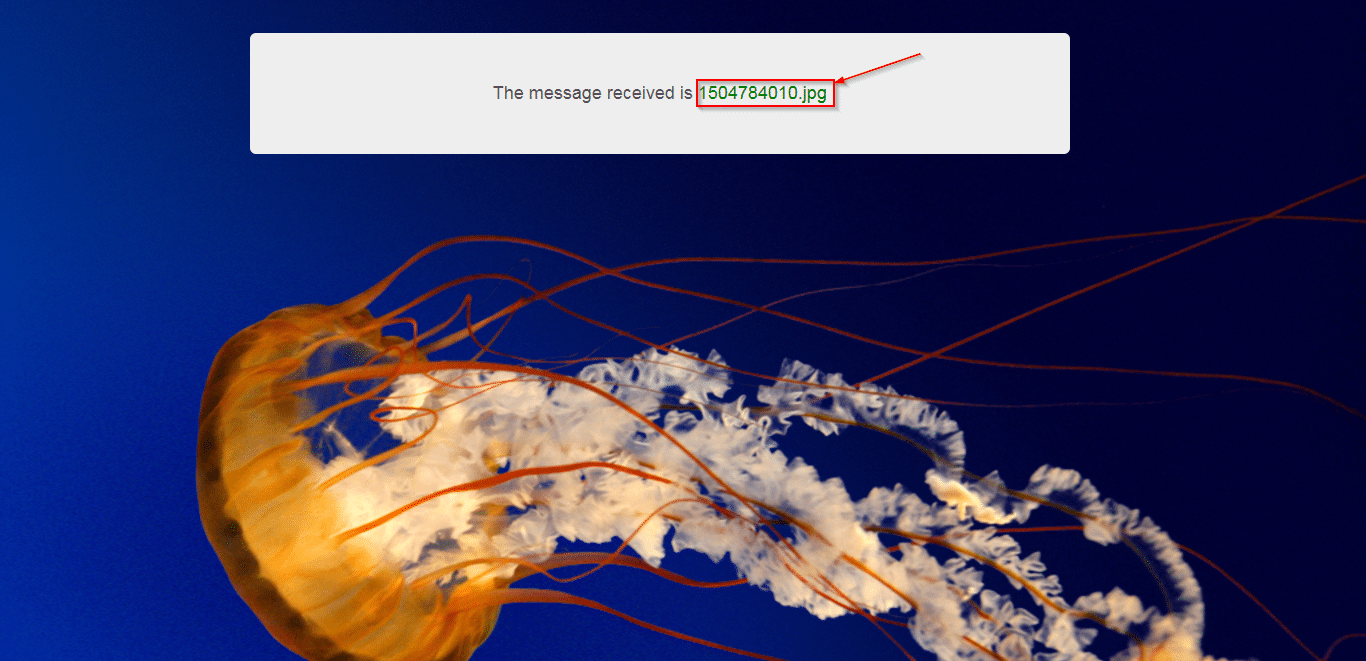
Now let’s check if we have an entry in blob as well:
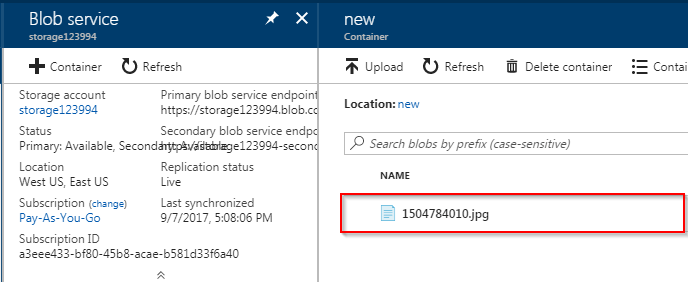
Step 8: Let’s go to our process page in the website to see if the entry from the queue and blob can be read, and yes! As you can see the image name is same.
With this, we conclude the part 1 of the demo. Let’s move on to part 2.
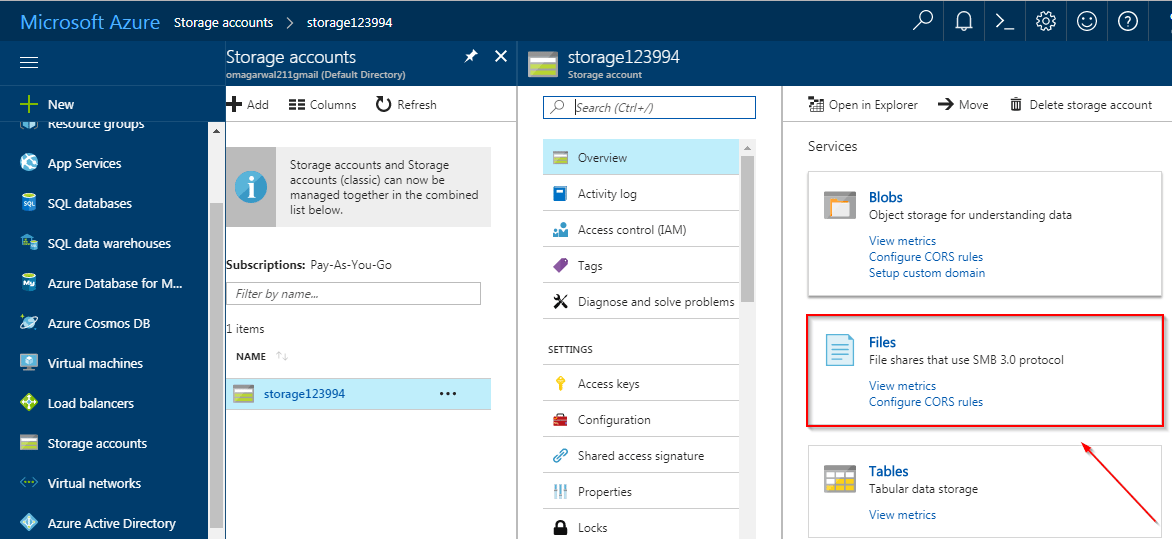
Part 2: In this part of this Azure storage tutorial, we will explore the file service in azure. The File Service in Azure uses the SMB 3.0 protocol for file transfers, this service can be attached to your windows OS as if it was an external drive. Let’s try this in Azure Portal Now:
Step 1: Go to your storage account overview page, and select the file service.
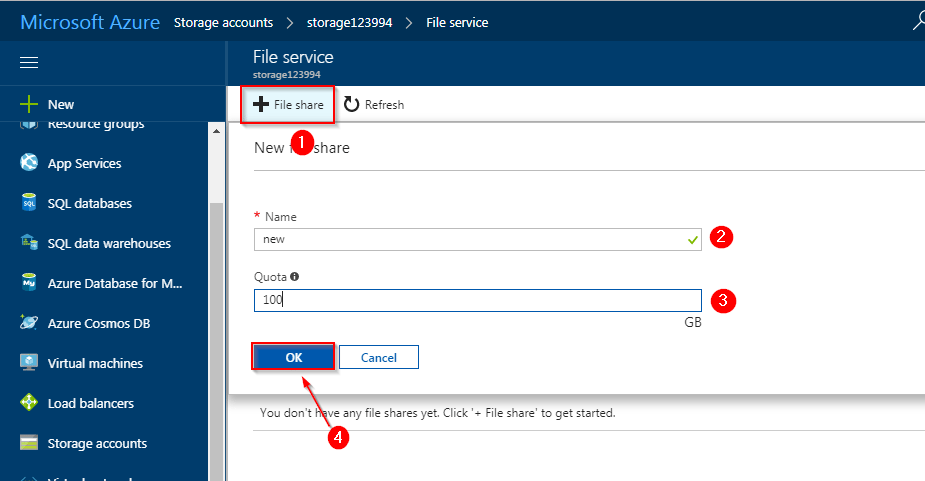
Step 2: On the next page, enter the name of your file instance, and desired size of your instance. Finally, click on OK.
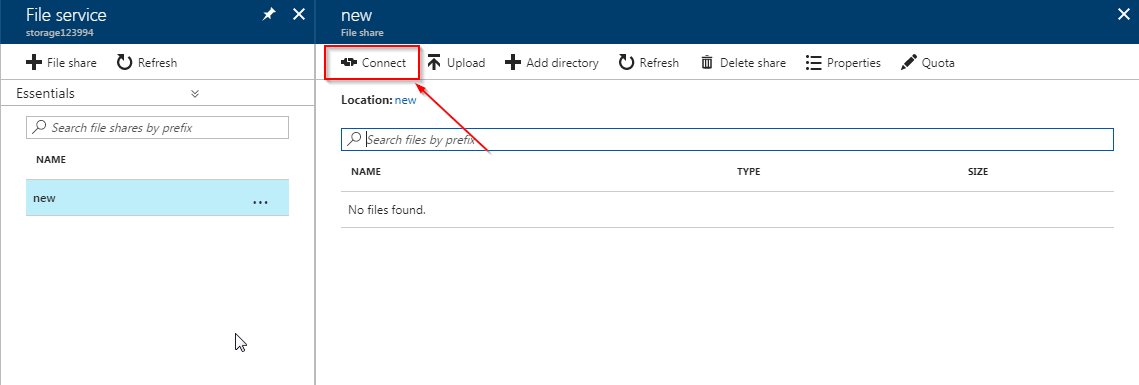
Step 3: Select your file service, and then click on connect.
In the properties pane, copy the link as shown in the image:
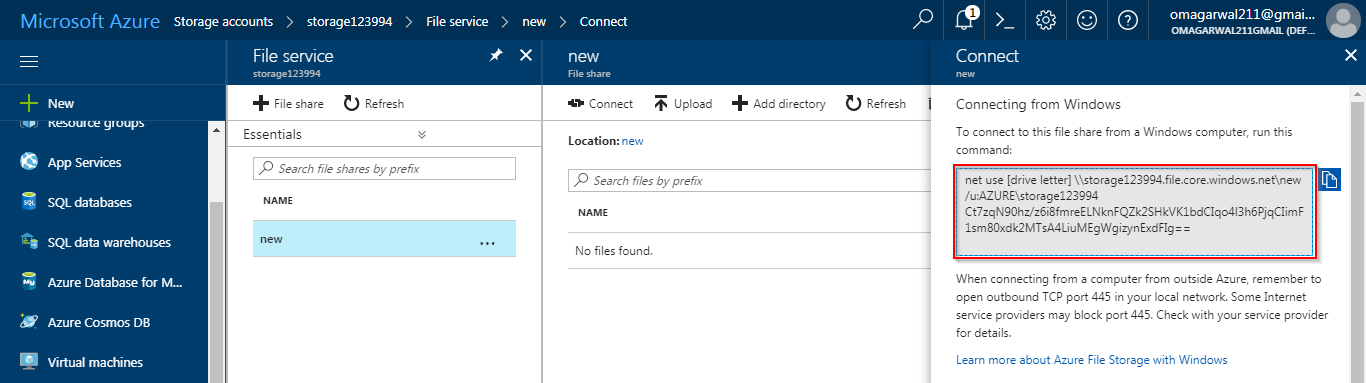
And paste it in notepad, so that you can differentiate the elements:
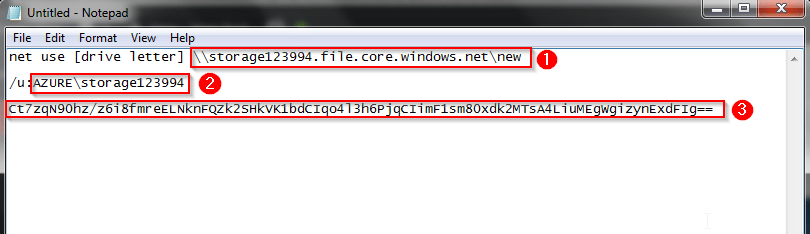
- The first point is the address column
- The second point is the user name
- The third point is your password
Save, these details they will be used in your next step in this azure storage tutorial.
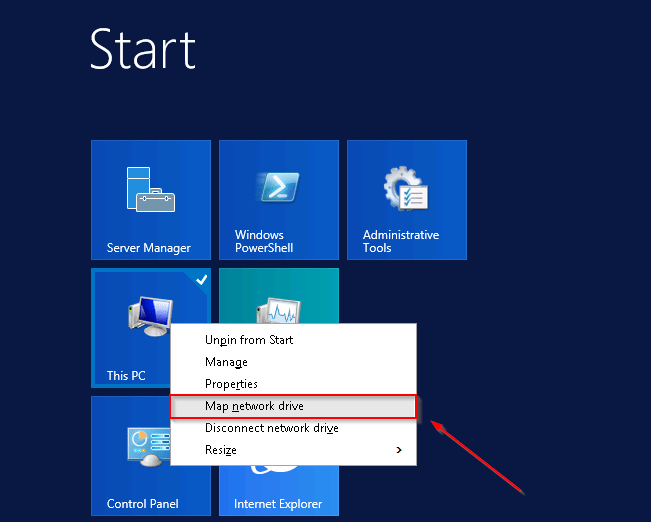
Step 4: Right Click on your my computer icon, on your desktop and click on Map Network Drive.
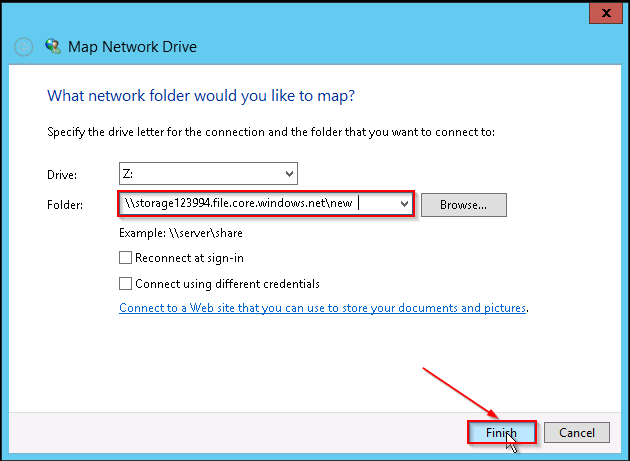
Step 5: Enter the first point that you copied from your notepad in the folder text box and click on finish.
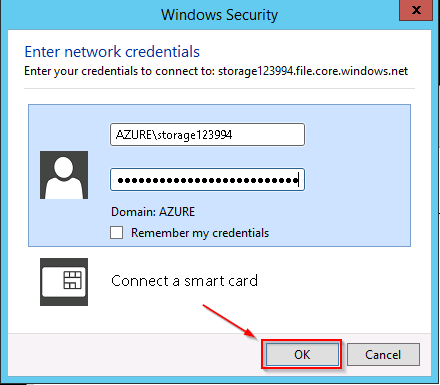
Step 6: On the next step, enter the username and password from notepad, and finally click on OK.
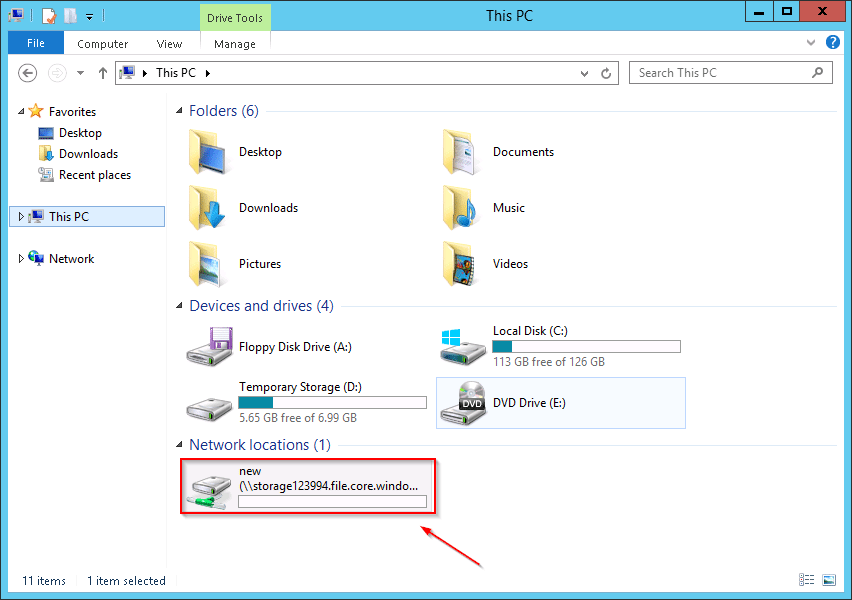
Step 7: Congratulations! Your azure storage drive is ready. You can now use it, like any other drive on your computer!
With this, we conclude our demo. Want to learn more about Azure? edureka! is here to help you out! You can check out our blogs in the left menu, we have extensively covered the prominent Azure Services, and this list will be updated frequently.
Related Article: Azure Interview Questions and Answers
If you are one of those, who want to learn this technology from professionals who are Microsoft Azure certified in and are leading industry experts, you are at the right place. We at edureka! are committed to your learning. We offer Azure Training Course which will help you get certified, and thus help you chase your dream work profile!
Also, If you wish to master the principles in Azure and DevOps and work on step-by-step tasks that have significant relevance for the world of business, industry professionals developed the Azure DevOps Course Online. After completing the training course, you can apply for one of the top jobs in MNCs in the world with the highest salary.
Get an in-depth understanding with this Azure full course video:
Furthermore, this Azure Tutorial blog series will be updated frequently as we expand our blog section on Azure services, so stay tuned!


Mind blowing Blogs…i really loved the way how it is described