What is Automation? How to automate tasks using RPA Tools? What are the Automation Anywhere Examples?
I believe you might have wondered the answers to these questions. Well, with UiPath, Blue Prism or Automation Anywhere, you can easily automate multiple tasks with few action commands. In this article on Automation Anywhere Examples, I am going to discuss the top automation examples that will help you automate tedious tasks. This will help you upskill your career as an RPA Certified Professional and standout in today’s market.
The following topics will be covered in this article:
So let’s get started!
What is Automation Anywhere?
Automation Anywhere is an RPA tool which aims to provide its users with scalable, secure and resilient services. It offers better performance as it has the ability to integrate into multiple platforms and also scale simultaneously. You can also summarize this tool as a summation of Robotic Process Automation, Cognitive Analytics, and Workforce Analytics. Refer to the image below.
 Apart from this, Automation Anywhere has recently launched a Community Edition / Free Trial version which is free for lifetime and offers an Enterprise Edition which you can use with a 30 Day Free Trial.
Enroll in our Automation Testing Course today and gain hands-on experience with real-world testing tools and frameworks!
Now, next in this article on Automation Anywhere Examples, let us look into the features of Automation Anywhere.
Automation Anywhere Features
The features of Automation Anywhere are as you can refer from the below image:

Now, that you know what is Automation Anywhere, let us next look into the various automation examples.
Examples of Automation Anywhere
For your better understanding, I have divided the examples to be shown in the following two sections:
Basic Automation Anywhere Commands
This section of the article on Automation Anywhere Examples will consist of the basic commands and different kinds of automation which will help you learn the tool better.
Find out our Automation Testing Training in Top Cities/Countries
| India | Other Cities/Countries |
| Bangalore | UK |
| Hyderabad | USA |
| Pune | Canada |
| Chennai | Singapore |
So, let us get started.
Windows Actions
The Windows Actions are used to automate tasks such as opening/closing/minimizing/maximizing a window and even getting the Active Window Title.
Problem Statement:
To automate the action of getting the title of an active window.
Solution:
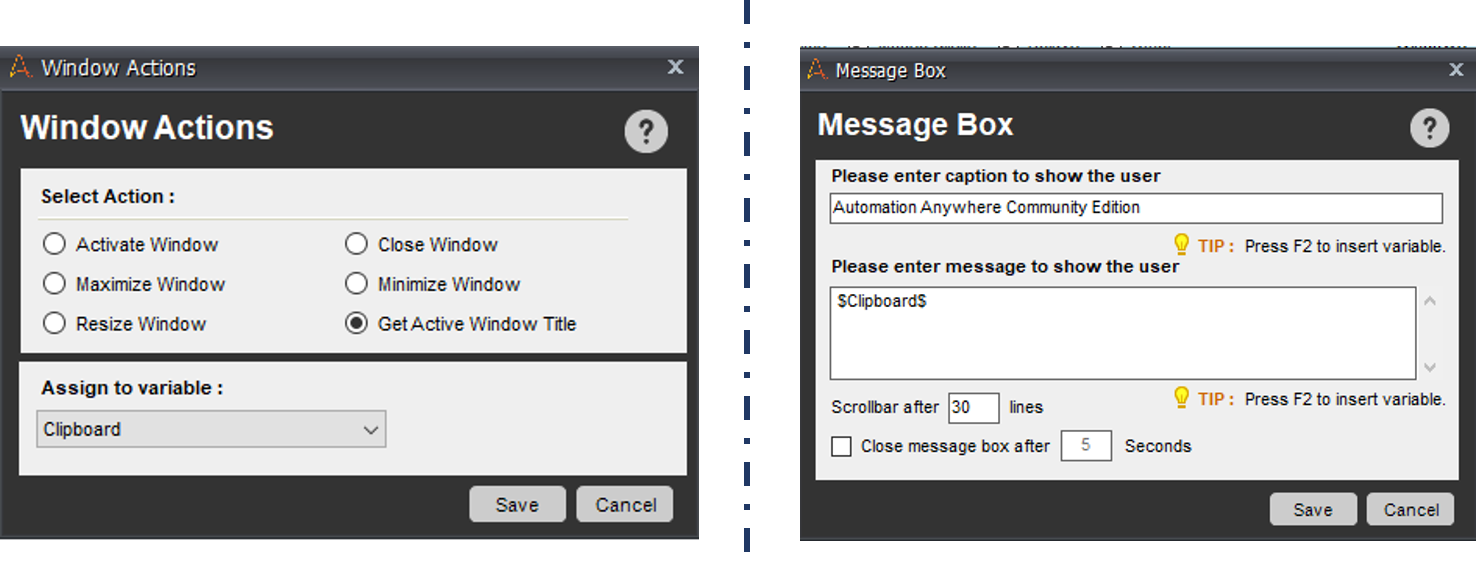
Step 1: Open the Automation Anywhere Workbench and drag the Get Active Window Title command into your workspace.
Step 2: Assign a variable. Here, I will assign the Clipboard system variable. Click on Save.
Step 3: Drag a Message Box and mention the Clipboard variable to display the output. Click on Save. Refer to the below image.
 Step 4: Save and Execute the task.
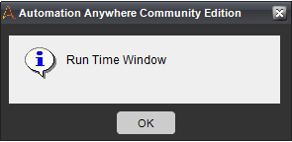
When you execute the task, you will see that the active window title will be displayed. Here the output is Run Time Window as you can see below.
 Now, this was just one command guys, you can use the other commands to open/close/resize a window by dragging your mouse over the window.
Mouse Clicks
The Mouse Clicks are used to automate the tasks which are related to clicking at a specific position on the application or a window
Problem Statement:
To automate the action of closing a notepad window.
Solution:
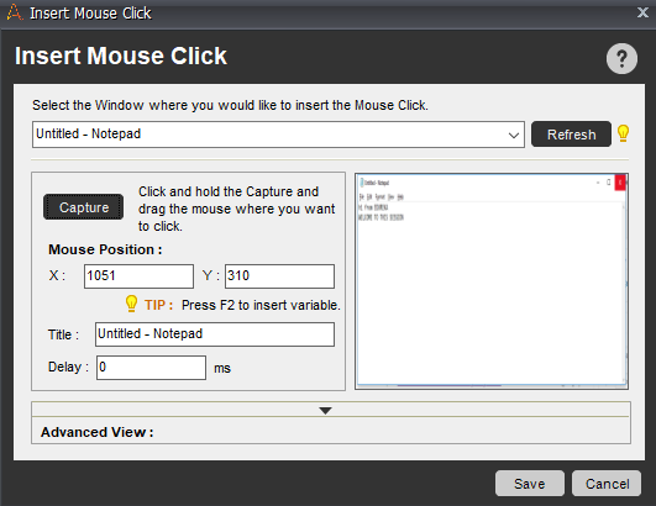
Step 1: Open the Automation Anywhere Workbench and drag the Insert Mouse Click command into your workspace.
Step 2: Select the window on which you want to click. Here I want to click on the Notepad window.
Step 3: Now click on Capture and hover your mouse over the area where you want to click. Here I want to click on the Close symbol.
Step 4: Now, click on Save. Refer to the below image.
 Step 5: Save and Execute the task.
When you execute the task, you will see that the notepad window is closed automatically.
String Operations
The String operations like in any other programming knowledge are used to perform various operations such as comparing two strings, replacing a string, finding a length of the string, reversing a string, splitting a string and so on.
Problem Statement:
To automate the task of replacing a few characters from a string.
Solution:
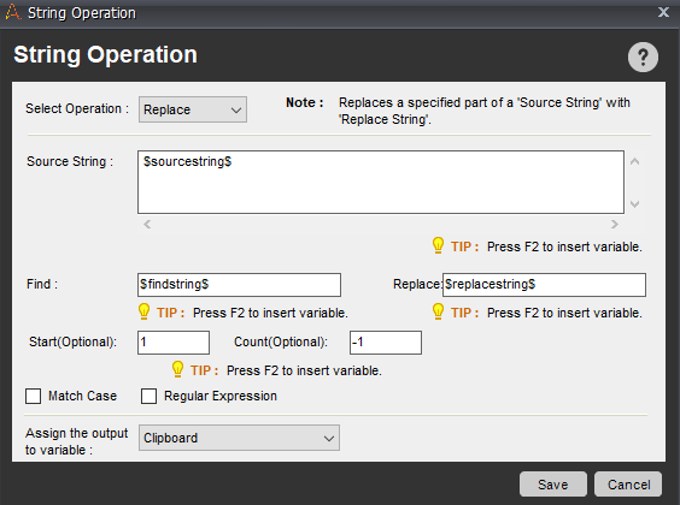
Step 1: Open the Automation Anywhere Workbench and assign the source strings, find and replace values to three different variables.
Step 2: Now, drag the Replace command from the String Operation section.
Step 3: In the source string section mention the initial string or the variable assigned to store the initial string.
Step 4: In the find and the replace section mention the find and the replace strings or the variables assigned to it.
Step 5: Assign the output variable. Here I have assigned the output to Clipboard variable. Now, click on Save. Refer to the below image.
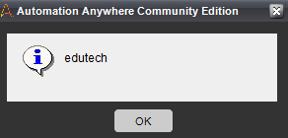
Step 6: Drag a Message Box and mention the Clipboard variable to display the output. Click on Save.
Step 7: Save and Execute your task.
When you execute the task, you will see that the string is replaced as below.
 Now, this was just one command guys, you can use the other commands to compare/ find the length/ find a sub-string/ trim and do many other operations on the strings.
Files & Folders
The files and folders command deals with the various actions which you can perform with the files or folders like copying/deleting/renaming/moving/zipping/ printing and so on.
Problem Statement:
To automate the task of copying the files from a source folder to the destination folder.
Solution:
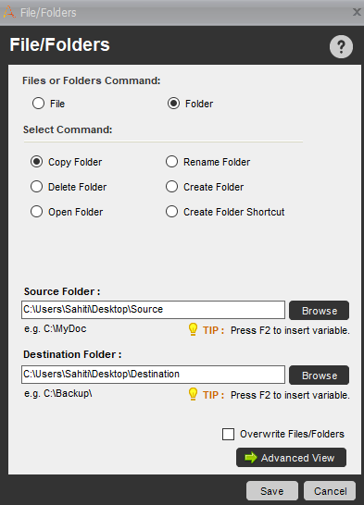
Step 1: Open the Automation Anywhere Workbench and go to the Files/Folders activity. Now, choose the Copy Files action and drag it to your workspace.
Step 2: Over here choose the option Folder since we wish to move a folder from a source path to the destination path.
Step 3: Then mention the source path in the Source File section and the Destination path in the Destination path section. Refer below.
 Step 4: Save and Execute your task.
Once you execute the task you will see that files present in a folder in the source path will be moved to the destination path.
Web Recorders
The web recorders are used in Automation Anywhere to extract text from the web, find broken links, navigate URL, manage web controls, download file and so on.
Problem Statement:
To automate the task of extracting a table from a webpage.
Solution:
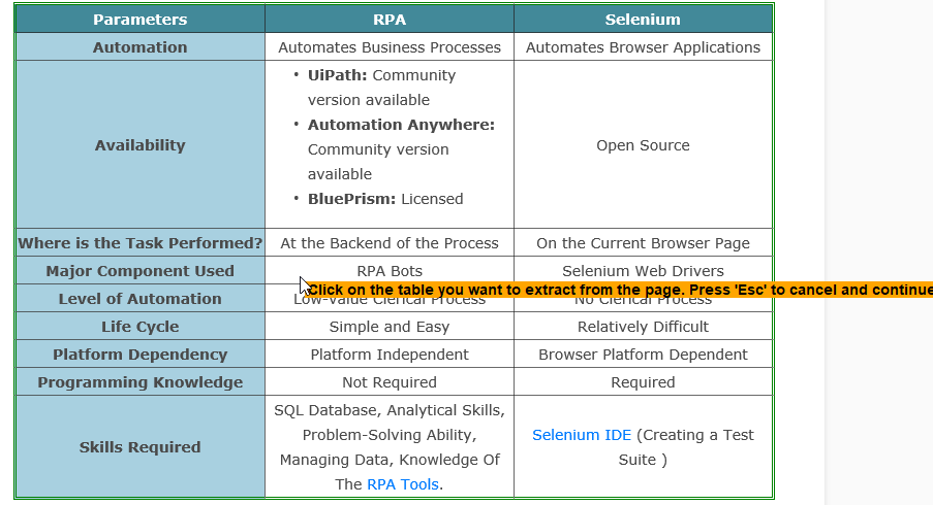
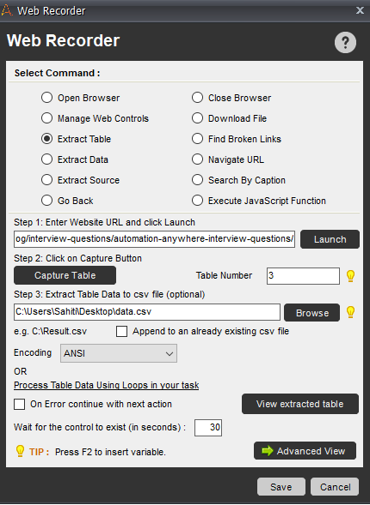
Step 1: Open the Automation Anywhere Workbench and drag the Extract Table command.
Step 2: Now, mention the URL and click on Launch. This will open your website.
Step 3: Next, click on Capture Table and hover your mouse over the table you wish to extract. Refer below.
 Step 4: Next, extract the table data to a CSV file by mentioning the path of the CSV file.
Step 5: You can also click on view extracted table by clicking on the View Extracted Table option. Then, click on Save. Refer below.
 Step 7: Save and Execute your task.
When you execute your task, you will observe that the table is extracted and stored into a CSV file as below.

Optical Character Recognition(OCR)
The optical character recognition aka OCR is used to capture an area, window or capture an image by path or URL.
Problem Statement:
To automate the task of extracting a text from a window and displaying the output.
Solution:
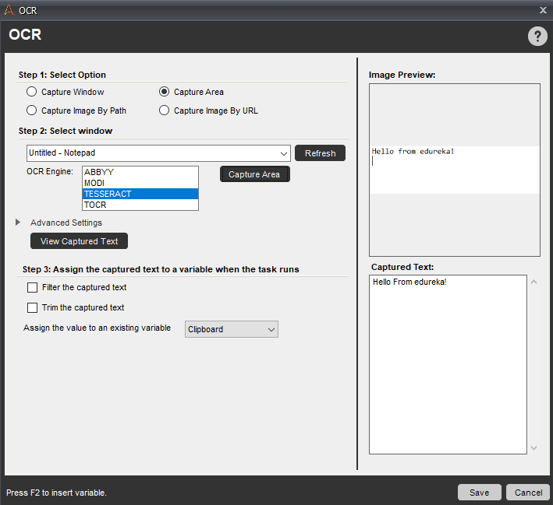
Step 1: Open the Automation Anywhere Workbench and drag the Capture Area command from the OCR section.
Step 2: Now, select the window from where you wish to extract text and choose the OCR Engine. By default, TESSERACT is chosen.
Step 3: Next, click on Capture Area and drag your mouse over the area from which you wish to extract data. Refer below.
Step 4: You can also view the Captured Text by clicking on View Captured Text. Then click on Save. Refer below.
 Step 5: Assign the output to a variable. Here, I am assigning the variable to the Clipboard variable.
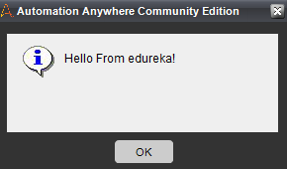
Step 6: Now, drag and drop a Message Box and mention the output variable to display the output.
Step 7: Save and Execute the task.
When you execute the task, you will see that the text is being extracted from the Notepad and is displayed on the Message Box as below.
KeyStrokes
Keystrokes are used to automate the tasks of writing text into an application. With the help of keystrokes, you can make sure you enter the text in any manner that you wish.
Problem Statement:
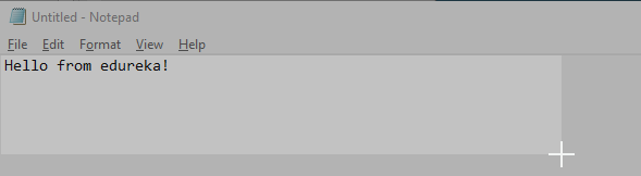
To automate the task of writing text into a notepad file.
Solution:
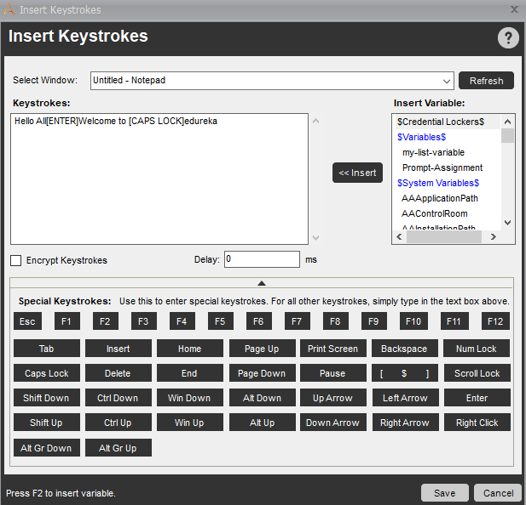
Step 1: Open the Automation Anywhere Workbench and drag and drop the Insert Keystrokes command.
Step 2: Type in your text that you want to display on a notepad using the keystrokes. In the below snapshot I have used ENTER, CAPS LOCK keystroke.
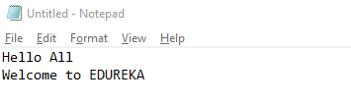
 Step 3: Save and Execute the task.
Once you execute the task you will see the text is automatically mentioned below.
Rest Web Services
The Rest Web Services are used to automate the task of fetching data from JSON APIs’ and storing it.
Problem Statement:
To automate the task of extracting the data from a JSON file and displaying the output in a Message Box.
Solution:
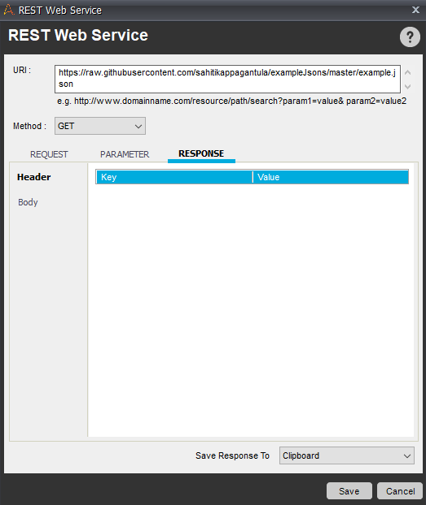
Step 1: Open the Automation Anywhere Workbench and drag and drop the REST Web Service command.
Step 2: Now mention the URL of the JSON API and choose the method as GET.
Step 3: Now, go to the Response section save the response to a variable.
Step 4: Drag a Message Box and mention the variable. Refer below.
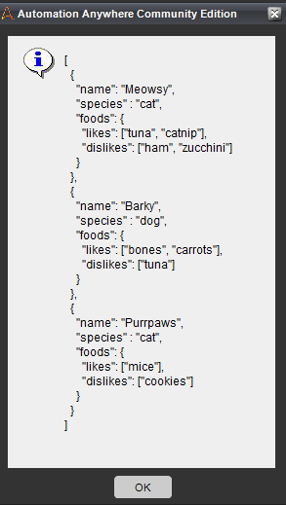
 Step 5: Save and Execute the task.
Once you execute the task, you will see the data being extracted from the JSON file and is being displayed on the Message Box. Refer below.
Now, with this, we come to an end of this section of this article on Automation Anywhere Examples. Next, in this article, I will show you some complex automation like Excel and PDF.
Complex Examples
In this section of the article on Automation Anywhere Examples, I will discuss the Excel and PDF automation.
So, let us get started guys!
Excel Automation
Excel Automation is used to tasks related to Excel such as opening/closing a spreadsheet, activating cells, going to a specific cell and so on.
Problem Statement
To automate the task of extracting the data from an Excel File according to some condition and storing the extracted data in another File.
Solution
Step 1: Open the Automation Anywhere Workbench.
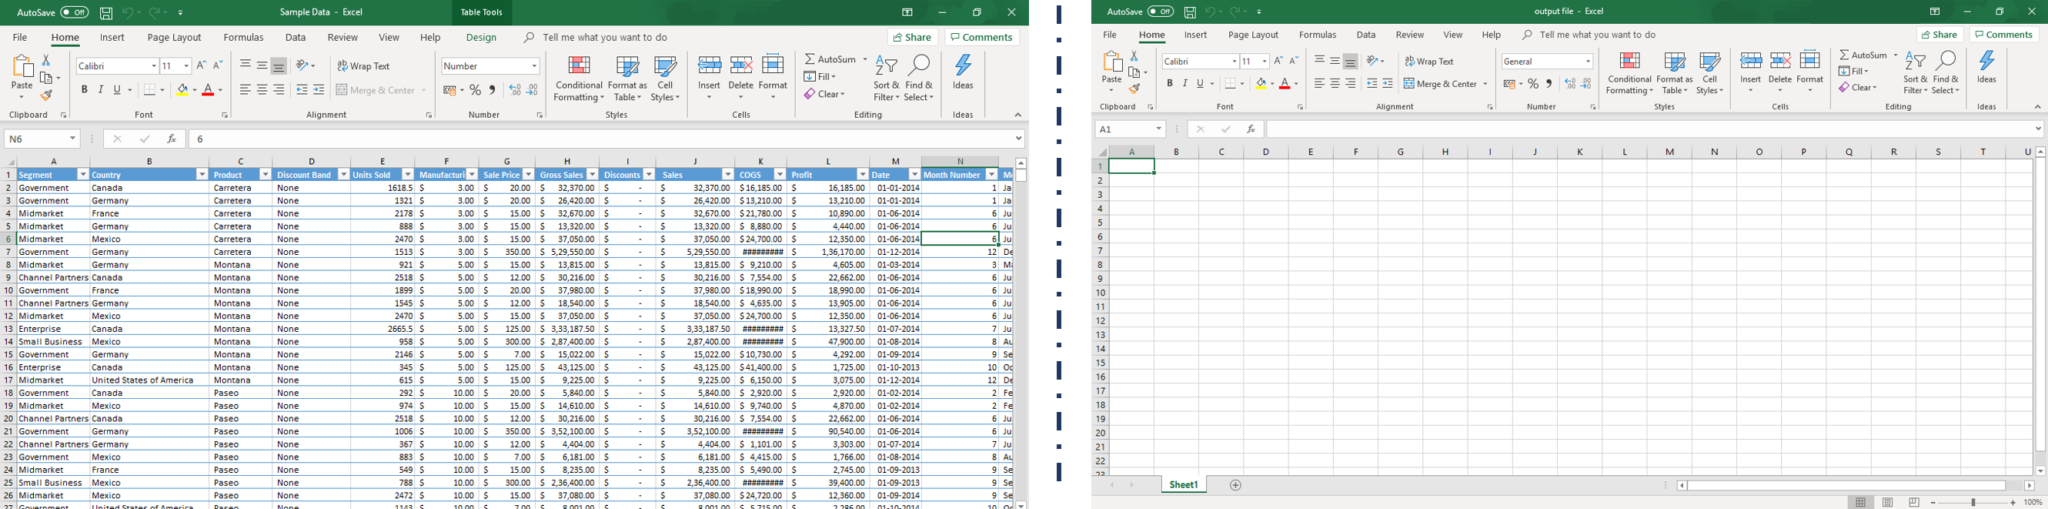
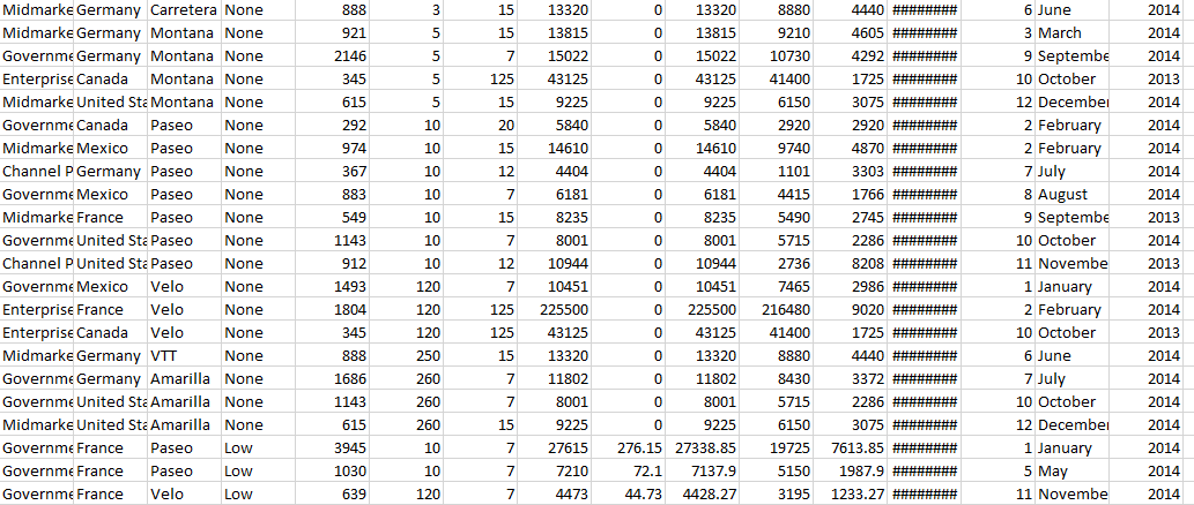
Before I move forward with the steps, let me show the file from which we are going to extract data and the output file.
Step 2: Now, your next step is to open both the spreadsheets. To do that, drag the Open Spreadsheets command from the Excel section.
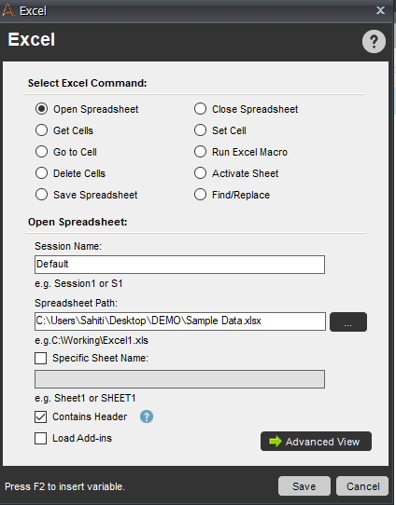
Step 3: Mention the path of the first spreadsheet( from where you have to extract data), check in the box of Contains Header and click on Save. Refer below.
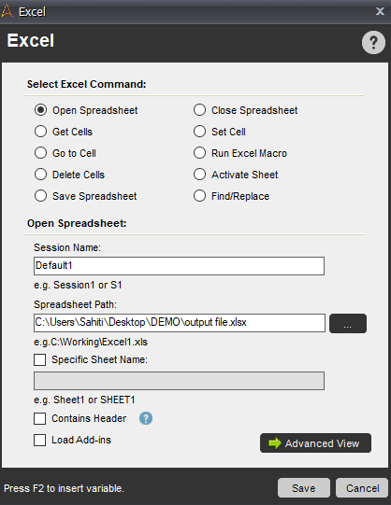 Step 4: Repeat the above two steps for the second spreadsheet and change the session name to Default1 so that it doesn’t clash with the session name of the first spreadsheet. Refer below.
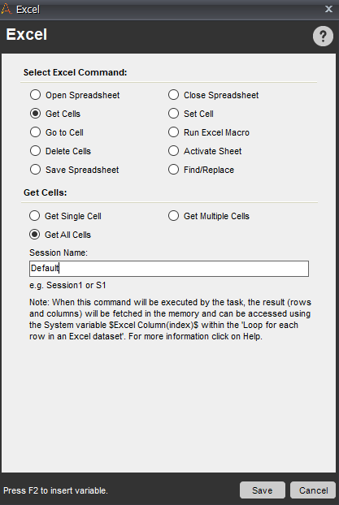
Step 5: Now, drag the Get Cell command and choose the Get All Cells option. Then, mention the session name to be Default(which is the session name for the first spreadsheet). Then click on Save. Refer below.
Step 6: Drag the Get All Cells action in between the actions of opening both the spreadsheets. This step will help you get the data from all the cells in the first spreadsheet.
Your task pane should look like the below image:

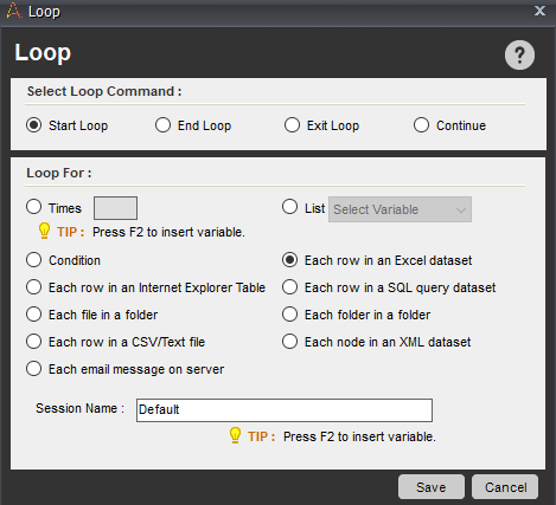
Step 7: Now, you have to start a loop. To do that, drag the Each Row in an Excel Dataset command from the loop section. Mention the session name as Default. Then, click on Save. Refer below.
Step 8: Now, you have to mention the condition based on which you wish to extract data. To do that follow the below steps.
Step 8.1: Drag and drop the variable command from the If section.
Step 8.2: Now click on the Edit option and set the condition using the following steps:
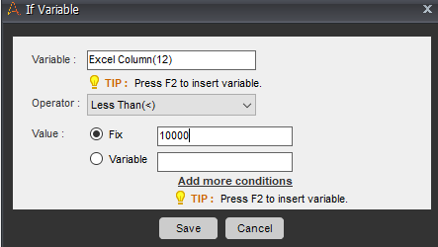
Step 8.2.1: Mention the variable as Excel Column by pressing on CTRL + F2 and then click on Insert. After that mention the value 12 since we want to set a condition on the 12th column of the dataset. Press on OK.
Step 8.2.2: Now, select the operator. Here I will select the Less Than(<) operator.
Step 8.2.3: In the value section mention the value 10000 and click on Save. Refer below.
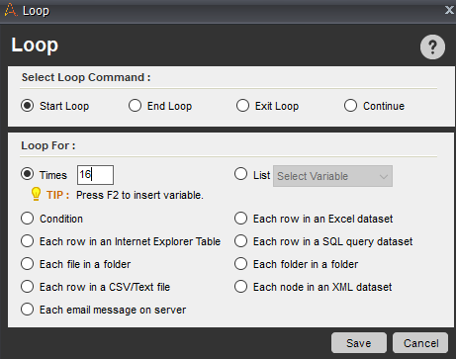
Step 9: Next, you have to iterate the loop of filling data for the number of columns present in the dataset. Since 16 columns are present in the dataset, you have to iterate the loop for 16 times. To do that, drag the Times command from the Loop section and mention 16 in the Times section. Then click on Save. Refer below.
Step 10: Now, you have to fill the data into specific cells. To do that you have to set the cell as follows:
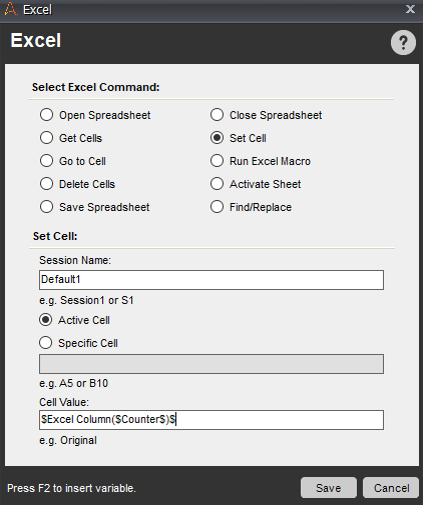
Step 10.1: Drag the Set Cell command from the Excel command and in the Cell Value section mention the variable ExcelColumn and click on Insert. Then mention the Counter variable by pressing on CTRL + F2. Finally, click on Save.
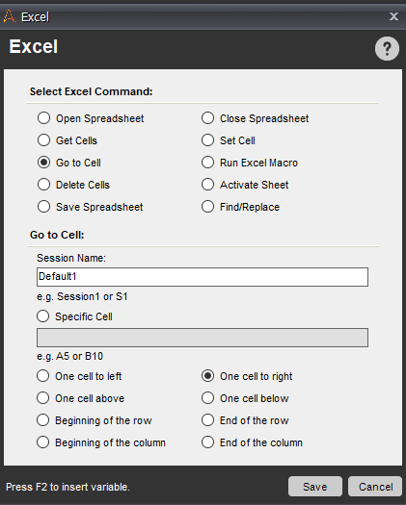
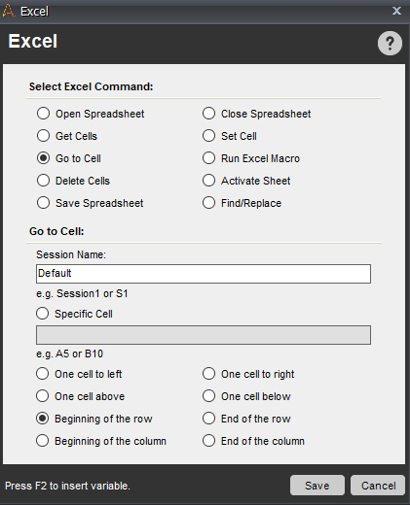
Step 11: Next, you have to go to one cell towards the right of the active cell, to store the next extracted data. So, to do that, drag the Go To Cell command from the Excel section and choose One Cell Right. Refer below.
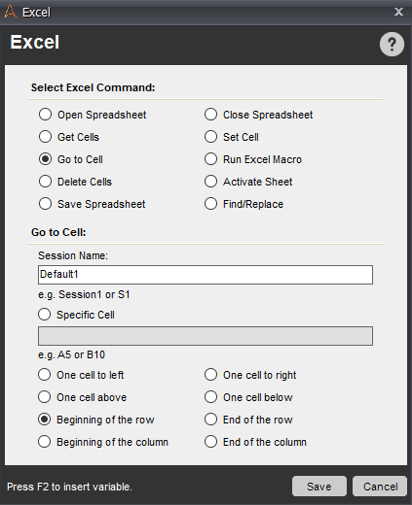
 Step 12: Once the data is stored for a specific row, you have to go to the next row to store the next set of data. To do that, you have to go the beginning of a row and one cell below from the active cell.
Step 12.1: So, to do that, drag the Go To Cell command from the Excel section and choose Beginning of the row. Refer below.
 Step 12.2: Again drag the Go To Cell command from the Excel section and choose One Cell Below. Refer below.
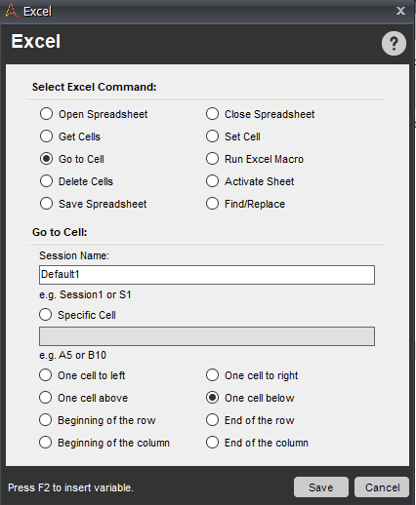
Your final task list should look like below:

Step 13: Now, click on the Save button, to save your task and execute the task by clicking on the Run button.
You would see the below output.
PDF Automation
The PDF Automation or the PDF Integration command is used in Automation Anywhere to automate tasks on PDFs’ such as merge two documents, extract text, split documents, convert PDF to image, and encrypt/decrypt a document.
Problem Statement
To automate the task of extracting the data from multiple PDF documents and storing the data into a CSV file.
Solution
Step 1: Open the Automation Anywhere Workbench.
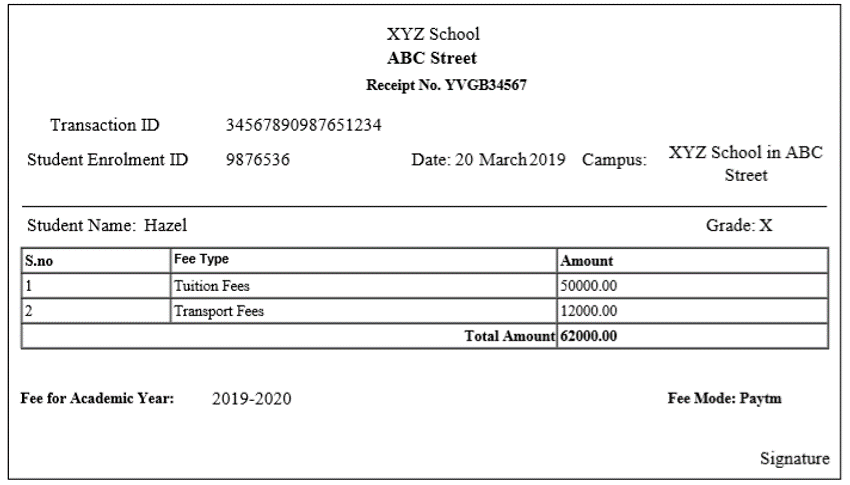
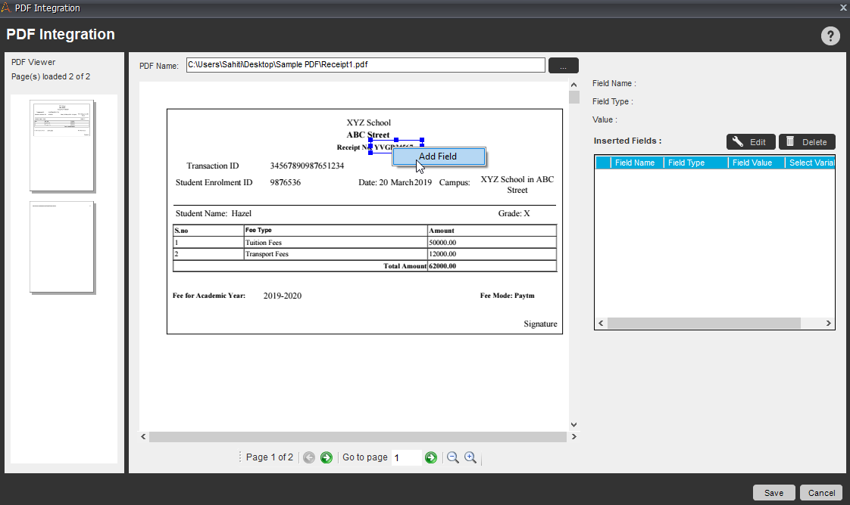
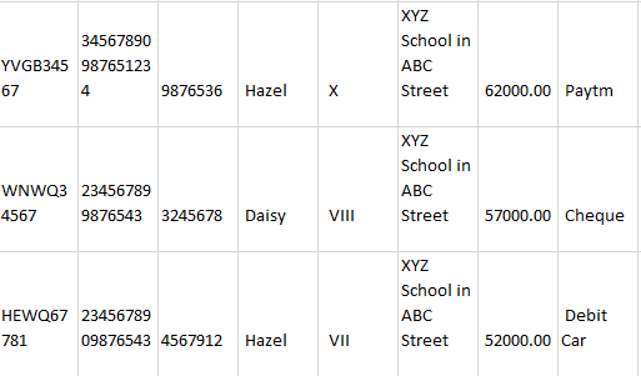
Step 2: Now choose the PDF from which you want to extract data and also take note of all the fields that you want to extract data. The below snapshots shows the document from which I want to extract data. Here I want to extract RecieptNo, TransactionID, StudentEnrolmentNo, StudentName, Grade, FeeModeofPayment, TotalAmount, DateofPayment.
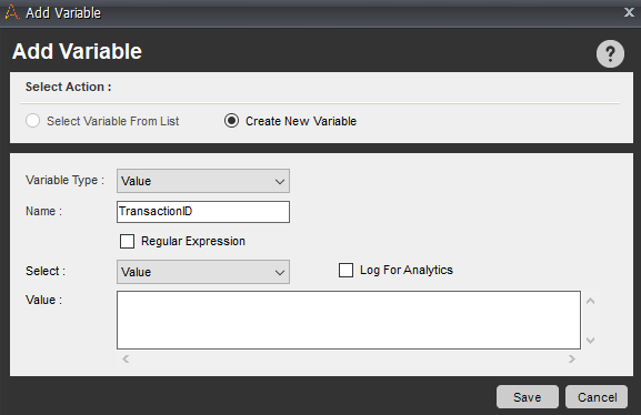
Step 3: Now, go to the Variable Manager on the right-hand side of your Workbench and add the variables for all the fields you want to extract data. Here you have to create 8 variables. Let me show you how to create a single variable.
Step 3.1: Click on the Add option. In the dialog box that opens up, mention the name of the variable in the Name field and click on Save. Refer below.
 Step 3.2: Repeat the above steps to create the other 7 variables.
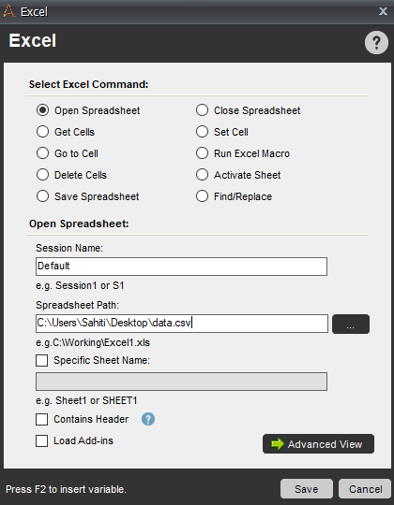
Step 4: Now click on the Excel command from the left panel and double click on the Open-Spreadsheet subcommand. This opens a dialog box.
Step 4.1: Now go to the ellipses button and mention the path of the Excel file where you want to store the extracted data. Then, click on Save. This step will design the task to open an Excel file. Refer below.
Step 5: Now, you have to make sure that the extracted data is getting filled automatically starting from the A2 Cell. To create an action for this Double-click on the Go-to-cell subcommand and enter A2 in the specific cell section. After that click on Save. Refer below.
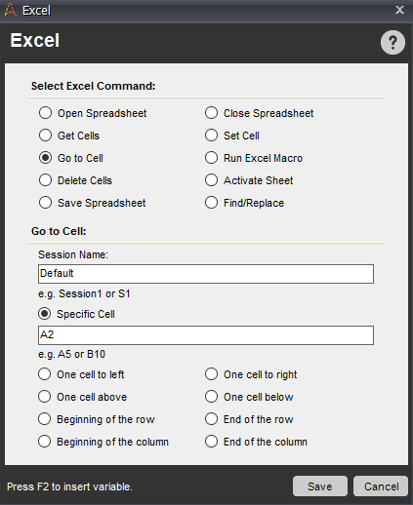
This step will design a task to place your cursor at the A2 cell in the spreadsheet which is open.
Step 6: Now, you have to start extracting data from the PDF File. To do so follow the below steps.
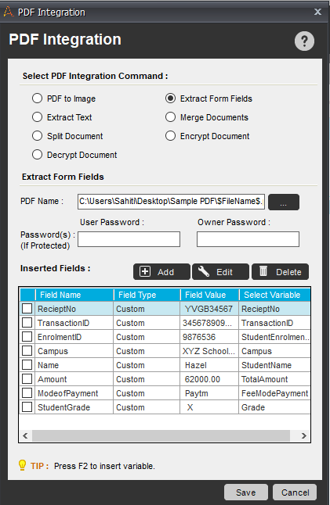
Step 6.1: Click on the PDF-Integration command and double-click on the Extract Form Fieldssubcommand.
Step 6.2: Now click on the ellipses button and choose the PDF file from which you want to extract data.
Step 6.3: After this, from the Inserted Fields section, choose the Add option and drag the mouse over the required field.
Step 6.4: Now, right-click the selected field, and choose the Add Field. Refer below.
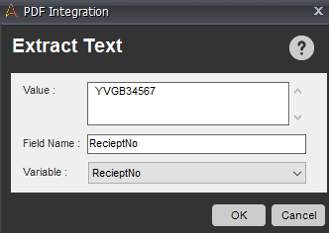
Step 6.5: In the extracted text window, choose the suitable variable name and enter the field name. Then click Ok. This will store the extracted data for the specified variable and the field name. Refer below.
Step 6.6: Similarly repeat the steps for the other 7 fields/variables.
Step 6.7: Finally click on Save.
Step 7: Now, you have to store the extracted data into respective cells in the Excel File. To do this follow the below steps:
Step 7.1: Click on the Excel command and double-click on the Set Cell subcommand.
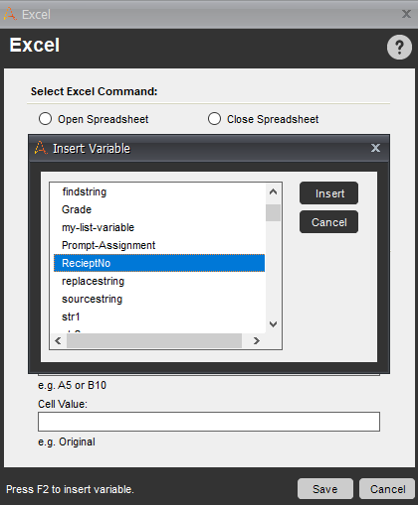
Step 7.2: In the dialog box that opens up, go to the Cell value section, press on F2 and choose the variable name that you would like to choose. Then click on Insert. Here I will choose RecieptNo. Refer below.
This action will make you store the data in the A2 cell.
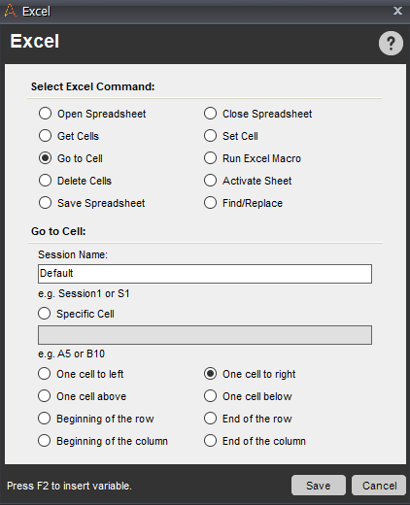
Step 7.3: Now, the next extracted data should be stored in the next cell that is B2(which is in the same row, but different column). To do that, double-click on the Go to cell subcommand and choose the option of One cell to right. After that click on Save.
Step 7.4: Now, to insert the value to the B2 cell, again double click on the Set Cell subcommand and press on F2. Choose the variable name and click on Insert.
Step 7.5: Now, insert the next value to the C2 cell. To do that repeat the above steps.
Now, you have extracted the data for a single PDF, if you wish to extract data from various other PDFs. You have to store the data in the next row right?
Step 8: To do so, Double click on the Go to Cell subcommand and choose One cell below.

Step 9: To go to the beginning cell i.e the first cell in the row, choose the Go to cell subcommand and choose Beginning of the row. Refer below.
Step 10: Now, all the above actions were to extract data from a single PDF File. To extract data from multiple PDF Files, follow the below steps.
Step 10.1: Click on the section action in the task pane and then Double click the Loop command from the left panel.
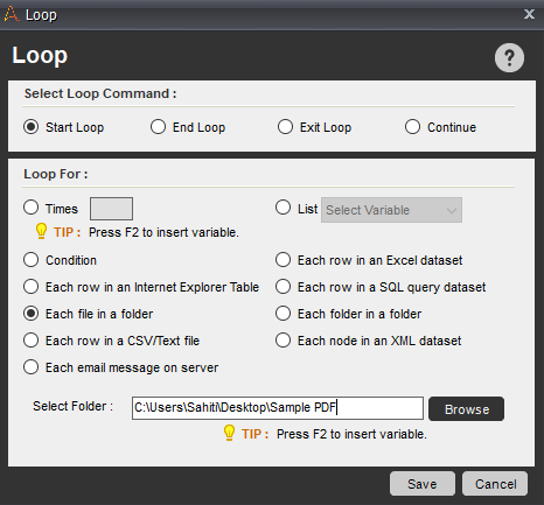
Step 10.2: Over here choose Double click on the Each File in a Folder command and from the Browse option mention the path of the folder which contains all the PDF Files. Then click on Save.
Step 10.3: Move the End Loop command to the last line of the action list.
Step 10.4: Double click the PDF Integration command and insert the required variable ($FileName$) in the PDF Name section.
This is how your final task list should look like.
Step 11: Now, click on the Save button, to save your task and execute the task by clicking on the Run button.
You would see the below output.
 So, folks! With this, we come to an end of this article on Automation Anywhere Examples. If you wish to give a jump start, to your career as an RPA Developer, then starting learning RPA and it’s various Tools.
We at Edureka!, offer instructor-led Automation anywhere advanced certification. Edureka! is a trusted online learning company with a network of more than 250,000 satisfied learners spread across the globe. This training will help you gain deep knowledge in Robotic Process Automation and hands-on experience in Automation Anywhere.
Got a question for us? Please mention it in the comments section of this Automation Anywhere Examples and we will get back to you