


Since Automation came into existence, various tools have been emerging in the market. Automation Anywhere is one such popular RPA tool used by the industries to automate various kinds of tasks. Now, this obviously makes us realize the need to enhance our RPA skills and understand the architecture of this tool. In this article on Automation Anywhere Control Room, I am going to discuss the following topics:
Automation Anywhere Control Room | Control Room Administration | Edureka

This session will cover the basics of Automation Anywhere Control Room.
What is Automation Anywhere?
![]()

Automation Anywhere is an RPA Tool which aims to provide the users with a digital workforce composed of software bots. These bots are responsible to complete an end-to-end process by simultaneously providing scalability and security.
This tool has recently launched a community edition which will help you to first explore the tool and automate tasks. Once you are proficient enough with this tool it also offers an Enterprise Edition with a 30-day free trial.
Boost Your Career with Our Comprehensive Automation Testing Course!
Now that you know what Automation Anywhere is, let’s examine its architecture.
Automation Anywhere Architecture
The architecture of Automation Anywhere is Distributed. This architecture has three components that work together to help the user achieve his tasks: the Bot Creators, Control Room, and Bot Runners. The Bot Creators and Runners are connected to the Control Room, which is the brain of Automation Anywhere.
Now, let us understand each of these components one by one.
Bot Creators
Bot Creators are simply used to create bots. These are desktop-based applications whose sole role is to upload or download bots and connect them to the control room. Also, multiple users can create bots that are created and configured for the Control Room.
Bot Runners
Bot Runners are responsible to run or execute the scheduled bots. Multiple bots can be executed in parallel, but the Bot Runners cannot update or create automation. This component of the Automation Anywhere is also connected to the Control Room and have the ability to report back the execution log status to the control room.
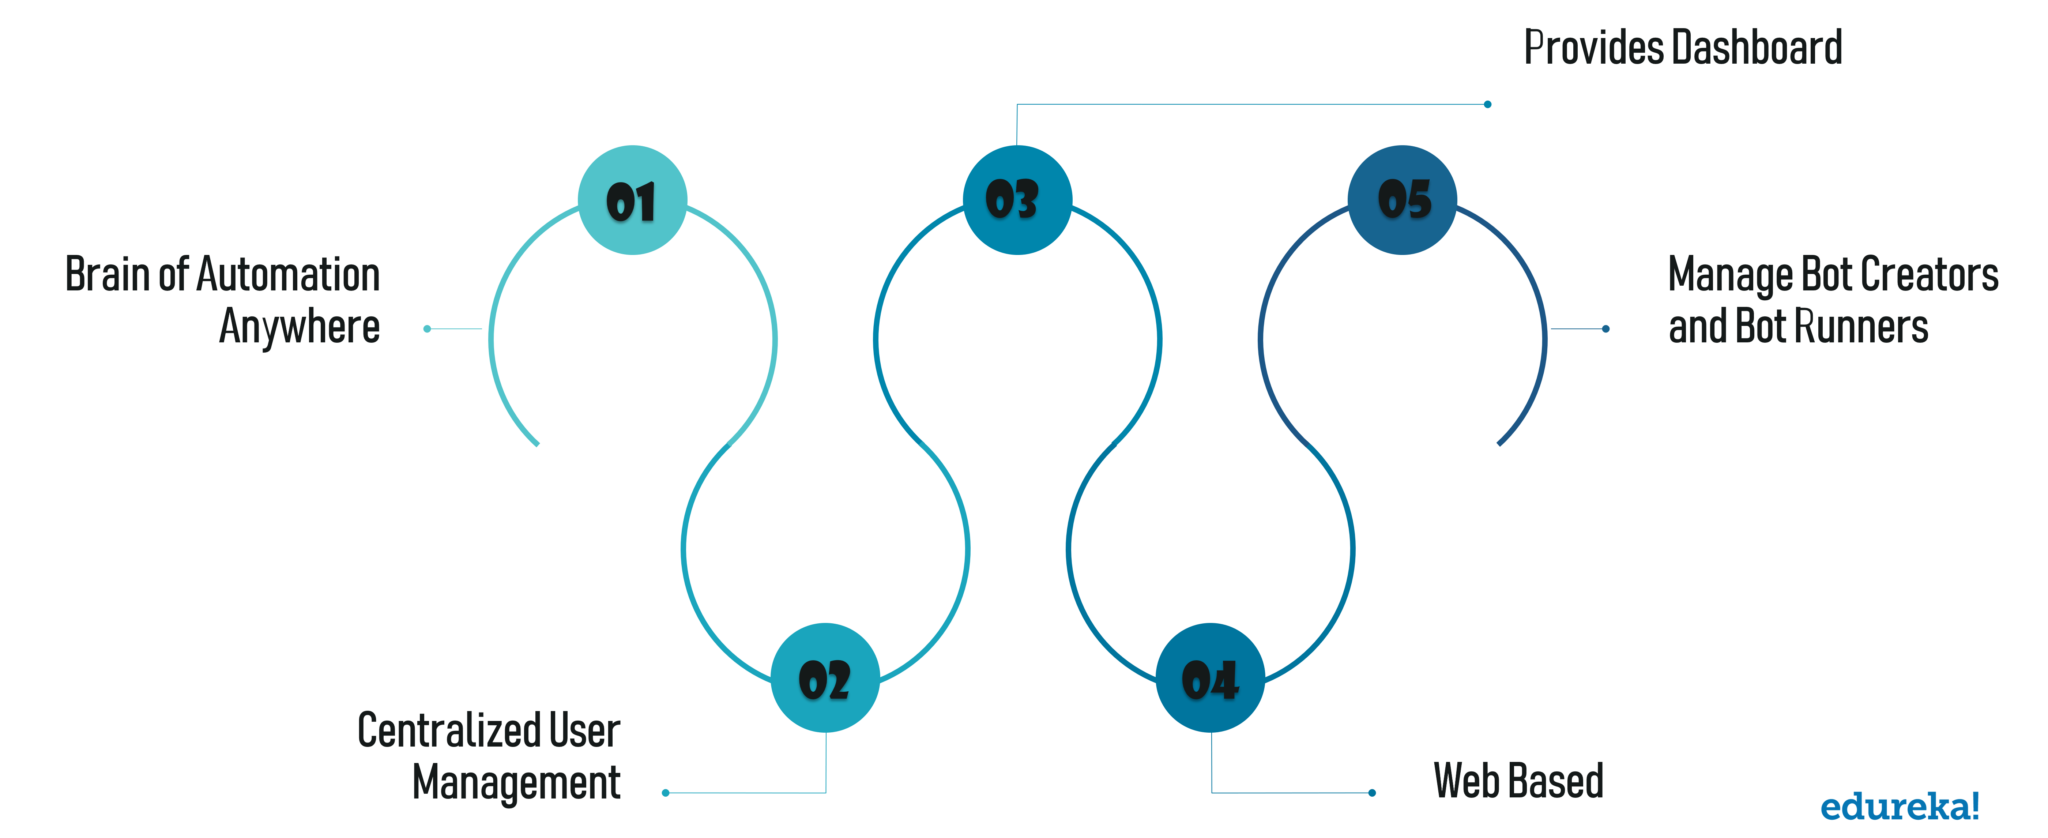
Control Room
Control Room is the most important component of the architecture. It is a web server that basically controls the bots created by the Bot Creators and also handles the automation executed by the Bot Runners. The Control Room ensures centralized management by offering features such as centralized user management, automation deployment, source control and so on. You can refer to the below image for a summary of the Control Room.

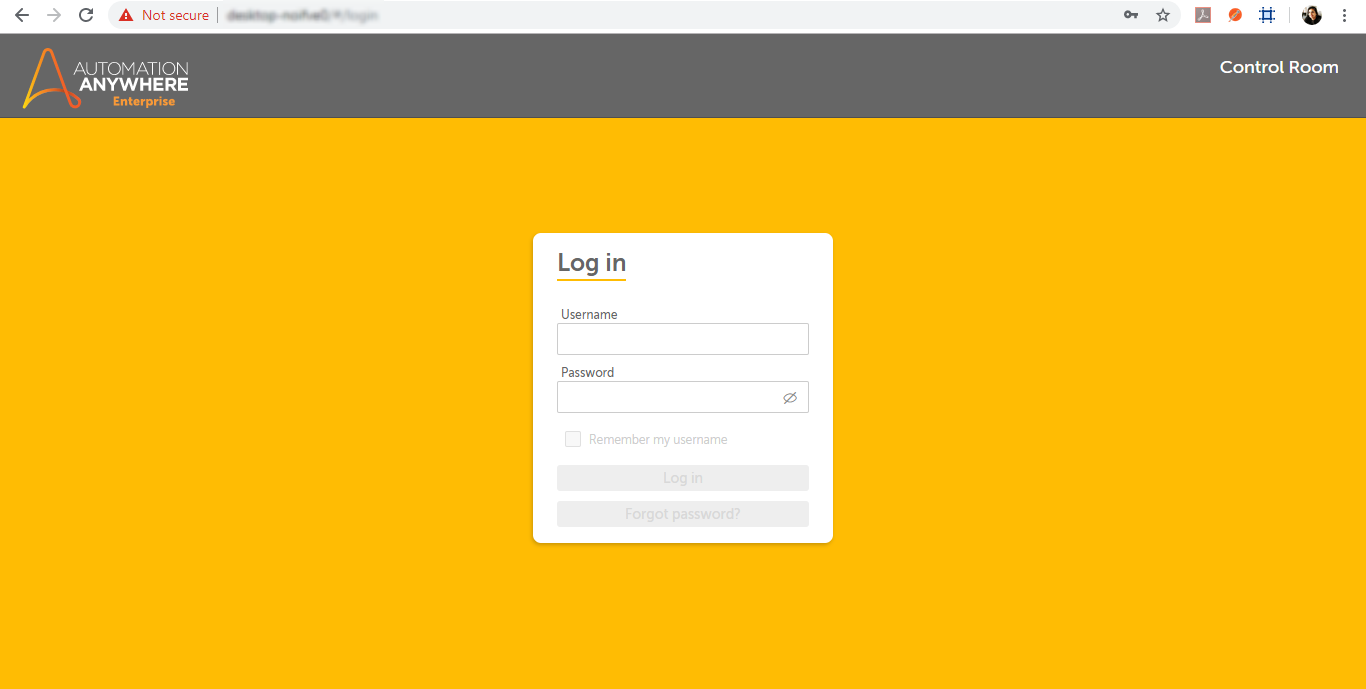
Now, once you have downloaded the Community Edition or the Enterprise Edition, you have to log in to the Control Room using the credentials. You can find these credentials in your email inbox. Refer the below screenshot:

Once you have logged in, you will be redirected to the dashboard of Control Room. Refer the below screenshot:
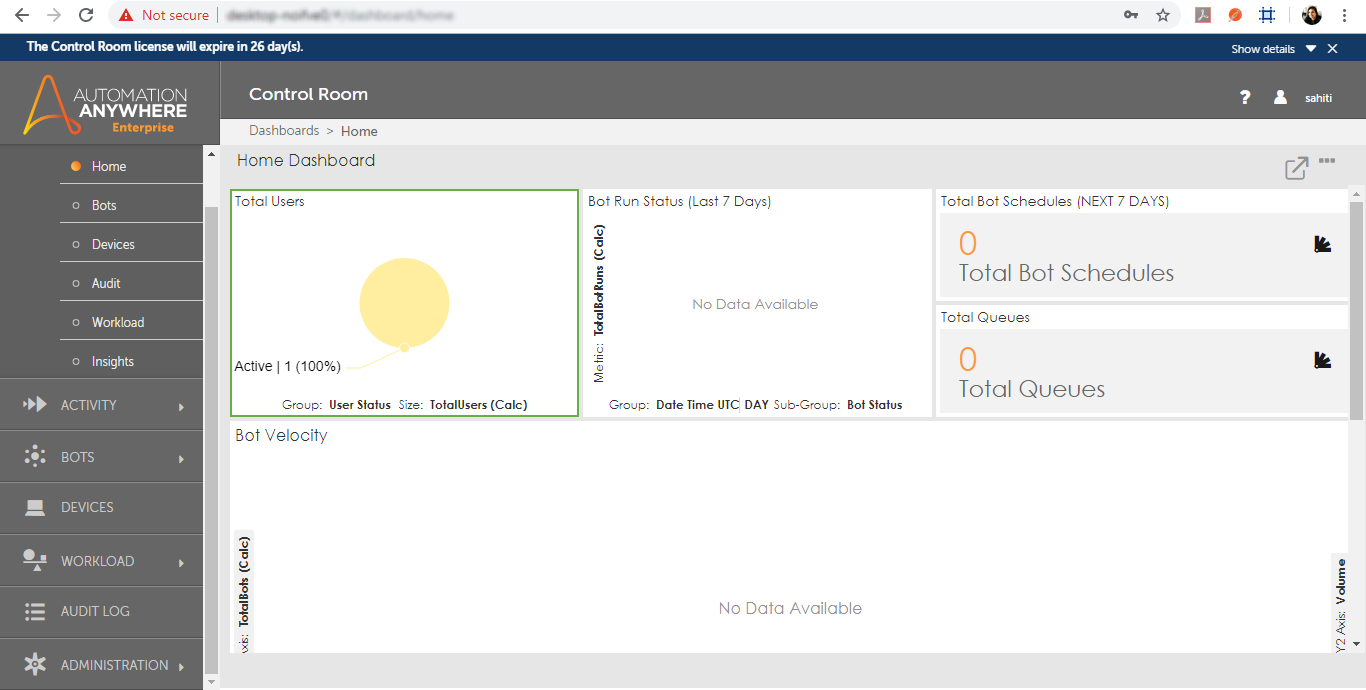

NOTE: In the above dashboard, please remember that you will not find the option of Administration on the left-hand side, if you do not have an Enterprise Edition.
As you can see from the above image, there are few components of Dashboard which you need to understand to use the Control Room dashboard. So, next in this article, let us look into components of Control Room.
Control Room Components
The components of the Control Room are as follows:
Dashboards:
The Dashboard feature of Control Room basically provides stats of various parameters. It has the following 5 options under it:
- Home – The Home dashboard shows the users the bot run status, total queues, total bot schedules, total users, bot velocity and the capacity of bots vs bot runners.
- Bots – The bots dashboard show the users the bot heartbeat, MVP bots, bot status, failure reasons, and the upcoming schedule of bots.
- Devices – The devices dashboard focus on hardware utilization such as CPU utilization, Memory Utilization, HDD Utilization, Upcoming Device Utilization, and Failure Analysis.
- Audit – The Audit tab keeps track of all the activities or actions performed by various users.
- Workload – The Workload Dashboard has two tabs: Executive Dashboard and Operation Manager’s Dashboard. The Executive Dashboard provides visualizations for queue status, queue with avg time, device pools by backlog and queues by time to complete. Similarly, the Operation Manager’s Dashboard provides visualization for device pools by FTE, pools by decreasing error rate, queues with avg time, device pools by backlogs.
- Insight – The Bot Insight focuses on providing real-time business insights and the digital workforce.
Activity:
The activity feature of the Control Room dashboard is mainly used to check the history and the progress of the scheduled activities. It has the following 3 options under it:
- In progress: The In Progress Activity tab is used to check the status of the activity which is currently executing. It gives all the details related to the activity such as the username, bot name, item name, progress, etc.
- Scheduled: The Scheduled activity tab is used to check the details of the activity which is scheduled to execute sometime later. It gives all the details related to the activity such as the username, bot name, item name, progress, etc.
- Historical: The historical activity tab is used to check the details of the activity which might have completed, finished, stopped or timed out. It gives details related to the device name, automation name, bot name, user, started on, etc.
Bots:
The Bots feature of Control Room dashboard to see the details of tasks created. It gives details such as the task name, credentials, client name, etc. It has the following 3 options under it:
- My Bots: The bots tab lists the tasks and its details such as the name, client name, last modified date.
- Credentials: The credentials tab displays the credentials, lockers, and credentials requests.
Devices:
The Devices feature displays whether a user is logged into the client UI on the device or not. Also, if the username is disabled then the device is shown ‘Offline’ and if the username is deleted then the device name will no longer appear.
Workload:
The workload feature of the Control Room Dashboard displays the load of the queues by displaying details such as queue name, automation name, automation status, bot name, and device pool.
Audit Log:
The Audit Log feature is used to keep track of all the actions performed by various users.
So, folks, these were the various components of Control Room.
Now, if you have the enterprise edition of Automation Anywhere, then you get an additional feature known as the Administration. So, nect in this article, let us look into the various options of this feature.
Administration
The Administration feature is used to configure the Control Room. It basically has 5 options under it:
- Settings: The settings tab provides the configuration settings of control room such as the database configurations, bots configurations, client application settings, credentials, and email notifications.
- Users: The Users tab is used to create users with various roles.
- Roles: The roles tab shows a list of predefined roles or you can create a role.
- Licenses: Shows a list of product and device licenses. It also shows which licenses are purchased and whether they are used or not.
- Migration: The Migration tab is used to migrate information from an old version of the Control Room.
So, now that you know the various components of Control Room, let us go ahead and look into a hands-on.
Hands-On
In the following hands-on, I am going to show you how to upload a bot on the control room.
Solution:
The following steps have to be followed to upload a bot:
- Create a User
- Assign the User with roles
- Allocate a License to the User
- Login to Automation Anywhere Client with the user details
- Choose the task, which has to be uploaded
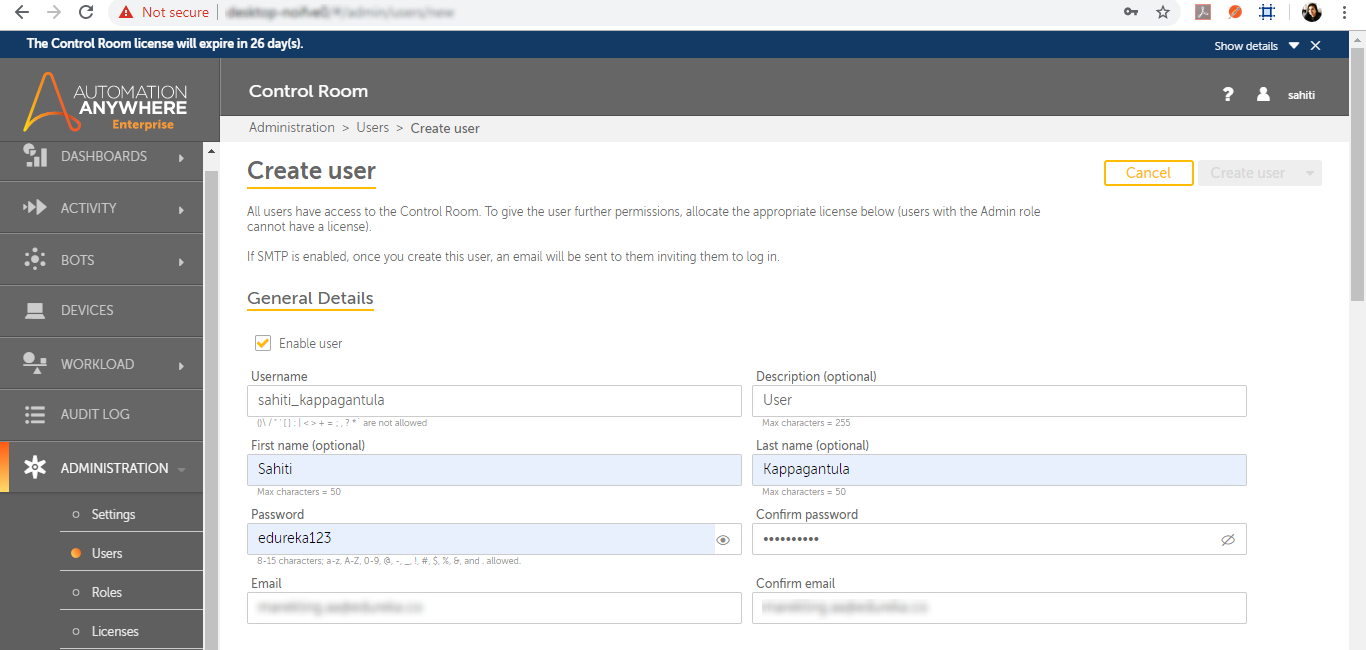
Creating a User
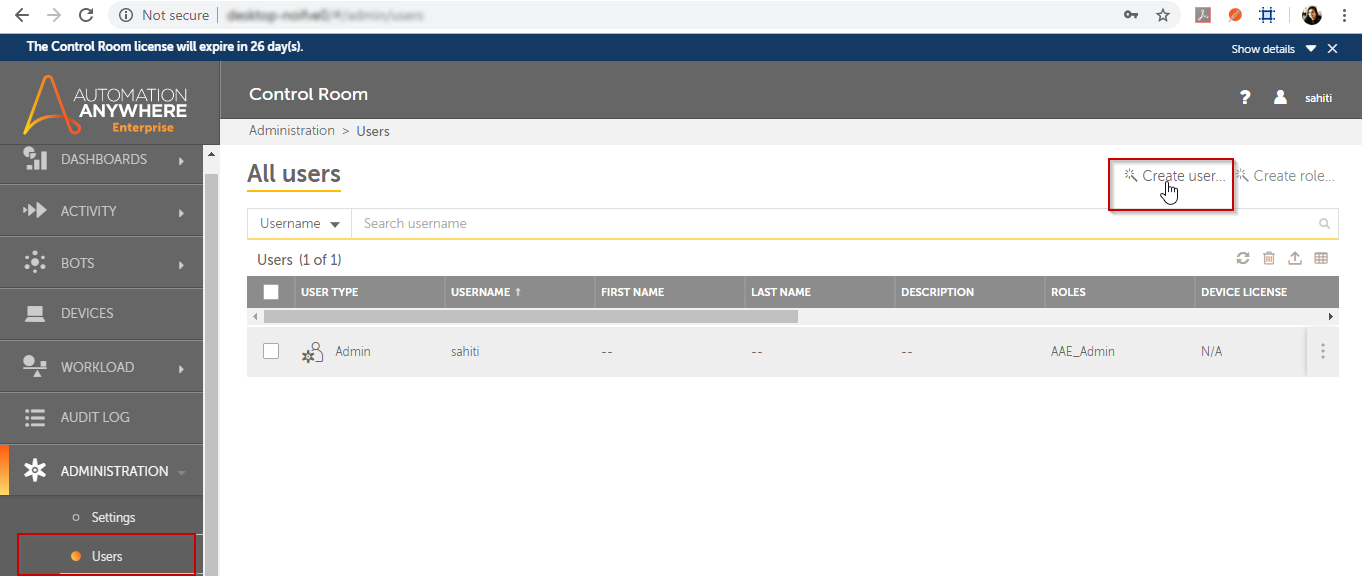
Step 1: Login to the control room, and go to Administration ->Users. Then, choose the option of Create a User on the right-hand side.

Step 2: Once you choose the option, to create a user, you will be redirected to the following screen, where you have to fill in general details as shown below:

Assign the User with roles
Step 1: After mentioning the general details, you have to next assign a role to the user. So, scroll down the page and choose the role you wish to give to the user. After that, click on the right-arrow beside the list, to assign the role to the user. Refer below.
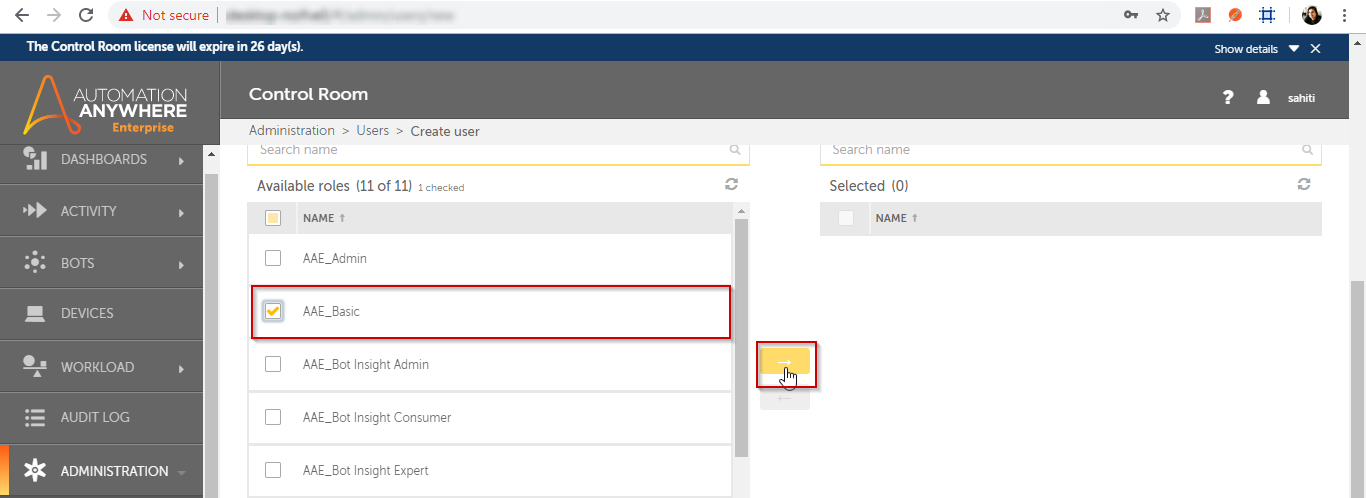

NOTE: Here, I will be assigning the AAE_Basic role to the user. You may assign more than one role to the user.
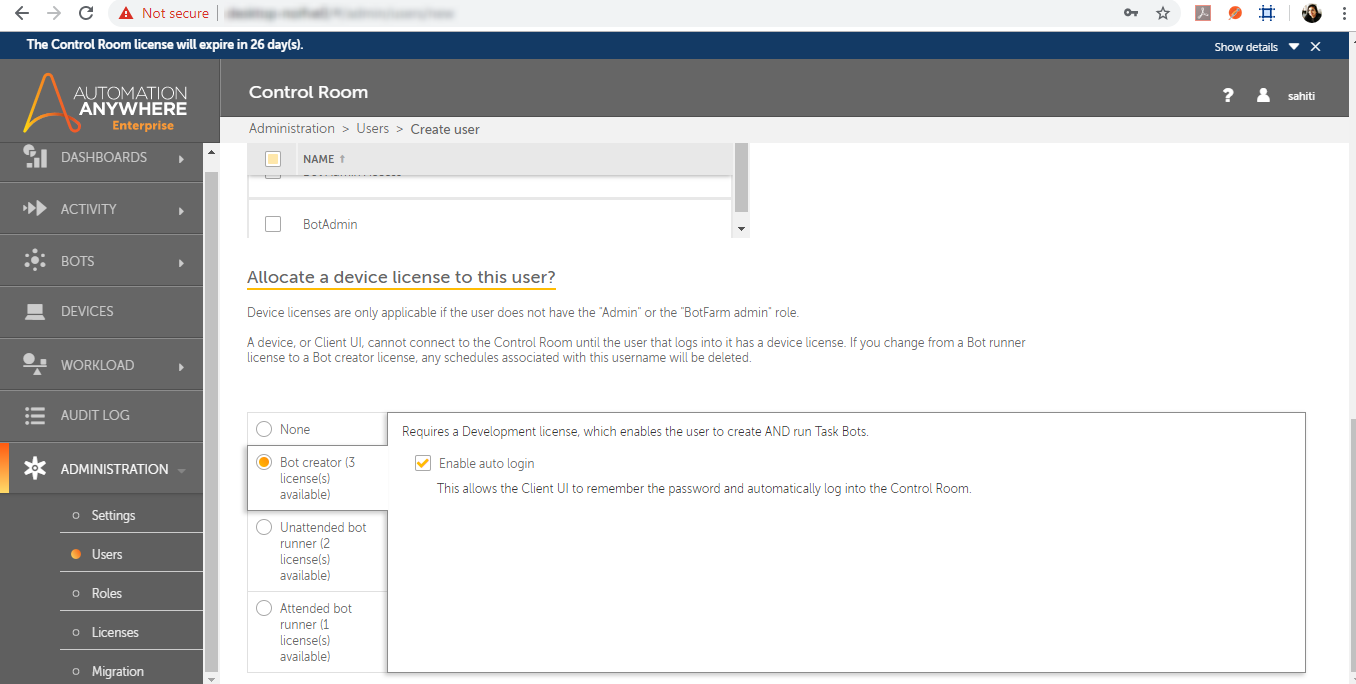
Allocate a License to the User
Step 1: Now, scroll down again, and choose the license which you wish to allocate to the user. Refer below.

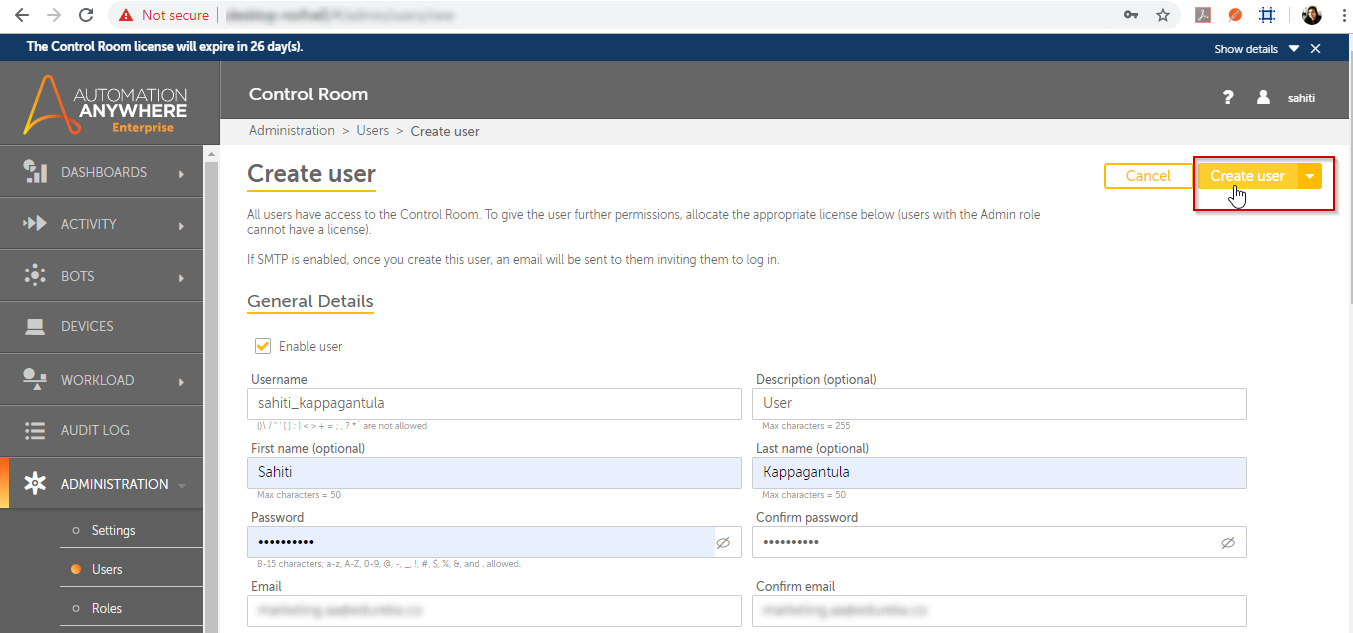
Step 2: Finally, scroll up the page and click on Create User as below.

Once, you click on Create User, a user will be automatically created and you can see the user on the Users tab as below:


Login to Automation Anywhere Client with the user details
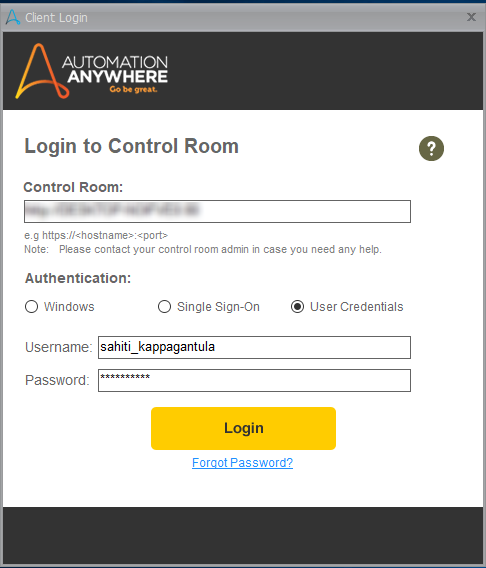
Now, once a user is created, you have to log in to the Automation Anywhere Enterprise Client, with the same username and password, you have mentioned above while creating a user. Also, to know the Control Room URL, you can go to the Administration -> Settings -> General.
Now, run the Client application and mention the details as below:

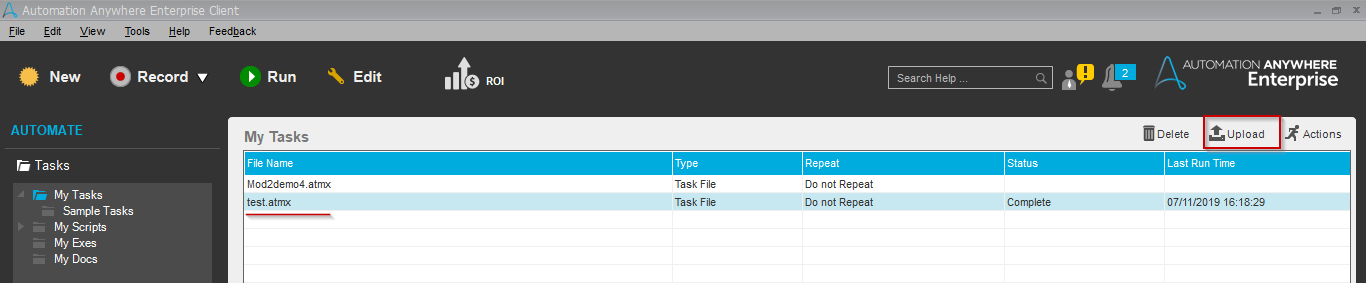
Choose the task, which has to be uploaded
Once, the Client opens, choose the task, you wish to upload and click on the option of Upload present on the right-hand side.

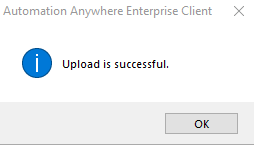
As soon as you click on the option of Upload, you will see the following output.

Finally, you can check whether the bot is uploaded or not, by going to the My Bots section as shown below.


So folks! That’s an end to this article on Automation Anywhere Control Room. I hope you understood what is the Control room and what are the different components of the dashboard of the Control Room. Now, If you wish to give a jump start, to your career as an RPA Developer, then starting learning RPA and it’s various Tools.
Find out our Automation Testing Training in Top Cities/Countries
| India | Other Cities/Countries |
| Bangalore | UK |
| Hyderabad | USA |
| Pune | Canada |
| Chennai | Singapore |
We at Edureka, offer an instructor-led UIPath Certification Course. Edureka is a trusted online learning company with a network of more than 250,000 satisfied learners spread across the globe. This training will help you gain deep knowledge in Robotic Process Automation and hands-on experience in Automation Anywhere. Take your automation skills to new heights by earning your Automation Anywhere Certification to validate your expertise in RPA and boost your career prospects.
Got a question for us? Please mention it in the comments section of this Automation Anywhere Control Room article and we will get back to you.