Data Science with Python Certification Course
- 132k Enrolled Learners
- Weekend
- Live Class
(49300)


 Copy Link!
Time does not wait for anyone, and in this immensely fast era, we always need tools by which we can speed up our tasks. Software development is one of the major tasks which requires the most resourceful environments that not just help the programmer write the code but also allow software production. This is the sole purpose of an IDE, and among the best, Atom is free and open source. It is a desktop application which is designed to serve Python developers in their endeavor.
Before getting into the depth, let’s take a quick look at all that will be studied in this article:
Let us first begin with figuring out as to why you actually need python Atom IDE?
The most basic way to create and run a Python program is to create an empty file with a .py extension and then point to that file from the command line with python filename.py. Alternatively, you can use IDLE which comes as a default application along with Python to execute your code. However, if you want to be productive, the first two options would not be the best ones. You will need to use something more reliable and productive. Here is where the Atom comes into the picture. Atom does not have features in the traditional sense, it creates packages that add to its hackable core. These packages provide features like auto-complete, code lines, and code highlighters.
So let’s move on and venture deep into this remarkable ‘Software for Software Development’, which is Atom.
Atom is an open-source text editor for multiple platforms, which supports packages developed in Node.js and has support for Git version control. Most of the packages are freely available and built by open-source communities. It is developed and maintained by GitHub, built using web technologies as a desktop application.
Atom is an open-source cross-platform IDE. It supports packages developed in Node.js and Git version control. Most of the packages are freely available and built by open-source communities. This IDE is developed and maintained by GitHub on Electron framework using web technologies.
To download Atom python text editor, go to https://atom.io/ . It will automatically detect your current operating system and show the corresponding setup file to download, click on download.
Once the download process is finished, complete the setup by clicking on run and wait until the installation is finished. Once installed, Atom will open automatically, in the default directory. A shortcut will also be created in the start menu.
To execute Python code, you will need to install the required packages or plug-in.

Let us now see how we can configure Atom Python to open in a standard way so as to access atom from the directory of our choice. You can also explore features like installing a theme or package using the welcome guide as shown in the image above. For now, just close the welcome guide and uncheck the option Show Welcome Guide when opening Atom so that the next time you launch atom the welcome screen does not appear.
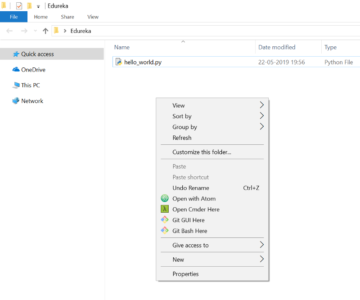
Now, go to the directory where you have downloaded atom, right click on it and select open with Atom.
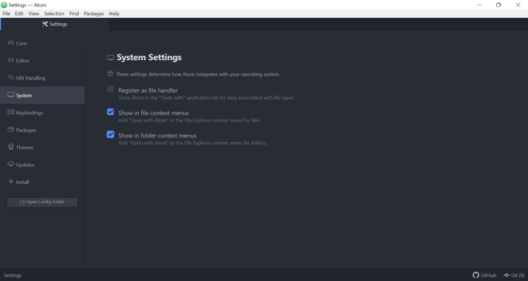
If you don’t see this option in the context menu, it can be launched from programs. Go to File->Settings or use Ctrl + Comma (Ctrl+,) to open settings.
In settings, click on the System tab and check the following options:
1) Show in file context menus
2) Show in folder context menus
Now the context menu will show the required option which is, open with Atom. Go to the directory and perform the same operation as described earlier.
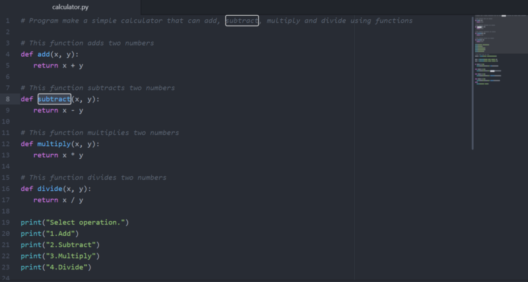
You will be able to see the tree view towards the left. If you don’t see the tree view, go to view and click toggle tree view or use the shortcut (Ctrl+/). In the tree view simply double click on the python file and you can see the code.
Normally, the command prompt is used to run Python programs. However, in Atom, a plugin called platformio-ide-terminal is available which can be used to execute the python files, To setup, this plugin, navigate to File->Settings click on Install tab and search for the platformio-ide-terminal plug-in and click on install.

Once the installation is finished, a terminal will be integrated inside Atom and you will be able to see a + icon in the left corner of the Atom python editor. The terminal will open in the current directory if clicked on it.
You can also view plugin details by clicking on the plugin package tab. It will show all the required details and how to use the plugins.
Splitting the Editor
When you have more than one file opened inside Atom, you can go to View -> Panes -> Split Right to send the current file to the right half of the window. This will help you boost your productivity when working with multiple files simultaneously.
There are two types of themes, namely, UI and Syntax themes. The UI themes are for changing the style of buttons, dropdowns, etc whereas the Syntax themes are for determining how the code is colored and the syntax highlighting details.
To check for all the installed themes, navigate to File->Settings, then click on the themes tab, and it will show you the desired result. In case you want to download new ones, go to + Install tab click on the Themes tab which is present beside Packages, look for the theme that you require and install it.
I personally like the default theme, but you can go ahead and change the theme for both and configure your editor as and how you prefer.
To change the default font, navigate to Settings then click on the Editor tab. Here, you will be able to see an option to change the font using Font Family to style it according to your preference.
To add on to some more fun, you can experiment with the following options:
Line-height is basically the spacing between two lines. In case you want to change it, navigate to the Editor tab, and change the line-height according to your preference.
If you scroll through the code normally, you will be able to scroll till the last line which will be at the bottom of the screen. Moving beyond it will be locked. If you enable the Scroll Past End package, you will be able to see the bottom line at the top of the screen giving you blank space below so that you can be comfortable working with code.
Without the indent guide, nothing is shown regarding indentations. Once enabled, you will see vertical lines which will help you understand where the indentations should appear.
There are many other options to look out for. You can go ahead and experiment with other options as well.
Now let’s move on to deal with some Python particular configurations.
Here are a few extremely useful plugins for Python to boost its productivity.
The Script package displays a document about the details of other packages such as commands, shortcuts, etc. If you are not comfortable with the default shortcuts, you can change them by navigating to the view code tab which contains a folder named key maps. Navigate to this folder and open script.cson and update it to suit your requirements. Please make a note that I have changed it to Ctrl-r as shown in the screenshot below.

Now, close all the windows and restart atom. When it restarts, you will be able to run Python Script using ctrl+r and you can see an output box at the bottom. This output box can also be customized as follows:
Navigate to File->Settings click on Themes tab and you can see the stylesheet towards the top. When you click on this, a stylesheet will open. Paste the following snippet to increase the font size of the script console.
.script-view .line{
font-size: 30px;
}

Script Console
This package will add icons preceding your files in the tree view as shown in the image below.
![]()
Before
After
Opening file with many lines of code will be displayed as a whole on the window towards the right side. The minimap-highlight-selected will highlight the function or variable which is selected as white patches on that mini window as shown in the screenshot below.
autocomplete-python:
Autocomplete pops-up a window having suggestions regarding what can appear when the programmer reaches a particular point while coding.

flake 8
It’s a linter for Python used to find errors in the script and to highlight them. To enable this you will need to install flake8 using the following command:
pip install flake8
Once done, you can see a little icon on the bottom left corner of Atom which will show a list of errors that were encountered.
python-autopep8
Python-autopep8 is used to format your code. It can be enabled from the autopep8 plugin settings by checking Format on Save option.
This brings us to the end of this article on ‘Atom Python’. So go ahead and explore the so-called ‘A hackable text editor for the 21st Century”. I hope you’ve followed everything neatly.
Got a question for us? Please mention it in the comments section of this “Atom Python IDE” blog and we will get back to you as soon as possible.
To get in-depth knowledge on Python along with its various applications, you can enroll for live Python online training with 24/7 support and lifetime access.


 Thank you for registering Join Edureka Meetup community for 100+ Free Webinars each month JOIN MEETUP GROUP