


There’s quite a buzz out there regarding the installation of Appium. It is generally deemed as confusing and tedious. In this blog, I will teach you how to install our favourite automation testing tool, Appium on both Windows and MAC. I’ll be providing step by step instructions along with screenshots where necessary. Following are the topics discussed –
What is Appium?

Appium is an open source, cross-platform mobile application testing tool. It is widely used by testers for automating their test cases because it can test all sorts of applications. Whether it be a native app, web app or hybrid app or whether it be Android or iOS-specific, Appium can handle it! Appium is just an HTTP server that processes requests to a UIAutomator which contains web driver commands for testing purposes. You should check out my Appium Tutorial if you are interested in learning about the working architecture of Appium.
Appium Features
Appium has been adopted in the industry due to its wide range of features. Let us discuss the ones that bring Appium into the spotlight.
- Support Webdriver Protocol – Webdriver Protocol gives better control over web UI. Automation without interrupting with the JS running on the page. Appium still is backwards Compatible with the JSON Wire Protocol.
- Robust Test Execution – Appium can easily execute tests regardless of the device being locally available or being on a remote server. The tests can be monitored in real-time as well.
- Multi-Platform Support – Appium can execute test cases across multiple platforms. As of now, Appium supports Android, iOS and Windows applications.
- No need to Rebuild Application – Appium doesn’t reinstall the application being tested onto the system again and again. Neither does it need any access to the library or source code of the application.
- Parallel Execution – Appium enables users to execute test automation scripts on multiple Android or iOS sessions. This can be achieved using UIAutomator, UIAutomation and Xcode9.
Appium Installation on Windows
- Download the following before you start the installation process-
- Install Java on your system. Don’t forget to set the environment variables!
- Install Android Studio on your system by running the installer and then create a new project.

- Extract the client library. Keep them separately in a file along with the Appium jar files.
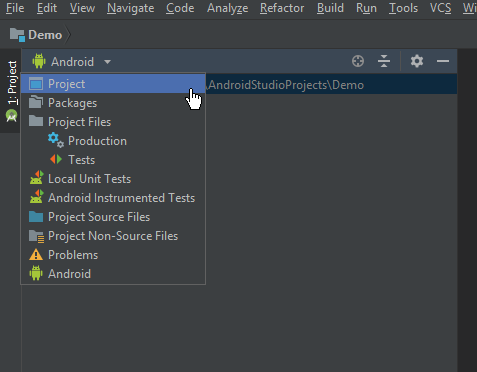
- Switch to the project view in Android studio.


- Now select the files you had extracted in step 4 and put in the lib folder under the app directory. Then select them all and add them as a library.

- Now select the files you had extracted in step 4 and put in the lib folder under the app directory. Then select them all and add them as a library.

- Once you have added the files as a library, you should see a build.gradle file in the app folder. Double click that and then go and rebuild your project. Once the project is rebuilt successfully it means you have installed Appium on your system with Android studio.
Appium Installation on MAC
- Firstly we will be installing java. To install java, head over to the java download page and download the ‘dmg’ file after accepting the licensing agreement. Once you have installed JAVA after following the on-screen installation, enter the following code into your terminal to check whether the installation was successful. The command should show the version of java installed.
java -version
- Now it’s time to set up the environment variable and path. Enter the following code into your terminal.
vim ~/.bash_profile
This will open up a vim-editor. Press I to enter into insert mode and enter the following code.
export JAVA_HOME = $(/usr/libexec/java_home)
export PATH = $JAVA_HOME/bin=$PATH
export PATH = /usr/local/bin:PATH
- After you have entered the above-mentioned code, press the escape key on the keyboard and enter “:wq“.This will return you to the terminal interface. Now enter the following code to pass the path as an argument.
source ~/.bash_profile
- Now, it’s time to install Xcode from the app store. Just search for Xcode on the app store and hit the install button.
- After you have installed Xcode, its time to install homebrew on your system. Copy the code below and paste it into your terminal.
/usr/bin/ruby -e "$(curl -fsSL https://raw.githubusercontent.com/Homebrew/install/master/install)"
- After the above code has run completely run the following commands.
brew update
brew doctor
xcode-select --install
- The above step completes the installation of Xcode. Now all you have to download is the Appium server. Head over to the official site and hit the Download Appium button. Once the download complete, click on the DMG file. Just follow the on-screen instructions. After Appium gets installed just drag and drop it into your applications folder. This completes the installation of Appium on MAC.
This brings us to the end of this Appium Installation Guide. If you want to learn more about the world of mobile application testing you could read up my other blog. If you are interested in reading some other blogs on various trending technologies, you could check out our blog catalogue.
If you wish to learn Software Testing and build a colourful career, then check out our Selenium Certification Course which comes with instructor-led live training and real-life project experience. This training will help you understand software testing and selenium in depth and help you achieve mastery over the subject.