


Apache Hadoop HDFS Architecture
Introduction:
In this blog, I am going to talk about Apache Hadoop HDFS Architecture. HDFS & YARN are the two important concepts you need to master for Hadoop Certification. You know that HDFS is a distributed file system that is deployed on low-cost commodity hardware. So, it’s high time that we should take a deep dive into Apache Hadoop HDFS Architecture and unlock its beauty.
Big Data & Hadoop Full Course – Learn Hadoop In 10 Hours | Hadoop Tutorial For Beginners | Edureka
This Edureka Big Data & Hadoop Full Course video will help you to Learn Data Analytics Concepts and also guide you how to became a Big Data Analytics Engineer
The topics that will be covered in this blog on Apache Hadoop HDFS Architecture are as follows:
- HDFS Master/Slave Topology
- NameNode, DataNode and Secondary NameNode
- What is a block?
- Replication Management
- Rack Awareness
- HDFS Read/Write – Behind the scenes
HDFS Architecture:
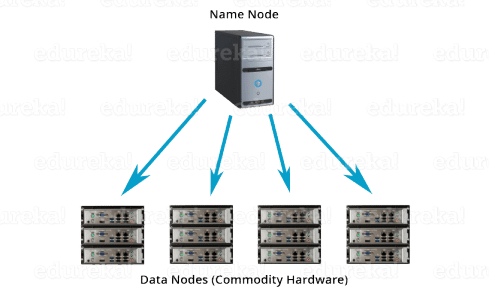
Apache HDFS or Hadoop Distributed File System is a block-structured file system where each file is divided into blocks of a pre-determined size. These blocks are stored across a cluster of one or several machines. Apache Hadoop HDFS Architecture follows a Master/Slave Architecture, where a cluster comprises of a single NameNode (Master node) and all the other nodes are DataNodes (Slave nodes). HDFS can be deployed on a broad spectrum of machines that support Java. Though one can run several DataNodes on a single machine, but in the practical world, these DataNodes are spread across various machines.
NameNode:

NameNode is the master node in the Apache Hadoop HDFS Architecture that maintains and manages the blocks present on the DataNodes (slave nodes). NameNode is a very highly available server that manages the File System Namespace and controls access to files by clients. I will be discussing this High Availability feature of Apache Hadoop HDFS in my next blog. The HDFS architecture is built in such a way that the user data never resides on the NameNode. The data resides on DataNodes only.
Functions of NameNode:
- It is the master daemon that maintains and manages the DataNodes (slave nodes)
- It records the metadata of all the files stored in the cluster, e.g. The location of blocks stored, the size of the files, permissions, hierarchy, etc. There are two files associated with the metadata:
- FsImage: It contains the complete state of the file system namespace since the start of the NameNode.
- EditLogs: It contains all the recent modifications made to the file system with respect to the most recent FsImage.
- It records each change that takes place to the file system metadata. For example, if a file is deleted in HDFS, the NameNode will immediately record this in the EditLog.
- It regularly receives a Heartbeat and a block report from all the DataNodes in the cluster to ensure that the DataNodes are live.
- It keeps a record of all the blocks in HDFS and in which nodes these blocks are located.
- The NameNode is also responsible to take care of the replication factor of all the blocks which we will discuss in detail later in this HDFS tutorial blog.
- In case of the DataNode failure, the NameNode chooses new DataNodes for new replicas, balance disk usage and manages the communication traffic to the DataNodes.
Understand the various properties of Namenode, Datanode and Secondary Namenode from the Hadoop Administration Course.
DataNode:
DataNodes are the slave nodes in HDFS. Unlike NameNode, DataNode is a commodity hardware, that is, a non-expensive system which is not of high quality or high-availability. The DataNode is a block server that stores the data in the local file ext3 or ext4.
Functions of DataNode:
- These are slave daemons or process which runs on each slave machine.
- The actual data is stored on DataNodes.
- The DataNodes perform the low-level read and write requests from the file system’s clients.
- They send heartbeats to the NameNode periodically to report the overall health of HDFS, by default, this frequency is set to 3 seconds.
Till now, you must have realized that the NameNode is pretty much important to us. If it fails, we are doomed. But don’t worry, we will be talking about how Hadoop solved this single point of failure problem in the next Apache Hadoop HDFS Architecture blog. So, just relax for now and let’s take one step at a time.
Learn more about Big Data and its applications from the Azure Data Engineer course
Secondary NameNode:
Apart from these two daemons, there is a third daemon or a process called Secondary NameNode. The Secondary NameNode works concurrently with the primary NameNode as a helper daemon. And don’t be confused about the Secondary NameNode being a backup NameNode because it is not.

Functions of Secondary NameNode:
- The Secondary NameNode is one which constantly reads all the file systems and metadata from the RAM of the NameNode and writes it into the hard disk or the file system.
- It is responsible for combining the EditLogs with FsImage from the NameNode.
- It downloads the EditLogs from the NameNode at regular intervals and applies to FsImage. The new FsImage is copied back to the NameNode, which is used whenever the NameNode is started the next time.
Hence, Secondary NameNode performs regular checkpoints in HDFS. Therefore, it is also called CheckpointNode.
Blocks:
Now, as we know that the data in HDFS is scattered across the DataNodes as blocks. Let’s have a look at what is a block and how is it formed?
Blocks are the nothing but the smallest continuous location on your hard drive where data is stored. In general, in any of the File System, you store the data as a collection of blocks. Similarly, HDFS stores each file as blocks which are scattered throughout the Apache Hadoop cluster. The default size of each block is 128 MB in Apache Hadoop 2.x (64 MB in Apache Hadoop 1.x) which you can configure as per your requirement.

It is not necessary that in HDFS, each file is stored in exact multiple of the configured block size (128 MB, 256 MB etc.). Let’s take an example where I have a file “example.txt” of size 514 MB as shown in above figure. Suppose that we are using the default configuration of block size, which is 128 MB. Then, how many blocks will be created? 5, Right. The first four blocks will be of 128 MB. But, the last block will be of 2 MB size only.
Now, you must be thinking why we need to have such a huge blocks size i.e. 128 MB?
Well, whenever we talk about HDFS, we talk about huge data sets, i.e. Terabytes and Petabytes of data. So, if we had a block size of let’s say of 4 KB, as in Linux file system, we would be having too many blocks and therefore too much of the metadata. So, managing these no. of blocks and metadata will create huge overhead, which is something, we don’t want.
As you understood what a block is, let us understand how the replication of these blocks takes place in the next section of this HDFS Architecture. Meanwhile, you may check out this video tutorial on HDFS Architecture where all the HDFS Architecture concepts has been discussed in detail:
Replication Management:
HDFS provides a reliable way to store huge data in a distributed environment as data blocks. The blocks are also replicated to provide fault tolerance. The default replication factor is 3 which is again configurable. So, as you can see in the figure below where each block is replicated three times and stored on different DataNodes (considering the default replication factor): 
Therefore, if you are storing a file of 128 MB in HDFS using the default configuration, you will end up occupying a space of 384 MB (3*128 MB) as the blocks will be replicated three times and each replica will be residing on a different DataNode.
Note: The NameNode collects block report from DataNode periodically to maintain the replication factor. Therefore, whenever a block is over-replicated or under-replicated the NameNode deletes or add replicas as needed.
Rack Awareness:

Anyways, moving ahead, let’s talk more about how HDFS places replica and what is rack awareness? Again, the NameNode also ensures that all the replicas are not stored on the same rack or a single rack. It follows an in-built Rack Awareness Algorithm to reduce latency as well as provide fault tolerance. Considering the replication factor is 3, the Rack Awareness Algorithm says that the first replica of a block will be stored on a local rack and the next two replicas will be stored on a different (remote) rack but, on a different DataNode within that (remote) rack as shown in the figure above. If you have more replicas, the rest of the replicas will be placed on random DataNodes provided not more than two replicas reside on the same rack, if possible. You can even check out the details of Big Data with the Azure Data Engineering Course in Singapore.
This is how an actual Hadoop production cluster looks like. Here, you have multiple racks populated with DataNodes:

Advantages of Rack Awareness:
So, now you will be thinking why do we need a Rack Awareness algorithm? The reasons are:
- To improve the network performance: The communication between nodes residing on different racks is directed via switch. In general, you will find greater network bandwidth between machines in the same rack than the machines residing in different rack. So, the Rack Awareness helps you to have reduce write traffic in between different racks and thus providing a better write performance. Also, you will be gaining increased read performance because you are using the bandwidth of multiple racks.
- To prevent loss of data: We don’t have to worry about the data even if an entire rack fails because of the switch failure or power failure. And if you think about it, it will make sense, as it is said that never put all your eggs in the same basket.
HDFS Read/ Write Architecture:
Now let’s talk about how the data read/write operations are performed on HDFS. HDFS follows Write Once – Read Many Philosophy. So, you can’t edit files already stored in HDFS. But, you can append new data by re-opening the file. Get a better understanding of the Hadoop Clusters, nodes, and architecture from the Hadoop Admin Training in Chennai.
HDFS Write Architecture:
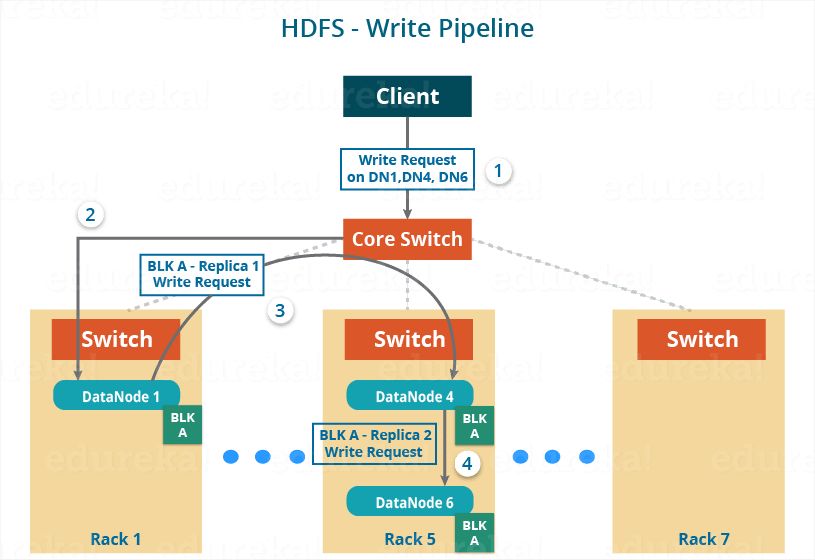
Suppose a situation where an HDFS client, wants to write a file named “example.txt” of size 248 MB.

Assume that the system block size is configured for 128 MB (default). So, the client will be dividing the file “example.txt” into 2 blocks – one of 128 MB (Block A) and the other of 120 MB (block B).
Now, the following protocol will be followed whenever the data is written into HDFS:
- At first, the HDFS client will reach out to the NameNode for a Write Request against the two blocks, say, Block A & Block B.
- The NameNode will then grant the client the write permission and will provide the IP addresses of the DataNodes where the file blocks will be copied eventually.
- The selection of IP addresses of DataNodes is purely randomized based on availability, replication factor and rack awareness that we have discussed earlier.
- Let’s say the replication factor is set to default i.e. 3. Therefore, for each block the NameNode will be providing the client a list of (3) IP addresses of DataNodes. The list will be unique for each block.
- Suppose, the NameNode provided following lists of IP addresses to the client:
- For Block A, list A = {IP of DataNode 1, IP of DataNode 4, IP of DataNode 6}
- For Block B, set B = {IP of DataNode 3, IP of DataNode 7, IP of DataNode 9}
- Each block will be copied in three different DataNodes to maintain the replication factor consistent throughout the cluster.
- Now the whole data copy process will happen in three stages:

- Set up of Pipeline
- Data streaming and replication
- Shutdown of Pipeline (Acknowledgement stage)
1. Set up of Pipeline:
Before writing the blocks, the client confirms whether the DataNodes, present in each of the list of IPs, are ready to receive the data or not. In doing so, the client creates a pipeline for each of the blocks by connecting the individual DataNodes in the respective list for that block. Let us consider Block A. The list of DataNodes provided by the NameNode is:
For Block A, list A = {IP of DataNode 1, IP of DataNode 4, IP of DataNode 6}.

So, for block A, the client will be performing the following steps to create a pipeline:
- The client will choose the first DataNode in the list (DataNode IPs for Block A) which is DataNode 1 and will establish a TCP/IP connection.
- The client will inform DataNode 1 to be ready to receive the block. It will also provide the IPs of next two DataNodes (4 and 6) to the DataNode 1 where the block is supposed to be replicated.
- The DataNode 1 will connect to DataNode 4. The DataNode 1 will inform DataNode 4 to be ready to receive the block and will give it the IP of DataNode 6. Then, DataNode 4 will tell DataNode 6 to be ready for receiving the data.
- Next, the acknowledgement of readiness will follow the reverse sequence, i.e. From the DataNode 6 to 4 and then to 1.
- At last DataNode 1 will inform the client that all the DataNodes are ready and a pipeline will be formed between the client, DataNode 1, 4 and 6.
- Now pipeline set up is complete and the client will finally begin the data copy or streaming process.
2. Data Streaming:
As the pipeline has been created, the client will push the data into the pipeline. Now, don’t forget that in HDFS, data is replicated based on replication factor. So, here Block A will be stored to three DataNodes as the assumed replication factor is 3. Moving ahead, the client will copy the block (A) to DataNode 1 only. The replication is always done by DataNodes sequentially.
So, the following steps will take place during replication:
- Once the block has been written to DataNode 1 by the client, DataNode 1 will connect to DataNode 4.
- Then, DataNode 1 will push the block in the pipeline and data will be copied to DataNode 4.
- Again, DataNode 4 will connect to DataNode 6 and will copy the last replica of the block.
3. Shutdown of Pipeline or Acknowledgement stage:
Once the block has been copied into all the three DataNodes, a series of acknowledgements will take place to ensure the client and NameNode that the data has been written successfully. Then, the client will finally close the pipeline to end the TCP session.
As shown in the figure below, the acknowledgement happens in the reverse sequence i.e. from DataNode 6 to 4 and then to 1. Finally, the DataNode 1 will push three acknowledgements (including its own) into the pipeline and send it to the client. The client will inform NameNode that data has been written successfully. The NameNode will update its metadata and the client will shut down the pipeline.

Similarly, Block B will also be copied into the DataNodes in parallel with Block A. So, the following things are to be noticed here:
- The client will copy Block A and Block B to the first DataNode simultaneously.
- Therefore, in our case, two pipelines will be formed for each of the block and all the process discussed above will happen in parallel in these two pipelines.
- The client writes the block into the first DataNode and then the DataNodes will be replicating the block sequentially.

As you can see in the above image, there are two pipelines formed for each block (A and B). Following is the flow of operations that is taking place for each block in their respective pipelines:
- For Block A: 1A -> 2A -> 3A -> 4A
- For Block B: 1B -> 2B -> 3B -> 4B -> 5B -> 6B
HDFS Read Architecture:
HDFS Read architecture is comparatively easy to understand. Let’s take the above example again where the HDFS client wants to read the file “example.txt” now.

Now, following steps will be taking place while reading the file:
- The client will reach out to NameNode asking for the block metadata for the file “example.txt”.
- The NameNode will return the list of DataNodes where each block (Block A and B) are stored.
- After that client, will connect to the DataNodes where the blocks are stored.
- The client starts reading data parallel from the DataNodes (Block A from DataNode 1 and Block B from DataNode 3).
- Once the client gets all the required file blocks, it will combine these blocks to form a file.
While serving read request of the client, HDFS selects the replica which is closest to the client. This reduces the read latency and the bandwidth consumption. Therefore, that replica is selected which resides on the same rack as the reader node, if possible.
Now, you should have a pretty good idea about Apache Hadoop HDFS Architecture. I understand that there is a lot of information here and it may not be easy to get it in one go. I would suggest you to go through it again and I am sure you will find it easier this time. Now, in my next blog, I will be talking about Apache Hadoop HDFS Federation and High Availability Architecture.
Now that you have understood Hadoop architecture, check out the Hadoop training in Chennai by Edureka, a trusted online learning company with a network of more than 250,000 satisfied learners spread across the globe. The Edureka Big Data architect course helps learners become expert in HDFS, Yarn, MapReduce, Pig, Hive, HBase, Oozie, Flume and Sqoop using real-time use cases on Retail, Social Media, Aviation, Tourism, Finance domain.
Got a question for us? Please mention it in the comments section and we will get back to you.


please send me code and dataset for predicting cat or dog
Thank you for your post. This is excellent information. It is amazing and
wonderful to visit your site.
It is absolutely well explained and precise but I wish to learn from the scrap then how would I be able to do it, Suggest me please. Thank You!
I have an error: FATAL namenode.NameNode: Failed to start namenode.
Please help
Hey Audrey, we’d like to help you out. Can you elaborate a little on the error? Thanks :)
Excellent and very precise blog !!!
Hey Sagar,
Thank you for appreciating our work. Do browse through our other blogs and let us know how you liked it. Cheers :)
a good and detailed explanation :) Thanks
Hey Fadoua! Thank you for appreciating our work. Do check out our Hadoop certification course here: https://www.edureka.co/big-data-hadoop-training-certification
Hope you find this useful as well :)
What happens if during write operation one of the datanode in the pipeline goes down?
I could imagine following possible scenarios:
– datanode goes down while waiting for data block
– datanode goes down while accepting the datablock
– datanode goes down while while waiting for acknowledgement (i.e. datablock has been copied and but further replication is still going on)
(by going down you can assume to be a machine crash or shutdown)
In HDFS multi block write pipeline figure, can’t we take 2B path same as 2A path, inorder to shorten the pipeline(no. of flow operations) for Block B ??
Very precise explanation !! Thanks
Hey Shweta, thanks for checking out our blog. We’re glad you found it useful.
You might also like our YouTube tutorials; check them out here: https://www.youtube.com/edurekaIN.
Do subscribe to stay posted on upcoming blogs. Cheers!
Hi, I need help to further understand this statement from Rack Awareness vs the block B sequence in HDFS Multi – Block Write Pipeline diagram..
Rack Awareness:
“Considering the replication factor is 3, the Rack Awareness Algorithm says that the first replica of a block will be stored on a local rack and the next two replicas will be stored on a different (remote) rack but, on a different DataNode within that (remote) rack as shown in the figure above. If you have more replicas, the rest of the replicas will be placed on random DataNodes provided not more than two replicas reside on the same rack, if possible.”
HDFS Multi – Block Write Pipeline:
The block B first replica was written in Node 7 in rack 7, then written in Node 9 still in rack 7 and then to Node 3 in rack 1
My understanding, the first replica will be in the local and that the subsequent write will be on another node in a different rack and then to another node to that within that same rack, but the “block B” shows otherwise. Can you help explain this further please?
Thanks you very much in advance.