
Advanced DevOps Certification Training with G ...
- 25k Enrolled Learners
- Weekend
- Live Class
(7990)


 Copy Link!
Ansible allows us to automate the configuration management of systems and add any number of clients as we wish. Have you ever wondered how complex this can get? Have you ever wondered how long and confusing the playbooks can get? How does Ansible still make it seem like a breeze? It uses the concept of Ansible Roles and that’s what we’re going to talk about in this blog.
Ansible Role is a concept that deals with ideas rather than events. Its basically another level of abstraction used to organize playbooks. They provide a skeleton for an independent and reusable collection of variables, tasks, templates, files, and modules which can be automatically loaded into the playbook. Playbooks are a collection of roles. Every role has specific functionality.
Let me explain this with an example. Suppose you want your playbook to perform 10 different tasks on 5 different systems, would you use a single playbook for this? No, using a single playbook can make it confusing and prone to blunders. Instead, you can create 10 different roles, where each role will perform one task. Then, all you need to do is, mention the name of the role inside the playbook to call them. You’ll learn how to use roles further in this blog.
Ansible Roles are independent of each other. Execution of one role doesn’t depend on others and hence they can be reused. You can even modify and personalize these roles according to your requirements. This reduces our task to rewrite an entire section of code every time we need it, thus simplifying our work.
Let’s go back to the previous example. You have written 10 roles and now you need to use 5 of them for another set of provisioning. Do you write the entire playbook again? No, you just reuse those 5 roles by calling them in this new Playbook. You can also make modifications if required but it would still end up saving a lot of your time.
Let’s say you need to write a playbook for setting up LAMP stack. You have to create 4 roles, each for creating Linux, Apache, MongoDB and PHP. In the future, if you want another playbook for setting up LAMP stack as well as WordPress, will you again create new roles for LAMP stack and WordPress? No! You can simply re-use the older roles (used for LAMP stack) and additionally create a new role for WordPress.
Using Ansible Roles, expect files to be in a certain file structure. The most confusing part of using roles is understanding the file hierarchy. Ansible provides a feature called Ansible Galaxy that helps you play with roles. We already know where our Ansible is on Ubuntu (/etc/ansible). Have you ever seen a directory called roles under /etc/ansible? That directory exists exactly for this reason. You create different roles inside this directory.
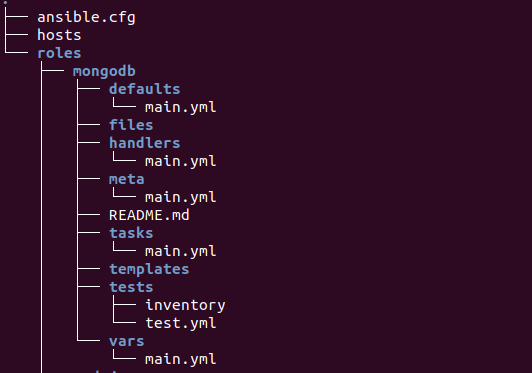
The directory will look like this:
You can create a role using ansible-galaxy init command inside /etc/ansible/roles.
$ sudo ansible-galaxy init <role-name>
![]()
You’ll see other role directories would have also been created.
![]()
These directories are tasks, handlers, defaults, vars, files, templates, and meta and a README.md file.
Tasks – Contains the main list of tasks that are to be executed by the role. It contains the main.yml file for that particular role.
Handlers – Contains handlers which may be used by this role or even anywhere outside this role.
Defaults – Contains the default variables that are going to be used by this role.
Vars – This directory consists of other variables that are going to be used by the role. These variables can be defined in your playbook, but it’s a good habit to define them in this section.
Files – Contains files that can be deployed by this role. It contains files that need to be sent to the hosts while configuring the role.
Meta – Defines metadata for this role. Basically, it contains files that establish role dependencies.
Every task directory must consist of a main.yml file where the actual code for that particular role is written.
![]()
Let’s now understand the working or roles with a demo of installing MEAN Stack.
I’ll be demonstrating how to install MEAN Stack using Ansible Roles by just executing one single playbook. We’re going to have three roles: 1)Installing prerequisites, 2)Installing MongoDB and 3)Installing NodeJS. I’m assuming that you’ve already installed Ansible and made a server-client connection on Ubuntu. Let’s start playing with Ansible Roles.
Step 1 – Navigate to /etc/ansible/roles directory and create the roles for prerequisites, MongoDB and NodeJS.
$ cd /etc/ansible/roles
$ sudo ansible-galaxy init prerequisites
$ sudo ansible-galaxy init mongodb
$ sudo ansible-galaxy init nodejs
You should now see three roles in your ‘roles’ directory.

Step 2 – Write main.yml for prerequisites which installs Git.
$ cd prerequisites/tasks/main.yml

---
- name: Install git
  apt:
     name: git
     state: present
     update_cache: yes
Step 3 – Write main.yml for MongoDB role
$ cd /mongodb/tasks/main.yml
---
- name: MongoDB - Import public key
  apt_key:
    keyserver: hkp://keyserver.ubuntu.com:80
    id: EA312927

- name: MongoDB - Add repository
  apt_repository:
    filename: '/etc/apt/sources.list.d/mongodb-org-3.2.list'
    repo: 'deb http://repo.mongodb.org/apt/ubuntu trusty/mongodb-org/3.2 multiverse'
  state: present
  update_cache: yes

- name: MongoDB - Install MongoDB
  apt:
    name: mongodb-org
    state: present
    update_cache: yes

- name: Start mongod
  shell: "mongod &"
Step 4 – Write main.yml for nodejs role
$ cd nodejs/tasks/main.yml

---
- name: Node.js - Get script
  get_url:
    url: "http://deb.nodesource.com/setup_6.x"
    dest: "{{ var_node }}/nodejs.sh"

- name: Node.js - Set execution permission to script
  file:
    path: "{{ var_node }}/nodejs.sh"
    mode: "u+x"

- name: Node.js - Execute installation script
  shell: "{{ var_node }}/nodejs.sh"

- name: Node.js - Remove installation script
  file:
    path: "{{ var_node}}/nodejs.sh"
    state: absent

- name: Node.js - Install Node.js
  apt: name={{ item }} state=present update_cache=yes
  with_items:
    - build-essential
    - nodejs

- name: Node.js - Install bower and gulp globally
  npm: name={{ item }} state=present global=yes
  with_items:
    - bower
    - gulp
Step 5 – Write your main playbook
$ cd /etc/ansible/mean.yml

---

- hosts: nodes
  remote_user: ansible
  become: yes
  become_method: sudo
  vars:
    #variable needed during node installation
    var_node: /tmp
  roles:
      - prerequisites
      - mongodb
      - nodejs
Now that we have defined roles for installing the prerequisites, MongoDB and NodeJs, let’s deploy them. Execute the playbook using the following command.
$ sudo ansible-playbook /etc/ansible/mean.yml -K

As you can see, all the tasks have been executed and their status has changed. This means the playbook changes have been applied to your server as well as to the host. Setting up MEAN Stack is just one example. You can set up literally anything and everything using Ansible Roles.
This brings us to the end of Ansible Roles blog. If you find this article helpful, check out the DevOps course offered by Edureka. It covers all the tools that have made the IT industry better.
Got a question for us? Please post it on Edureka Community and we will get back to you.


 Thank you for registering Join Edureka Meetup community for 100+ Free Webinars each month JOIN MEETUP GROUP