
Advanced DevOps Certification Training with G ...
- 25k Enrolled Learners
- Weekend
- Live Class
(7990)


 Copy Link!
The first step in automating any operational life cycle of the application is automating the provisioning of the infrastructure. Provisioning is an annoying process of setting-up configurations, allocating memory, disk space, etc., before actually using them. Let’s see how Ansible Provisioning makes this simpler and faster.
Most of the large scale deployments require you to have an identical environment setup on multiple systems. So, how do you do that? Execute the same set of commands on a hundred systems manually?? Nahh.. That’s too old school. This is something machines are good at, not humans. What if I told you this long and boring process could be done by just executing a single Ansible playbook? That’s what we’re going to talk about in this blog – Ansible Provisioning.
DevOps is a culture where automation is given a really high priority. When there can be tools for automating the deployment and the testing process, why not have tools for configuration management and provisioning. There are a million ways to get smarter and using Ansible is one of them. It is one of the most widely used tools.
Ansible uses YAML based playbooks that can even be understood by a beginner. It uses an agentless architecture to communicate with its clients which does not involve any third party tool to be installed on the client’s machine, and instead uses SSH-based connections. Ansible being an automation tool, let’s find out what can it automate.
Name a stage in the development cycle and Ansible will help you with it, be it configuration management, provisioning, orchestration, continuous delivery, security or even application deployment. Ansible unites the development cycle workflow into a single agent less automation platform.
As mentioned earlier, the first step to automating the operational life cycle of the applications is getting the environment ready, i.e, provisioning. Large deployments require multiple hosts having the exact same configurations. After provisioning one host, what are the chances that you’ll get the next 10 hosts to have the exact same configurations if done manually? Also how much time will you spend doing the same repetitive task? This is where Ansible comes to our service. You can provision hundreds of hosts just by executing a single playbook. Magic? Haha! No, just evolution in automation.
Demo: Create a LAMP Stack and Deploy a Webpage
Suppose you’re trying to deploy a website on 30 systems, every website deployment will require a base OS, web-server, Database, and PHP. We use ansible playbook to install these pre-requisites on all 30 systems at once.
In this Ansible provisioning demo, I’m going to show you how to provision the website hosting environment using Ansible. We install the LAMP (Linux, Apache, MySQL, and PHP) stack and then deploy a website.
For this demo, I’ve used a Linux VirtualBox having Ubuntu version 17.04. I’ve used two virtual machines, one as my server where Ansible is installed and the other machine acts as my remote host. Let’s start with setting Ansible on the server.
I’ve created a simple static webpage saved in a folder index which has two files, index.html, and style.css.
<html>
<head>
<title>Website using HTML and CSS</title>
<link href="style.css" rel="stylesheet" type="text/css">
</head>
<body>
<header>
<div class="top">
<ul class="nav-menu">
<li class="homebtn"> <a href="">Home</a></li>
<li> <a href="">About</a></li>
<li> <a href="">Breeds</a></li>
<li> <a href="">Adoption</a></li>
<li> <a href="">Contact</a></li>
</ul>
</div>
<div class="tagline">
<h1>Share your home with a cute dog!</h1>
<div class="adopt">
<a href="" class="bttn">Adopt Now</a>
</div>
</div>
</header>
</body>
</html>
*
{
margin:0;
padding:0;
}

header {
background-image: linear-gradient(rgba(0,0,0,0.5), rgba(0,0,0,0.5)),url('puppie.jpg');
height:100vh;
background-size:cover;
background-position:center;
}

.nav-menu {
float: right;
list-style:none;
margin-top:30px;
}

.nav-menu li {
display: inline-block;
}

.nav-menu li a {
color:turquoise;
text-decoration: none;
padding:5px 20px;
font-family:"Verdana", "sans-serif";
font-size:20px;
}

.homebtn a {
border: 1px solid grey;
background-color:white;
}

.nav-menu li a:hover {
border:1px solid grey;
background-color: white;
}

.tagline {
position: absolute;
width:1200px;
margin-left:0;
margin-top:0;
}

h1 {
color:white;
font-size:50px;
font-family:"Verdana", "sans-serif";
text-align:center;
margin-top:275px;
}

.adopt {
margin-top:30px;
margin-left:540px;
}

.bttn {
border: 1px solid white;
padding:10px 30px;
color:yellow;
font-family:"Verdana", "sans-serif";
font-size: 22px;
text-decoration:none;
}

.adopt a:hover {
background-color: burlywood;
}
Step 1: Execute the following commands to update repositories, add the required repositories and configure PPA on your machine for Ansible installation:
$ sudo apt-get update
$ sudo apt-get install software-properties-common
$ sudo apt-add-repository ppa:ansible/ansible
Press enter to accept the PPA addition and then finally install Ansible after updating the repositories.
$ sudo apt-get update
$ sudo apt-get install ansible
Step 2: Go to your server’s /etc/hosts file and add the hostname and the IP address of the host.
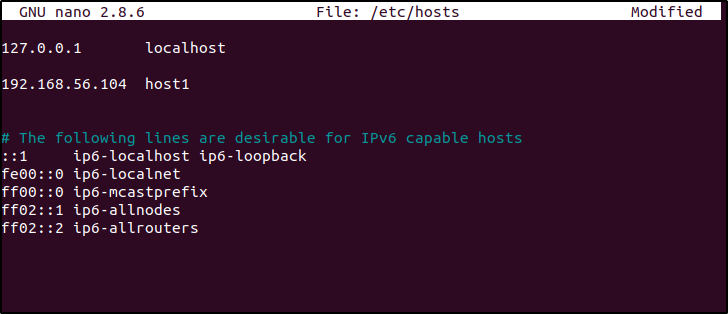 Fig. 1 – Add Remote hosts to /etc/hosts File – Ansible Provisioning
Step 3: As Ansible works on the agentless architecture of using SSH to communicate with its hosts, set-up the ssh keys. Basically, we have one server and one host. We control the host with our server and hence we create a public ssh-key on the server and copy it in the host’s machine. Execute the following command on the server:
$ ssh-keygen You’ll be prompted to enter the filename where you’d like to save your key and also prompt you for creating a password for accessing the generated key which is optional. By default, the public key gets saved in .ssh/id_rsa.pub file and the private key gets saved in .ssh/id_rsa.
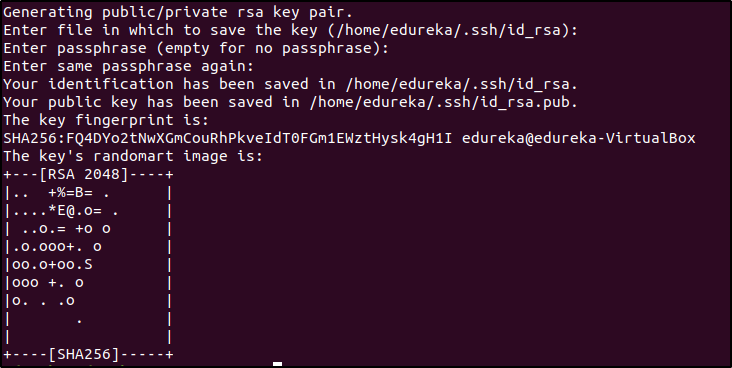 Fig. 2 – Create ssh Key – Ansible Provisioning
Now this generated key needs to be present in your host. Copying the key into the host can be done in two ways, either manually copy into the host or use the ssh-copy-id command. In this case, I’m going to copy it using the ssh-copy-id root@IP_of_host command.
$ ssh-copy-id root@192.168.56.104Note- Make sure you’re able to ssh into your host before executing this command.
Step 4: Configure Ansible hosts. Go to /etc/ansible/hosts file and add the hostname. This will vary according to the number of hosts and servers you have. You can also have more than one server here.
 Fig. 3 – Add Remote Hosts in the Inventory File – Ansible Provisioning
Step 5: Check if your hosts are ready. Execute this command you should get a similar output.
$ ansible -m ping all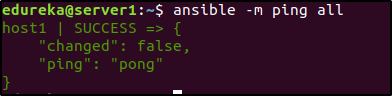 Fig. 4 – Check Remote Host’s Status – Ansible Provisioning
Step 6: Now our Ansible is ready, let’s make the environment ready to deploy a website. We’re going to use a single Ansible playbook to install Apache, MySql, and PHP. Let’s have a look at it.
Note: If you’re a beginner, have a look at this blog which explains how to write a playbook.
---
# Setup LAMP Stack
-  hosts: host1
   tasks:

      -  name: Add ppa repository
         become: yes
         apt_repository: repo=ppa:ondrej/php

      -  name: Install lamp stack
         become: yes
         apt:
            pkg:
              - apache2
              - mysql-server
              - php7.0
              - php7.0-mysql
            state: present
            update cache: yes

      -  name: start apache server
          become: yes
          service:
              name: apache2
               state: started
                enabled: yes

      -  name: start mysql service
          become: yes
          services:
             name: mysql
             state: started
             enabled: yes

      -  name:  create target directory
          file: path=/var/www/html state=directory mode=0755

      - name:  deploy index.html
         became: yes
          copy:
              src: /etc/ansible/index/index.html
              dest: var/www/html/index/index.html
Here as you can see, we have 6 tasks, each task performs a specific function.
Execute this playbook with the following command:
$ ansible-playbook lamp.yml -KThe lines become: yes in the playbook tells that it needs to execute as root and hence when you execute the command, it’ll prompt for sudo password.
![]() Fig. 5 – Execute Ansible Playbook – Ansible Provisioning
Fig. 5 – Execute Ansible Playbook – Ansible Provisioning
Now you can go into the host machine and check if the website has been hosted.
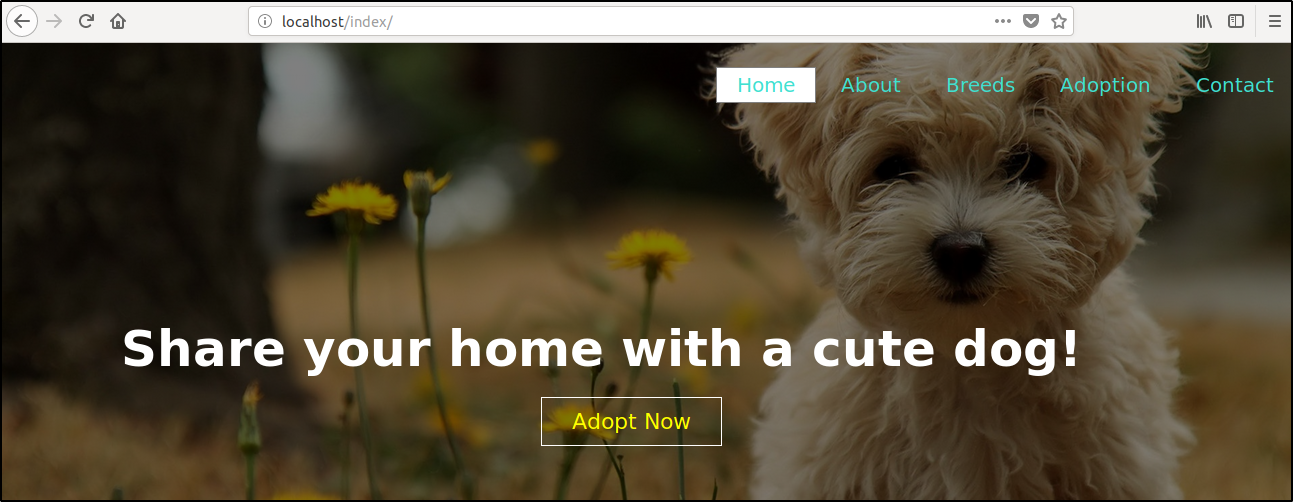 Fig. 6 – Host the Website on Localhost – Ansible Provisioning
Now that is a webpage that would be deployed in all the hosts that interact with the server(in our case, we only had one host) but the same would be possible even for 100 remote hosts.
This brings us to the end of Ansible Provisioning blog. If you find this article helpful, check out the DevOps course offered by Edureka. It covers all the tools that has made the IT industry smarter.
Got a question for us? Please post it on Edureka Community and we will get back to you.


 Thank you for registering Join Edureka Meetup community for 100+ Free Webinars each month JOIN MEETUP GROUP