


One of the most popular and frequently used front-end development frameworks is Angular. The market for recruiting Angular engineers has gotten more competitive as the popularity of this technology has grown. As the demand for professional and experienced Angular programmers grows, more countries are looking to expand their Angular development workforce. Mobile and desktop applications can be built using this platform. Angular is used by a number of cutting-edge organizations to construct modern web applications. The best way to land you a good job with a handsome salary in this domain is to get an Angular Certification. However, if you are still unaware of this technology, here is a complete Angular 8 Tutorial that will help you learn Angular 8 from scratch.
History & Versions
Angular was rewritten from the ground up of AngularJS by Google.
Angular 2
Angular 2.0 was announced in October 2014. The dramatic modifications in version 2.0 sparked a lot of debate among developers. According to the Angular team, angular 2 was promoted from Alpha to Developer Preview on April 30, 2015. In December 2015, Angular 2 was promoted to Beta, and the first release candidate was released in May 2016.
Angular 4
On 13 December 2016 Angular 4 was announced,and 3 is skipped to avoid confusion caused by a version mismatch in the router package, which was already published as v3.3.0. HttpClient, a simpler, easier-to-use, and more powerful library for making HTTP Requests, as well as router life cycle events for Guards and Resolvers, were introduced in this release. To learn more about Angular, check out this Full Stack Web Developement Course.
Angular 5
Angular 5 was released on November 1, 2017. Support for progressive web apps, a build optimizer, and Material Design improvements are among the highlights of Angular 5.
Angular 6
Angular 6 was released on May 4, 2018. This is a big version that focuses less on the underlying framework and more on the toolchain and making future Angular development easier, like: ng update, ng add, Angular Elements, Angular Material + CDK Components, Angular Material Starter Components, CLI Workspaces, Library Support, Tree Shakable Providers, Animations Performance Improvements, and RxJS v6.
Angular 7
Angular 7 was released on October 18, 2018.Updates to Application Performance, Angular Material & CDK, Virtual Scrolling, Improved Accessibility of Selects, Content Projection utilising web standards now supported for custom elements, and Typescript 3.1, RxJS 6.3, and Node 10 dependency updates(still supporting Node 8)
Angular 8
Angular 8 was released on May 28, 2019. Differential loading is available for entire application code, as well as dynamic imports for lazy routes, Web workers, TypeScript 3.4 support, and an opt-in preview of Angular Ivy. The opt-in preview for Angular Ivy contains:
- Code generated that is easier to read and debug at runtime
- Faster rebuild time
- Improved payload size
- Improved template type checking
- Backwards compatibility
Angular 9
Angular 9 was released on February 6, 2020. By default, all applications in Version 9 use the Ivy compiler and runtime. Angular can support TypeScript 3.6 and 3.7.
The Ivy compiler and runtime, in addition to hundreds of bug fixes, provides a number of benefits, such as:
- Smaller bundle sizes
- Faster testing
- Better debugging
- Improved CSS class and style binding
- Improved type checking
- Improved build errors
- Build times have been improved, and AOT is now enabled by default.
- Improved Internationalization
Angular 10
Angular 10 was released in June, 2020.
- New Date Range Picker (Material UI library)
- Warnings about CommonJS imports
- Optional Stricter Settings
Keeping Up to Date with the Ecosystem
New Default Browser Configuration
Angular 11
Angular 11 was released in November 2020.
Angular 12
Angular 12 was released in May, 2021.[25]
Deprecated support for IE11
Each version should be backwards compatible with the previous release.
Angular 8 Tutorial | Create Angular Project from Scratch | Angular Training | Edureka
This Edureka “Angular 8 Tutorial” will help you learn Angular 8 completely along with a step by step demonstration on how to create an Angular project from scratch.
Also Read What is an Angular Developer
What is Angular?
Angular is a Typescript-based open-source framework for building client-side web applications. Since Typescript is a superset of JavaScript, let us first understand JavaScript briefly. JavaScript runs on the client-side of the web, which can be used to design or program how the web pages behave on the occurrence of an event. Typically, JavaScript is used for interface interactions, slideshows, and other interactive components. JavaScript evolved quickly and has also been used for server-side programming (like in Node.js), game development, etc. Angular is in high demand among all other Web Developer Training Courses in India and the United States.
JavaScript deals with dynamic content, which is an important aspect of web development. Dynamic content refers to constantly changing content and it adapts to specific users. For example, JavaScript can be used to determine whether or not to render the mobile version of the website by checking the device, which is accessing the website.
This encouraged web developers to start creating their own custom JavaScript libraries for reducing the number of code lines and implementing complex functionalities easily. jQuery is a fast, small, and feature-rich JavaScript library, which makes things like HTML document traversal and manipulation, event handling, animation, and Ajax much simpler with an easy-to-use API. jQuery became the most popular one because it was easy to use and extremely powerful.
Since jQuery has no real structure, the developer has full freedom to build projects as they see fit. However, the lack of structure also means it’s easier to fall into the trap of “spaghetti code,” which can lead to confusion in larger projects with no clear design direction or code maintainability. For these situations, a framework like Angular can be a big help.
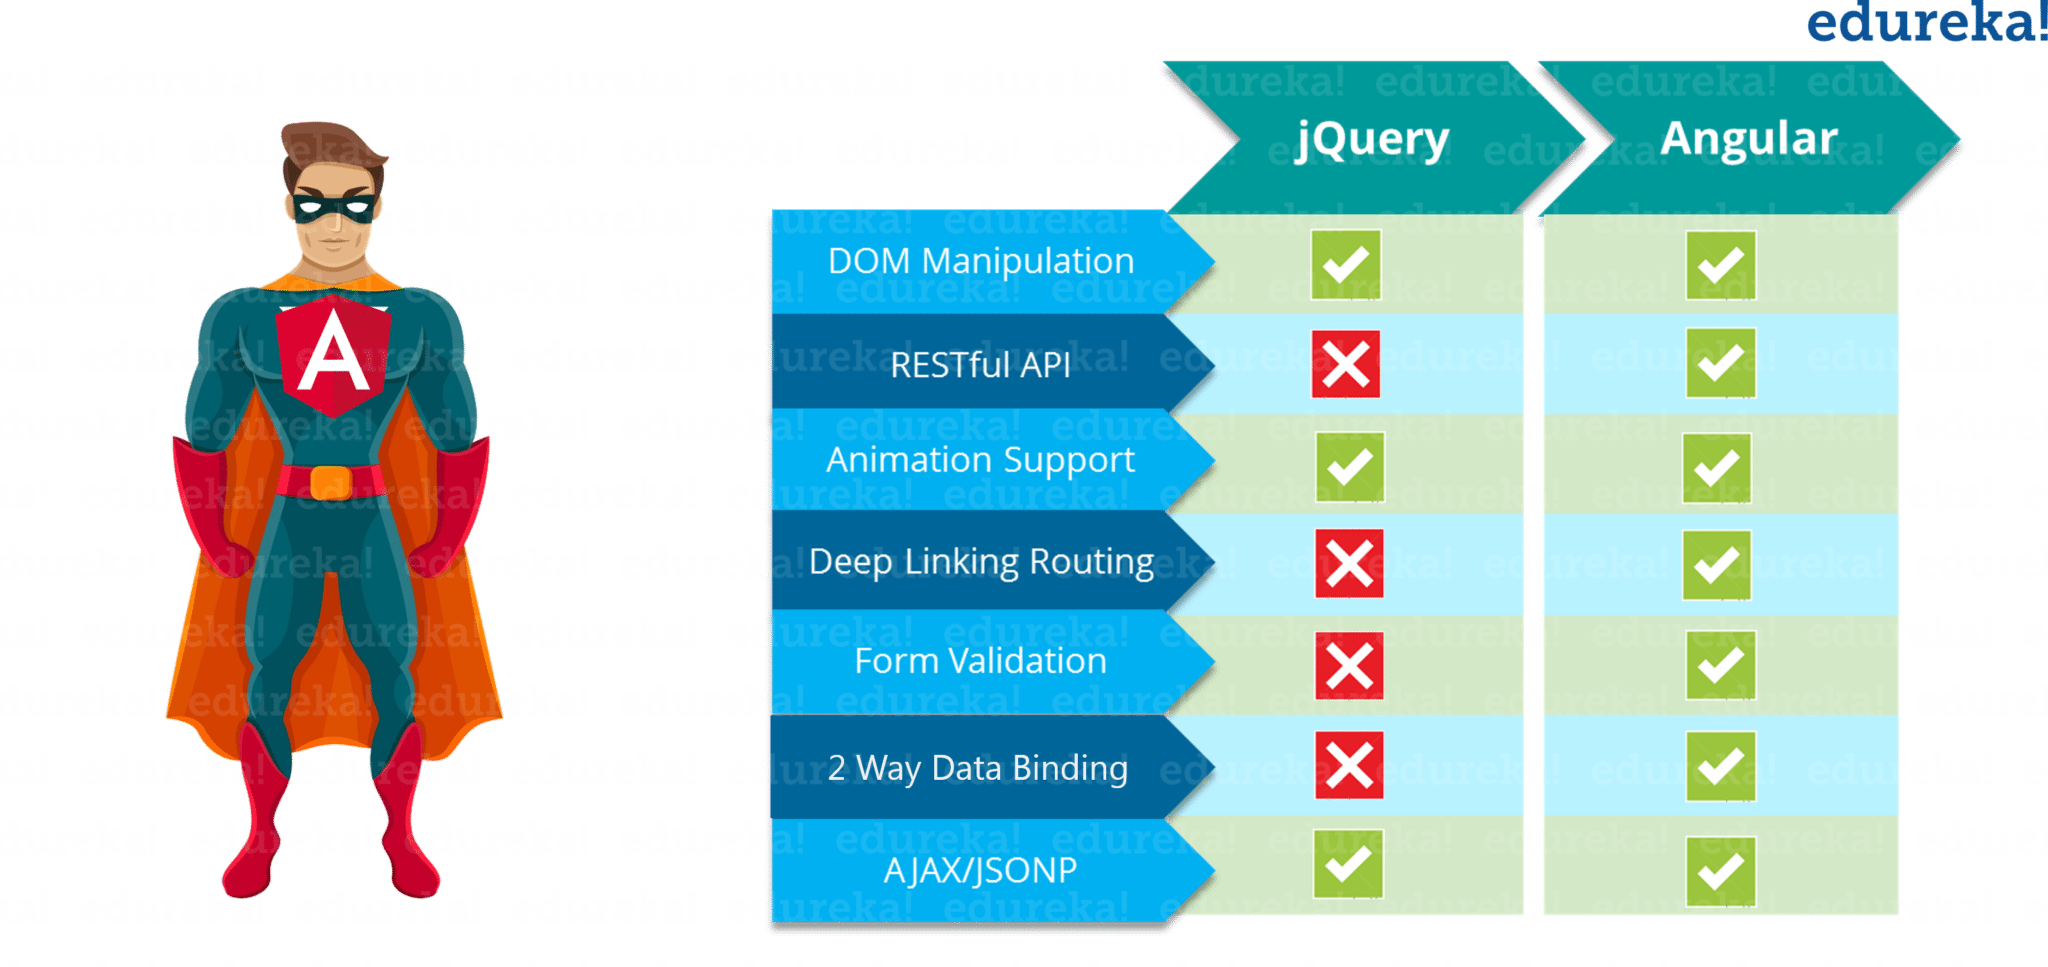 Figure: Angular 8 Tutorial – Angular vs jQuery
Angular is a client-side JavaScript framework that was specifically designed to help developers build SPAs (Single Page Applications) in accordance with best practices for web development. By providing a structured environment for building SPAs, the risk of producing “spaghetti code” is highly reduced. So, you must be wondering what is SPA?
Single-Page Applications (or SPA’s) are applications that are accessed via a web browser like other websites but offer more dynamic interactions resembling native mobile and desktop apps. The most notable difference between a regular website and SPA is the reduced amount of page refreshes. SPAs have a heavier usage of AJAX- a way to communicate with back-end servers without doing a full page refresh to get data loaded into our application. As a result, the process of rendering pages happens mostly on the client-side.
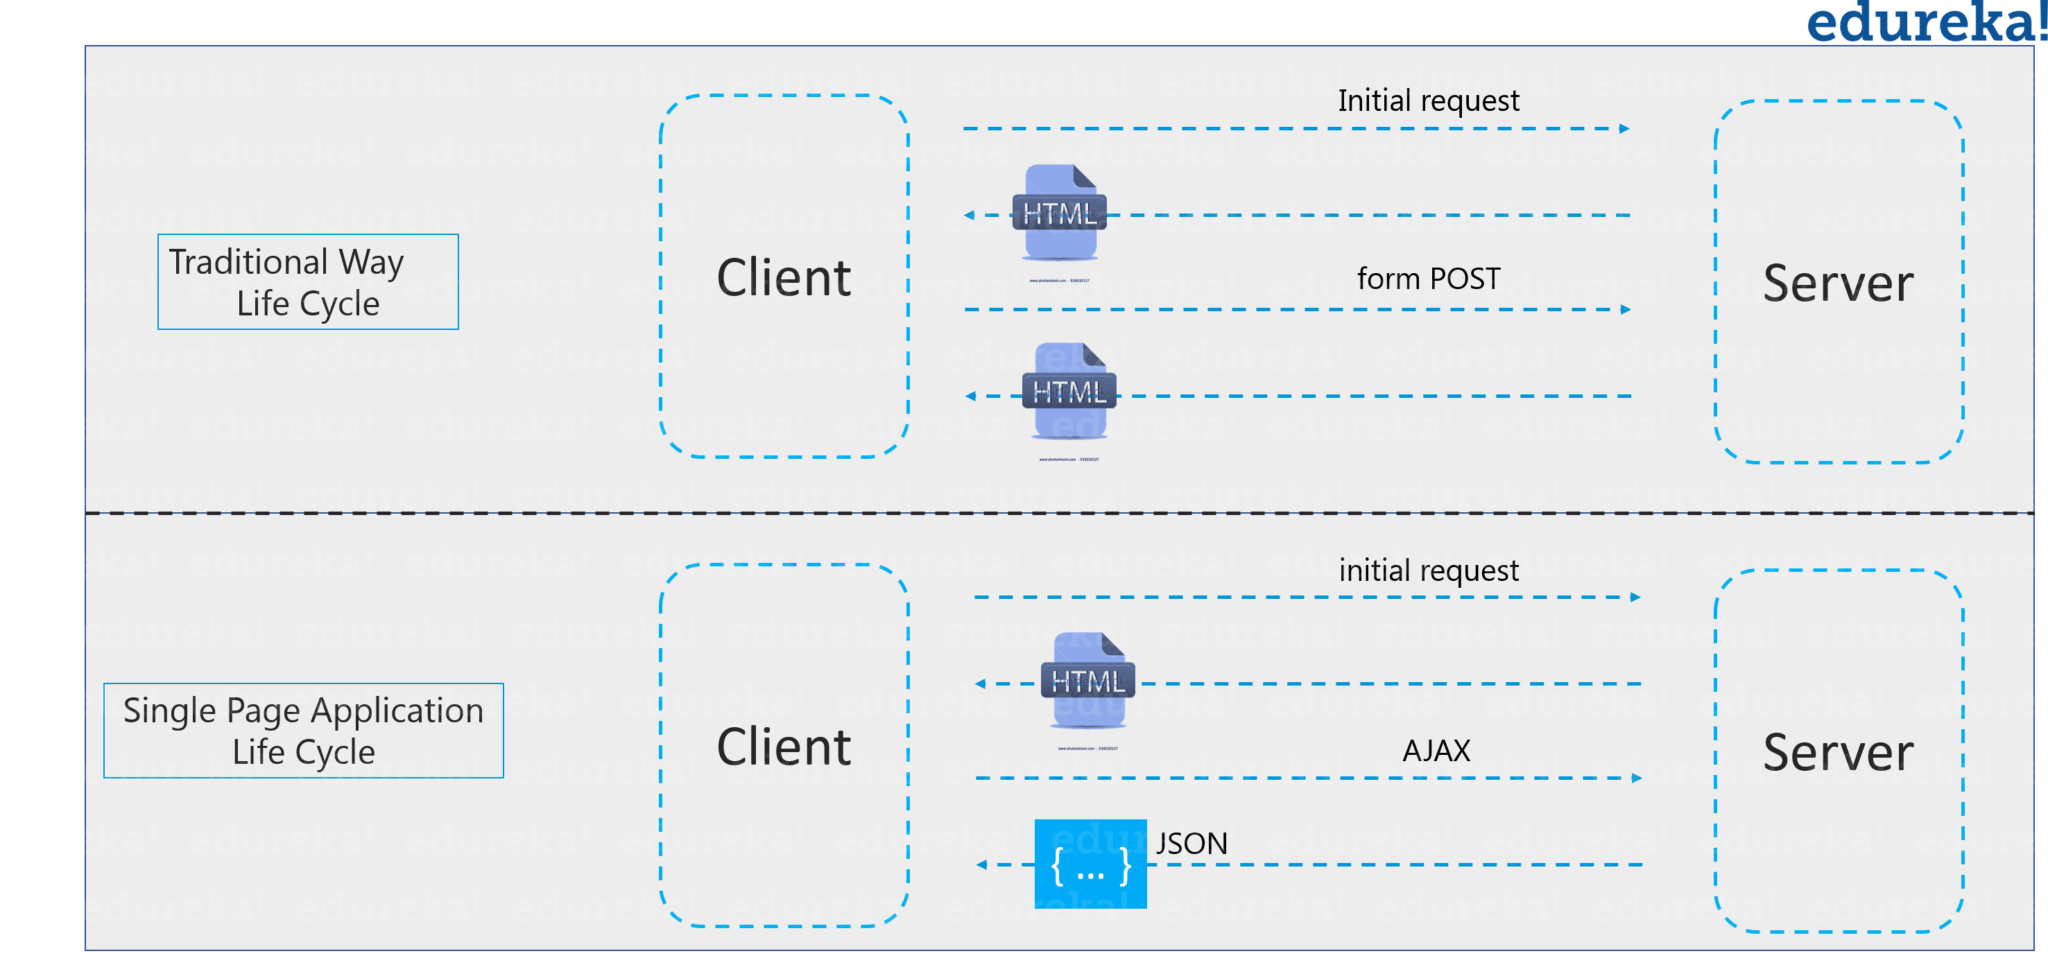 Figure: Angular 8 Tutorial – Single Page Application
For example, if you go through Gmail, you will notice that while opening mail from the inbox will only fetch the email and display it in place of the e-mail list. The rest of the components like sidebar, navigation bar, etc. are not reloaded. It only refreshes the DOM (Document Object Model) for the required section. So, this reduces the overhead loading of the website.
So, now as we know what is Javascript & Jquery and how angular came into the picture. Moving ahead in Angular 8 Tutorial, we will look through the features of angular and understand how to work with Angular.
Angular 8 Tutorial
Angular is a TypeScript-based open-source front-end web application platform led by the Angular Team at Google and by a community of individuals and corporations. Angular is a complete rewrite from the same team that built AngularJS. But let me tell you that Angular is completely different from AngularJS. Let us understand the differences between Angular and AngularJS.
- The architecture of an Angular application is different from AngularJS. The main building blocks for Angular are modules, components, templates, metadata, data binding, directives, services, and dependency injection. We will be looking at it in a while.
- Angular does not have a concept of “scope” or controllers instead, it uses a hierarchy of components as its main architectural concept.
- Angular has a simpler expression syntax, focusing on “[ ]” for property binding, and “( )” for event binding
- Mobile development – Desktop development is much easier when mobile performance issues are handled first. Thus, Angular first handles mobile development.
- Modularity – Angular follows modularity. Similar functionalities are kept together in same modules. This gives Angular a lighter & faster core.
Angular recommends the use of Microsoft’s TypeScript language, which introduces the following features:
- Class-based Object-Oriented Programming
- Static Typing
TypeScript is a superset of ECMAScript 6 (ES6) and is backward compatible with ECMAScript 5. Angular 8 also includes the benefits of ES5 to ES2015+:
- Iterators
- For/ Of loops
- Reflection
- Improved dependency injection – bindings make it possible for dependencies to be named
- Dynamic loading
- Asynchronous template compilation
- Simpler Routing
- Replacing controllers and $scope with components and directives – a component is a directive with a template
- Support reactive programming using RxJS
Moving ahead in this Angular 8 tutorial, let’s understand the features of Angular.
Angular Features
 Figure: Angular 8 Tutorial – Angular Features
Cross-Platform
Progressive web apps: It uses modern web platform capabilities to deliver an app-like experience. It gives high performance, offline, and zero-step installation. So, working with Angular is pretty much easy.
Native: You can build native mobile apps with strategies using Ionic Framework, NativeScript, and React Native. Join our Best Flutter Course and become a proficient mobile app developer with in-demand skills.
Desktop: Create desktop-installed apps across Mac, Windows, and Linux using the same Angular methods you’ve learned for the web plus.
Speed and Performance
Code generation: Angular turns your templates into code that’s highly optimized for JavaScript virtual machines, giving you all the benefits of hand-written code with the productivity of a framework.
Universal: You can use any technology with Angular for serving the application like node.js, .NET, PHP and other servers
Code splitting: Angular apps load quickly with the new Component Router, which delivers automatic code-splitting, so users only load code required to render the view they request.
Productivity
Templates: Quickly create UI views with simple and powerful template syntax.
Angular CLI: Command-line tools: You can easily and quickly start building components, adding components, testing them, and then, instantly deploy them using Angular CLI.
IDEs: Get intelligent code completion, instant errors, and other feedback in popular editors and IDEs like Microsoft’s VS Code.
Full Development Story
Testing: With the Jasmine test framework, the Angular CLI downloads and installs everything required for testing your application. When you run ng test command, the app will be built in watch mode and the Karma test runner will be launched. Once that is done, you will see the output in the terminal plus, the chrome browser will open up showing the output in Jasmine HTML Reporter.
Angular 12 First App
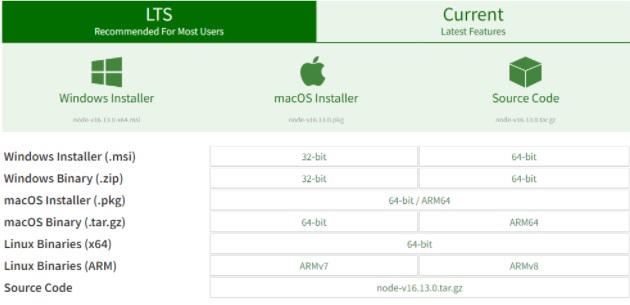
To start off, install any editor of your choice. Let’s consider the VSCode editor here and start with our application installation followed by creation.
Install the node package manager
Once the npm is installed open the command prompt and run these commands:
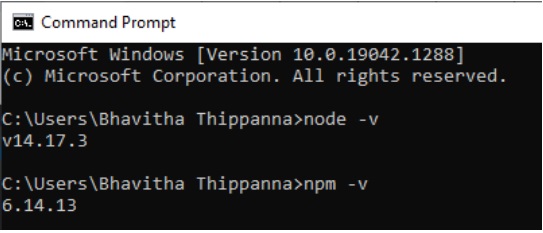
Here these commands indicate the versions of the node packages installed. Now with this we have installed the Node package manager. Now we are ready to set up the run the following commands.
To run any Angular command installing the Angular CLI is the first step
npm install -g @angular/cli
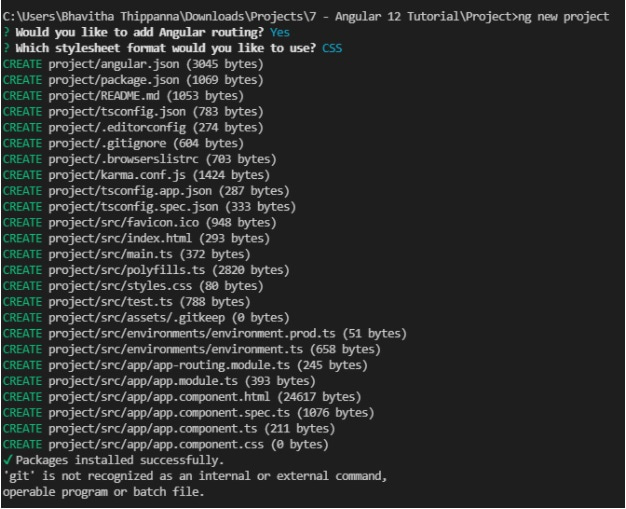
 Now, let’s create our Angular project
ng new project-name
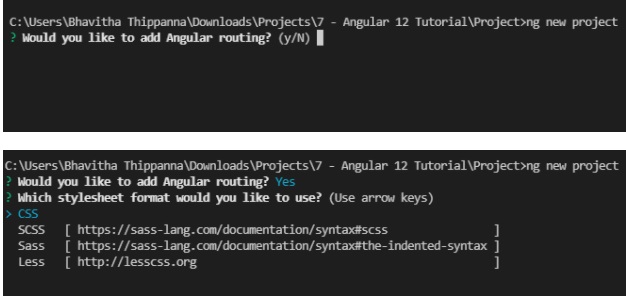
To work in the project we just created let’s enter into the directory or change directory
cd project-name

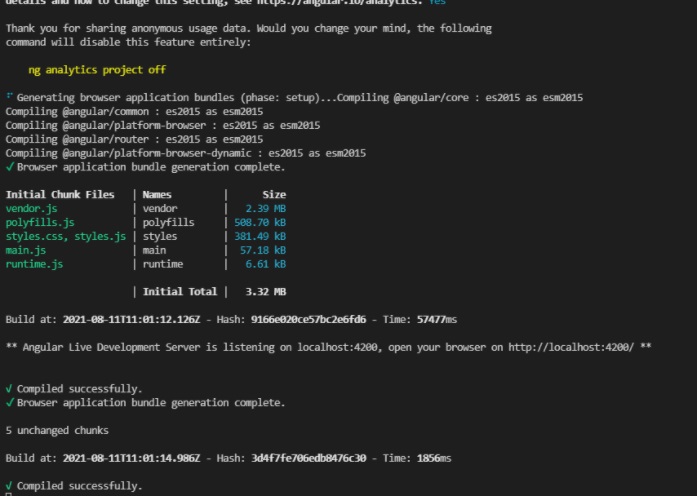
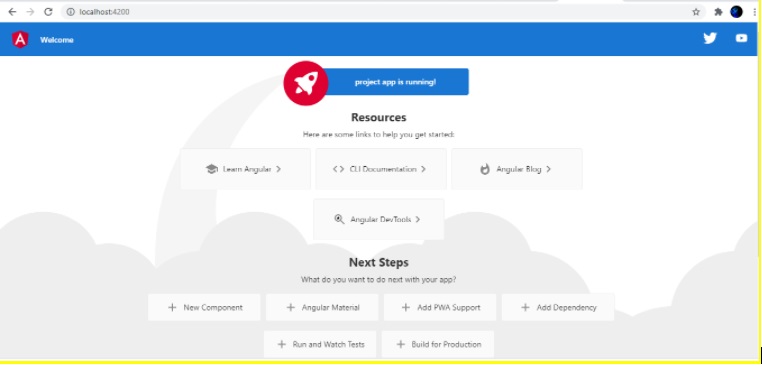
Now, let’s start the server
ng serve
Run the following command here, to create your Angular application, enter into the directory & start your server.
ng new app-name
cd app-name
ng serve
Angular 12 Files Explanation
Now that we have our application created. Why don’t we look at our files and directories inside.
If you click on the folder and dive into the IDE this is what you can see.
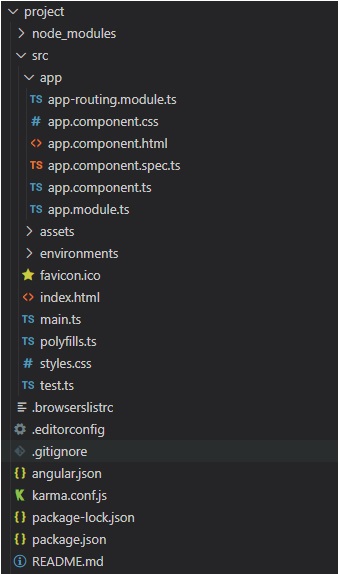
Let’s navigate into the src -> app ->, here you can see the components of the application just created.
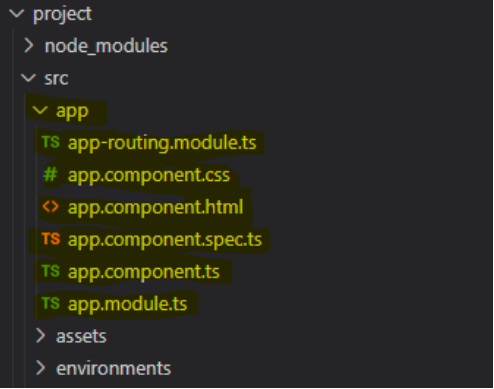
The component file you see there will be:
- app.component.css
- app.component.html
- app.component.spec.ts
- app.component.ts
- App.module.ts
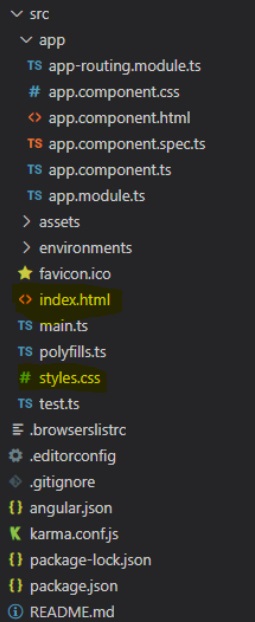
Along with these files there is a main HTML file and a main styling file inside the directory of app-name.
- index.html
- style.css
All CLI commands
Angular CLI is a command-line interface tool for initialising, developing, scaffolding, and maintaining Angular applications. These commands can be run directly from a command prompt or indirectly using an interactive UI, such as the Angular Console.
| Command | Alias | Description |
| add | It’s used to provide external library support to your project. | |
| build | b | It compiles an Angular application into a directory at a specified output path. Run the command from within a workspace directory. |
| config | It accesses or modifies Angular configuration data in the workspace’s angular.json file. | |
| doc | d | It looks for a given keyword in the official Angular documentation (angular.io) in a browser. |
| e2e | e | It builds and serves an Angular app before using Protractor to run end-to-end tests. |
| generate | g | It uses a schematic to generate and/or modify files. |
| help | It provides a list of accessible commands as well as brief descriptions of each. | |
| lint | l | It’s used to execute linting tools on the code of an Angular app in a specific project folder. |
| new | n | It builds a new workspace and an Angular app from scratch. |
| run | It runs an Architect target with a specific builder configuration that you specify in your project. | |
| serve | s | It builds and servers your app, rebuilding when files are modified. |
| test | t | It runs unit tests in a project. |
| update | It updates your application and its dependencies. See https://update.angular.io/ | |
| version | v | It gives the Angular CLI version. |
| xi18n | It extracts i18n messages from source code. |
What’s new in Angular 8:
TypeScript 3.4:
Angular 8 requires TypeScript 3.4 for web development
Opt-n Ivy Preview:
Ivy is the name given to Angular’s next-generation compilation and rendering pipeline. This will help you optionally preview your website to see how it works
Differential Loading:
As a part of its build process, Angular 8 CLI will be able to produce both legacy and modern JS bundles i.e ES5 and ES2015+. This implies a differentially-loaded client-side with improved speed and TTI (Time to Interactive) for the present browsers
Backward compatibility of Router:
This helps in simplifying the upgrade path for large projects
Opt-in Usage Sharing:
With this feature, the Angular team will be able to collect anonymous information with your consent to keep a track of the commands that are used and the time taken to build your projects
Dependency Updates:
Angular 8 has updated the dependencies on tools like RxJS, Node, and TypeScript (as mentioned earlier) for better performance and sync with the current environment
Web Worker Building:
Web workers allow you to write code that runs separately from the main thread. This improves speed by parallelizing multiple tasks. The developers of Angular 8 have added bundling support for web workers as a result of requests from developers
Building Blocks of Angular
The main building blocks of Angular are:
- Modules
- Components
- Templates
- Metadata
- Data binding
- Directives
- Services
- Dependency injection
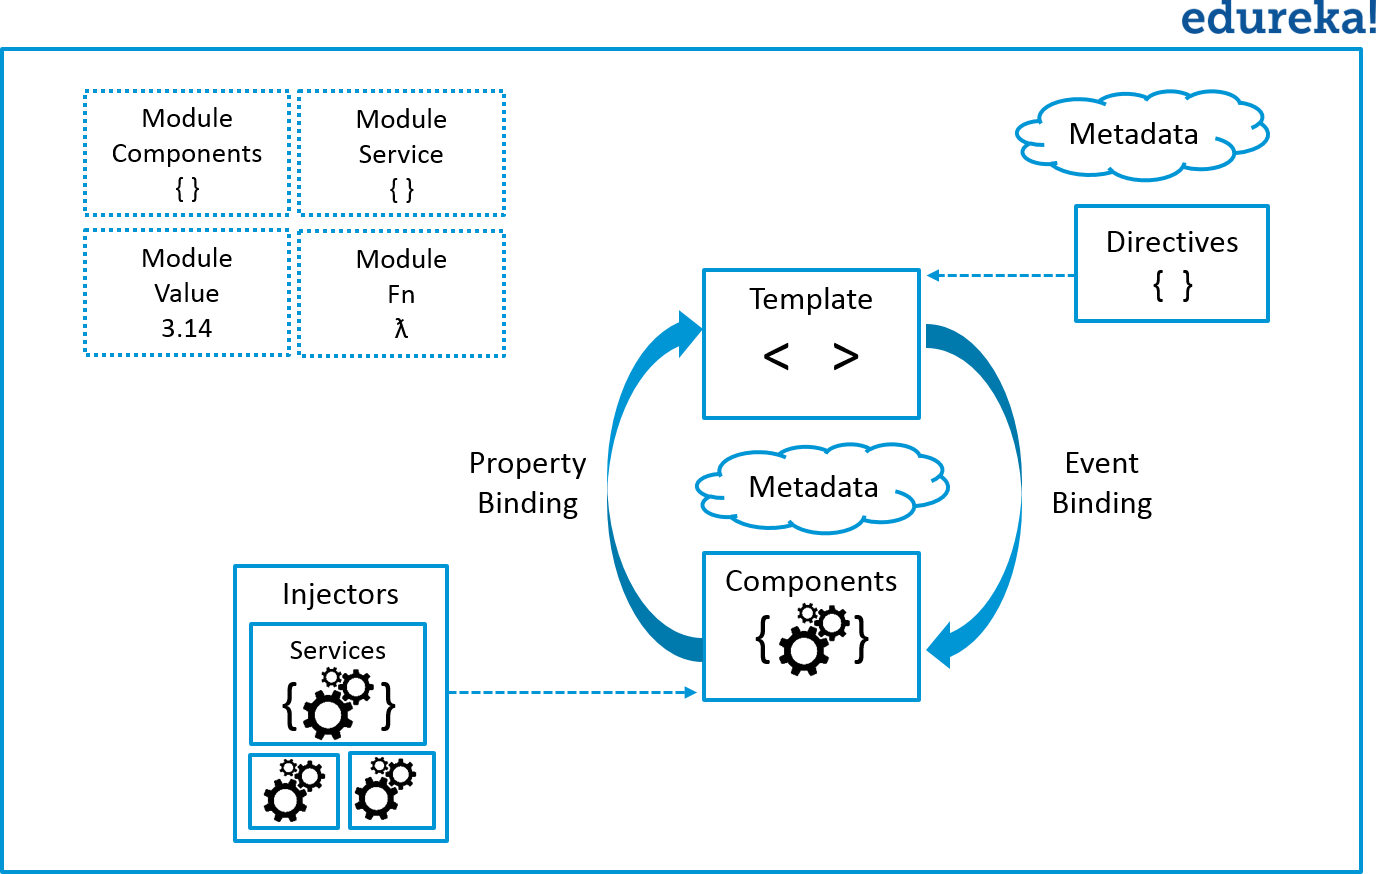
Figure: Angular 8 Tutorial – Architecture
Angular 12 Libraries
Many applications need to solve the same general problems, such as presenting a unified user interface, presenting data, and allowing data entry. Developers can create general solutions for particular domains that can be adapted for re-use in different applications. Such a solution can be constructed as Angular libraries, which can then be shared and published as npm packages.
An Angular library is a type of Angular project that, unlike an application, cannot run on its own. A library must be imported before it can be utilised in a programme.
Creating Libraries:
To begin, run the following commands in Angular CLI to create a new library skeleton in a new workspace.
ng new my-workspace –create-application=false
cd my-workspace
The ng generate command creates a projects/my-lib folder in your workspace that contains a NgModule component and a service.
ng generate library my-lib
The workspace configuration file, angular.json, is updated with a project of type library when you generate a new library.
"projects": {
...
"my-lib": {
"root": "projects/my-lib",
"sourceRoot": "projects/my-lib/src",
"projectType": "library",
"prefix": "lib",
"architect": {
"build": {
"builder": "@angular-devkit/build-angular:ng-packagr",
CLI commands can be used to build, test, and lint the project:
ng build my-lib --configuration development

ng test my-lib

ng lint my-lib
It’s worth noting that the project’s configured builder differs from the default builder for application projects.
Did you know that Angular CLI will allow you to publish your library as well?
To create and publish your library as a npm package, use the Angular CLI and the npm package manager.
Always use the production configuration when creating libraries for distribution. This guarantees that the resulting output uses the correct npm package format and optimizations.
ng build my-lib
cd dist/my-lib
npm publish
Now we’ll see how we can use these libraries in our applications.
To use your own library in an app, follow these steps:
- Build the library.You can’t utilise a library until it’s been constructed.
ng build my-lib - Import from the library by name in your applications:
import { myExport } from ‘my-lib’;
Make sure that there is a version compatible with your libraries that you published.
The Angular version used to build an application should always match or exceed the Angular version used to build any of its dependent libraries. For example, if a library uses Angular version 12, all applications that rely on it should also use Angular version 12 or later. Using an older version of the application is not supported by Angular.
And finally, for other ‘npm’ commands to be running undisturbed, if you ran ‘yarn install’ or ‘npm install’ you had to re-run ‘ngcc’. Regardless of other npm processes, libraries now only need to be processed by the linker once.
Modules
Angular apps are modular and to maintain modularity, we have Angular modules or you can say NgModules. Every Angular app contains at least one Angular module, i.e. the root module. Generally, it is named as AppModule. The root module can be the only module in a small application. While most of the apps have multiple modules. You can say, a module is a cohesive block of code with a related set of capabilities that have a specific application domain or a workflow. Any angular module is a class with @NgModule decorator.
Decorators are functions that modify JavaScript classes. Decorators are basically used for attaching metadata to classes so that, it knows the configuration of those classes and how they should work. NgModule is a decorator function that takes metadata objects whose properties describe the module. The properties are:
- declarations: The classes that are related to views and they belong to this module. There are three classes of Angular that can contain view: components, directives, and pipes. We will talk about them in a while.
- exports: The classes that should be accessible to the components of other modules.
- imports: Modules whose classes are needed by the component of this module.
- providers: Services present in one of the modules which are to be used in the other modules or components. Once a service is included in the providers it becomes accessible in all parts of that application
- bootstrap: The root component which is the main view of the application. This root module only has this property and it indicates the component that is to be bootstrapped.
Let us take a look at how the root module (i.e. src/app/app.module.ts) looks like initially:
import { BrowserModule } from '@angular/platform-browser';
import { NgModule } from '@angular/core';

import { AppComponent } from './app.component';

@NgModule({
  declarations: [
    AppComponent
  ],
  imports: [
    BrowserModule
  ],
  providers: [],
  bootstrap: [AppComponent]
})
export class AppModule { }
A root module generally doesn’t export it’s class because as root module is the one which imports other modules & components to use them. We bootstrap the AppModule in a main.ts file, where we specify the bootstrap module and inside the bootstrap module, it contains the bootstrap component.
import { enableProdMode } from '@angular/core';
import { platformBrowserDynamic } from '@angular/platform-browser-dynamic';

import { AppModule } from './app/app.module';
import { environment } from './environments/environment';

if (environment.production) {
  enableProdMode();
}

platformBrowserDynamic().bootstrapModule(AppModule)
  .catch(err => console.error(err));
<3>Angular libraries
Angular gives us a collection of JavaScript modules (library modules) that provide various functionalities. Each Angular library has @angular prefix, like @angular/core, @angular/compiler, @angular/compiler-cli, @angular/http, @angular/router. You can install them using the npm package manager and import parts of them with JavaScript import statements.
import { Component } from '@angular/core';In the above example, Angular’s Component decorator is imported from the @angular/core library.
Now moving ahead in Angular 8 Tutorial, let us understand the next and one of the important building blocks of Angular, i.e. Component.
Components
A component controls one or more sections on the screen called a view. For example, if you are building a course list application, you can have components like App Component (the bootstrapped component), Course Component, Course Detail Component, etc.
Inside the component, you define a component’s application logic i.e. how does it support the view—inside a class. The class interacts with the view through an API of properties and methods.
Every app has a main component that is bootstrapped inside the main module, i.e AppComponent.
import { Component } from '@angular/core';

@Component({
  selector: 'app-root',
  templateUrl: './app.component.html',
  styleUrls: ['./app.component.css']
})
export class AppComponent {
  title = 'Edureka!';
}
import { Component, OnInit } from '@angular/core';
import { Course } from '../courses';
import { CoursesService } from '../courses.service';

@Component({
  selector: 'app-course',
  templateUrl: './course.component.html',
  styleUrls: ['./course.component.css']
})
export class CourseComponent implements OnInit {

  courses: Course[];


  constructor(private courseService: CoursesService) { }

  ngOnInit() {
    this.getCourses();
  }


  getCourses(): void {
    this.courseService.getCourses().subscribe(course => this.courses = course);
  }
}
Templates
You associate the component’s view with its companion template. A template is nothing but a form of HTML tags that tells Angular about how to render the component. A template looks like regular HTML, except for a few differences. Here is a template for our CourseComponent as we discussed above:
<div>
<div id="highlighter_460276" class="syntaxhighlighter plain">
<pre><h2>All Courses</h2>

<ul class="course">

<li *ngFor="let course of courses">
      <a routerLink="/detail/{{course.id}}"></a>
    <span class="badge">{{course.id}}</span> {{course.name}}
</ul>
Metadata
@Component({
<div>
<pre>  selector: 'app-course',
  templateUrl: './course.component.html',
  styleUrls: ['./course.component.css']
})
Here is the @Component decorator, which identifies the class immediately below it as a component class. The @Component decorator takes the required configuration object which Angular needs to create and present the component and its view. The most important configurations of @Component decorator are:
- Vector tells Angular to create and insert an instance of this component where it finds <app-course> tag. For example, if an app’s HTML contains <app-course></app-course>, then Angular inserts an instance of the CourseComponent view between those tags.
- templateUrl: It contains the path of this component’s HTML template.
- styleUrls: It is the component-specific style sheet.
The metadata in the @Component tells Angular where to get the major building blocks you specify for the component. The template, metadata, and component together describe a view. The architectural takeaway is that you must add metadata to your code so that Angular knows what to do.
Data Binding
If you are not using a framework, you have to push data values into the HTML controls and turn user responses into some actions and value updates. Writing such push/pull logic is tedious, error-prone, and a nightmare to read. Angular supports data binding, a mechanism for coordinating parts of a template with parts of a component. You should add binding markup to the template HTML to tell Angular how to connect both sides. 
Figure: Angular 8 Tutorial – Data Binding Each form has a direction — to the DOM, from the DOM, or in both directions.
<li> {{course.name}}</li>

<course-detail [course]="selectedCourse"></course-detail>

<li (click)="selectCourse(Course)"></li>
- The {{course.name}} interpolation displays the component’s name property value within the <li> element.
- The [course] property binding passes the value of selectedCourse from the CourseComponent to the course property of the child CourseDetailComponent.
- The(click) event binding calls the component’s selectCourse method when the user clicks a courses’ name.
Two-way data binding is an important part as it combines property and event binding in a single notation, using the ngModel directive. Here’s an example from the CourseDetailComponent template:
<input [(ngModel)]="courses.name" placeholder="name"/>
In two-way binding, a data property value flows to the input box from the component as with property binding. The user’s changes also flow back to the component, resetting the property to the latest value, as with event binding. Angular processes all data bindings once per JavaScript event cycle, from the root of the application component tree through all child components. Data binding plays an important role in communication between a template and its component. Data binding is also important for communication between parent and child components. Moving further in this Angular 8 Tutorial, we will discuss the next building block, i.e. directive.
Angular Forms & Form Validation
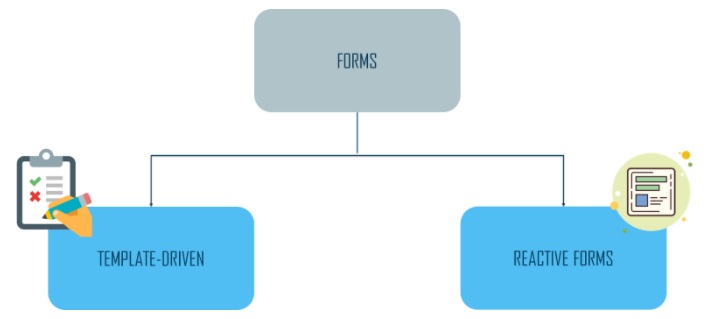
Providing a form for users to fill out is one of the most popular features of any web application. Everyday, you utilize forms to log in, register, place orders and so on. It’s dangerous to process user inputs before validating them. As a complete framework, Angular offers strong functionality for validating user inputs and showing validation notifications. It comes with a number of commonly used built-in validators that you can use, or you can develop your own custom validators. A typical HTML form with a few extra features is called an Angular form. In each form there is something called as, A FormControl which is basically an object that’s required for each field (input, radio, select, etc.) in the form, now we’ll get into that in the next session. Also forms actually leverage synchronous data flow between the view and the data model and also they allow direct access to the underlying form API which will make creating large-scale forms pretty easier. Getting a deeper view into it: Reactive and template-driven techniques to processing user input through forms are available in Angular. Both capture user input events from the view, evaluate the user input, update the form model and data model, and keep track of changes. Reactive forms and template-driven forms process and manage form data differently. Each approach offers different advantages.
- Reactive Forms: Direct, explicit access to the underlying forms object model is provided by reactive forms. They’re more robust than template-driven forms: they’re more scalable, reusable, and testable. Use reactive forms if forms are an important aspect of your app or if you’re already utilising reactive patterns to develop it.
- Template-driven forms: They construct and manipulate the underlying object model using directives in the template. They’re handy for adding a simple form to an app, such as a signup form for an email list. They’re simple to integrate into an app, but they’re not as scalable as reactive forms. Template-driven forms could be useful if you have extremely basic form needs and logic that can be managed purely in the template.
Let’s look at the key differences between them: The table below summarizes the key differences between reactive and template-driven forms. KEYSREACTIVETEMPLATE-DRIVEN
- SETUP OF FORM MODELExplicit, created in component classImplicit, created by directives
- DATA MODELStructured and immutableUnstructured and mutable
- DATA FLOWSynchronousAsynchronous
FORM VALIDATIONFunctionsDirectives Validation in Template-Driven Forms Validators are built-in to Angular to validate typical use cases. To use built-in validators, you’ll need to add validation attributes to each form field that needs to be validated. These validation attributes are the same as the HTML5 needed, minlength, maxlength, and other validation attributes. Angular has supplied directives that match these attributes to the validator functions described in the Angular framework. Angular generates a list of validation errors whenever the value of a FormControl changes by executing validation. If the list is empty, the status is valid; otherwise, the status is invalid. We must add proper validation attributes to each FormControl and export ngModel to a local template variable for each form control in which we want to apply validation The example below exports ngModel to a variable named name:
<input type="text" class="form-control" id="name" required maxlength="15" minlength="2" [(ngModel)]="name" name="name" #name="ngModel">
- The built-in validators necessary, minlength, and maxlength were used in the above example.
- The <input> element carries the HTML validation attributes: required and minlength.
To check for validity states of the utilised validators, we can use the template variable name in the template:
*ngIf"name.invalid && (name.dirty || name.touched)"

Name is required.

Name cannot be more than 15 characters long.

Name must be at least 2 characters long.
Take note of the following characteristics that the example illustrates:. #name=”ngModel” exports ngModel into a local variable called name. Many of the characteristics of the underlying FormControl instance are mirrored in ngModel, so you can use it in the template to check for control statuses like valid and dirty. A sample, how a simple Template-driven Form looks when validation is applied. Validation in reactive Forms The component class is the source of truth in a reactive form. Rather than using attributes in the template to add validators, you add validator methods directly to the form control model in the component class. When the value of the control changes, Angular calls these functions. There are Validator Functions in Reactive Forms to perform validation Asynchronous or synchronous validator functions are available.
- Sync validators: Sync validators are synchronous functions that take a control instance and return a list of validation errors or null right away. When you instantiate a FormControl, you can give these in as the second argument.
- Async validators: Asynchronous methods that take a control object and return a Promise or Observable that emits a series of validation errors or null after some time. When you instantiate a FormControl, you can give these in as the third argument.
We don’t pass the ngModel directive to reactive forms, and we also don’t use HTML5 validation attributes. Validators are specified when the FormControl objects are created in the component. The FormControl class has the following signature.
class FormControl extends AbstractControl {
constructor(formState: any = null, validatorOrOpts?: ValidatorFn | AbstractControlOptions |&

ValidatorFn[], asyncValidator?: AsyncValidatorFn | AsyncValidatorFn[])
We can supply the right ValidatorFn to a FormControl to enable the built-in validator functionalities. We’ve utilised the following built-in validators for the following example: required, minLength, and maxLength – 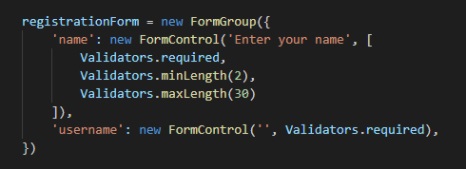
Also, unlike Template-driven forms, we don’t employ the validation properties. Validators.required, Validators.minLength(2), and other ValidatorFn is used. When you enter Validators followed by a dot in your code editor, it may autocomplete every ValidatorFn. A sample, how a simple Reactive Form looks when validation is applied.
Here is the video on Angular tutorial for beginners to understand the concept:
This Edureka Angular 8 Tutorial will help you learn Angular 8 completely along with a step by step demonstration on how to create an Angular project from scratch.
In this section, we looked at Template-Driven and Reactive forms as two distinct approaches to manage user inputs. On both sorts of forms, we learnt how to add validation. Finally, we created our own validator function and included it alongside the built-in validators. As we can see, Angular provides excellent form support as well as some essential under-the-hood tools for form validation. This tutorial does not cover all of the features available in Angular forms. Angular Resources EDUREKA CERTIFICATION TRAINING : https://www.edureka.co/angular-training
FOR DEVELOPMENT
- IDE’s
- Amexio Canvas Web Based Drag and Drop IDE by MetaMagic
- Amexio Canvas is Drag and Drop Environment to create Fully Responsive Web and Smart Device HTML5/Angular Apps. Code will be auto generated and hot deployed by the Canvas for live testing. Out of the box 50+ Material Design Theme support. Commit your code to GitHub public or private repository.
- Visual Studio Code
- VS Code is a Free, Lightweight Tool for Editing and Debugging Web Apps.
- You can also find more on their official website.
FOR BOOKS
- Angular Router
- This book is a comprehensive guide to the Angular router written by its designer. The book explores the library in depth, including the mental model, design constraints, subtleties of the API.
- Developing with Angular
- Practical journey with Angular framework, ES6, TypeScript, webpack and Angular CLI.
- Learning Angular – Third Edition
- A no-nonsense beginner’s guide to building web applications with Angular and TypeScript
- Developing with Angular
- Practical journey with Angular framework, ES6, TypeScript, webpack and Angular CLI.
- ng-book
- The in-depth, complete, and up-to-date book on Angular. Become an Angular expert today.
FOR COMMUNITY
Here is the video on Angular tutorial for beginners to understand the concept:
Angular Full Course in 5 Hours | Angular Tutorial For Beginners | Angular Training | Edureka
This Edureka Angular Full Course video will help you understand and learn the fundamentals of Angular. This Angular Tutorial is ideal for both beginners as well as professionals who want to master various concepts of Angular.
Module Loaders
An angular module ( NgModule) is a container for a collection of linked components, services, directives, and pipes that work together to form an application. A module can be thought of as a package that implements a certain business function in your application. An angular application contains a single root module, the ‘app module,’ which connects all of the other modules, known as ‘feature modules.’ In larger applications, it’s common practise to divide down functionality into separate modules, which allows for three different loading methodologies like preloading, eager loading, and lazy loading.
- Eager loading: To load a feature module eagerly, use the @NgModule decorator’s imports metadata to import it into an application module. In tiny applications, eager loading is beneficial. All feature modules will be loaded before the programme starts with eager loading. As a result, the programme will respond to following requests faster.
- Preloading: To preload a feature module, use the loadChildren property to load it and the preloadingStrategy property with RouterModule.forRoot to customise it. That feature module cannot be included in the application module. When the preloadingStrategy property is set to Angular PreloadAllModules, all feature modules configured with loadChildren are preloaded.We need to implement a bespoke preloading technique to preload specific modules. Only those features that will be viewed by users immediately after the programme starts should be preloaded; the remainder of the feature modules can be loaded later. As a result, we will be able to boost the performance of our larger-scale application.
- Lazy Loading: We must use the loadChildren property in the route configuration to load a feature module slowly, and the feature module must not be imported into the application module.When the application’s size grows, lazy loading comes in handy. Lazy loading allows feature modules to be loaded only when they are needed, making programme startup faster.
Handling Errors
By using Angular’s HttpClient along with catchError from RxJS, we can easily write a function to handle errors within each service. In addition, HttpClient may process JSON responses and return a JavaScript object in the observable. There are two types of errors that must be dealt with differently:
- Client-side: Errors in the front-end code and network issues These errors are returned by HttpClient as ErrorEvent objects.
- Server-side: AJAX problems, user errors, back-end code errors, database issues, and file system failures are all examples of faults that might occur. These errors are returned by HttpClient as HTTP Error Responses.
- We can figure out what type of error we have and how to address it by checking if an error is an instance of Error
- This is a decent solution for a single service, however a real programme comprises multiple services, each of which could throw an error.
- Unfortunately, this method necessitates copying the handleError function across all services, which is a major Angular development anti-pattern. If the way we handle errors needs to change, then we have to update every single handleError function across every service. This is ineffective and can easily result in the spread of other bugs. We require a streamlined method for handling errors across the entire program. Fortunately, Angular’s HttpInterceptor makes this possible.
import { HttpClient, HttpHeaders } from '@angular/common/http'; import { Observable, throwError } from 'rxjs'; import { retry, catchError } from 'rxjs/operators'; import { Injectable } from '@angular/core'; import { User } from './user.model'; @Injectable({ providedIn: 'root' }) export class UserService { private apiUrl = 'https://localhost:8080/api/users'; constructor(private http: HttpClient) {} getUsers(): Observable<User[]> { return this.http.get<User[]>(this.apiUrl).pipe( retry(1), catchError(this.handleError) ); } handleError(error) { let errorMessage = ''; if (error.error instanceof ErrorEvent) { // client-side error errorMessage = `Error: ${error.error.message}`; } else { // server-side error errorMessage = `Error Code: ${error.status}nMessage: ${error.message}`; } window.alert(errorMessage); return throwError(errorMessage); } } Directives
Angular templates are dynamic. When Angular renders them, it transforms the DOM according to the instructions given by directives. A directive is a class with a @Directive decorator. A component is a directive-with-a-template; a @Component decorator is actually a @Directive decorator extended with template-oriented features.
While a component is technically a directive, components are so distinctive and central to Angular applications that this architectural overview separates components from directives.
Two other kinds of directives exist: structural and attribute directives.
Directive tends to appear within an element tag as attributes do, sometimes by name but more often as the target of an assignment or a binding.
Structural directives alter layout by adding, removing, and replacing elements in DOM.
This example template uses two built-in structural directives:
<li *ngFor="let course of coursess"></li>
<course-detail *ngIf="selectedCourse"></course-detail>
- *ngFor tells Angular to retrieve one <li> per course in the courses
- *ngIf includes the CourseDetail component only if a selected course exists.
Attribute directives alter the appearance or behavior of an existing element. In templates, they look like regular HTML attributes. The ngModel directive, which implements two-way data binding, is an example of an attribute directive. ngModel modifies the behavior of an existing element by setting its display value property and responding to change events.
<input [(ngModel)]="courses.name" placeholder="name"/>
You can also write your own directives, i.e. Custom Directive.
Service and Dependency Injection
Services
We can write reusable code and utilise it in any component that requires it thanks to services. Using the dependency injection framework, services can be injected into other components and services. The Provider’s information is used to declare dependencies in the Module. Angular generates a component tree-like tree of injectors and providers. The hierarchical pattern is what you’re looking for.
What is Angular Service?
A service is a reusable piece of code with a specific purpose. You’ll utilise this code in a lot of different parts of your programme.
Our components require data access. You can put data access code in each component, but this is wasteful and violates the single-responsibility principle. The focus of the Component should be on displaying data to the user.
What is Angular Service used for?
- Logging services, for example, are features that are not dependent on other components.
- Logic or data can be shared between components.
- External interactions, such as data access, should be encapsulated.
How to create an Angular Service?
A Javascript function is all that an Angular service is. All we have to do now is construct a class and populate it with methods and properties. We can then call the methods of this class by creating an instance of it in our component.
Getting data from a data source is one of the best uses of services. Let’s construct a basic service that retrieves product information and sends it to our component.
ng generate service service-name
import { Injectable } from '@angular/core';

@Injectable({
  providedIn: 'root',
})
export class ServiceName {
  constructor() {}
}
Dependency Injection
Angular dependency injection is now an integral component of the framework. It gives us the ability to inject dependencies into Components, Directives, Pipes, and Services. Using an example in this tutorial, we will learn what Angular Dependency Injection is and how to inject dependency into a Component, Directives, Pipes, or Service.
Dependencies are services or objects that a class needs to perform its function. Dependency injection, or DI, is a design pattern in which a class requests dependencies from external sources rather than creating them.
The @Injectable() decorator specifies that Angular can use this class in the DI system. For which the metadata is, providedIn: ‘root’.
Services
Service is a broad category encompassing any value, function, or feature that your application needs. A service is typically a class with a well-defined purpose. Anything can be a service. Examples include:
- logging service
- data service
- message bus
- tax calculator
- application configuration

Figure: Angular 8 Tutorial – Services
Angular has no definition of a service. There is no service base class and no place to register a service. Yet services are fundamental to any Angular application. Components are the consumers of services.
Here’s an example of a service class:
import { Injectable } from '@angular/core';
import {Course} from './courses';
import { Observable, of } from 'rxjs';
import {COURSES} from './mock-course';
import { MessageService } from './messages.service';

@Injectable({
  providedIn: 'root'
})
export class CoursesService {

  constructor(private messageService: MessageService) { }

  getCourses(): Observable<Course[]> {
    // TODO: send the message _after_ fetching the heroes
    this.messageService.add('CourseService: fetched courses');
    return of(COURSES);
  }

  getCourse(id: number): Observable<Course>
  {
    this.messageService.add(`CoursesService: fetched courses id=${id}`);
    return of (COURSES.find(courses => courses.id === id));
  }

}
Services are everywhere. Component classes don’t fetch data from the server, validate user input, or log directly to the console. They delegate such tasks to services.
A component’s job is to enable the user experience and nothing more. It mediates between the view (rendered by the template) and the application logic. A good component presents properties and methods for data binding. Angular does help you follow these principles by making it easy to factor your application logic into services and make those services available to components through dependency injection.
So, now let us understand dependency injection, in this Angular 8 Tutorial blog.
Dependency Injection
Dependency injection is a way to supply a new instance of a class with the fully-formed dependencies it requires. Most dependencies are services. Angular uses dependency injection to provide new components with the services they need. Angular can tell which services a component needs by looking at the types of its constructor parameters.
Here is the video to explain Angular 8 Dependency Injection in details:
Angular 8 Dependency Injection | Understanding DI Design Patterns | Angular 8 Training | Edureka
This Edureka “Angular Dependency Injection” video will help you learn about DI and Services in Angular along with working examples.
Dependencies are services or objects that a class needs to perform its function. Dependency injection, or DI, is a design pattern in which a class requests dependencies from external sources rather than creating them.
The @Injectable() decorator specifies that Angular can use this class in the DI system. For which the metadata is, providedIn: ‘root’.
When Angular creates a component, it first asks an injector for the services that the component requires.
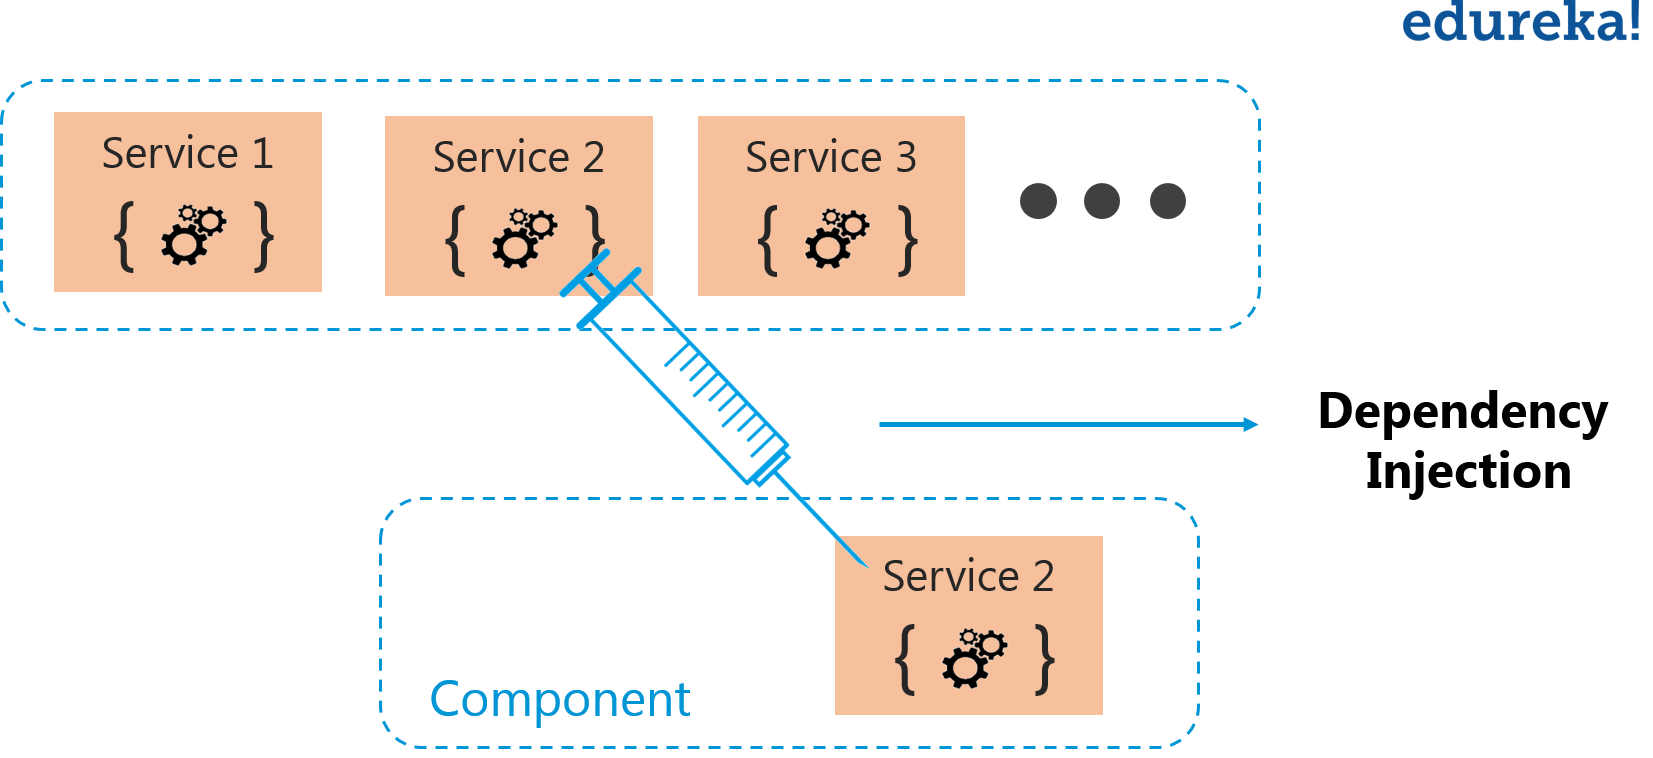
Figure: Angular 8 Tutorial – Dependency Injection
In the below example you can see, we are registering a provider of the Firebase Service with the injector. A provider is something that can create or return service, typically the service class itself. You can register providers in modules or in components.
In general, add providers to the root module so that the same instance of a service is available everywhere as shown in the code below.
import { BrowserModule } from '@angular/platform-browser';
import { NgModule } from '@angular/core';
import { FormsModule } from '@angular/forms'; // <-- NgModel lives here

import { AppRoutingModule } from './app-routing.module';
import { AppComponent } from './app.component';
import { CourseComponent } from './course/course.component';
import { CourseDetailComponent } from './course-detail/course-detail.component';
import { MessagesComponent } from './messages/messages.component';
import { DashboardComponent } from './dashboard/dashboard.component';
import {NgbModule} from '@ng-bootstrap/ng-bootstrap';
import { FooterComponent } from './footer/footer.component';

@NgModule({
  declarations: [
    AppComponent,
    CourseComponent,
    CourseDetailComponent,
    MessagesComponent,
    DashboardComponent,
    FooterComponent
  ],
  imports: [
    BrowserModule,
    FormsModule,
    AppRoutingModule,
    NgbModule,
  ],
  providers: [],
  bootstrap: [AppComponent]
})
export class AppModule { }
Alternatively, you can register a service at a component level in the providers property of the @Component decorator:
import { Component } from '@angular/core';
import { FirebaseService } from './services/firebase.service';

@Component({
selector:'app-root',
templateUrl:'./app.component.html',
styleUrls: ['./app.component.css'],
providers: [FirebaseService]
})
export class AppComponent {
title = 'app works!';
}(NOTE: For complete code, refer to the video specified above)
Registering at a component level means you get a new instance of the service with each new instance of that component.
Concluding about dependency injection, you can say that:
- Dependency injection is wired into the Angular framework and used everywhere.
- The injector is the main mechanism.
- An injector maintains a container of service instances that it created.
- An injector can create a new service instance from a provider.
- A provider is a recipe for creating a service.
- Register providers with injectors.
This brings us to the end of the Angular 8 Tutorial blog. I hope this blog was informative and added value to you. Now, you must be clear with the building blocks of Angular and ready to create an Angular application. I would recommend you to go through this Angular 8 Tutorial Edureka video playlist to watch videos and learn how to create an Angular application.
Learn more about Questions
How to make FileReader work with Angular
How to Check Empty Object in Angular
How to load external scripts in Angular
Know about What are the Advantages and Disadvantages of Angular?
If you are prepare for Angular related job , check out this Angular interview Questions
Angular is a JavaScript framework which is used to create scalable, enterprise, and performance client-side web applications. With Angular framework adoption being high, performance management of the application is community driven indirectly driving better job opportunities. The Angular Certification Training aims at covering all these new concepts around Enterprise Application Development.


Wow Nice tutorials Easy to understand.
nice tutorial for beginner..if you provide the source code it will be very helpful
Hey Sree, thank you for going through our blog. We will definitely try sharing it with you. Do mention your email address for the same. Cheers :)
Very nice article. As I always prefer edureka for learning new technologies. thanks.
Hey Prashanth! Thank you for being an avid learner. Do subscribe to our channel and stay connected with us. Thanks :)
i am using mysql database and running on localhost:3306. what changes i have to made in the program
Very good blog for beginners, thank you very much.
Hey Shivakumar! Thank you for appreciating our efforts. Keep learning and keep growing. Cheers :)
Very useful blog for beginners, thank you!
Thank you. Keep reading our blogs and stay updated with our content. You can also check out the tutorial videos on our Youtube channel. https://www.youtube.com/channel/UCkw4JCwteGrDHIsyIIKo4tQ?view_as=subscriber
Do subscribe, like and share if you find it useful. Cheers :)
nice tutorial.
Very useful.
Thanks Shubham
your article is just copy paste of all information from angular.io
haha
Like your post very much! May I get the source code used in this blog?
when i inject dependence in contacts.component.ts
constructor(private contactService : ContactService){}
then will not work flow stop on app component page not go for component page.. wts the prob how i check
Import CommonModule which provides common directives such as *ngIf and *ngFor,
the usage varies from different versions of Angular.