Routing helps in navigating from one page to another page in a web application. In Angular, it is commonly known as Angular Routing. However, if you are not aware of it yet, here is an article to help you learn Angular Routing in detail.
In this article, I will be going over the following topics:
Introduction to Angular Routing
A browser generally follows a well-known model of navigation in a web application like:
- Suppose, you enter a URL in the address bar, the browser navigates to a corresponding page.
- If you click a link on the page, the browser navigates to a new page.
- If you click on browser’s back and forward buttons, the browser navigates backward and forward respectively through the history of pages you’ve visited.

Angular Routing borrows from this model to navigate through different pages in the application. It interprets a browser URL as an instruction to navigate to a client-generated view. You can bind the router to links on a page that helps in navigating to the appropriate application view when the user clicks a link. You can also navigate requisitely when the user clicks a button or selects an option from a dropbox. The router also keeps an activity log in the browser’s history journal, so the forward and back buttons function as well. Check out this full stack development course today to learn more.
Angular Routing Installation
Now, let’s start with a quick tutorial on how to install Angular Routing to an application. First things first, make sure you have Angular installed in your system. If you are not familiar with Angular, refer to the link on Angular CLI Installation. Once you have everything set up, let’s build a new Angular Project.
First, you need to create a directory where you want to create your project. Later, you need to change your path to that directory using cd command on your Windows Command Prompt or any other CLI you are using. Suppose you have a directory named ‘Angular Routing’ which is located on Desktop, you need to type the following command to navigate into that directory.
cd C:Users/System_Name/Desktop/Angular Routing
Later, you need to type the following command to create your new Angular project.
ng new angular-routing
First, it will ask you whether to add Angular Routing to your project which goes on something like this:
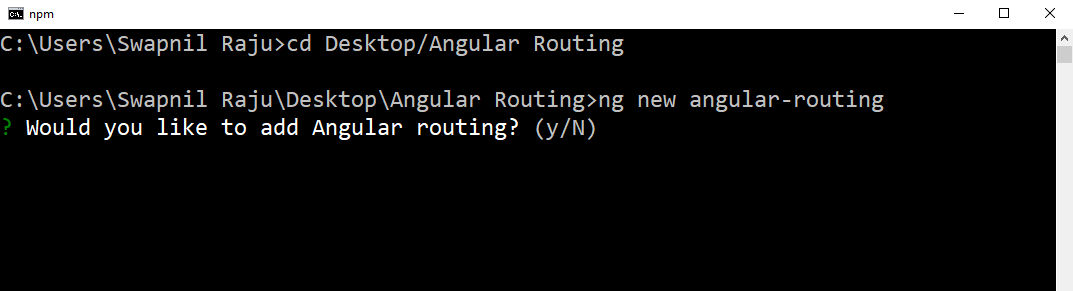
You need to choose y i.e., yes to add routing to your project. Next, it will ask you which stylesheet format you would like to use as shown below:

You need to click on CSS to install default CSS stylesheet on your application which includes all the other stylesheets.
Subsequently, this will create a new project named angular-routing in your directory. You can navigate into your project with the following command:
cd angular-routing
In case, you already have an Angular project and would like to add routing to it, you can simply type the following command on your Command Prompt.
ng generate module app-routing --flat --module=app
This will add routing to your project and generates app-routing.module.ts file into your src/app directory. The generated file will look something like this:
import { NgModule } from '@angular/core';
import { Routes, RouterModule } from '@angular/router';

const routes: Routes = [ ];

@NgModule({
   imports: [RouterModule.forRoot(routes)],
   exports: [RouterModule]
})

export class AppRoutingModule { }
Join our UX Design Course and become a design superstar.
Routing between App and First Components
First, you need to generate a component named first-component using the following command:
ng g c first-component
This will create the component named ‘first-component’ in your src/app directory. This consists of the following sub-components:
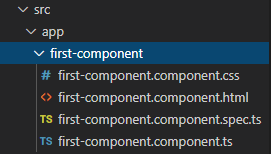
- first-component.component.css
- first-component.component.html
- first-component.component.spec.ts
- first-component.component.ts
Now, let’s say you want to add routing from app.component to your first-component. First, you need to go to the app.component.html file on your application and erase all the existing code. Next, you need to write the new code as follows:
<mat-toolbar>
   <span>Angular Routing Tutorial</span>
</mat-toolbar>

<router-outlet></router-outlet>
Here, <mat-toolbar> is a container from Angular Material that is used for headers and titles. In case, you are not familiar with it, you can refer to the article on Angular Material for the installation and a demo tutorial.
Find out our Angular Course in Top Cities
| India | India |
| Angular Training in Bangalore | Angular Training in Delhi |
| Angular Training in Chennai | Angular Training in Kolkata |
| Angular Training in Hyderabad | Angular Training in Mumbai |
<router-outlet> is a router directive from the router library which is used for directing the router where to display the routed views. To use this directive, you need to first import it in app.module.ts file from the angular router directory using the following command:
import { Routes, RouterModule } from '@angular/router';Later, you need to also add this module in the imports:[ ] section located in the app.module.ts file.
imports: [
   BrowserModule,
   AppRoutingModule,
   BrowserAnimationsModule,
   MatToolbarModule,
   RouterModule.forRoot(routes)
],
For Routes, you need to add “RouterModule.forRoot(routes)”.
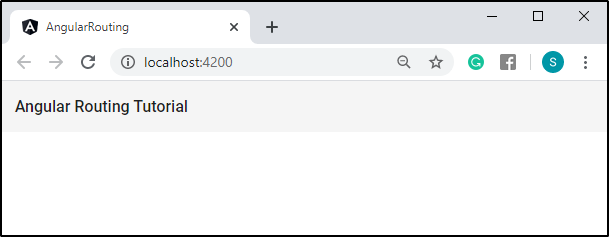
Now, let’s serve your project using the following command:
ng serve -o
This will open your project on the default browser of your system as shown below:
Let’s say, now you want to create a root for your first-component. First, let’s write a code to display the contents of the first-component page, in the first-component.component.html file.
<h3>Welcome to the First Component!</h3>
Next, let’s head on to the app.module.ts file and create a path for first-component in Routes=[ ] section.
const routes: Routes = [
{ path: 'first-component', component: FirstComponentComponent }
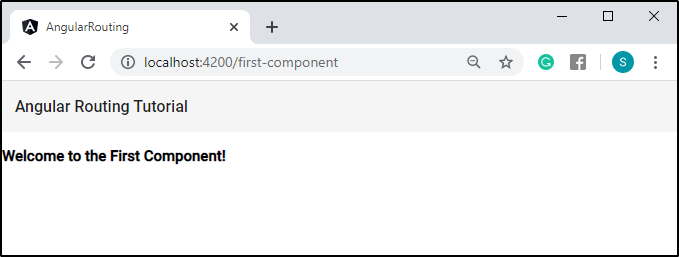
];This will create a route for first-component and you can view this component using the following URL on your browser:
http://localhost:4200/first-component
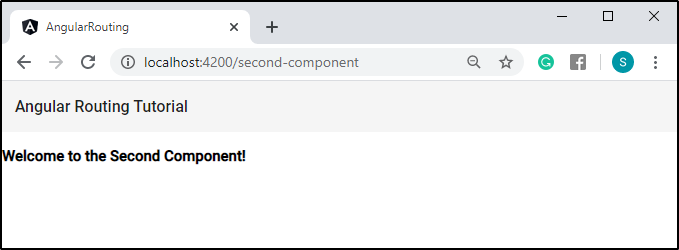
This will display the contents of the first-component file as follows:
Component-to-Component Routing
Suppose you want to navigate from component-to-component. First things first, you need to generate another component in your application. Later, you need to add a router link on your first-component.component.html file to your second-component.component.html file which is as follows:
<h3>Welcome to the First Component!</h3>
<p>Click the link below to navigate into second component</p>
<nav>
   <a routerLink = "/second-component">Second Component</a>
</nav>
Next, you need to follow the same procedure to create a route for second-component just like you did for first-component in the app.module.ts file. Once your second-component path is created, you can view it on your browser.

You need to click on the “Second Component” link to navigate to the second-component page and display the contents of it.
Find out our UI UX Design Course in Top Cities
| India | India |
| UI UX Designer Course in Chennai | UI UX Design Course in Mumbai |
| UI UX Design Course in Pune | UI UX Design Course in Ahmedabad |
| UI UX Design Course in Bangalore | UI UX Design Course in Delhi |
Routing through Buttons
Suppose you want to navigate through buttons. First, let’s add a “Menu” option and also a “Home” icon to your application. You need to open your app.component.html file and edit the code as follows:
<mat-toolbar>
   <span>Angular Routing Tutorial</span>
   <span class="homespace"></span>
   <button class="example" mat-icon-button routerLink="/">
      <mat-icon aria-hidden="false" aria-label="Example home icon">home</mat-icon>
   </button>
   <span class="space"></span>
   <button class="btns" mat-button [matMenuTriggerFor]="menu">Menu</button>
   <mat-menu #menu="matMenu">
      <button mat-menu-item routerLink="/settings">Settings</button>
      <button mat-menu-item routerLink="/help">Help</button>
   </mat-menu>
</mat-toolbar>

<router-outlet></router-outlet>
Here, <mat-icon> is a container from Angular Material that is used to represent various icons. To use this, you need to import MatIconModule just like MatToolbarModule from ‘@angular/material’ directory, in your app.module.ts file.
You need to even generate two components i.e. settings and help components. Now, you need to follow the same procedure to create a route for these components as you used above. In the above HTML code, routerLink=”/” refers to the path to your first page URL i.e. http://localhost:4200.
Next, you need to write the following code in your app.component.css file.
.space{
    flex: 1 1 auto;
}

.homespace{
    flex: 20 0 auto;
}

.btns{
    width: 100px;
    height: 40px;
    font-size: large;
    border-radius: 10px;
    border: 3px solid #113c89;
    background-color: rgb(252, 173, 173);
    cursor: pointer;
}

.example {
    background-color: Transparent;
    background-repeat:no-repeat;
    border: none;
    cursor:pointer;
    overflow: hidden;
    outline:none;
}
After creating paths for settings and help components, you can view it on your browser by serving your project.
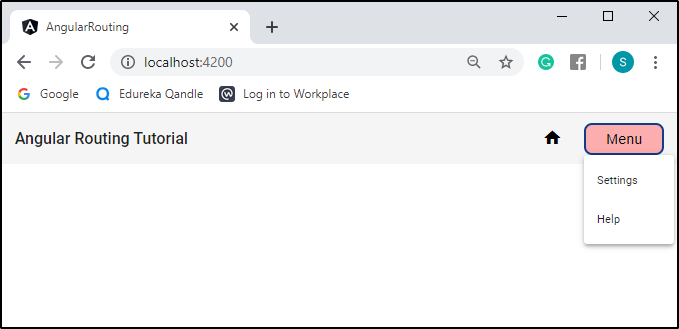
Now, you need to just click on either “Settings” or “Help” options to navigate through these pages. I will show you an example of the “Settings” option.

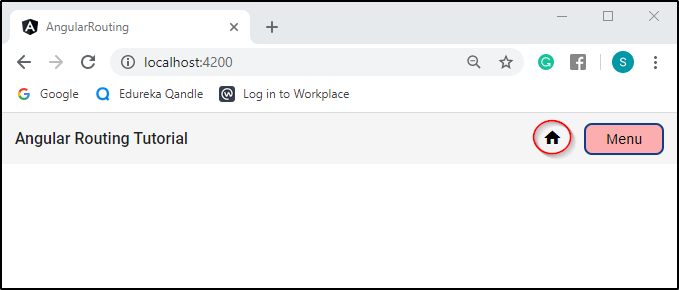
As shown in the above image, I just clicked on the “Settings” option and later, it is redirected to the “/settings” page.
To head back to your first page, you need to just click on the “Home” icon and it will redirect you to your first page as shown below.
Special String Path
There is also a special string ‘**’ that can be added to the path. This string is used to redirect to your defined path if the requested URL doesn’t match any of your defined paths or routes. This string can be added in your Routes=[ ] section which is located in the app.module.ts file.
const routes: Routes = [
   { path: 'first-component', component: FirstComponentComponent },
   { path: 'second-component', component: SecondComponentComponent },
   { path: 'settings', component: SettingsComponent },
   { path: 'help', component: HelpComponent },
   { path: '**', redirectTo: '', pathMatch: 'full' }
];
For example, you could see the defined paths in your application. In your browser URL section, you need to type the following address:
http://localhost:4200/third-component
As third-component doesn’t exist, it will redirect to your first page URL i.e. http://localhost:4200 and will display the contents of it.
With this, I would like to end my blog. I hope you are clear about the fundamentals of Angular Routing. If you have any doubts or queries regarding this article, do not hesitate to post them in the comments section below.
If you would like to learn all that you just learned from this blog, and more about Angular, and gear your career towards a proficient Angular Developer, then consider enrolling for our Angular Certification Course.
Got a question for us? Please mention it in the comments section of this “Angular Routing” blog and we will get back to you as soon as possible.