


In this blog, we will understand what is Angular Directive with sample codes to get a better understanding. Later moving forward, we will understand Attribute & Structural Directives. We will also focus on writing custom directives in Angular. Below is the sequence in which we will cover all the topics:
You may go through this recording of Angular Directive where our Angular Certification Training expert has explained the topics in a detailed manner with examples that will help you to understand this concept better.
This Edureka “Angular Directives” tutorial will help you to learn about different directives in Angular 2.
Now, let us move ahead in this Angular Directive blog and first understand what is Angular Directive?
Angular Directive
You might be wondering why we need Angular Directives. Now take a look at the below image, if you want a similar functionality in all the components for an example fade-in and fade-out functionality, you can take two approaches. The common approach would be, you can explicitly write the code in all the components for the required behavior, but it would be tedious and complex. Alternatively, like a function in a programming language, you can write the code and later you can call it anytime whenever you want that behavior of that function. Similarly, you can create a directive and write the behavior inside it. So wherever you need that behavior, you can import the directive.
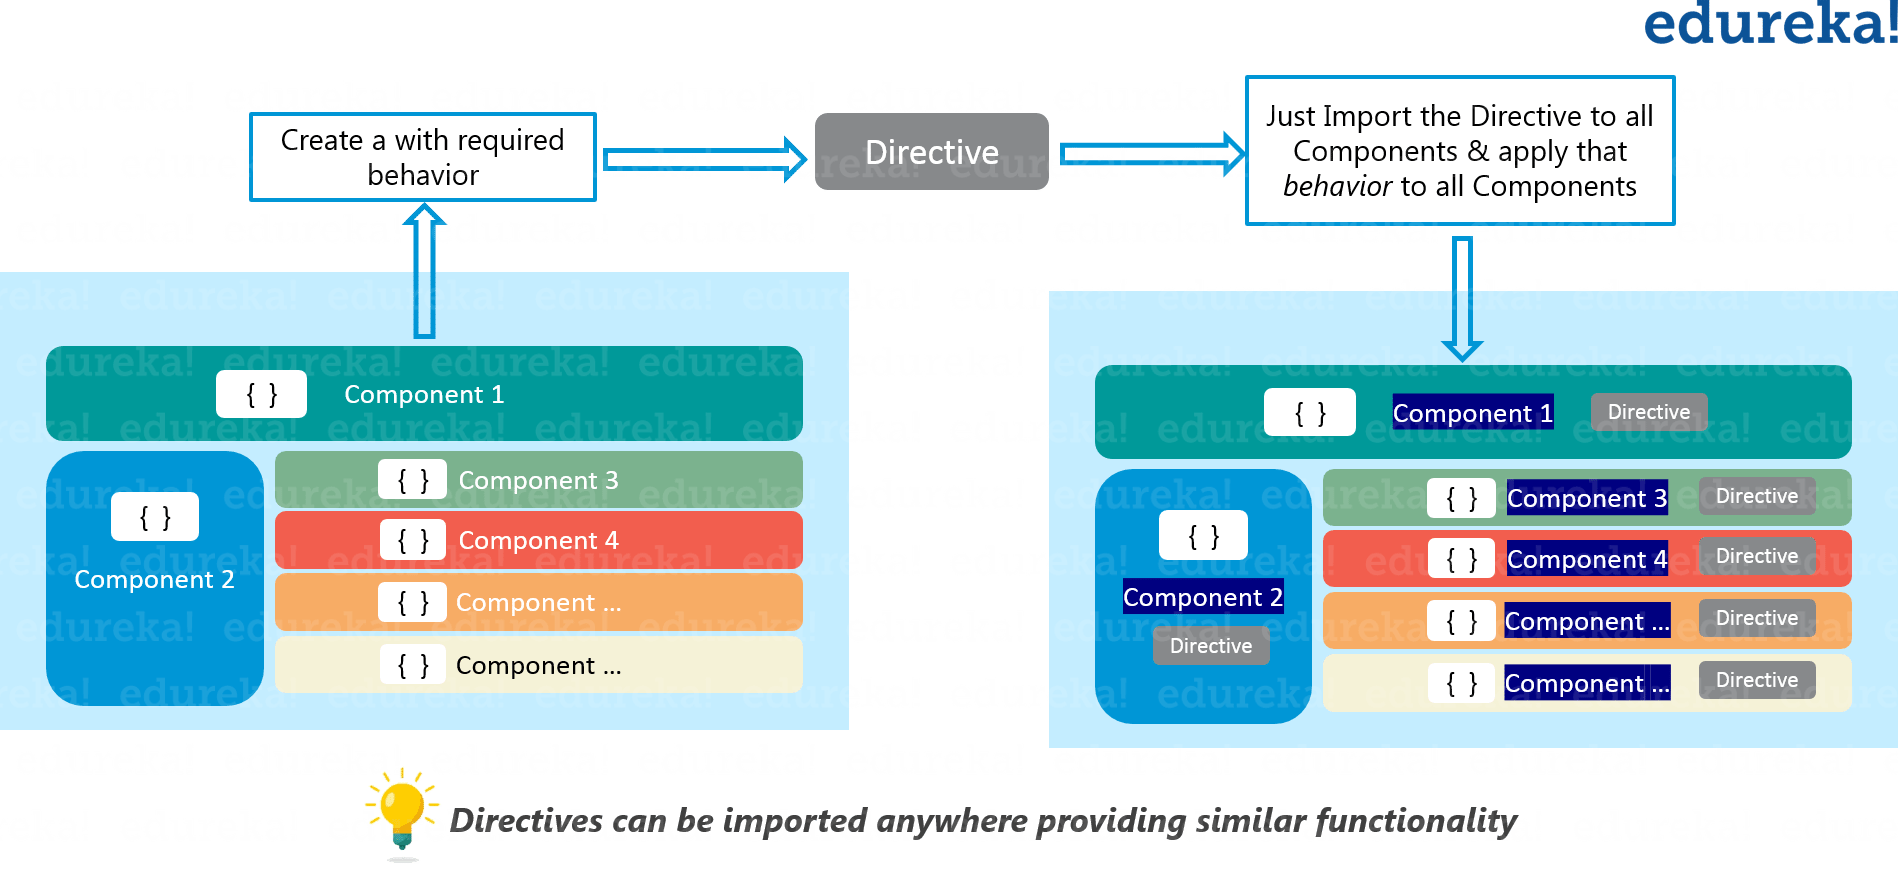
Fig: Angular Directive – Why do we need Directives?
Angular Directive is basically a class with a @Directive decorator. You might be wondering what are decorators? Decorators are functions that modify JavaScript classes. Decorators are used for attaching metadata to classes, it knows the configuration of those classes and how they should work.
You would be surprised to know that a component is also a directive-with-a-template. A @Component decorator is actually a @Directive decorator extended with template-oriented features. Whenever Angular renders a directive, it changes the DOM according to the instructions given by the directive. Directive appears within an element tag similar to attributes.
The Angular Directive can be classified into two types: structural and attribute directives.
Structural directives alter layouts by adding, removing, and replacing elements in DOM.
Let us briefly understand the two majorly used built-in structural directives:
<li *ngFor="let movie of movies"></li>

<movie-detail *ngIf="selectedMovie"></movie-detail>
- *ngFor is a looping variable that tells Angular to take one <li> per movie from the movie list.
- *ngIf will include the MovieDetail component only if a movie is selected otherwise it will remove it from the DOM.
Attribute directive alter the appearance or behavior of an existing element. When you include attribute directives in templates, they look like regular HTML attributes. The ngModel directive, which implements two-way data binding, is an example of an attribute directive. ngModel modifies the behavior of an existing element by setting its display property and responding to the changing events.
<input [(ngModel)]="movie.name">
Angular has a few more directives that either alter the layout structure (for example, ngSwitch) or modify aspects of DOM elements and components (for example, ngStyle and ngClass) which I will be talking about. You can also write your own directives, i.e. Custom Angular Directive.
Now moving forward, we will discuss attribute directives first and then structural directives to get a clear idea of how they work and how to implement them.
Learn the secrets of stunning UI/UX design with our UI UX Design Course.
Angular Directive: Attribute Directives
Attribute Directive is basically used to modify or alter the appearance and behavior of an element.
The selector is the property that identifies the attribute. It is used as HTML tag to target & insert an instance of the directive class where it finds that tag. The directive class implements the desired directive behavior.
Now we will create a myHighlight attribute directive to set an element’s background color when you hovers over that element.
It can be applied anywhere using the below code:
Highlight me!
Create the highlight directive typescript file i.e. src/app/highlight.directive.ts and embed the following code:
import { Directive, ElementRef, HostListener, Input } from '@angular/core';

@Directive({
selector: '[myHighlight]'
})

export class HighlightDirective {

constructor(private el: ElementRef) { }
@Input() defaultColor: string;
@Input('myHighlight') highlightColor: string;

@HostListener('mouseenter') onMouseEnter() {
  this.highlight(this.highlightColor || this.defaultColor || 'red');
}

@HostListener('mouseleave') onMouseLeave() {
  this.highlight(null);
}

private highlight(color: string) {
  this.el.nativeElement.style.backgroundColor = color;
}

}
The import statement specifies the required dependencies used from the Angular core:
- The directive provides the functionality of the @Directive decorator.
- ElementRef injects into the directive’s constructor so that the code can access the DOM element.
- Input allows data to flow from the binding expression into the directive.
Next, the @Directive decorator function contains the directive metadata in a configuration object as an argument.
@Directive requires a selector to identify that the HTML in the template is associated with the directive. Here, the directive’s selector is [myHighlight]. Angular locates all elements in the template which has an attribute named myHighlight.
After the @Directive metadata, the next part in the above code is the directive’s class, called HighlightDirective, which contains the logic for the directive. Exporting HighlightDirective makes it accessible to other components.
Angular creates a new instance of the directive’s class for each matching element, injecting an Angular ElementRef into the constructor. ElementRef is a service that grants direct access to the DOM element through its nativeElement property. To use the new myHighlight, inside a template that applies the directive as an attribute to a paragraph (<p>) element. The <p> element is the attribute host.
Put the template in the app component file or you can also create a new HTML file and provide its path in templateURL:
import { Component } from '@angular/core';
@Component({
selector: 'my-app',
template: `

<h1>My First Attribute Directive</h1>


<h4>Pick a highlight color</h4>


<div>
  <input type="radio" name="colors" (click)="color='lightgreen'">Green
  <input type="radio" name="colors" (click)="color='yellow'">Yellow
  <input type="radio" name="colors" (click)="color='cyan'">Cyan
</div>


 Highlight me!


 Highlight me too!

`
})

export class AppComponent { }
Next, add an import statement to fetch the Highlight directive and add that class to the declarations NgModule metadata. This way Angular recognizes the directive when it encounters myHighlight in the template. In the below code you can see how to import the directive in the main module.
import { NgModule } from '@angular/core';
import { BrowserModule } from '@angular/platform-browser';
import { HighlightDirective } from './highlight.directive';
import { AppComponent } from './app.component';

@NgModule({
imports: [ BrowserModule ],
declarations: [ AppComponent, HighlightDirective ],
bootstrap: [ AppComponent ]
})

export class AppModule { }
Now when the app runs, the myHighlight directive highlights the paragraph text, angular detects that you’re trying to bind to something and finds this directive in the module’s declarations array. After specifying HighlightDirective in the declarations array, Angular knows it can apply the directive to components declared in this module.
To summarize, Angular found the myHighlight attribute on the <p> element. It created an instance of the HighlightDirective class and injected a reference to the <p> element into the directive’s constructor which sets the <p> element’s background style.
Again, looking back at the directive code, we are adding two eventhandlers that respond when the mouse enters or leaves, each adorned by the HostListener decorator.
import { Directive, ElementRef, HostListener, Input } from '@angular/core';
@Directive({selector: '[myHighlight]' })

export class HighlightDirective {

constructor(private el: ElementRef) { }
@Input() defaultColor: string;
@Input('myHighlight') highlightColor: string;

@HostListener('mouseenter') onMouseEnter() {
  this.highlight(this.highlightColor || this.defaultColor || 'red');
}
@HostListener('mouseleave') onMouseLeave() {
  this.highlight(null);
}
private highlight(color: string) {
  this.el.nativeElement.style.backgroundColor = color;
}
}
The @HostListener decorator lets you subscribe to events of the DOM element that hosts an attribute directive.
The handlers delegate to a helper method that sets the color on the DOM element, el, which you declare and initializes in the constructor.
Notice the @Input decorator. It adds metadata to the class that makes the directive’s highlightColor property available for binding. It’s called an input property because data flows from the binding expression into the directive. Without that input metadata, Angular rejects the binding.
The [myHighlight] attribute binding both applies the highlighting directive to the <p> element and sets the directive’s highlight color with a property binding. We’re re-using the directive’s attribute selector ([myHighlight]) to do both jobs.
@Input('myHighlight') highlightColor: string;
Inside the directive, the property is known as highlightColor. Outside the directive, where you bind to it, it’s known as myHighlight.
<h1>My First Attribute Directive</h1>


<h4>Pick a highlight color</h4>


<div>
<input type="radio" name="colors" (click)="color='lightgreen'">Green
<input type="radio" name="colors" (click)="color='yellow'">Yellow
<input type="radio" name="colors" (click)="color='cyan'">Cyan
</div>


 Highlight me!


 Highlight me too!
In the above code section, you’ll turn AppComponent into a harness that lets you pick the highlight color with a radio button and bind your color choice to the directive. Angular knows that the defaultColor binding belongs to the HighlightDirective because you made it public with the @Input decorator.
@Input('myHighlight') highlightColor: string;
Either way, the @Input decorator tells Angular that this property is public and available for binding by a parent component. Without @Input, Angular refuses to bind to the property.
The component and its template trust each other implicitly. Therefore, the component’s own template may bind to any property of that component, with or without the @Input decorator. But a component or directive shouldn’t blindly trust other components and directives. The properties of a component or a directive are hidden from binding by default. They are private from an Angular binding perspective. When adorned with the @Input decorator, the property becomes public from an Angular binding perspective. Only then can it be bound by some other component or directive.
When a property appears in the template expression to the right of the equals (=), it belongs to the template’s component and does not require the @Input decorator. When it appears in square brackets ([ ]) to the left of the equals (=), the property belongs to some other component or directive; that property must be adorned with the @Input decorator.
<span style="color: #ff0000;"></pre>

</span>

 Highlight me!
Now looking at the above code you can easily infer that:
The color property in the expression on the right belongs to the template’s component. The template and its component trust each other. The color property doesn’t require the @Input
The myHighlight property on the left refers to an aliased property of the HighlightDirective, not a property of the template’s component. There are trust issues. Therefore, the directive property must carry the @Input decorator.
Now after discussing Attribute Directives in this Angular Directive blog, we should move ahead to the Structural Directive.
Angular Directive: Structural Directives
Structural directives are responsible for shape or reshape the DOM’s structure, typically by adding, removing, or manipulating elements. Similar to other directives, you apply a structural directive to a host element. The directive then does whatever it’s designed to do with that host element. Structural directives are easy to recognize. An asterisk (*) precedes the directive attribute name. It does not require brackets or parentheses like attribute directive.
Three of the common, built-in structural directives are NgIf, NgFor, and NgSwitch. Let us take a look how they look in a template:
<div *ngIf="movie" >{{movie.name}}</div>
<ul>
<li *ngFor="let movie of movies">{{movie.name}}</li>
</ul>
<div [ngSwitch]="movie?.genre">
<action-movie *ngSwitchCase="'action'" [movie]=" movie "></action-movie>
<horror-movie *ngSwitchCase="'horror'" [movie]=" movie "></horror-movie>
<thriller-movie *ngSwitchCase="'thriller'" [movie]=" movie "></thriller-movie>
<unknown-movie *ngSwitchDefault [movie]=" movie "></unknown-movie>
</div>
The Directives can be written in both UpperCamelCase and lowerCamelCase. This is because NgIf refers to the directive class & ngIf refers to the directive’s attribute name. When we talk about its properties and what the directive does, we will refer to the directive class. Whereas we will refer to the attribute name when describing how you apply the directive to an element in the HTML template.
NgIf
NgIf is the simplest structural directive and the easiest to understand. It takes a boolean expression and makes an entire chunk of the DOM appear or disappear. You can assume it similar as if statement in a programming language
  Expression is true and ngIf is true.
  This paragraph will be included in the DOM.

  Expression is false and ngIf is false.
  This paragraph will not be included in the DOM.
The ngIf directive doesn’t hide elements. It adds and removes them physically from the DOM. You can confirm it by using browser developer tools to inspect the DOM. When the condition is false, NgIf removes its host element from the DOM, detaches the component from Angular change detection, and destroys it.
Do not get confused between removing and hiding. The difference between hiding and removing doesn’t matter for a simple paragraph. But it does matter when the host element is attached to a resource-intensive component. The component stays attached to its DOM element. It keeps listening to events. Angular keeps checking for the changes that could affect data bindings.
Although the element is invisible, the component listens to the DOM. The performance and memory burden can be substantial, responsiveness can degrade, and the user sees nothing. On the positive side, showing the element again is quick. The component’s previous state is preserved and ready to display. The component doesn’t re-initialize—an operation that could be expensive. So hiding and showing is sometimes the right thing to do.
But if you want to remove the DOM element that the user can’t see and recover the unused resources, in such situation you use the structural directive like NgIf .
Why we use Asterisk (*)?
Surely you noticed the asterisk (*) prefix to the directive name and wondered why it is important? Here *ngIf is displaying the hero’s name if hero exists.
<div *ngIf="movie">{{movie.name}}</div>
Internally, Angular decouples it in two stages. First, it translates the *ngIf=”…” into a template attribute, template = “ngIf …” and then it becomes:
<div template="ngIf movie">{{movie.name}}</div>
Then it translates the template attribute into a <ng-template> element, wrapped around the host element as shown below.
<ng-template [ngIf]="movie">
<div>
{{movie.name}}
</div>
</ng-template>
- The *ngIf directive moved to the <ng-template> element where it became a property binding,[ngIf].
- The rest of the<div>, including its class attribute, moved inside the <ng-template>
None of these forms are actually rendered. Only the finished product ends up in the DOM.
The NgFor and NgSwitch directives follow the same pattern.
*ngFor
Angular transforms the *ngFor in similar fashion from asterisk (*) syntax through template attribute to <ng-template> element.
It looks like this:
<div *ngFor="let movie of movies">{{movie.name}}</div>


<div template="ngFor let movie of movies">{{movie.name}}</div>


<ng-template ngFor let-movie [ngForOf]="movies">{{movie.name}}
</ng-template>
ngFor needs a looping variable (let movie) and a list (movies). Everything outside the ngFor string stays with the host element (the <div>) as it moves inside the <ng-template>.
The Angular microsyntax lets you configure a directive in a compact, friendly string. The microsyntax parser translates that string into attributes on the <ng-template>:
- The let keyword declares a template input variable that you reference within the template. The input variables in this example is movie. The parser translates let movie into variables named, let-movie.
- As theNgFor directive loops through the list, it sets and resets properties of its own context
Template input variable
A template input variable is a variable whose value you can refer within a single instance of the template. All are preceded by the keyword let.
You declare a template input variable using the let keyword (let hero). The variable’s scope is limited to a single instance of the repeated template. You can use the same variable name again in the definition of other structural directives.
You can only apply one structural directive per host element. For an example, if you want to repeat a block of HTML but only when a particular condition is true. You’ll try to put both an *ngFor and an *ngIf on the same host element. Angular won’t let you. You may apply only one structural directive to an element.
The reason is simplicity. Structural directives can do complex things with the host element. When two directives lay claim to the same host element, which one takes precedence? Which should go first, the NgIf or the NgFor?
It is hard to answer these questions. There’s an easy solution for this use case: put the *ngIf on a container element that wraps the *ngFor element. One or both elements can be an ng-container. So if you don’t have to introduce extra levels of HTML, you can use NgSwitch in such conditions.
NgSwitch Directive
The Angular NgSwitch is actually a set of cooperating directives: NgSwitch, NgSwitchCase, and NgSwitchDefault.
Here’s an example.
<div [ngSwitch]="movie?.genre"> <action-movie *ngSwitchCase="'action'" [movie]=" movie "></action-movie> <horror-movie *ngSwitchCase="'horror'" [movie]=" movie "></horror-movie> <thriller-movie *ngSwitchCase="'thriller'" [movie]=" movie "></thriller-movie> <unknown-movive *ngSwitchDefault [movie]=" movie "></unknown-movie> </div>
The switch value assigned to NgSwitch (movie.genre) determines which of the switch cases are displayed.
NgSwitchCase and NgSwitchDefault are structural directives. You attach them to elements using the asterisk (*) prefix notation. A NgSwitchCase displays its host element when its value matches the switch value. The NgSwitchDefault displays its host element when no sibling NgSwitchCase matches the switch value.
The element to which you apply a directive is its host element. The <action-movie> is the host element for the happy *ngSwitchCase. The <unknown-movie> is the host element for the *ngSwitchDefault.
<div [ngSwitch]="movie?.genre"> <action-movie *ngSwitchCase="'action'" [movie]=" movie "></action-movie> <horror-movie *ngSwitchCase="'horror'" [movie]=" movie "></horror-movie> <thriller-movie *ngSwitchCase="'thriller'" [movie]=" movie "></thriller-movie> <unknown-movive *ngSwitchDefault [movie]=" movie "></unknown-movie> </div>
Internally, it is also converted into the <ng-template> element form. Then it looks like:
<div [ngSwitch]="movie?.genre"> <ng-template [ngSwitchCase]="'action'"> <action-movie [movie]="movie"></ action-movie > </ng-template> <ng-template [ngSwitchCase]="'sad'"> <horror-movie [movie]="movie"></horror-movie> </ng-template> <ng-template [ngSwitchCase]="'confused'"> <thriller-movie [movie]="movie"></thriller-movie> </ng-template > <ng-template ngSwitchDefault> <unknown-movie [movie]="movie"></unknown-movie> </ng-template> </div>
The <ng-template> is an Angular element for rendering HTML. It is never displayed directly. In fact, before rendering the view, Angular replaces the <ng-template> and its contents with a comment.
Now in this Angular Directive blog, let us look how you can write a custom structural directive.
Custom Structural Directive
For writing a custom structural directive:
- Import the Directive decorator (instead of the Component decorator).
- Import the Input, TemplateRef, and ViewContainerRef symbols; you’ll need them for any structural directive.
- Apply the decorator to the directive class.
- Set the CSSattribute selector that identifies the directive when applied to an element in a template.
This is how you start creating a directive:
import{Directive, Input, TemplateRef, ViewContainerRef} from '@angular/core';

@Directive({
selector: '[myCustom]'
})

export class myCustomDirective {}
The directive’s selector is typically the directive’s attribute name in square brackets, [myCustom]. The directive attribute name should be spelled in lowerCamelCase and begin with a prefix. Don’t use ng. That prefix belongs to Angular. The directive class name ends in Directive
TemplateRef and ViewContainerRef
A simple structural angular directive creates an embedded view from the Angular-generated <ng-template> and inserts that view in a view container adjacent to the directive’s original <p> host element. You’ll acquire the <ng-template> contents with a TemplateRef and access the view container through a ViewContainerRef. You inject both in the directive constructor as private variables of the class.
I hope this blog was informative and added value to you. Now, you must be clear about Angular Directive and ready to work with the Angular application. I would recommend you to go through this Angular Tutorial Edureka video playlist to watch videos and learn how to work with the Angular applications.
Learn about Angular dropdown menu
Master Flutter’s powerful features and create stunning user interfaces in a Flutter Training.
Angular is a JavaScript framework that is used to create scalable, enterprise, and performance client-side web applications. With Angular framework adoption being high, performance management of the application is community driven indirectly driving better job opportunities. The Angular Certification Training aims at covering all these new concepts around Enterprise Application Development.


yes. the code snippets are probably wrong. Where is the p element man? just wrote the directive in a cavemen fashion in the html body.
In order for highlight to work you need to finish the binding on app.component.html or your template ` ` on app.component.ts:
p [myHighlight]=”color”> Highlight me p
p [myHighlight]=”color”> Highlight me too! p
There is no such thing as UpperCamelCase and lowerCamelCase.
There are PascalCase and camelCase
Your code snippets are wrong – for example I don’t see the myHighlight directive actually _used_ in any HTML!
Otherwise this is a good intro to Directives – but will certainly confuse newcomers unless you fix up the code!