CLI or Command Line Interface has been introduced to offer a more efficient development experience and to increase the performance of an application. CLI has been tagged to Angular, which is called Angular CLI, to make Angular applications faster with increased efficiency and to produce the best outcome of the application.
To get in-depth knowledge of Angular CLI or Angular, consider enrolling in Angular Course by Edureka.
In this article, you will learn about Angular CLI and will be going over the following topics:
- Introduction to Angular CLI
- Angular CLI Installation
- Angular Materials Installation
- Generating Angular Components
- Routing with Angular CLI
Introduction to Angular CLI
GUI is considered to be interactive but plagued with performance issues. This has lead to people who prefer performance over visuals, to use a command-line interface or a CLI. Earlier using AngularJS, it was a pretty hefty task for a large project to organize the code, loading of JavaScript Files, debugging code and the involvement of third-party libraries. This was solved when AngularJS was re-written completely and named Angular, along with CLI or Command-Line Interface, which uses TypeScript.

Angular CLI is a command-line interface tool that can be used to develop and generate Angular projects and helps in maintaining Angular applications. Now, let’s see a few features of Angular CLI.
Features of Angular CLI
- Angular CLI helps in producing components, services, and modules with just single-line commands.
- It helps in the reduction of the application size of Angular, which offers enhanced development experience.
- It also offers a clean coding feature of TypeScript.
Let’s have a glance at how to install Angular CLI.
Angular CLI Installation
Angular CLI can be installed using the Node Package Manager i.e. npm. Make sure you have NodeJS installed with the correct path set on your development system. If you are not familiar with NodeJS, you could refer to our NodeJS installation blog. Once you have everything set up, go ahead and type the following commands on your Windows Command Prompt or any other CLI you are using:
npm install -g @angular/cli
This command will install the latest version of Angular CLI globally (due to -g extension) on your system. You can type the following command to verify whether Angular CLI is installed or not.
ng --version
This command will check the version of Angular CLI installed on your system. For example, you can refer to my system’s Angular CLI version below.

As shown above, you could refer to the versions of Angular CLI and NodeJS installed on my system.
If you are facing any issues in installing Angular CLI, type the following command for online help with the Angular team and add a short description of the issue you are facing.
ng help serve
Here, ng stands for angular and all the commands of Angular CLI begin with ng.
Angular Project Creation
Now, let’s say you want to build a new Angular project. First, create a directory where you want to create your project and change your path to that directory using cd command on your CLI. Suppose you have a directory named ‘First Project’ which is located on Desktop, type the following command to navigate into that directory.
cd C:Users/System_Name/Desktop/First Project
Later, type the following command to create your new Angular project.
ng new my-first-project
Now, it asks you whether to add Angular Routing to your project which goes on something like this:

I would recommend you add routing to your project as it helps in navigating through your application. So, type y to add routing.
Now, it asks you which stylesheet format you would like to use as shown below:
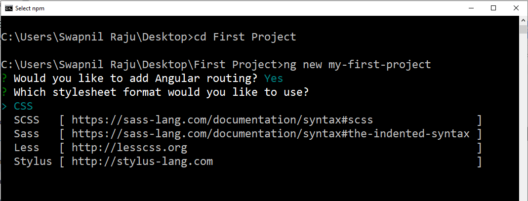
Click on CSS to install default CSS stylesheet on your application which includes all the other stylesheets.
Now, this creates your new project named my-first-project in your directory with the following configurations and code files. You can navigate into your project with the following command:
cd my-first-project

Serving Your Project
Whenever you create a new project using Angular CLI, you will get a premade project to start you off. You can view this project by locally serving the application by typing the following command:
ng serve
This will serve the project at the default port number provided by Angular i.e. 4200. You can view your project by visiting http://localhost:4200/ in your browser. You can even order angular to open the browser up for you by using the -open flag.
ng serve --open
There is also a short-hand form for -open flag i.e -o flag.
ng serve -o
This will open your project on the default browser of your system.

Moving ahead, you will learn how to install Angular Materials.
Find out our Angular Course in Top Cities
| India | India |
| Angular Training in Bangalore | Angular Training in Delhi |
| Angular Training in Chennai | Angular Training in Kolkata |
| Angular Training in Hyderabad | Angular Training in Mumbai |
Angular Materials Installation
Angular Materials or User-Interface (UI) components help you to design your application in a structured manner that attracts users and makes it easier to access the elements or the components present in your application. They also help in designing your applications beautifully with unique styles and shapes. So, using UI components is highly recommended to attract users and to build communication between the user and the website.
You can add Angular materials by using the following command:
ng add @angular/material
Now, it asks you to choose a prebuilt theme name or a custom theme.

Choose the “Indigo/Pink” prebuilt theme which is the default theme to style your application. You can also choose the “Custom” theme so that you can customize your theme files which include all common styles that are used by multiple components.
Now, it asks you to set up HammerJS. HammerJS is a popular library in Angular material that adds support for touch gestures like Swipe, Pan, Pinch, Rotate and many more.

You could choose either Yes or No. But, I would recommend choosing “Yes” as using gestures looks trendy in your application.
Now, it asks you to set up Browser Animations for Angular Material.

Choose “Yes” so that you could use animations on your application. Angular Animations make your application more fun and easier to use. This can improve your app and user experience which attracts users’ attention.
Subsequently, this will install Angular materials in your application.
Leverage the Salesforce CLI to run automated tests on your Salesforce applications.
Generating Angular Components
Once your project is created, let us get into generating Angular components. These components help in making your application in a structured manner with component-based architecture.
ng generate component first-component
You can also use short forms using Angular CLI. For example, you can create the same component using the following command:
ng g c first-component
This creates the component named ‘first-component’ in your src/app directory. This consists of the following sub-components:
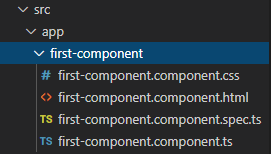
- first-component.component.css: This file contains CSS language which is linked to the following HTML file.
- first-component.component.html: This file contains HTML code which decides the structure of the component and how it looks.
- first-component.component.spec.ts: This is a TypeScript file which is used for testing purposes and isn’t of much use during development.
- first-component.component.ts: This is also a TypeScript file that creates a FirstComponent class that implements OnInit, which has a default constructor() and a default method, known as ngOnInit().
These components are the User-Interface (UI) to build an Angular app. They help in building dynamic Single Page Applications (SPAs) which is the significant feature of Angular that makes it easier for developers to navigate through different components and makes the app more efficient.
Routing with Angular CLI
Routing is a very essential feature required in modern Web-Development which is needed to navigate from page-to-page or component-to-component. Thanks to the Angular team, now you can directly add routing to your application while creating a new project as mentioned in the Angular CLI Installation section. If you haven’t added routing to your project, you can simply type the following command on your Command Prompt.
ng generate module app-routing --flat --module=app
This adds routing to your project and generates app-routing.module.ts file into your src/app directory. The generated file looks something like this:
import { NgModule } from '@angular/core';
import { Routes, RouterModule } from '@angular/router';

const routes: Routes = [
],

@NgModule({
   imports: [RouterModule.forRoot(routes)],
   exports: [RouterModule]
})

export class AppRoutingModule { }
Routing between App and First Components
Now, let’s say you want to add routing from app.component to your first-component. First, go to app.component.html on your application and erase all the existing code. Now, write the new code as follows:
<mat-toolbar> <span>First Project<</span> </mat-toolbar> <router-outlet></router-outlet>
<mat-toolbar> is a container from Angular material that is used for headers and titles. To use this toolbar, you need to first import it in app.module.ts file from Angular materials using the following command:
import { MatToolbarModule } from '@angular/material';<router-outlet> is a router directive from the router library which is used for directing the router where to display the routed views. To use this directive, you need to follow the same procedure as Mat Toolbar using the following command:
import { Routes, RouterModule } from '@angular/router';Later, you need to also add these modules in the imports:[ ] section located in the app.module.ts file.
imports: [
   BrowserModule,
   AppRoutingModule,
   BrowserAnimationsModule,
   RouterModule.forRoot(routes),
   MatToolbarModule
],
For Routes, you need to add “RouterModule.forRoot(routes)”.
For Mat Toolbar, you need to add “MatToolbarModule”.
Now, let’s serve your project using ng serve –open command.

Let’s say, now you want to create a root for your first-component. First, let’s write a code to display the contents of the first-component page, in the first-component.component.html file.
<h3>first-component works!</h3>
Now, let’s head on to the app.module.ts file and create a path for first-component in Routes=[ ] section.
const routes: Routes = [
   { path: 'first-component', component: FirstComponentComponent }
];
This should create a route for first-component and you can view this component using the following URL on your browser:
http://localhost:4200/first-component
This displays the contents of the first-component file as follows:

Component-to-Component Routing
Let’s say you want to navigate from component-to-component. First things first, you need to generate another component in your application. Later, add a router link on your first-component.component.html file to your second-component.component.html file which is as follows:
<h3>first-component works!</h3>
<p>Click the link below to navigate into second component</p>
<nav>
   <a routerLink = "/second-component">Second Component</a>
</nav>
Now, you need to follow the same procedure to create a route for second-component just like you did for first-component. Once your second-component path is created, you can view it on your browser.

Click on the “Second Component” link to navigate to the second-component page and display the contents of it.

There is also a special string ‘**’ that can be added to the path. This string is used to redirect to your defined path if the requested URL doesn’t match any of your defined paths or routes. This string can be added in your Routes=[ ] section which is located in the app.module.ts file.
const routes: Routes = [
   { path: 'first-component', component: FirstComponentComponent },
   { path: 'second-component', component: SecondComponentComponent },
   { path: '**', redirectTo: '', pathMatch: 'full' }
];
For example, you could see the defined paths in your application. In your browser URL section, type the following address:
http://localhost:4200/third-component
As third-component doesn’t exist, it will redirect to your first page URL i.e. http://localhost:4200 and displays the contents of it.
With this, I’d like to end my blog here. I hope you are clear about the fundamentals of Angular CLI. If you have any doubts or queries regarding this article, do not hesitate to post them in the comment section below.
Got a question for us? Please mention it in the comments section of this “Angular CLI” blog and we will get back to you as soon as possible.