If you are new to Android Development, you’ve landed in the perfect place to kick start your learning about the layout design. This article on Android layout design tutorial will help your way out with some useful tips to make a better UI design and also explains how to design a UI.
I’ll be discussing the below topics:
Android Layout Design Tutorial: Introduction to UI components
Talking about the UI components, the typical UI of any Android application consists of these components:
- Main Action Bar
- View Control
- Content Area
- Split Action Bar
These play a major role while you are developing a complex application. You’ll get a clear view of this when we get to the demo section of this article.
Another important factor that helps in customizing the UI design would be the view component.
Let’s see what is a View in Android Development.
Android Layout Design Tutorial: Views
A View is considered as a basic building block for a proper user interface that is actually created from the View class. This occupies a rectangular area on the screen and is eventually takes care of drawing and event handling.
A View is the base class for widgets, which are used to create interactive UI components like buttons, text fields, etc. Now talking about the rectangle area or a box, It can either be an image, a piece of text, a button or anything that an android application can display. The rectangle here is actually invisible, but every view occupies a rectangle shape.
You might have a question, what can be the size of this rectangle?
The answer is you can either set it manually by specifying the exact size(with proper units) or by using some predefined values. These predefined values are match_parentand wrap_content. This match_parent signifies that it will occupy the complete space available on the display of the device. Whereas, wrap_content refers that it will occupy only that much space as required for its content to display.
Now let’s point out the major differences between View and the ViewGroup.
View
- View objects are the basic building blocks of the UI elements in Android.
- A View is a simple rectangle box which response to the user’s actions.
- View refers to the android.view.View class, which is the base class of all UI classes.
- Examples are EditText, Button, CheckBox, etc..
ViewGroup
- ViewGroup is the invisible container which holds View and ViewGroup.
- ViewGroup is the base class for the Layouts.
- For example, LinearLayout is the ViewGroup that contains Button(View), and other Layouts also.
Now let’s move ahead and understand the Layouts that are present.
Android Layout Design Tutorial: Types of Layouts
A layout defines the structure for a User Interface in the application. All elements in the layout are built using a hierarchy of View and ViewGroup objects.
Now let’s see how to declare the layout.
You can declare a layout in two ways:
Declare UI elements in XML. Android provides a straightforward XML vocabulary that corresponds to the View classes and subclasses, such as those for widgets and layouts.
Note: You can also use Android Studio’s Layout Editor to build your XML layout using a drag-and-drop interface.
Instantiate layout elements at run time. The application can create View and ViewGroup objects and manipulate their properties programmatically.
Let’s discuss the different types of Layouts.
The UI in Android is a hierarchy of Views and ViewGroups. The ViewGroups will be intermediate nodes in the hierarchy, and the views will be terminal nodes.
- Linear layout
- Absolute layout
- Relative layout
- Table layout
- Frame layout
Let’s discuss them in detail.
Linear layout
The linear layout is used to place one element on each line. So, all the elements will be placed in an orderly top-to-bottom fashion. This is a very widely-used layout for creating forms on Android. It can also be referred as a view group that aligns all children in a single direction, vertically or horizontally.
Absolute layout
In absolute layout, you can specify the exact coordinates of each control that you want to place. In this type of layout, you can give the exact X and Y coordinates of each control. It enables you to specify the exact location of its children.
Relative layout
A Relative Layout is a ViewGroup that displays child views in relative positions. You can specify the position of the elements in relation to other elements, or in relation to the parent container.
Table layout
Using the table layout, you can create a table with rows and columns and place elements within them. In each row, you can specify one or more elements. You can use this command <TableRow> to create a new table layout.
Frame layout
The Frame layout is used when you want to show one item on each screen. Using the frame layout, you can have multiple items. This Frame Layout is a placeholder on the screen that you can use to display a single view.
Android Layout Design Tutorial: Units of measurement
When you are specifying the size of an element on an Android UI, you should definitely remember the following units of measurement.
| Unit | Description |
|---|---|
| dp | Density Independent Pixel. 1dp is equivalent to one pixel on a 160dpi screen. |
| sp | Scale Independent Pixel. This is very similar to dp but just that this is recommended for specifying font sizes. |
| pt | Point. A point is defined to be 1/72 of an inch. |
| px | Pixel. Corresponds to actual pixels on the screen |
Now, let’s move ahead to the final topic of this article.
Android Layout Design Tutorial: Demo
In this demo section, let’s understand how to work with layouts in Android Studio.
Refer the step by step intallation guide to Android Studio.
This is how the layout looks like. Just select the drawable and you’ll find a few classes, select any other class under this drawable. You can either code the layout structure or you can view the design and just drag and drop the components on the design space.
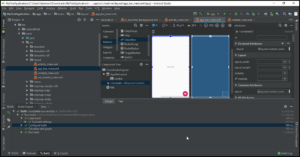
You can view the components that you have selected under the component tree.
You can also find these in the layout.
- Palette: This holds the list of views and view groups that you can drag into your layout.
- Component Tree: Consists of the View hierarchy for your layout.
- Toolbar: Buttons to configure the layout appearance in the editor and to change a few layout attributes.
- Design editor: Layout in Design or Blueprint view, or both. Also considered as the design space.
- Attributes: It controls the selected view’s attributes.
With this, we come to the end of this article on “Android Layout Design Tutorial”. Hope you guys are clear with what has been shared with you in this tutorial. Stay tuned for other blogs and Good Luck with your Android Development career.
Now that you have understood the basics of Android Layout Design, check out the Android Training by Edureka, a trusted online learning company with a network of more than 250,000 satisfied learners spread across the globe.
Edureka’s Android App Development Certification Training course is designed for students and professionals who want to be an Android Developer. The course is designed to give you a head start into Java programming and train you for both core and advanced concepts along with a project where you be expected to create an App in Android.
Got a question for us? Please mention it in the comments section of this “Android Layout Design Tutorial” blog and we will get back to you as soon as possible.