


Welcome to my first blog of Android Tutorial series. As you know, e-commerce market is booming like anything and with a lot of new companies setting foot every now and then, the competition in the market has attained new heights. Therefore, it has become quite essential for every company to get an online presence and reach out to more number of people quickly. Nowadays, almost every person owns a smartphone. Hence, mobile applications have become a handy way to connect with more number of people and develop virtual customers or clients. However, a common dilemma faced by most people is whether to go with Android or IOS? Well, all I can say in one line is “It all depend on CHOICES!”.
According to me, android is the best bet. Why? Android today has managed to build a record of 88% of the global market, whereas competitors like Apple’s IOS, windows are way behind. Also, android is reasonable, cost-effective and many other features contribute to its success. Clearly, android is leading when it comes to sheer volume.
In this Android Tutorial blog, I will take you through the following topics, which will be the base of the upcoming blogs:
You may go through this recording of Android Tutorial where our instructor has explained the topics in a detailed manner with examples that will help you to understand this concept better.
Android Tutorial | Android App Development | Edureka
So let’s begin with the first topic in android tutorial blog, i.e Introduction to Android.
Android Tutorial : Introduction to Android

Android is a mobile operating system developed by Google. It is based on the Linux kernel and designed primarily for touchscreen mobile devices such as smartphones and tablets.
Google has changed the life of everyone by launching a product that improves the mobile experience for everyone. Android helps in understanding your tastes and needs by giving various features such as having wallpapers, themes and launchers which completely change the look of your device’s interface.
Android Tutorial : Why Android?
Android is the most successful and powerful mobile operating system in the market today. So before jumping into that, let’s first get an answer to why Android?
- Open-source
- Customizable operating System
- Reduce cost of development and overall complexity
- Larger community and developer reach
- Inter app integration
- Higher success ratio
- Rich development environment – variety of apps can be developed
Low-cost smartphones in emerging markets, and strong demand for premium smartphones, continued to be the driving factors,” said Anshul Gupta, research director at Gartner.
This is surely Google’s magic. Now, let’s see how android has evolved.
Android Tutorial: Evolution of Android
Google has launched different versions of Android till now. The name of these versions are in alphabetical order such as Cupcake, Donut, Eclair, Froyo, Gingerbread and so on. Now the interesting fact to be noticed in these versions is the name of the operating system, which are named after desserts. Isn’t that great ? Hence, the latest version i.e 7.0 is named after Nougat, which is said to be the sweetest release till date.
Let us see different versions that have come across till now. The initial versions of android 1.0 and 1.1 were not given any specific names. They were the initial versions which became the base for the upcoming android versions with mind boggling innovations.

Let’s move ahead in android tutorial blog and understand the architecture of android.
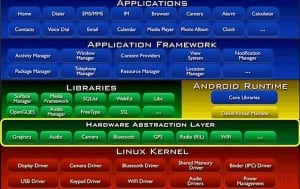
Android Tutorial : Architecture
The Android OS is a software stack of different layers, in which each layer is a group of some program components. It includes your operating system, middleware and important applications. Each layer in the architecture provides different services to the layer just above it.
Following are the different layers in the Android stack:
- Linux Kernel Layer – Linux kernel is the bottom most layer in the architecture of android. It never really interacts with the users and developers, but is at the heart of the whole system. Its importance stems from the fact that it provides the functions in the Android system such as hardware abstraction, memory management programs, security settings, power management software, other hardware drivers, network stack etc.
- Libraries – The next layer in the Android architecture includes libraries. Libraries carry a set of instructions to guide the device to handle different types of data. For example – the playback and recording of various audio and video formats is guided by the Media Framework Library.
- Runtime – The third section of the architecture is runtime which provides a key component called Dalvik Virtual Machine (DVM). Dalvik is an open-source software and Java Virtual Machine specially designed and optimized for Android.
- Application Framework Layer – Our applications directly interact with these blocks of the Android architecture. These programs manage the basic functions of phone like resource management, voice call management etc. It provides many higher-level services to applications in the form of Java classes. Some important blocks of Application Framework are activity management, content providers, resource manager, notification manager, view system.
- Applications layer – The applications are at the topmost layer of the Android stack. All the applications will be installed in this layer such as address book, games etc.

Android Tutorial: Features
As we all know Android has plenty of features. Some of the major features are listed below:
- User Interface – Android operating system provides a UI which is associated with the activity and presented to user.
- Messaging – It supports messaging services -SMS , MMS.
- Web Browser – It is based on the open-source WebKit layout engine which is coupled with Chrome’s V8 JavaScript engine that supports HTML5 and CSS3.
- Connectivity – It has various connections such as Bluetooth, Wi-Fi, GSM/EDGE, CDMA etc.
- Storage – A light relational database – SQL (SQlite) is used for the storage purpose.
- Multi-touch – Android has native support for multi-touch feature.
- Multi-tasking – Android support multi tasking where user can perform multiple tasks simultaneously.
- Multi-Language – It supports single direction and bi-directional text feature.
- Wi-Fi Direct – Android supports a technology that lets apps discover and pair directly over a high-bandwidth peer-to-peer connection.
- Android Beam – This feature is used to share instantly just by touching two NFC enabled phones together.
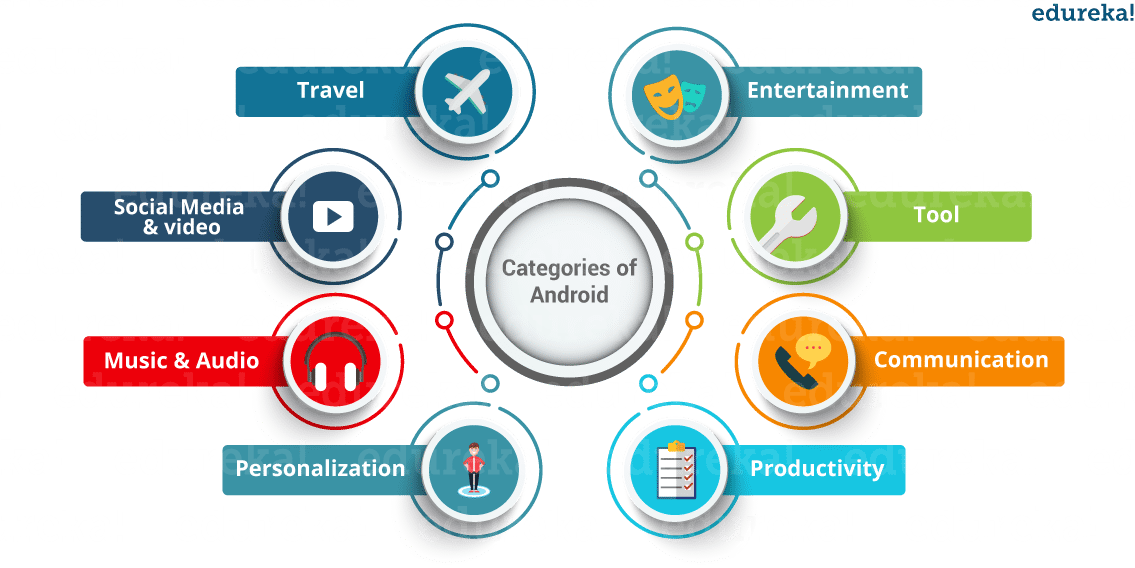
Apart from these, android is used in various fields. If you open your playstore, there are several categories where android can be used. Some of them are mentioned below:
 By now, you know what is android and how it plays a major role in our lives. Let us move forward in our android tutorial blog and understand the core building blocks of Android!
Android Tutorial : Core Building Blocks
There are mainly five components that are considered to be the core building blocks within an android application:
- Activity
- Services
- Broadcast Receivers
- Content Providers
- Manifest
Let’s understand them in detail:
Android Tutorial : Activity
An Activity is the screen representation of any application in Android.
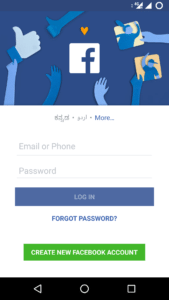 It serves as an entry point for user’s interaction. Each activity has a layout file where you can place your UI. An application can have different activities. For example, facebook start page where you enter your email/phone and password to login acts as an activity.
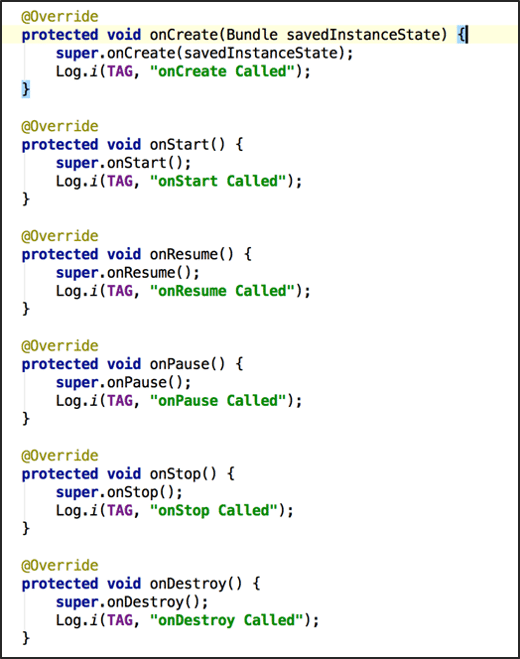
Below are the two methods which almost all subclasses of Activity will implement:
onCreate ( Bundle) : It is a method where your initialization is done. Under this, you will call setContentView(int) with a layout resource which defines your UI. Also, you can retrieve the widgets in that UI by using findViewById(Int). These are required to interact programmatically.
onPause() : It is a method which deals with the user whenever it leaves the activity. So any changes made by the user should be committed which is done by the ContentProvider that holds the data.
An activity is implemented as a subclass of Activity class as follows:
public class MainActivity extends Activity {
}
Now let’s move ahead in our Android Tutorial blog and understand the life cycle of an activity.
Android Tutorial: Activity Life Cycle
As the user navigates between different screens or apps, it goes through different states in their lifecycle. So an activity lifecycle consists of 7 different methods of android.app.Activity class.
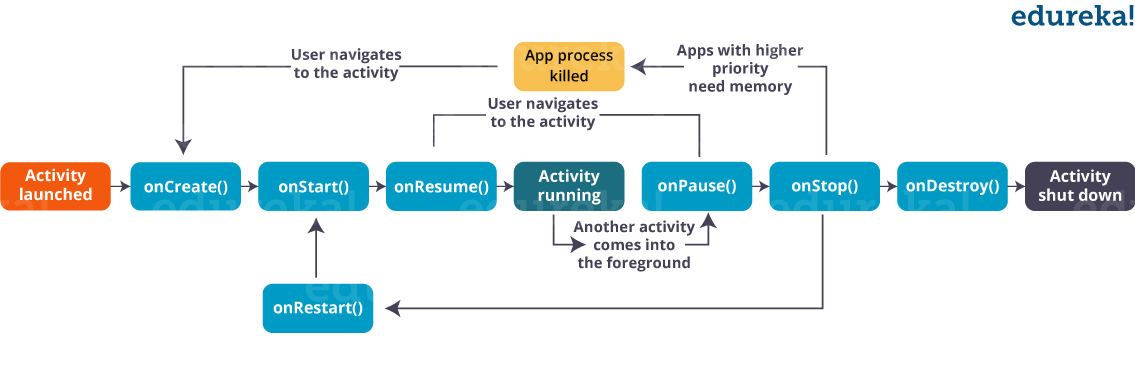
You must be aware that a program starts from a main() function in different programming languages. Similarly, android initiates the program within an activity with a call to onCreate() callback method. There is a sequence of callback methods that starts up an activity and then tear down in different methods shown in the above Activity life cycle diagram:
Let’s understand these methods:
onCreate() :
In this state, the activity is created.
onStart() :
This callback method is called when the activity becomes visible to the user.
onResume() :
The activity is in the foreground and the user can interact with it.
onPause() :
Activity is partially obscured by another activity. Other activity that’s in the foreground is semi-transparent.
onStop() :
The activity is completely hidden and not visible to the user.
onDestroy() :
Activity is destroyed and removed from the memory.
Android Tutorial: Services
A service in android is a background process which is used to perform long running operations. Let’s say, a service of location is active in the background while the user is in different application. So it does not disturb the user interaction with an activity. Now, services are classified into two types, namely:
- Local : This service is accessed from within the application.
- Remote – This service is accessed remotely from other applications running on the same device.
It is implemented as a subclass of Service class as follows :
public class MyService extends Service {

}
Android Tutorial: Broadcast Receiver
A Broadcast Receiver is a mechanism using which host application can listen for System level events. Broadcast receiver is used by the application whenever they need to perform the execution based on system events. Like listening for Incoming call, sms etc. Broadcast receivers helps in responding to broadcast messages from other application or from the system. It is used to handle communication between Android operating system and applications.
It is implemented as a subclass of BroadcastReceiver class and each message is broadcaster as an Intent object.
public class Myreceiver extends BroadcastReceiver{
public void onReceive(context,intent){}
}
Android Tutorial: Content Provider
Content providers manage access to a structured set of data. It is the standard interface that connects data in one process with code running in another process. They encapsulate the data and provide mechanisms for defining data security. Content providers are used to share the data between different applications.
It is implemented as a subclass of ContentProvider class and must implement a standard set of APIs that enable other applications to perform transactions.
public class MyContentprovider extends ContentProvider {

public void onCreate(){}

}
Finally, let’s move on to our last building block in android i.e Manifest.
Android Tutorial: Manifest
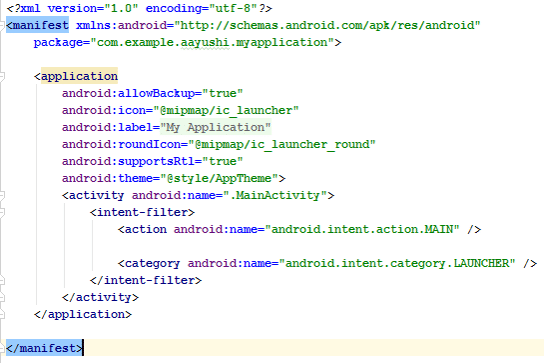
Manifest file plays an integral role as it provides the essential information about your app to the Android system, which the system must have before it can run any of the app’s code. Manifest file performs various tasks such as:
- It names the Java package for the app as the package name serves as a unique identifier for the application.
- It protects the application by declaring permissions in order to access protected parts of the API and interact with other applications.
- Manifest file declares the minimum level of the android API and list the libraries which is linked with the application.
- Manifest file list the instrumentation classes. These classes provide profiling and other information as the application runs, but this information is removed as soon the application is publishes. It remains only till the application is in development mode.
Structure of a manifest file: The structure of a manifest file consists of various elements such as action, activity, activity-alias and many more. Refer to the below screenshot which shows the general structure of the manifest file.
Moving ahead, let’s understand the anatomy of an android application.
Anatomy of Android Application
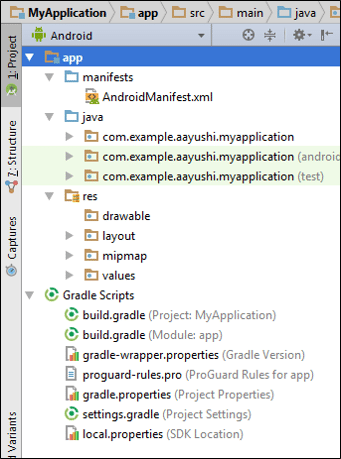
app :
It describes the fundamental characteristics of the app and defines each of its components.
java :
This contains the .java source files for your project. By default, it includes an MainActivity.java source file. Under this, you create all the activities which have .java extensions and all the code behind the application. MainActivity.java is the actual file which gets converted to a dalvik executable and runs your app.
res :
It is a directory for files that define your app’s user interface. You can add TextView, button etc to build the GUI and use its various attributes like android:layout_width, android:layout_height etc which are used to set its width and height.
This is an auto generated file which contains compileSdkVersion, buildToolsVersion, applicationId, minSdkVersion, targetSdkVersion, versionCode and versionName.
Now you must have understood all the components in an android app. So let’s implement them!
Android Tutorial: Installation
First let me excite you by telling that you can start developing android applications on any of the operating system. It can be Microsoft Windows XP or later version, Mac OS or Linux.
Now to start off with the implementation part, we need to install the following software’s:
- JDK – Java Development Kit
- Android Studio
So let’s get started by installing JDK in the system. To download it, you can follow the below steps:
- Go to the link: http://www.oracle.com/technetwork/java/javase/downloads/jdk8-downloads-2133151.html
- You can download JDk as per your system’s requirement.

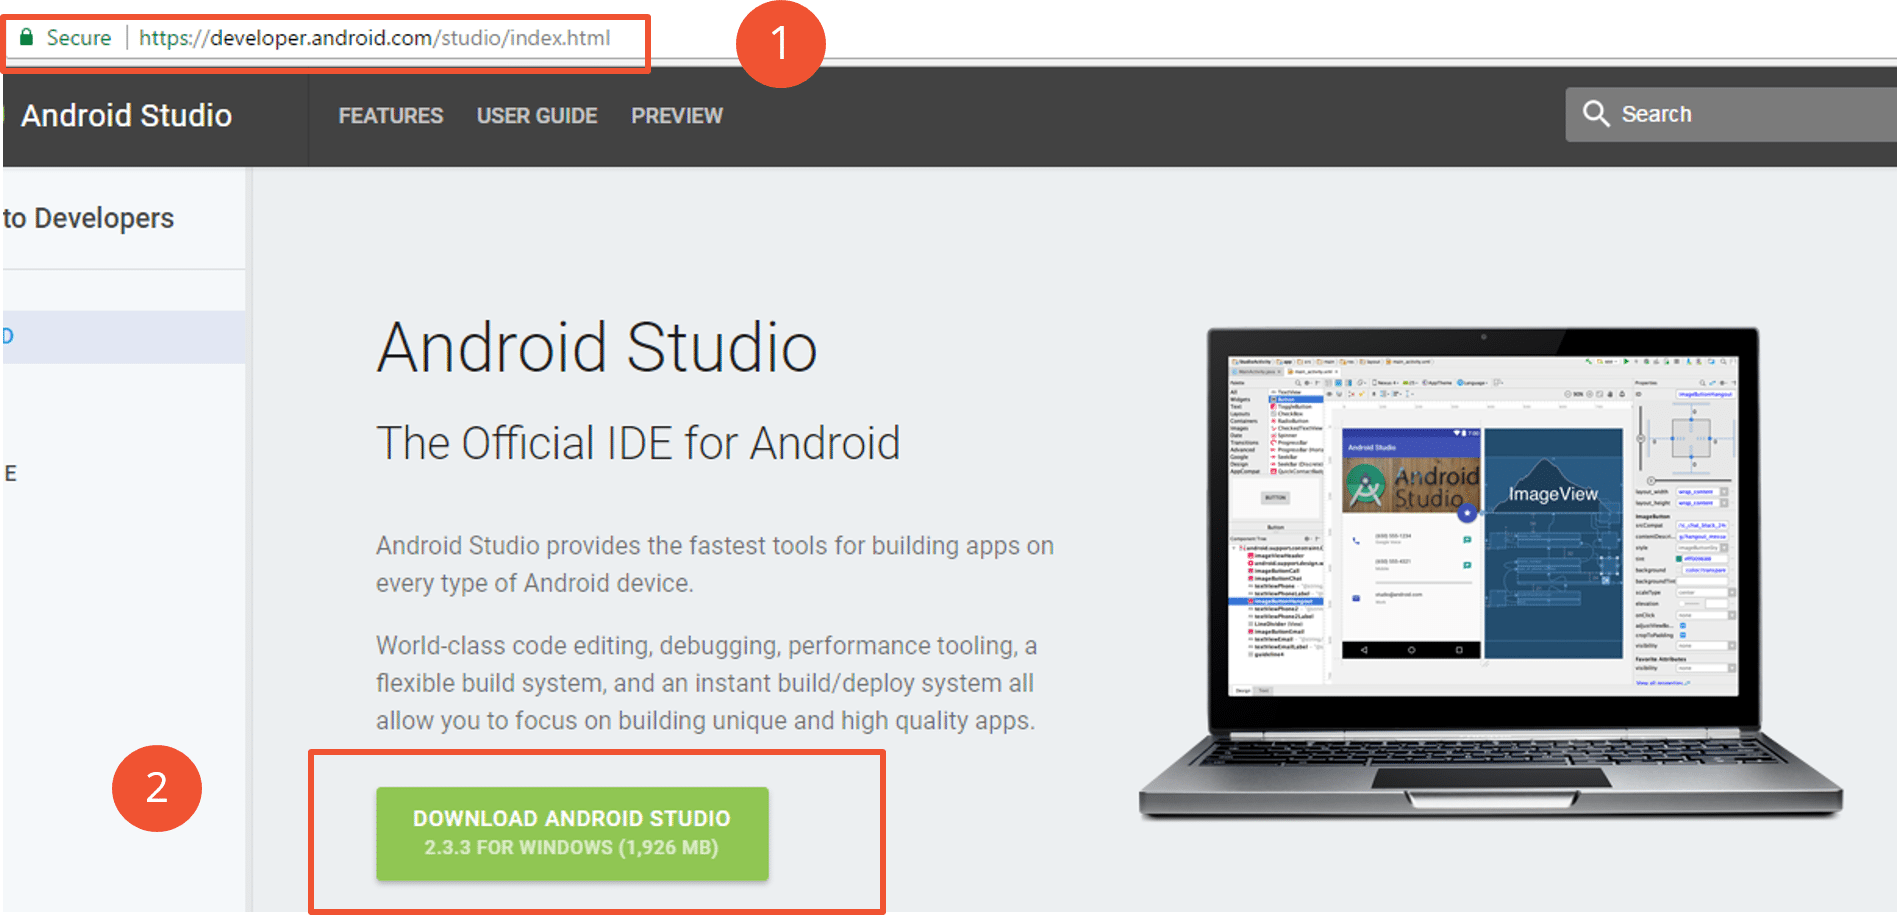
Once its there in your system, you can go ahead and follow the below process to download and install Android Studio on your system.
- Go to the link: https://developer.android.com/studio/index.html
- Download latest android studio 2.3.3
You can refer to the below screenshot to get a better understanding:
Let us move forward in our android tutorial blog and do some hands-on where we will create a basic android application. So let’s begin coding!
Android Tutorial : My First Application
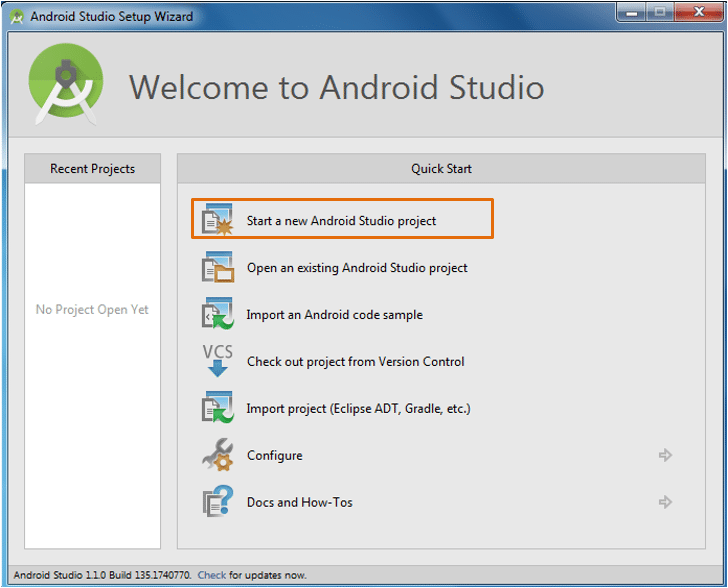
Let’s create a very basic android application. First of all we need to create a new project in Android Studio. To create a new project click on “Start a new Android Studio Project”.
After that, you can configure your project by giving Application name > Company domain > Package Location > click Next.
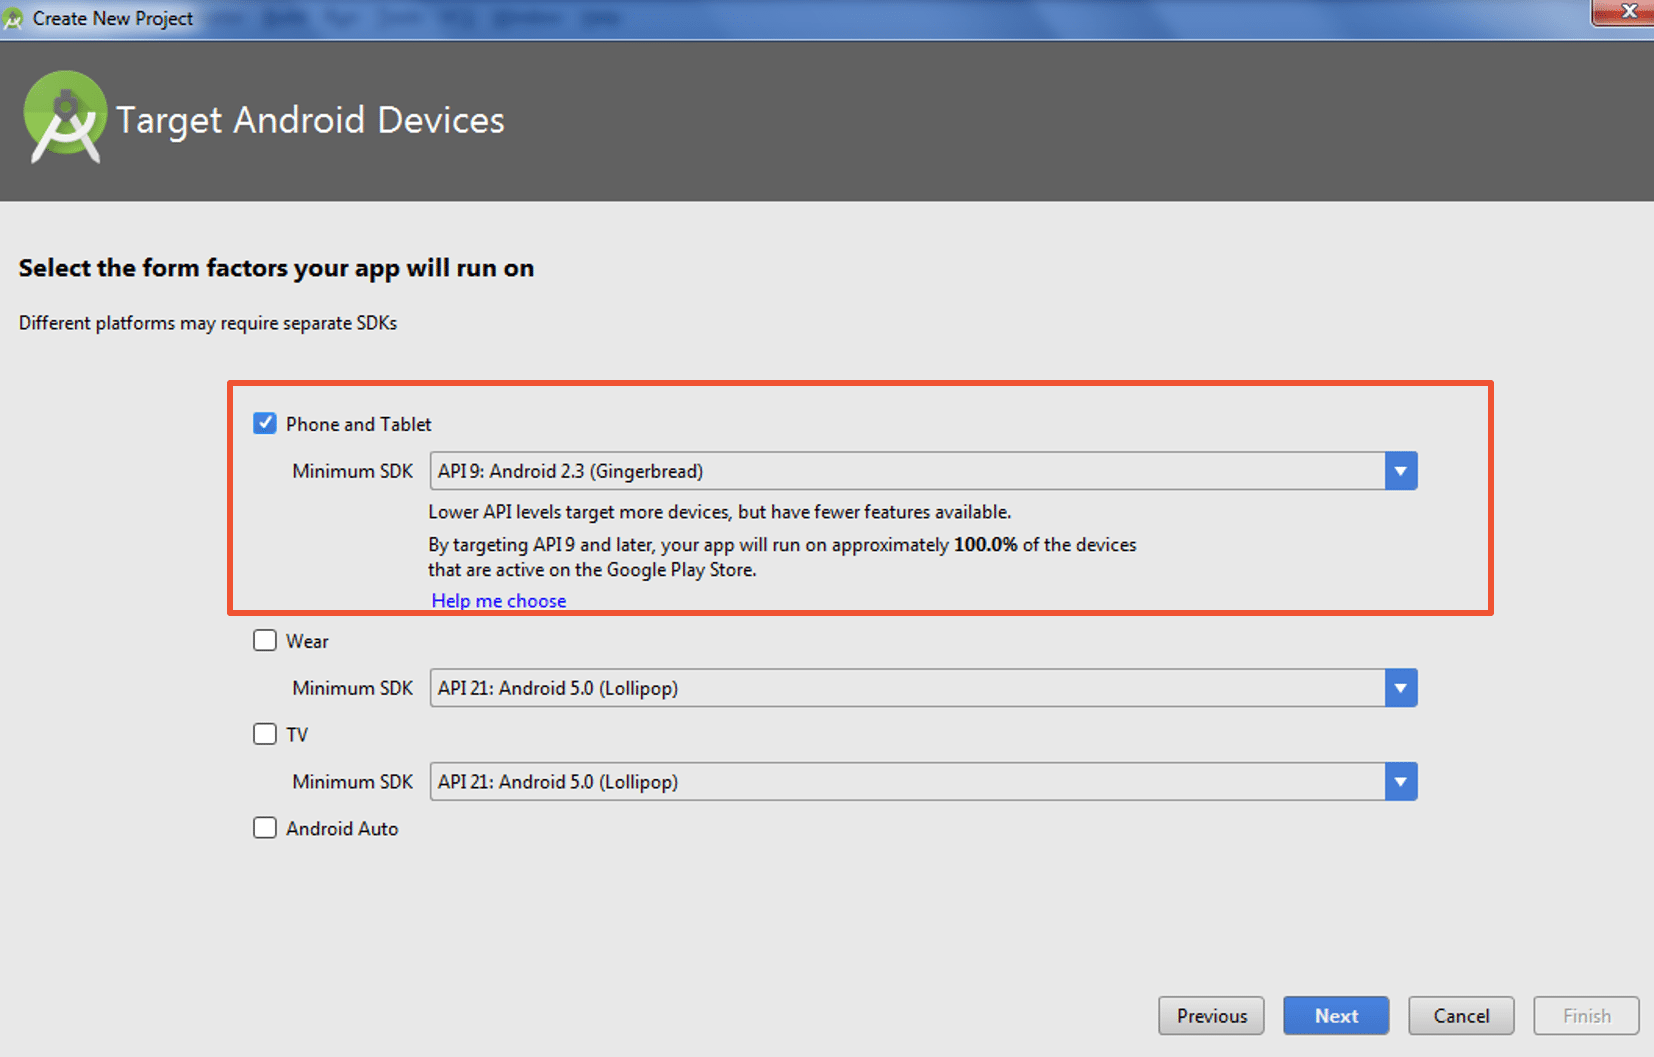
Then you have to select the form factors your app will run on. Select Phone and Tablet > Select the minimum SDK as API:9 Android 2.3 (Gingerbread).
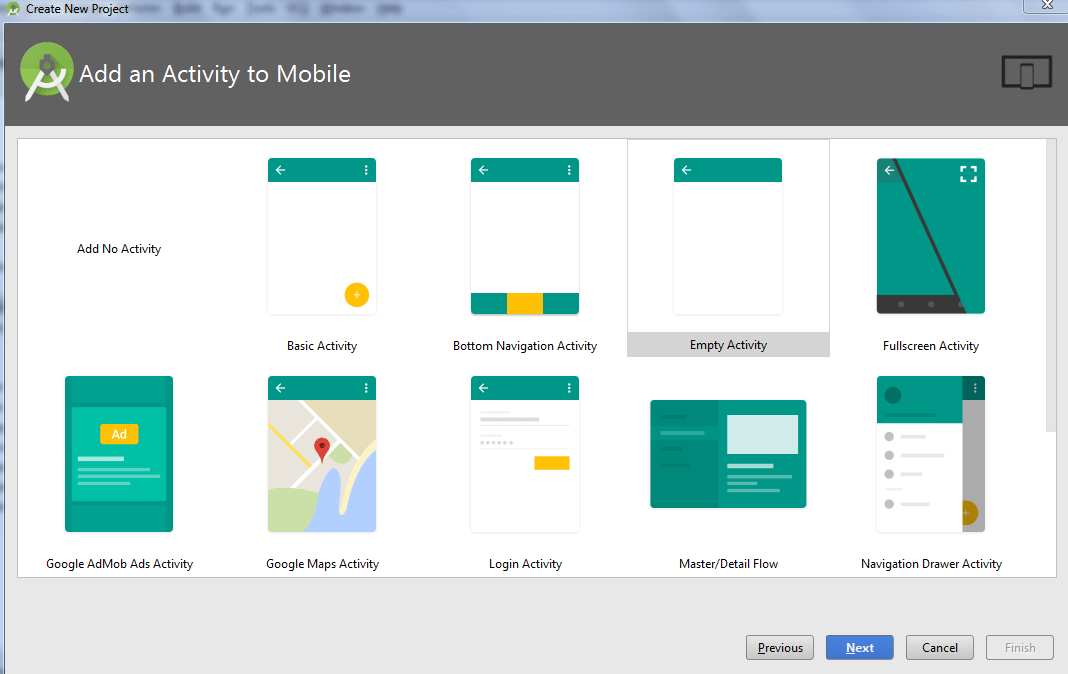
 Now that the target device is set, We can add an activity to Mobile.
For starters , let’s select “Empty Activity” and click “Next”.
Once you click on Next, you can customize your activity. In the “Customize the Activity” window, fill up the activity name and Layout name and click Finish.
Your project and activity has been created !
Let’s create an app that prints “Welcome to Edureka Android Tutorial”. For this, MainActivity.java file is the actual application file which will be executed first. So let’s have a look at the default code generated by the application for printing ‘Hello World’.
package com.example.aayushi.myapplication;

import android.support.v7.app.AppCompatActivity;
import android.os.Bundle;

public class MainActivity extends AppCompatActivity {

    @Override
    protected void onCreate(Bundle savedInstanceState) {
        super.onCreate(savedInstanceState);
        setContentView(R.layout.activity_main);
    }
}
We’ve seen that the activities has .java file extension. Let’s see the layout of the same activity. The activity_main.xml file is located in the res/layout folder. This file is referenced by your app when you build your UI. By default, there is ‘Hello World’ printed related to the default layout. You can change the android:text=”Welcome to Edureka Android Tutorial” and size of the text in your layout file as written in the below code.
<?xml version="1.0" encoding="utf-8"?>
<android.support.constraint.ConstraintLayout xmlns:android="http://schemas.android.com/apk/res/android" xmlns:app="http://schemas.android.com/apk/res-auto" xmlns:tools="http://schemas.android.com/tools" android:layout_width="match_parent" android:layout_height="match_parent" tools:context="com.example.aayushi.myapplication.MainActivity">
<TextView android:layout_width="wrap_content" android:layout_height="wrap_content" android:text="Welcome to Edureka Android Tutorial" android:textSize="22dp" app:layout_constraintBottom_toBottomOf="parent" app:layout_constraintLeft_toLeftOf="parent" app:layout_constraintRight_toRightOf="parent" app:layout_constraintTop_toTopOf="parent" />
</android.support.constraint.ConstraintLayout>
You are all done with the code. let’s run the app now!
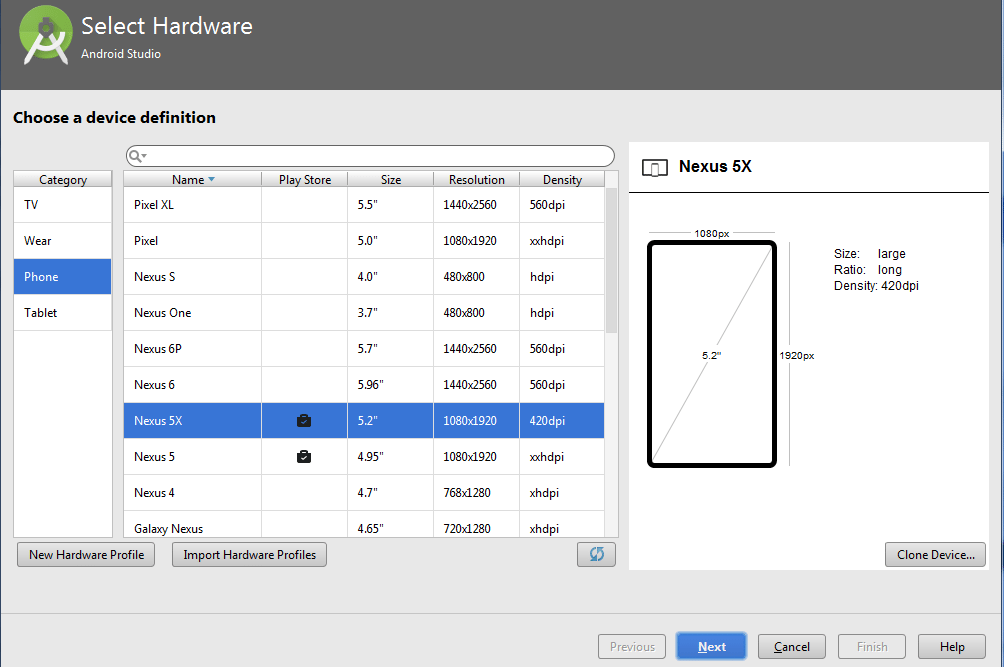
For executing the code, you can directly Run ‘app’ or press ‘Shift+F10’. Once you run it, it will ask you to select a deployment target. You can either connect your android device through USB or create a virtual device. To create one virtual device, you can click “Create New virtual device” and choose the device according to your needs. Refer the screenshot below:
Click ‘Next’ and your virtual device is ready!
I have opted for Nexus_6 as android Emulator. Android studio installs the app on your emulator and if everything is fine with your set-up and application, the following screen will be displayed.
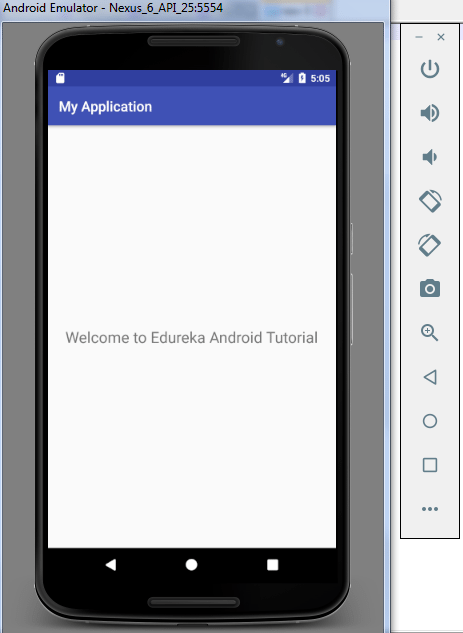
Congratulations! Your first android app is ready!
This is the end of the Android Tutorial blog. I hope you guys are clear about each and every aspect that I have discussed above. Stay tuned for other blogs and Good Luck with your Android Development career.
Now that you have understood basics of Android, check out the Android Training by Edureka, a trusted online learning company with a network of more than 250,000 satisfied learners spread across the globe. Edureka’s Android App Development Certification Training course is designed for students and professionals who want to be an Android Developer. The course is designed to give you a head start into Java programming and train you for both core and advanced concepts along with a project where you be expected to create an App in Android.
Got a question for us? Please mention it in the comments section of this “Android Tutorial” blog and we will get back to you as soon as possible.


Very well explained and i hope it will help me a lot in Android app development.
Android Development
Nice article. Your collection is very helpful. Thanks for sharing .