Often using multiple applications on your smartphone, you may want to switch from one application to another but also ensure that all your applications remain active in the background. These are nothing but the services offered by Android. So, this article on Android Services Tutorial will help you understand how to work with the Services.
I’ll be covering the following topics:
- What are Android Services?
- Android- Services Life cycle
- Android- Services Methods
- Skeleton code for Android Services
- Demo
What are Android Services?
Service is basically a process. Android service is a component that runs in the background in order to perform long-running operations without interacting with the user and it works even if the application is destroyed. Another application component can start a service and it continues to run in the background even if you switch to another application.
Additionally, a component can bind itself to a service in order to interact with it and also perform interprocess communication.
Note: The android.app.Service is a subclass of ContextWrapper class and Android service is not a thread or separate process.
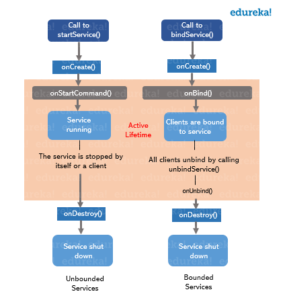
Android- Services Life cycle
Android Services life cycle can have two forms of services. The lifecycle of a service follows two different paths, namely:
Started
A service is started when an application component calls startService() method. Once started, a service can run in the background indefinitely, even if the component which is responsible for the start is destroyed. It is stopped by using the stopService() method. The service can also stop itself by calling the stopSelf() method.
A service is bound when an application component binds to it by calling bindService(). Bound service offers a client-server interface that allows components to interact with the service, send requests and, get results. It processes across inter-process communication (IPC). The client can unbind the service by calling the unbindService() method.
Moving on to the next section of this article on Android Services, let’s discuss the different methods under the service class.
Android Services Tutorial : Methods
There are a few methods using which you can easily perform operations on any application. Some of them are:
Skeleton code
public class MainActivity extends Activity {

private TextView textView;
private BroadcastReceiver receiver = new BroadcastReceiver() {

@Override
public void onReceive(Context context, Intent intent) {
Bundle bundle = intent.getExtras();
if (bundle != null) {
String string = bundle.getString(DownloadService.FILEPATH);
int resultCode = bundle.getInt(DownloadService.RESULT);
if (resultCode == RESULT_OK) {
Toast.makeText(MainActivity.this, "Download complete. Download URI: " + string, Toast.LENGTH_LONG).show();
textView.setText("Download done");
} else {
Toast.makeText(MainActivity.this, "Download failed",
Toast.LENGTH_LONG).show();
textView.setText("Download failed");
}
}
}
};

@Override
public void onCreate(Bundle savedInstanceState) {
super.onCreate(savedInstanceState);
setContentView(R.layout.activity_main);
textView = (TextView) findViewById(R.id.status);
}

@Override
protected void onResume() {
super.onResume();
registerReceiver(receiver, new IntentFilter(
DownloadService.NOTIFICATION));
}
@Override
protected void onPause() {
super.onPause();
unregisterReceiver(receiver);
}

public void onClick(View view) {

Intent intent = new Intent(this, DownloadService.class);
// add infos for the service which file to download and where to store
intent.putExtra(DownloadService.FILENAME, "index.html");
intent.putExtra(DownloadService.URL, "www.edureka.co");
startService(intent);
textView.setText("Service started");
}
}
In this example, you can see the methods like onCreate(), onResume(), onPause(). These methods make up the structure of the Services in Android.
Now, getting to the practical part of this Android Services Tutorial, let’s see how to create a service and handle it.
Demo
Let’s see how to play music in the background. In order to do that, I’ll be using Andriod Studio.
Step 1
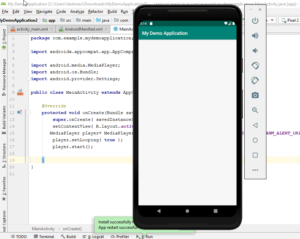
Create a new empty project. Name your project and click on the Java folder and click on the MainActivity. First, add MediaPlayer so that you can import the player details like start, set the loop and so on.
package com.example.mydemoapplication;

import androidx.appcompat.app.AppCompatActivity;

public class MainActivity extends AppCompatActivity {

@Override
protected void onCreate(Bundle savedInstanceState) {
super.onCreate( savedInstanceState );
setContentView( R.layout.activity_main );

MediaPlayer player = MediaPlayer.create( this, Settings.System.DEFAULT_ALARM_ALERT_URI );
player.setLooping( true );
player.start();
}
}
Note: If you are using it for the first time, don’t forget to enable the BIOS. You can do this by restarting your system.
You will have to add a virtual device. Just click on Open AVD manager.

Select a device of your choice and you’re ready to go!
This will only run when the screen is active but to make this application work even in the background, you need to add a few more lines of code in the activity_main.xml file.
Step 2
Once you run the corresponding code, you will be able to run the application and will be able to play the music on the background, i.e., if any other application is opened, this audio will still be playing.
Let’s see how this can be done.
- Create another class in the Java folder and name it. Here, I’ve called it “MyService“.
- This class extends the Service class.
- Once you have the Service class methods, implement the methods by clicking alt+Enter.
- After this, you have to override the methods. So, right-click on the window to get the options.
- Generate the override methods, select onStartCommand(), and OnDestroy().
- Edit the onStartCommand() methods by adding the following code.:
MediaPlayer player = MediaPlayer.create( this, Settings.System.DEFAULT_ALARM_ALERT_URI );
player.setLooping( true );
player.start();
Note: Delete this code in the MainActivity.
- This will throw an error asking you to remove the statement. So, remove the return statement and declare MediaPlayer as a private method and return START_STICKY. This will return the start status.
- Add player.stop() in the onDestroy() method.
Step 3
Go to res and go to layouts, click on android_main.xml to get the XML file of the application.
- Remove the TextView and replace it with the LinearLayout and add Buttons. Add the corresponding code.
<LinearLayout
    android:orientation="vertical"
    android:layout_width="match_parent"
    android:layout_height="wrap_content"
    android:layout_centerVertical="true"
    tools:ignore="MissingConstraints">
    <Button
        android:id="@+id/buttonStart"
        android:text="Start Service"
        android:layout_width="wrap_content"
        android:layout_height="match_parent"/>
    <Button
        android:id="@+id/buttonStop"
        android:text="Stop Service"
        android:layout_width="wrap_content"
        android:layout_height="match_parent"/>
</LinearLayout>
- Once you do this, go back to the MainActivity class and add the corresponding code in order to link the XML file and the MyServiceClass.
package com.example.newproject;

import androidx.appcompat.app.AppCompatActivity;

public class MainActivity extends AppCompatActivity implements View.OnClickListener {
private Button start, stop;

@Override
protected void onCreate(Bundle savedInstanceState) {
super.onCreate( savedInstanceState );
setContentView( R.layout.activity_main );


start=(Button) findViewById( R.id.buttonStart );
stop= (Button) findViewById( R.id.buttonStop );

start.setOnClickListener( this );
stop.setOnClickListener( this );

}

@Override
public void onClick(View view) {
if(view == start){
startService(new Intent( this, MyServiceClass.class ) );
}else if (view == stop){
stopService(new Intent( this, MyServiceClass.class ) );

}
}
}
Step 4
Once you are done linking the classes, let’s run the code.
Note: Add the Service class name in the AndroidManifiest.xml file.

Next, let’s run the code.

Once you start the service, it will run on the background even if another application is opened. You can start or stop the service by clicking on the buttons.
This is a simple demo where you have learned how to work with Android Services.
So with this, we come to the end of this article on “Android Services Tutorial”. I hope you are clear with the topics that are covered in this blog.
Now that you have gone through our Android Services Tutorial blog, you can check out Edureka’s Android App Development Certification Training to quick-start your learning.
Have any queries? Don’t forget to mention them in the comments of this “Android Services Tutorial” blog. We will get back to you.