Mobile application development has a lot of demand ever since the beginning. And say, in an interview, the interviewer will ask about the Android Projects that you have worked on. You will have a lot of things to talk about. So, I’m writing this blog on Android Projects which will help if you are a beginner, intermediate or advanced professionalist.
Let’s have a look at the topics to be covered in this article:
- Introduction to Android
- How to go about learning Android Projects?
- Beginner level project- Simple demo project
- Intermediate level project-ToDoTask
- Advanced level project – Gaming project
- Conclusion
Let’s begin!
Introduction to Android
 The OS has developed a lot in the last 15 years starting from black and white phones to recent smartphones or mini computers. Android is a powerful Linux based Operating System developed by Google which is primarily designed for touch screen mobile devices such as smartphones, tablet computers.
It is also an open-source Operating System. Android basically helps in understanding your tastes by giving various features such as having wallpapers, themes, and launchers which completely change the look of your device’s interface.
Not known fact: Android was developed by the Open Handset Alliance (OHA), that is led by Google. This OHA is a consortium of multiple companies like Samsung, Sony, Intel, and so many others to provide services and deploy handsets using the Android platform.
How to go about learning Android Projects?
The answer to this question is fairly simple and straightforward. It all starts with learning the basics and all the fundamentals of Android. This is basically a measurement index to know how comfortable you are working with Android Development.
The very next thing you need to know is the way using which you can work on Android. Once you learn about different ways of creating an application, you will be well-versed in developing any sort of application. Want to learn how to build mobile apps using Flutter? Enroll in a Flutter Certification and start your journey today.
And also, if you have some peer knowledge about Android, you can up-skill your learning with Edureka now in order to understand the process.
Projects are basically used to solve a problem at hand. If providing solutions to the various simple and complex problems is your kind of thing, then you should definitely consider working on Android projects.
Once you’ve learned how to do this, you’ll find it easy to understand how to master Application Development. At any point in your career, you will have to work on Projects concerned with the particular domain. So, utilize this opportunity to learn about Android Application Development.
Beginner level project- Simple demo project
The best beginner project for Android Development is to develop an application that helps in log in.
This is very simple and easy. You need an IDE to work on and that is Android Studio. This IDE helps in developing Android applications.
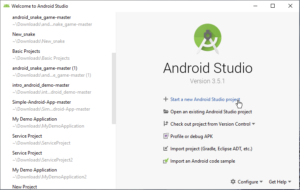
Step 1: Create a new project.
Next, choose a project. There are a lot of options, so, for this project, I’m going to select login project.
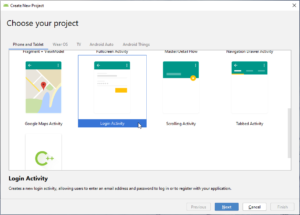
After this, give a name to your project and select the programming language. In this case, I’m going to consider working with Kotlin.
Step 2: Select a virtual device. To do this, go to AVD manager and click on Create a virtual device and you’ll get a list of devices that you can use. You can either use a normal phone to work on.
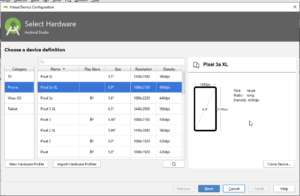
Note: Enable BIOS to select a device of your choice.
Step 3: Under the Java folder, you’ll find the corresponding classes. Just edit them and you are good to go.
Here, I am going to create a login android application. Here, the first screen is the Welcome page as shown below.

In order to create and design this screen, you need to configure your layout. For that, you need to open the layout folder and double click activity_main.xml as shown below.

Once you open the XML file, you need to create the elements based on the structure you want your screen to look like. Before creating the elements, I will open the design tab and drag and drop the buttons onto my screen as shown below.

After this, I will go back and configure the activity_main.xml file and create all the elements. Your code looks like:
<?xml version="1.0" encoding="utf-8"?> <androidx.constraintlayout.widget.ConstraintLayout xmlns:android="<a href="http://schemas.android.com/apk/res/android">http://schemas.android.com/apk/res/android</a>" xmlns:tools="<a href="http://schemas.android.com/tools">http://schemas.android.com/tools</a>" xmlns:app="<a href="http://schemas.android.com/apk/res-auto">http://schemas.android.com/apk/res-auto</a>" android:layout_width="match_parent" android:layout_height="match_parent" tools:context=".MainActivity"

<TextView android:layout_width="wrap_content" android:layout_height="wrap_content" android:text="Welcome to Kotlin Android App" android:textSize="26sp" android:textColor="#000000" app:layout_constraintBottom_toBottomOf="parent" app:layout_constraintLeft_toLeftOf="parent" app:layout_constraintRight_toRightOf="parent" app:layout_constraintTop_toTopOf="parent" android:id="@+id/textView"/>
<Button android:text="Click here to Login" android:layout_width="wrap_content" android:layout_height="wrap_content" android:id="@+id/click" android:layout_marginTop="16dp" app:layout_constraintTop_toBottomOf="@+id/textView" android:layout_marginEnd="96dp" android:layout_marginRight="96dp" app:layout_constraintEnd_toEndOf="@+id/textView"/>
</androidx.constraintlayout.widget.ConstraintLayout>
Note: If Gradle project sync fails when the project is opened for the first time, click on the link Install missing platform(s) and sync project” in the “Messages” window the missing components are downloaded and installed by Android Studio.
After this, you need to create a Kotlin Class file to add the listeners for calling the actions from the XML file. So here, I will be adding the listeners for calling the actions for buttons and the text views that I have created in the XML file.
package com.example.kotlinandroid
import android.content.Intent

import androidx.appcompat.app.AppCompatActivity

import android.os.Bundle

import android.widget.Button

import android.widget.Toast

class MainActivity : AppCompatActivity() {

override fun onCreate(savedInstanceState: Bundle?) {

super.onCreate(savedInstanceState)

setContentView(R.layout.activity_main)

val but_click=findViewById<Button>(R.id.click)

but_click.setOnClickListener{

val intent = Intent(this, login::class.java)

startActivity(intent)

}

}

}
With this, your first Welcome page screen is completely created. Next, you have a login screen where you need to enter the email address and password and then hit the login button as shown in the below snapshot.

Now I will create the design layout according to the above image in my Design Tab of second activity i.e activity_login.xml file as shown below.

After this, I will configure my XML file same as shown in the above screen.
<?xml version="1.0" encoding="utf-8"?> <androidx.constraintlayout.widget.ConstraintLayout
xmlns:android="<a href="http://schemas.android.com/apk/res/android">http://schemas.android.com/apk/res/android</a>"
xmlns:tools="<a href="http://schemas.android.com/tools">http://schemas.android.com/tools</a>"
xmlns:app="<a href="http://schemas.android.com/apk/res-auto">http://schemas.android.com/apk/res-auto</a>"
android:layout_width="match_parent"
android:layout_height="match_parent"
tools:context=".login">

<TextView android:text="Password: "
android:textSize="20sp"
android:textColor="#000000"
android:layout_width="wrap_content"
android:layout_height="wrap_content"
app:layout_constraintStart_toStartOf="parent"
android:layout_marginTop="144dp"
android:layout_marginLeft="6dp"
android:layout_marginStart="6dp"
app:layout_constraintTop_toBottomOf="@+id/imageView"
android:id="@+id/textView6"
app:layout_constraintHorizontal_chainStyle="packed"
app:layout_constraintEnd_toStartOf="@+id/pass"
android:layout_marginEnd="24dp"
android:layout_marginRight="24dp"
app:layout_constraintHorizontal_bias="1.0"/>

<EditText android:layout_width="wrap_content"
android:layout_height="wrap_content"
android:inputType="textEmailAddress"
android:ems="10"
android:id="@+id/email"
app:layout_constraintBaseline_toBaselineOf="@+id/textView5"
app:layout_constraintStart_toEndOf="@+id/textView5"
app:layout_constraintEnd_toEndOf="parent"/>

<EditText android:layout_width="wrap_content"
android:layout_height="wrap_content"
android:inputType="textPassword"
android:ems="10"
android:id="@+id/pass"
app:layout_constraintStart_toStartOf="@+id/email"
android:layout_marginTop="29dp"
app:layout_constraintTop_toBottomOf="@+id/email"/>

<Button android:text="Login"
android:layout_width="wrap_content"
android:layout_height="wrap_content"
android:id="@+id/login"
app:layout_constraintStart_toStartOf="@+id/pass"
android:layout_marginTop="29dp"
android:layout_marginLeft="23dp"
android:layout_marginStart="23dp"
app:layout_constraintTop_toBottomOf="@+id/pass"/>

</androidx.constraintlayout.widget.ConstraintLayout>
Now, you can login to the application.

After this, you need to create a Kotlin Class file to add the listeners for calling the actions from the XML file. After configuring all the 3 screens you have to check for Gradle build and then run the project. When you do so, it will ask you to choose the virtual device and you need to choose the one which you like and run the code. Your first mobile application will be launched.
This is the basic project for beginners.
Next, let’s move ahead to work on the intermediate project.
Android Projects: Intermediate level project-ToDoTask
This project will help you with creating a task list and adding a reminder to the task. This project is mainly written in Java.
In this case, I’m just going to write the main class because of the number of programs that are covered in this project is more than 5.
So, giving you a gist about the entire project, I would sum up as creating a task and also adding an alarm to it.
package </span>com.example.avjindersinghsekhon.minimaltodo.Main;

<span>import </span>android.content.Intent;
<span>import </span>android.os.Bundle;
<span>import </span>android.support.annotation.<span>NonNull</span>;
<span>import </span>android.support.v4.app.Fragment;
<span>import </span>android.support.v7.app.ActionBar;
<span>import </span>android.view.Menu;
<span>import </span>android.view.MenuItem;

<span>import </span>com.example.avjindersinghsekhon.minimaltodo.About.AboutActivity;
<span>import </span>com.example.avjindersinghsekhon.minimaltodo.AppDefault.AppDefaultActivity;
<span>import </span>com.example.avjindersinghsekhon.minimaltodo.R;
<span>import </span>com.example.avjindersinghsekhon.minimaltodo.Settings.SettingsActivity;

<span>public class </span>MainActivity <span>extends </span>AppDefaultActivity {

<span>protected void </span>onCreate(Bundle savedInstanceState) {
<span>super</span>.onCreate(savedInstanceState);
<span>final </span>android.support.v7.widget.Toolbar toolbar = (android.support.v7.widget.Toolbar) findViewById(R.id.<span>toolbar</span>);
setSupportActionBar(toolbar);
ActionBar actionBar = getSupportActionBar();
<span>if </span>(actionBar != <span>null</span>) {
actionBar.setDisplayHomeAsUpEnabled(<span>false</span>);
}
}

<span>@Override
</span><span> </span><span>protected int </span>contentViewLayoutRes() {
<span>return </span>R.layout.<span>activity_main</span>;
}

<span>@NonNull
</span><span> @Override
</span><span> </span><span>protected </span>Fragment createInitialFragment() {
<span>return </span>MainFragment.<span>newInstance</span>();
}

<span>@Override
</span><span> </span><span>public boolean </span>onCreateOptionsMenu(Menu menu) {
getMenuInflater().inflate(R.menu.<span>menu_main</span>, menu);
<span>return true</span>;
}

<span>@Override
</span><span> </span><span>public boolean </span>onOptionsItemSelected(MenuItem item) {
<span>switch </span>(item.getItemId()) {
<span>case </span>R.id.<span>aboutMeMenuItem</span>:
Intent i = <span>new </span>Intent(<span>this</span>, AboutActivity.<span>class</span>);
startActivity(i);
<span>return true</span>;
<span>// case R.id.switch_themes:
</span><span>// if(mTheme == R.style.CustomStyle_DarkTheme){
</span><span>// addThemeToSharedPreferences(LIGHTTHEME);
</span><span>// }
</span><span>// else{
</span><span>// addThemeToSharedPreferences(DARKTHEME);
</span><span>// }
</span><span>//
</span><span>//// if(mTheme == R.style.CustomStyle_DarkTheme){
</span><span>//// mTheme = R.style.CustomStyle_LightTheme;
</span><span>//// }
</span><span>//// else{
</span><span>//// mTheme = R.style.CustomStyle_DarkTheme;
</span><span>//// }
</span><span>// this.recreate();
</span><span>// return true;
</span><span> </span><span>case </span>R.id.<span>preferences</span>:
Intent intent = <span>new </span>Intent(<span>this</span>, SettingsActivity.<span>class</span>);
startActivity(intent);
<span>return true</span>;

<span>default</span>:
<span>return super</span>.onOptionsItemSelected(item);
}
}
}
The output of this would be:

You can add the title and set a reminder.

Please refer to the video for an end to end guidance on the coding part.
Next, we have the advanced Android Project. In this case, I’m going to be working on a game. Android offers a lot of gaming applications and one among them which is a snake game in Android.
Advanced level project – Gaming project
Here, I’ll explain how to create a gaming application.
This project will help you create a snake game application.
- You need a first create a board on which you can run the application.
- Create a node pointing it where to begin.
- Add directions that indicates the path in which the snake can traverse.
Even in this case, I’m going to be adding only the main program for your reference.
package </span>com.felipe.snake.game;

<span>import </span>java.util.LinkedList;

<span>import </span>com.felipe.snake.Direction;
<span>import </span>com.felipe.snake.Node;

<span>public class </span>Snake {

<span>private </span>LinkedList<Node> <span>body</span>;
<span>private int </span><span>endRow</span>;
<span>private int </span><span>endColumn</span>;
<span>private </span>Direction <span>direction</span>;

<span>public </span>Snake(<span>int </span>maxRows, <span>int </span>maxColumns) {
<span>this</span>.<span>endRow </span>= maxRows;
<span>this</span>.<span>endColumn </span>= maxColumns;
<span>this</span>.setBody(<span>new </span>LinkedList<Node>());
<span>this</span>.<span>direction </span>= Direction.<span>RIGHT</span>;

}

<span>public void </span>move(Direction direction) {

<span>if </span>(!validadeDirection(direction)) {
<span>return</span>;
}

Node head = getBody().getLast();

<span>for </span>(<span>int </span>i = <span>0</span>; i < <span>body</span>.size() - <span>1</span>; i++) {
Node nexNode = <span>body</span>.get(i + <span>1</span>);
Node node = <span>body</span>.get(i);
node.setRow(nexNode.getRow());
node.setColumn(nexNode.getColumn());
}

moveHead(direction, head);

<span>this</span>.<span>direction </span>= direction;
}

<span>public boolean </span>verify(<span>int </span>row, <span>int </span>column) {
<span>for </span>(Node node : <span>this</span>.getBody()) {
<span>if </span>(node.getRow() == row && node.getColumn() == column) {
<span>return true</span>;
}
}
<span>return false</span>;
}

<span>private void </span>moveHead(Direction direction, Node node) {
<span>if </span>(direction.equals(Direction.<span>LEFT</span>)) {

<span>if </span>(node.getColumn() == <span>0</span>) {
node.setColumn(<span>endColumn</span>);
} <span>else </span>{
node.setColumn(node.getColumn() - <span>1</span>);
}

} <span>else if </span>(direction.equals(Direction.<span>RIGHT</span>)) {

<span>if </span>(node.getColumn() == <span>endColumn</span>) {
node.setColumn(<span>0</span>);
} <span>else </span>{
node.setColumn(node.getColumn() + <span>1</span>);
}

} <span>else if </span>(direction.equals(Direction.<span>UP</span>)) {

<span>if </span>(node.getRow() == <span>0</span>) {
node.setRow(<span>endRow </span>- <span>1</span>);
} <span>else </span>{
node.setRow(node.getRow() - <span>1</span>);
}

} <span>else if </span>(direction.equals(Direction.<span>DOWN</span>)) {

<span>if </span>(node.getRow() == <span>endRow</span>) {
node.setRow(<span>0</span>);
} <span>else </span>{
node.setRow(node.getRow() + <span>1</span>);
}

}
}

<span>private boolean </span>validadeDirection(Direction direction) {
<span>if </span>(direction.equals(Direction.<span>LEFT</span>)
<span>this</span>.<span>direction</span>.equals(Direction.<span>RIGHT</span>)) {
<span>return false</span>;
}
<span>if </span>(direction.equals(Direction.<span>RIGHT</span>)
<span>this</span>.<span>direction</span>.equals(Direction.<span>LEFT</span>)) {
<span>return false</span>;
}
<span>if </span>(direction.equals(Direction.<span>UP</span>)
<span>this</span>.<span>direction</span>.equals(Direction.<span>DOWN</span>)) {
<span>return false</span>;
}
<span>if </span>(direction.equals(Direction.<span>DOWN</span>)
&& <span>this</span>.<span>direction</span>.equals(Direction.<span>LEFT</span>)) {
<span>return false</span>;
}
<span>return true</span>;
}

<span>public </span>LinkedList<Node> getBody() {
<span>return </span><span>body</span>;
}

<span>public void </span>setBody(LinkedList<Node> body) {
<span>this</span>.<span>body </span>= body;
}

}
In this project, you will move the snake in the entire layout. The output is depicted as below:
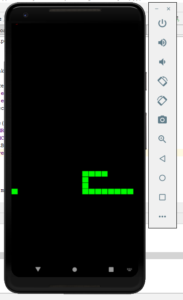
This is exactly how you can create a snake application on Android. To get full details on the different operations that are performed, do refer to the video.
Android Projects: Conclusion
These are just a part of the vast Android world. There are a lot of projects that require hands-on, like Arduino, sensors and many more.
Android is like oxygen when you talk about Mobile Development. So, practice these projects and also explore new things and develop an application of your own.
With these, we come to the end of this article on Android Projects. I hope you guys have understood how to create an Android application on your own and learned about the challenges and how to resolve them.
Keep exploring more on Android by kickstarting your learning with Edureka now.
Now that you have gone through our Android Projects blog, you can check out Edureka’s Android App Development Certification Training for more exciting content.
Have any queries? Don’t forget to mention them in the comments of this “Android Projects” blog. We will get back to you.