In this age of internet and digital data, we see a lot of online data being generated and consumed. It has resulted in a huge amount of online traffic. Hence it becomes very important for online platforms to manage this traffic and serve their customers better and faster. This Amazon Route 53 (AWS Route 53) tutorial will help you understand and implement the above-mentioned practices.
So let us this Amazon Route 53 Tutorial by with the following service,
Amazon Route 53
 It is a scalable (DNS) service that provides a reliable way to redirect traffic to applications. To achieve this domain names are translated to IP addresses to help computers connect better. It is possible to connect queries to entities like Elastic Load Balancers in AWS using Amazon Route 53. Hence developers can map domain names to S3 buckets or other resources. With Amazon Route 53 businesses can monitor and route global data traffic with ease. In simple words, Route 53 is mainly used for 3 purpose:-
Now let us continue with this Amazon Route 53 tutorial and take look at the next topic,
Types Of Routing
Amazon Route 53 makes use of different routing policies to route traffic prevalent globally. Here is the list of the same,
- Simple Routing
- Latency-based Routing
- Failover Routing
- Geolocation Routing
- Geoproximity Routing (Traffic Flow Only)
- Multivalue Answer Routing
- Weighted Routing
In this article on Amazon Route 53 tutorial, we would be precisely focusing on Latency Routing Policy
Latency Routing Policy
Performance plays an important role in the success of a website. There is a direct correlation between the response time of a website and the traffic to it. According to google,
- Pinterest increased search engine traffic and sign-ups by 15% when they reduced perceived wait times by 40%
- The BBC found they lost an additional 10% of users for every additional second their site took to load
If a website or a CRM application has customers from multiple locations, then the website can be installed or hosted across multiple AWS regions. And any requests for the website could be serviced from the AWS region that provides the lowest latency to improve the overall customer satisfaction. This feature is provided by ‘Latency Routing Policy’ which is part of the AWS Route53 Service.
Let us move on to the final chapter of this Amazon Route 53 tutorial,
Demo Routing A Sample Website
In this tutorial we would be setting up a simple static website in two different regions (let’s say – North Virginia and Mumbai) and then access the website using a domain name and notice that we would be automatically redirected to the closest AWS region. The pattern while selecting the regions is that one of the regions should be the one closest to you physically and the other one towards the other end of the world like an antipode.
Here is sequence of high-level steps for the same. Also the entire demo can be done within the AWS free tier.
- Create a free domain from Freenom
- Create two Ubuntu EC2 instances in different AWS regions
- Install Apache web server and create a simple static website
- Configure Route53 for “Latency Routing Policy
- Add the Nameservers from Route53 to Freenom
- Test the entire setup.
What are the prerequisites?
Access to two running Ubuntu EC2 instances in North Virginia and Mumbai regions, (the choice of availability zone in a region doesn’t matter). An EC2 instance of t2.micro type should be good enough as we would be installing a simple static web site and the good thing is that t2.micro also falls under the AWS free tier. The procedure for creating EC2 instances and how to connect to them is mentioned in the Edureka tutorial Amazon Elastic Compute Cloud.
- Make sure to select the latest Ubuntu for the AMI. Also ensure that port 80 (http) and port 22 (ssh) are open in the Security Group
A free domain from Freenom as mentioned in the official documentation has to be created. An existing domain name from any domain provider can also be used in this tutorial, but the steps in this tutorial pertain to the domain created from Freenom.
Step 1: Install the Web Server and create a simple static website on Ubuntu
Login to both Ubuntu Servers using Putty or some other software and issue the following commands to install the web server and create a static website.
Step1.1: Become a root user to perform the subsequent commands.
sudo su
Step1.2: Get the list of software
apt-get update
Step1.3: Install Apache webserver along with dependencies and start it.
apt-get install apache2
service apache2 start
Step1.4: Create a static webpage ‘index.html’ in the /var/www/html folder.
cd /var/www/html
echo “I am in Mumbai” > index.html
And there you go you almost have a website to use,

For the North Virginia Server change the string to “I am in North Virginia”. Usually, the same set of web pages would be deployed across all the regions. But, to distinguish which AWS region the Route53 is redirecting to, it’s necessary to have a different web page on each of the server.

Step1.5: Make sure that the website is up and running by typing the IP address of the EC2 servers in the browser.
Check out our AWS Certification Training in Top Cities
Step 2: Configure the Route53 for Latency Based Routing Policy (Amazon Route 53 Tutorial)
According to the AWS Documentation on Hosted Zone Pricing, there is no additional cost for creating a Hosted Zone. If the same is deleted within 12 hours from the creation.
Step 2.1: Go to the AWS Management Console, look for Route53 service and Click on “Get started now” under the DNS management.

Step 2.2: Click on “Create Hosted Zone” and enter the domain name which was created in Freenom and click on Create.

The Hosted Zone should be created and the Nameservers should appear as shown below. We will use the same in the Freenom console later.

Step 2.3: Click on “Create Record Set” once for each Ubuntu server and specify the details as shown below. Note that the IP address mentioned in the Value field is the IP address of the EC2 instance. Also, the name of the record should be same for both the ANAME RECORDS (test in this case) and “SET ID” for both the records should be different.
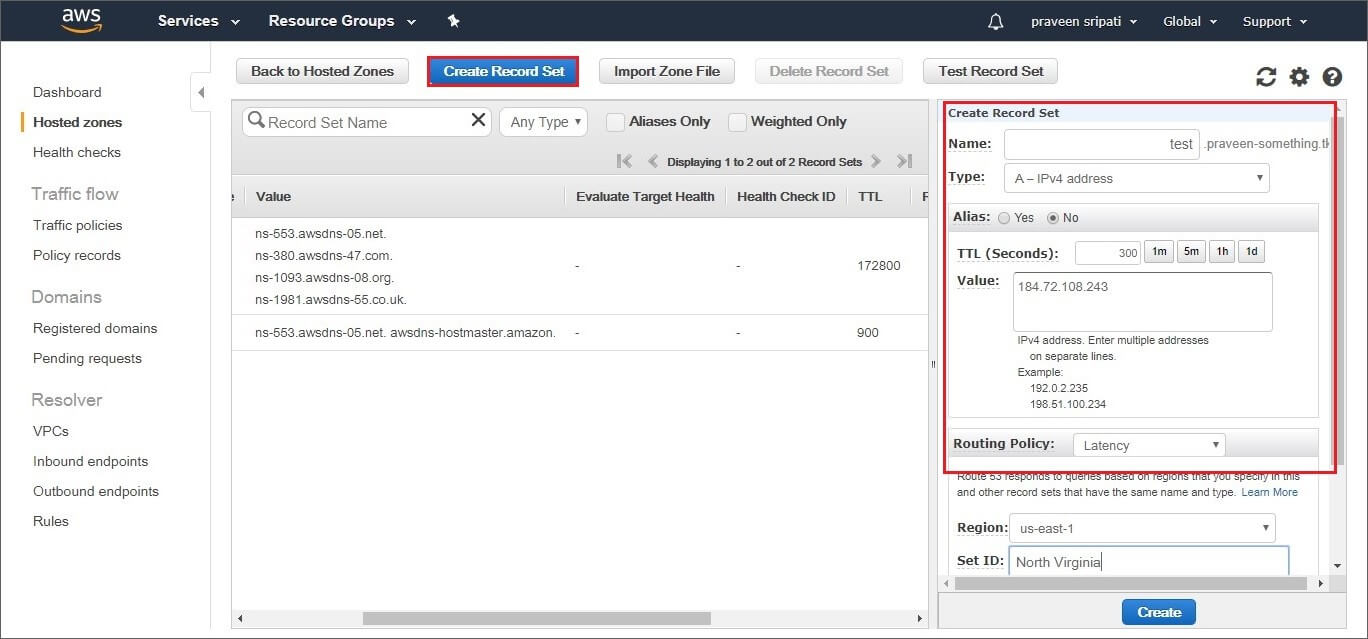
Finally, the ANAME records should be shown as below.

Step 3: Add the Nameservers from Route53 to Freenom (Amazon Route 53 Tutorial)
The Nameserver details from the Route53 Hosted Zone should be added to the Freenom domain created earlier, this would enable Freenom to resolve the domain names to IP addresses.
Step 3.1: Navigate to Freenom in the Browser and go to “Services -> My Domains”. All the currently owned domains will be displayed. Click on “Manage Domains” to change it.

Step3.2: Go to “Management Tool -> Nameservers and select “Use custom nameservers.

Step3.3: Enter the Nameservers received from AWS Route53 Hosted Zone and Click on “Change Nameservers” to complete the setting in Freenom.

If the domain has been registered with GoDaddy then follow the official instructions to setup the custom Nameservers. The above sequence of steps are for Freenom.
Step 4: Testing the entire setup
Now that the entire setup is complete. Enter the URL of the domain name in the browser and Route53 “Latency Routing Policy” should automatically redirect to the webpage based on the best latency. As this tutorial is being written from India, we are getting automatically redirected to the Mumbai AWS region as you can see below,

In this tutorial, we noticed that the “Latency routing policy” will redirect the user to the region based on the latency time, ultimately providing the customer the best experience. The only problem with this approach is that the web servers must be replicated across multiple regions and this leads to additional cost.
Related Article: Learn AWS Interview Questions about Amazon Route 5.
In the upcoming tutorials, we will look at the “Weighted Routing Policy” which allows the traffic to be rerouted proportionally based on the size of the EC2 instance. Now before you leave, make sure to delete the resources created as part of this tutorial, as there is a cost associated with those outside the free tier.
So this is it guys, this brings us to the end of this article on the Amazon Route 53 tutorial. In case if you wish to gain expertise in this subject, Edureka has come up with a curriculum that covers exactly, what you would need to crack the Solution Architect Exam! You can have a look at the course details for AWS Solution Architect Certification Training.
In case of any queries related to this blog, please feel free to put questions in the comments section below and we would be more than happy to reply to you at the earliest.