Its common knowledge that Amazon Web Services(AWS) is a well-known provider of cloud services, while Kubernetes is quickly becoming the standard way to manage application containers in the production environment. While many developers would gladly use Kubernetes, the time-consuming cluster management process can be a turnoff. As a solution, developers can use Amazon Elastic Container Service for Kubernetes (Amazon EKS), which allows them to create Kubernetes clusters in the cloud very quickly and easily.
Amazon EKS
Though containers have been around since the early days of Linux, Docker introduced the modern version of this technology. Kubernetes is open source software that allows you to deploy and manage containerized applications at scale. It also provides portability and extensibility, enabling you to scale containers seamlessly. But, the downside of Kubernetes is that it takes a lot of time to deploy a cluster with master and worker nodes. A turn around for this is Amazon EKS.
Amazon Elastic Container Service for Kubernetes(Amazon EKS)
 Amazon Elastic Container Service for Kubernetes (Amazon EKS) is a managed service that makes it easy for users to run Kubernetes on AWS without needing to stand up or maintain your own Kubernetes control plane. Since Amazon EKS is a managed service it handles tasks such as provisioning, upgrades, and patching.
Definition aside, let’s take a look at the benefits of Amazon EKS:
- Amazon EKS runs the Kubernetes management infrastructure across multiple AWS Availability Zones, thereby freeing users from maintaining Kubernetes control plane.
- Infrastructure running on Amazon EKS is secure by default by setting up a secure and encrypted communication channel between worker nodes & Kubernetes endpoint.
- AWS actively works with the Kubernetes community and makes contributions to the Kubernetes code base.
- Applications managed by Amazon EKS are fully compatible with applications managed by any standard Kubernetes environment.
You may go through this Kubernetes EKS Tutorial recording where our AWS Training expert has explained how you can launch an application on AWS EKS cluster.
Kubernetes On AWS | AWS EKS Tutorial | Edureka
This Edureka! live session on “AWS Kubernetes Tutorial” will help you understand how to deploy a containerized application onto a Kubernetes cluster managed by Amazon Elastic Container Service for Kubernetes (Amazon EKS).
So, the above reasons are convincing enough to start using Amazon EKS. Now, let’s take a look at how Amazon EKS actually works.
How does Amazon EKS work?
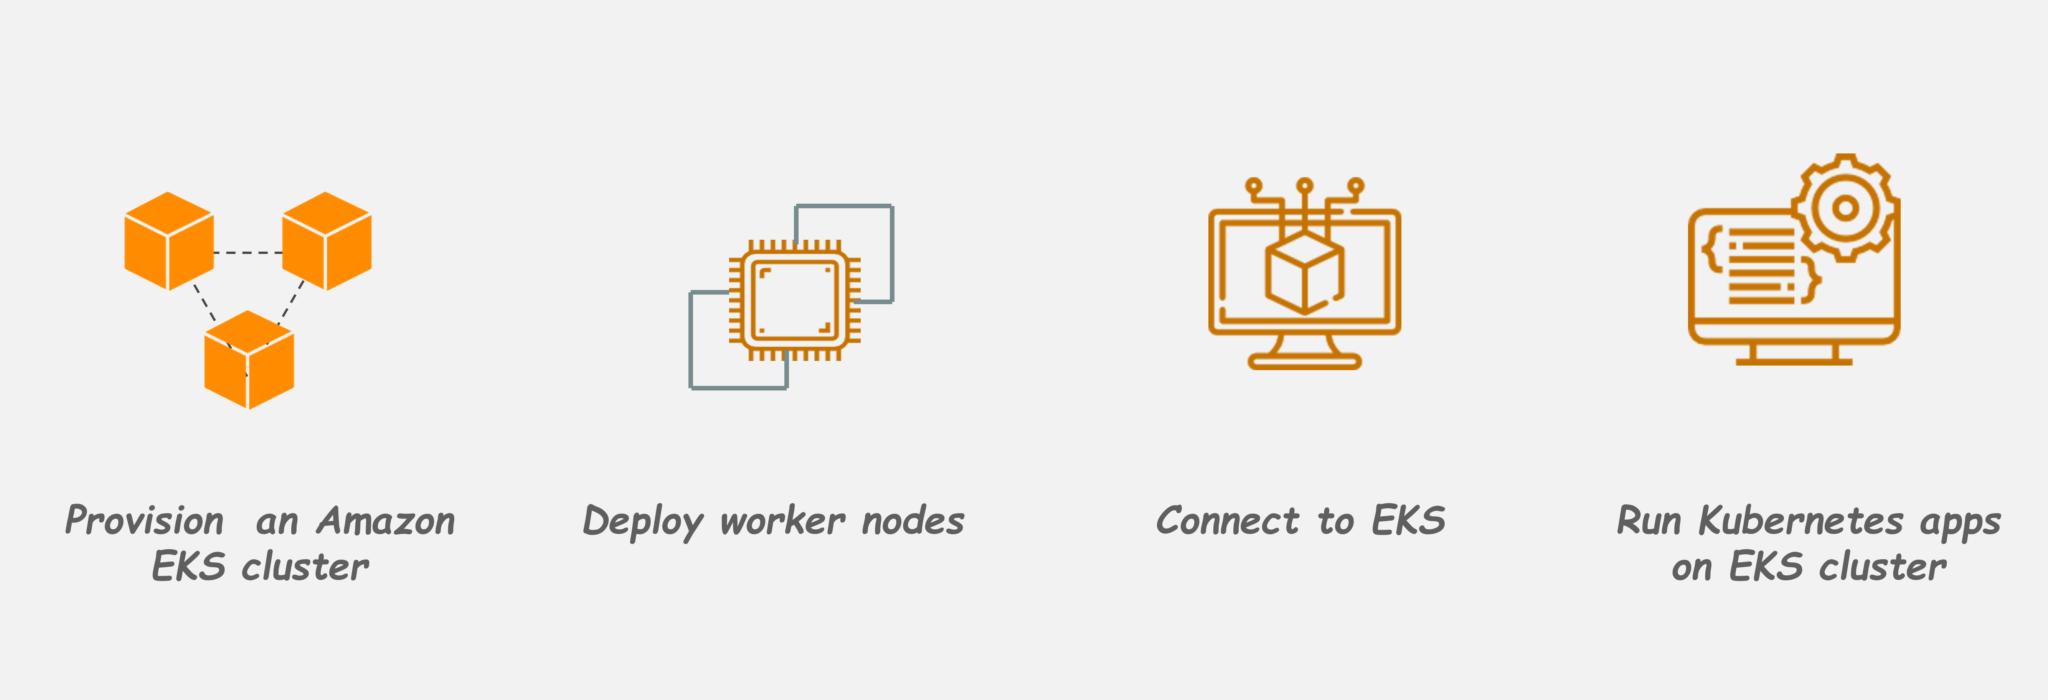
Getting started with Amazon EKS is easy fairly easy:
- First, create an Amazon EKS cluster in the AWS Management Console or with the AWS CLI or one of the AWS SDKs
- Then, launch worker nodes and enable them to join the Amazon EKS cluster which you created earlier
- When your cluster is ready, you can configure your favorite Kubernetes tools to communicate with your cluster
- Deploy and manage applications on your Amazon EKS cluster the same way that you would with any other Kubernetes environment
Now, let’s see how to deploy a containerized application onto a Kubernetes cluster using Amazon Elastic Container Service for Kubernetes.
Deploy a Kubernetes Application with Amazon EKS
Demo: In this demo, we will see how to launch a simple nginx application on Kubernetes cluster using Amazon EKS. Here are the steps you will follow:
This section will walk you through these steps in detail.
Assumptions and Prerequisites
- You should have an AWS account with an active subscription and be able to log in using AWS IAM account credentials. If you don’t have either of these create an AWS account & create an IAM user in your AWS account.
- You should install the latest version of the AWS command-line interface (CLI), to a location in your system path. In case you haven’t, install it using these instructions.
Step 1: Create an AWS IAM service role and a VPC
The first step is to create an IAM role that Kubernetes can assume to create AWS resources. To do this:
- Navigate to AWS IAM Console & in “Roles” section, click the “Create role” button
- Select “AWS service” as the type of entity and “EKS” as the service
- Enter a name for the service role and click “Create role” to create the role

Amazon EKS also requires a Virtual Private Cloud (VPC) to deploy the cluster. To create this VPC:
- Navigate to the AWS CloudFormation console and click on “Create Stack”
- On the “Select Template” page, select the option to “Specify an Amazon S3 template URL” and enter the URL
- After specifying all the details, review and confirm them. Then click “Create” to proceed

Step 2: Create an Amazon EKS cluster
At this point, you are ready to create a new Amazon EKS cluster. To do this:
- Navigate to the Amazon EKS console and click on “Create cluster” button
- Enter details into the EKS cluster creation form such as cluster name, role ARN, VPC, subnets and security groups
- Click “Create” to create the Amazon EKS cluster

Step 3: Configure kubectl for Amazon EKS cluster
Kubernetes uses a command-line utility called Kubectl for communicating with Kubernetes cluster. Amazon EKS clusters also require the AWS IAM Authenticator for Kubernetes to allow IAM authentication for your Kubernetes cluster. So, install both of these binaries. Instructions for downloading and setup are in the Amazon EKS documentation.
Note: Ensure that you have at least version of the AWS CLI installed and your system’s Python version must be Python 2.7.9 or greater.
Next, you have to create a kubeconfig file for your cluster with the AWS CLI update-kubeconfig command as follows:
- Use the AWS CLI update-kubeconfig command to create or update your kubeconfig for your cluster
- Test your configuration

Step 4: Launch and configure Amazon EKS worker nodes
Note: Wait for your cluster status to show as ACTIVE. If you launch your worker nodes before the cluster is active, the worker nodes will fail to register with the cluster and you will have to relaunch them.
Once the control plane of your cluster has been activated, the next step is to add nodes to it. To do this:
- Navigate to the AWS CloudFormation console and click on “Create stack” option
- On the “Select Template” page, select the option to “Specify an Amazon S3 template URL” and enter the URL
- On the “Specify Details” page, enter details as shown below. Review the details and click on “Create”
- Once stack creation is complete, select the stack name in the list of available stacks and select the “Outputs” section in the lower left pane. Make a note of Role ARN

Now to enable worker nodes to join Kubernetes cluster follow below steps:
- On your local system, create a file named aws-auth-cm.yaml and fill it with the content below. Replace the AWS-ARN with the node instance role that you copied from the stack output earlier

- Apply the configuration. This command may take a few minutes to finish.
- Watch the status of your nodes and wait for them to reach the
Readystate

Step 5: Launch a simple nginx application
To create an application you need to create a Kubernetes object of type Deployment. On your local system, create a file named nginx.yaml and fill it with the content below.
Now, as a backup for application, you also need to create a Kubernetes object of Service type. A Kubernetes Service is an abstraction which defines a logical set of Pods running somewhere in your cluster, that all provide the same functionality as ones which you created earlier. On your local system, create a file named nginx.yaml and fill it with the content below.

- Create the nginx application and nginx service
- List the running services and capture the external IP address & port
- After your external IP address is available, point a web browser to that address at the respective port to view your nginx application


Congratulations! Now you know how to deploy a containerized application onto a Kubernetes cluster using Amazon Elastic Container Service(Amazon EKS).
Step 6: Cleaning up the application & assigned resources
When you are finished experimenting with your application, you should clean up the resources that you created for it to avoid incurring unnecessary costs. You can do so using the following commands:

I hope now you have a basic idea of what Amazon EKS is and how to use it to create and launch containerized applications on a Kubernetes cluster.
So this is it! I hope this blog was informative and added value to your knowledge. If you are interested to take your knowledge of Amazon Web Services to next level then enroll for the AWS Solutions Architect Course by Edureka.
Got a question for us? Please mention it in the comments section of “AWS Elastic Beanstalk” and we will get back to you as soon as possible.