


Most of us already know that normal applications can be easily built using core Java concepts. But, when it comes to developing web applications, advanced Java fundamentals, like JSP, Servlets, JDBC etc., can add on to the capabilities and features of the application and thus are essential for developers. Through the medium of this blog on Advanced Java Tutorial, I will be giving you a complete insight into the fundamental concepts of Advance Java.
- Introduction to Advanced Java
- JDBC
- Java Servlets
- JSP
You may also go through this recording of Advanced Java Tutorial where you can understand the topics in a detailed manner with examples.
Advance Java Tutorial | J2EE, Java Servlets, JSP, JDBC | Java Certification Training | Edureka

Advanced Java Tutorial: Introduction to Advanced Java


Advanced Java is everything that goes beyond Core Java – most importantly the APIs defined in Java Enterprise Edition, includes Servlet programming, Web Services, the Persistence API, etc. It is a Web & Enterprise application development platform which basically follows client & server architecture.
Advanced Java Tutorial: Need for Advance Java
Below I have listed down few major advantages of Advance Java:
- Advance Java i.e. JEE (Java Enterprise Edition) gives you the library to understand the Client-Server architecture for Web Application Development which Core Java doesn’t support.
- J2EE is platform Independent, Java Centric environment for developing, building & deploying Web-based applications online. It also consists of a set of services, APIs, and protocols, which provides the functionality that is necessary for developing multi-tiered, web-based applications.
- You will be able to work with Web and Application Servers like Apache Tomcat, Glassfish etc and understand the communication over HTTP protocol. But, in Core Java, it is not possible.
- There are a lot of Advance Java frameworks like Spring, JSF, Struts etc. which enable you to develop a secure transaction based web apps for the domains like E-Commerce, Banking, Legal, Financial, Healthcare, Inventory etc.
- To work and understand the hot technologies like Hadoop and Cloud services, you should be prepared with core and advanced Java concepts.
I hope you understood why Advanced Java is essential. For your better understanding, I have divided this article into three sections. Each of these section deals with one of the most important concepts of advanced Java:
So, now let’s begin our discussion and understand the concept of Java Database Connectivity, a helpful tool to interact with the database.
Advanced Java Tutorial: Introduction to JDBC
JDBC is a standard Java API for a database-independent connectivity between the Java programming language and a wide range of databases. This application program interface lets you encode the access request statements, in Structured Query Language (SQL). They are then passed to the program that manages the database. It mainly involves opening a connection, creating a SQL Database, executing SQL queries and then arriving at the output.
We can use JDBC API to access tabular data stored in any relational database. By the help of JDBC API, we can save, update, delete and fetch data from the databases. It is similar to the Open Database Connectivity (ODBC) provided by Microsoft.
For a better understanding of working of JDBC, let’s dive deeper into the topic and understand the architecture that lies behind Java Database Connectivity.
Advanced Java Tutorial: JDBC Architecture
The JDBC API supports both two-tier and three-tier processing models for database access but in general, JDBC Architecture consists of two layers −
- JDBC API: This provides the application-to-JDBC Manager connection.
- JDBC Driver API: This supports the JDBC Manager-to-Driver Connection.
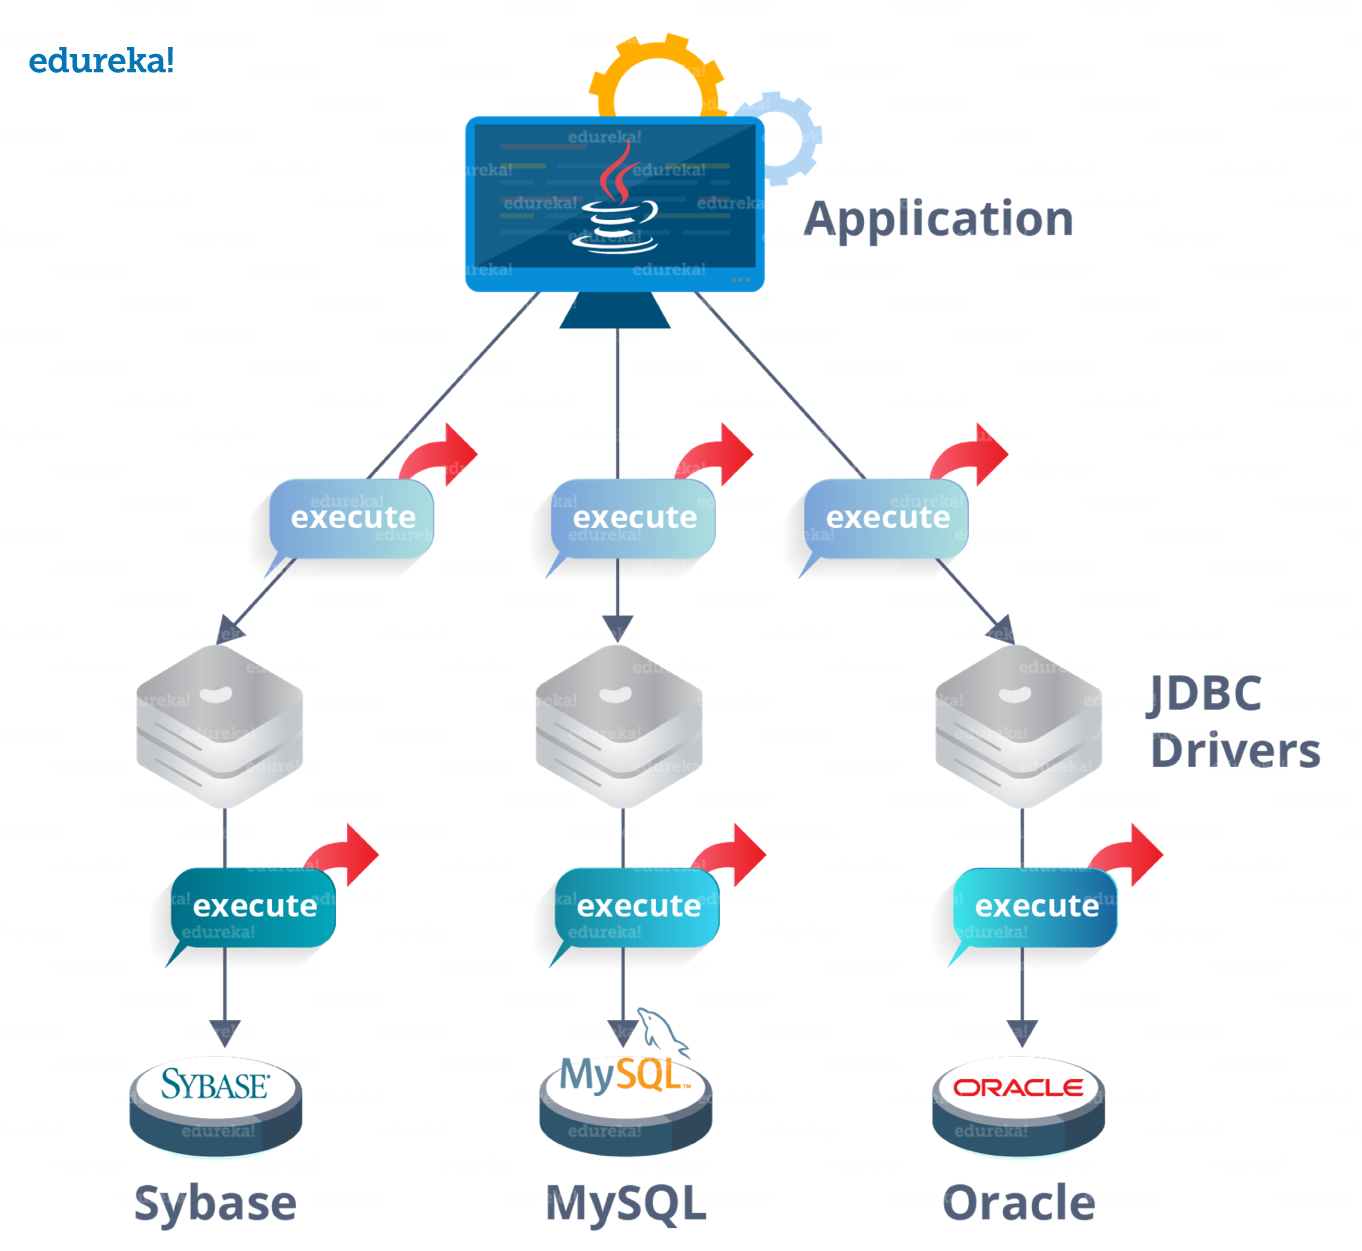

The JDBC API uses a driver manager and database-specific drivers to provide transparent connectivity to heterogeneous databases. The JDBC driver manager ensures that the correct driver is used to access each data source. The driver manager is capable of supporting multiple concurrent drivers connected to multiple heterogeneous databases.
Advanced Java Tutorial: Common JDBC Components
The JDBC API provides the following interfaces and classes −
- DriverManager is used to manage a list of database drivers. The first driver that recognizes a certain subprotocol under JDBC will be used to establish a database Connection.
- Driver is an interface that handles the communications with the database server. It also abstracts the details associated with working with Driver objects.
- Connection is an interface that consists all the methods required to connect to a database. The connection object represents communication context, i.e., all communication with the database is through connection object only.
Now let’s move on to the next topic and look at the steps required to create a JDBC Application.
Advanced Java Tutorial: Steps to create JDBC Application
In order to create JDBC Application, we need to follow few steps. Let’s see what are they.
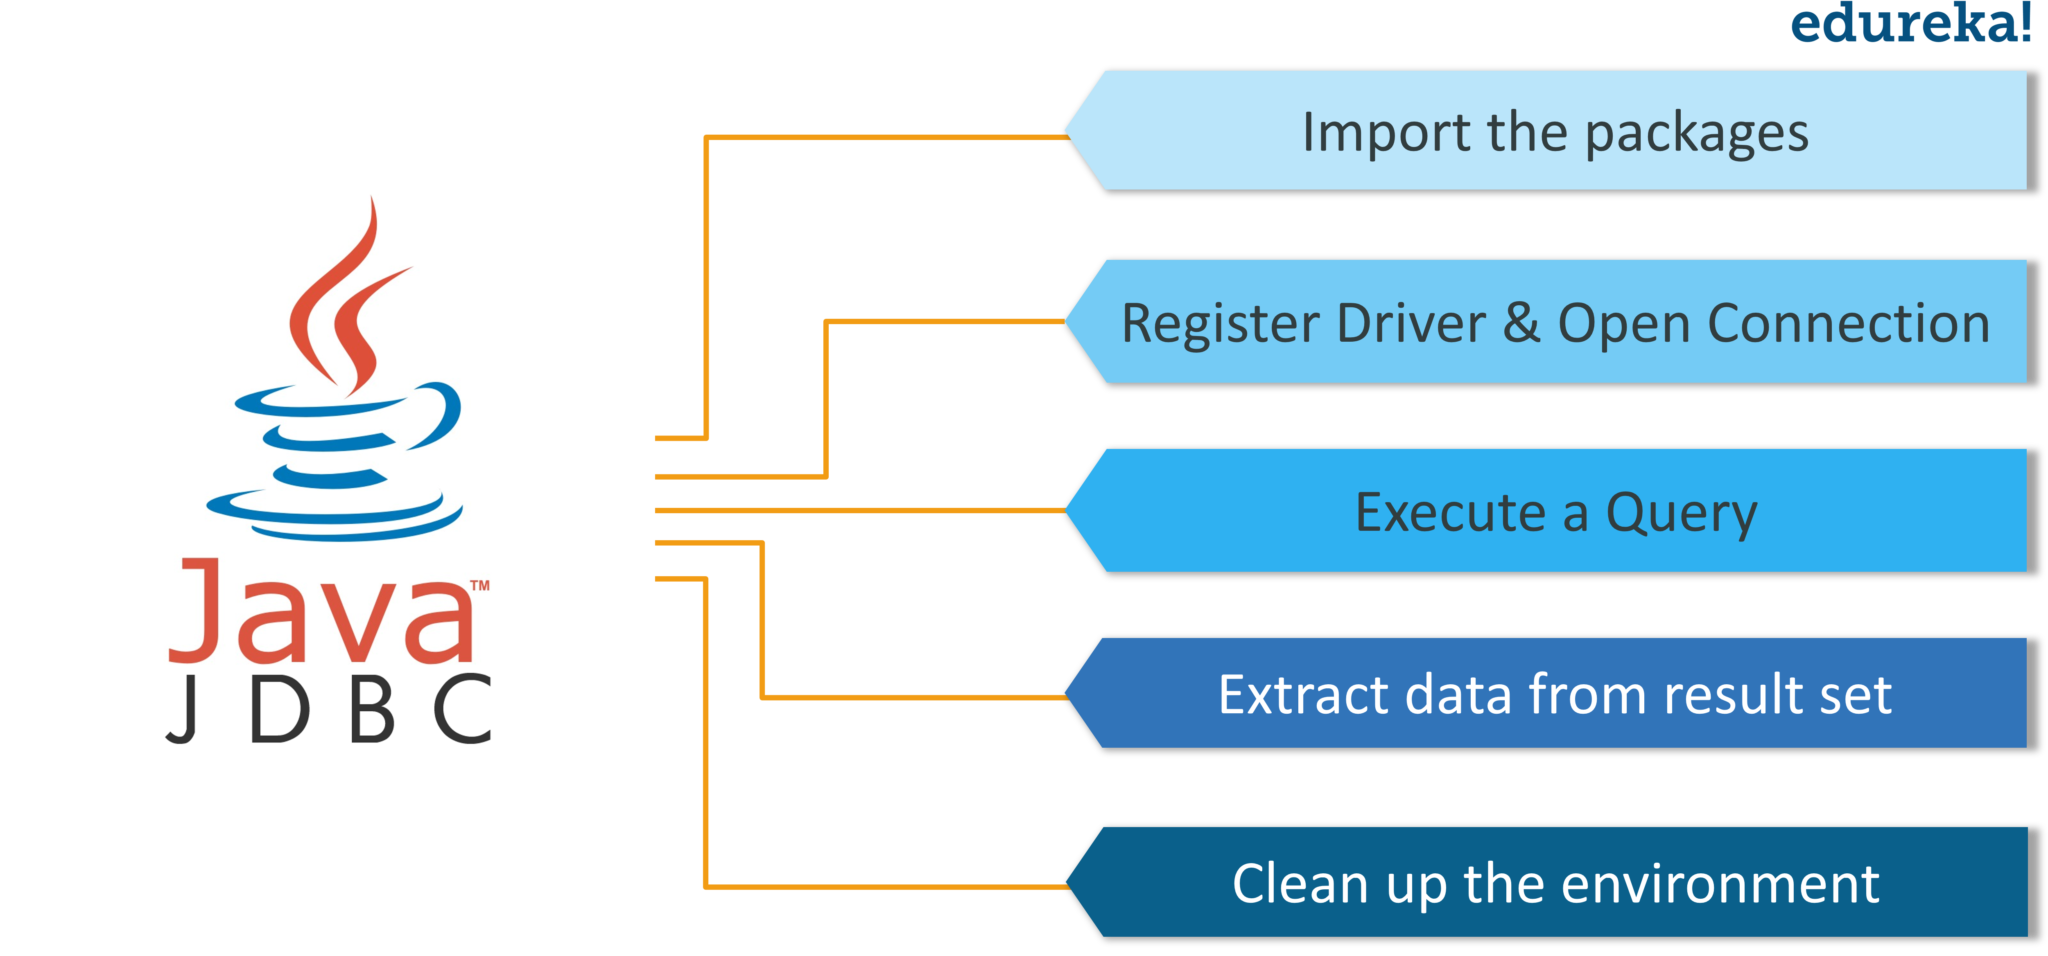

- Import the packages: You need to include the packages containing the JDBC classes needed for database programming. Most often, using import java.sql.* will suffice.
- Register the JDBC driver: Here you have to initialize a driver so that you can open a communication channel with the database.
- Open a connection: Here, you can use the getConnection() method to create a Connection object, which represents a physical connection with the database.
- Execute a query: Requires using an object of type Statement for building and submitting an SQL statement to the database.
- Extract data from result set: Requires that you use the appropriate getXXX() method to retrieve the data from the result set.
- Clean up the environment: Requires explicitly closing all database resources versus relying on the JVM’s garbage collection.
Now as you have seen various steps involved to create a JDBC Application, let’s see an example code to create a database and establish a connection.
package Edureka;
import java.sql.*;
import java.sql.DriverManager;
public class Example {
// JDBC driver name and database URL
static final String JDBC_DRIVER = "com.mysql.jdbc.Driver";
static final String DB_URL = "jdbc:mysql://localhost/emp";
//  Database credentials
static final String USER = "root";
static final String PASS = "";
public static void main(String[] args) {
Connection conn = null;
Statement stmt = null;
try{
//STEP 2: Register JDBC driver
Class.forName("com.mysql.cj.jdbc.Driver");
//STEP 3: Open a connection
System.out.println("Connecting to database...");
conn = DriverManager.getConnection(DB_URL,"root","");
//STEP 4: Execute a query
System.out.println("Creating statement...");
stmt = conn.createStatement();
String sql;
sql = "SELECT id, first, last, age FROM Employees";
ResultSet rs = stmt.executeQuery(sql);
//STEP 5: Extract data from result set
while(rs.next()){
//Retrieve by column name
int id  = rs.getInt("id");
int age = rs.getInt("age");
String first = rs.getString("first");
String last = rs.getString("last");
//Display values
System.out.print("ID: " + id);
System.out.print(", Age: " + age);
System.out.print(", First: " + first);
System.out.println(", Last: " + last);
}
//STEP 6: Clean-up environment
rs.close();
stmt.close();
conn.close();
}catch(SQLException se){
//Handle errors for JDBC
se.printStackTrace();
}catch(Exception e){
//Handle errors for Class.forName
e.printStackTrace();
}finally{
//finally block used to close resources
try{
if(stmt!=null)
stmt.close()
}catch(SQLException se2){
}// nothing can be done
try{
if(conn!=null)
conn.close();
}catch(SQLException se){
se.printStackTrace();
}//end finally try
}//end try
System.out.println("Goodbye!");
}//end main
} // end Example
Above code creates a table in your localhost database. To insert the values in the created database, you can refer to the below code. I will be writing the code only for step 4. Rest of the code remains the same as above.
//STEP 4: Execute a query
System.out.println("Creating table in given database...");
stmt = conn.createStatement();
String sql = "CREATE TABLE EMPLOYEES " +
"(id INTEGER not NULL, " +
" first VARCHAR(255), " +
" last VARCHAR(255), " +
" age INTEGER, " +
" PRIMARY KEY ( id ))";
stmt.executeUpdate(sql);
System.out.println("Created table in given database...");
System.out.println("Inserting records into the table...");
stmt =conn.createStatement();
String sql ="INSERT INTO Employees VALUES (100, 'Kriss', 'Kurian', 18)";
stmt.executeUpdate(sql);
sql = "INSERT INTO Employees VALUES (101, 'Enrique', 'John', 25)";
stmt.executeUpdate(sql);
sql= "INSERT INTO Employees  (102, 'Taylor', 'Swift', 30)";
stmt.executeUpdate(sql);
sql= "INSERT INTO  Employees VALUES(103, 'Linkin', 'Park', 28)";
stmt.executeUpdate(sql);
System.out.println("Inserted records into the table...");
So this is how you can establish a connection to the database and insert values in the tables. Now let’s move further and understand various JDBC Driver Types
Advanced Java Tutorial: JDBC Driver Types
JDBC drivers implement the defined interfaces in the JDBC API, for interacting with your database server. Essentially, a JDBC driver makes it possible to do three things:
1. Establish a connection with a data source.
2. Send queries and update statements to the data source.
3. Process the results.
For example, the use of JDBC drivers enables you to open a database connection to interact with it by sending SQL or database commands.
There are 4 types of drivers, namely:
Type 1: JDBC-ODBC Bridge Diver
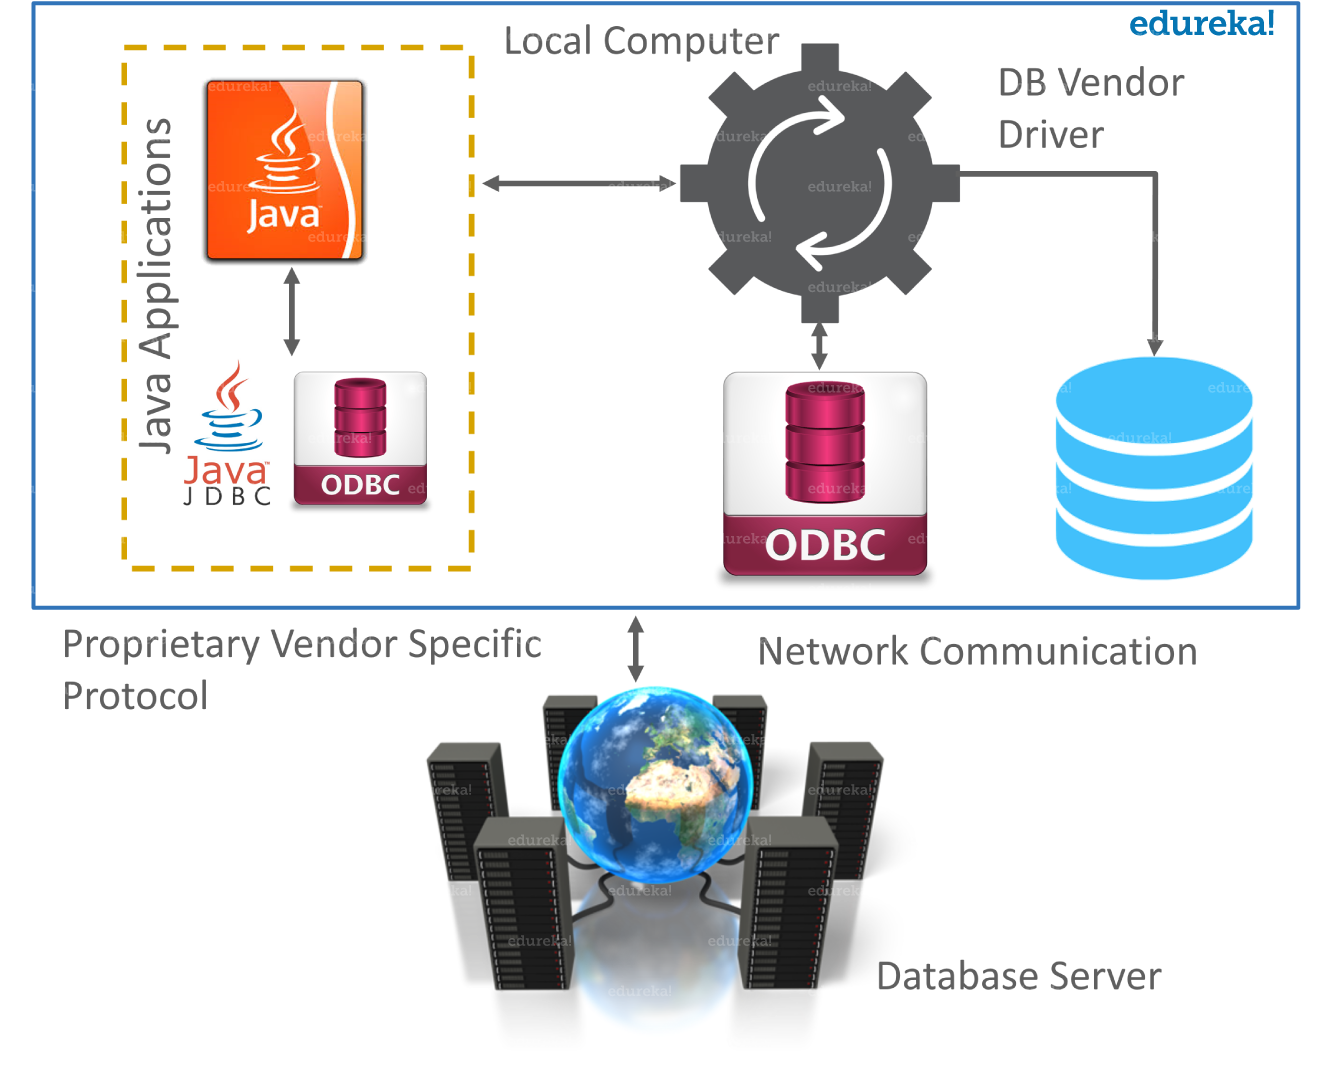
In Type 1 driver, a JDBC bridge accesses ODBC drivers installed on each client machine. Further, ODBC configures Data Source Name (DSN) that represents the target database.

Type 2: JDBC-Native API
In a Type 2 driver, JDBC API calls are converted into native C/C++ API calls, which are unique to the database. These drivers are typically provided by the database vendors and used in the same manner as the JDBC-ODBC Bridge. The vendor-specific driver must be installed on each client machine.
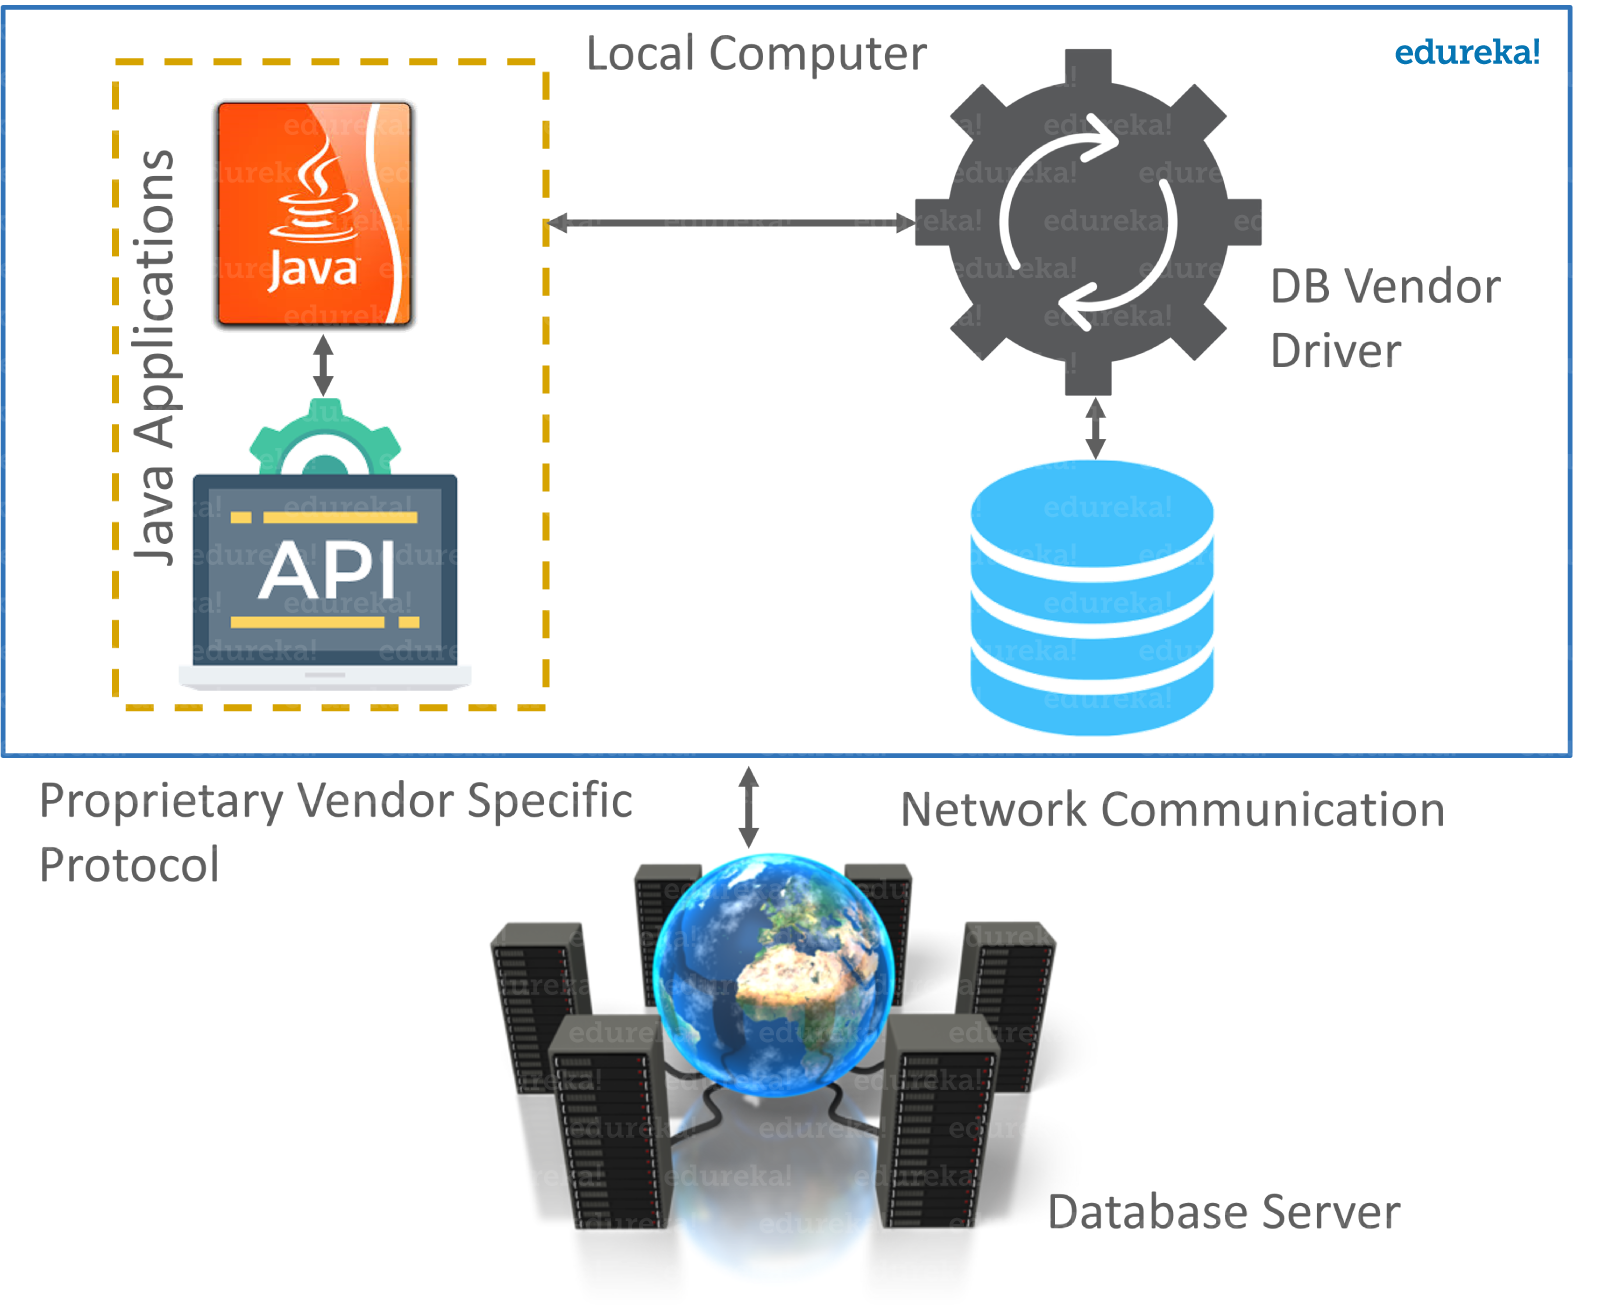

The Oracle Call Interface (OCI) driver is an example of a Type 2 driver.
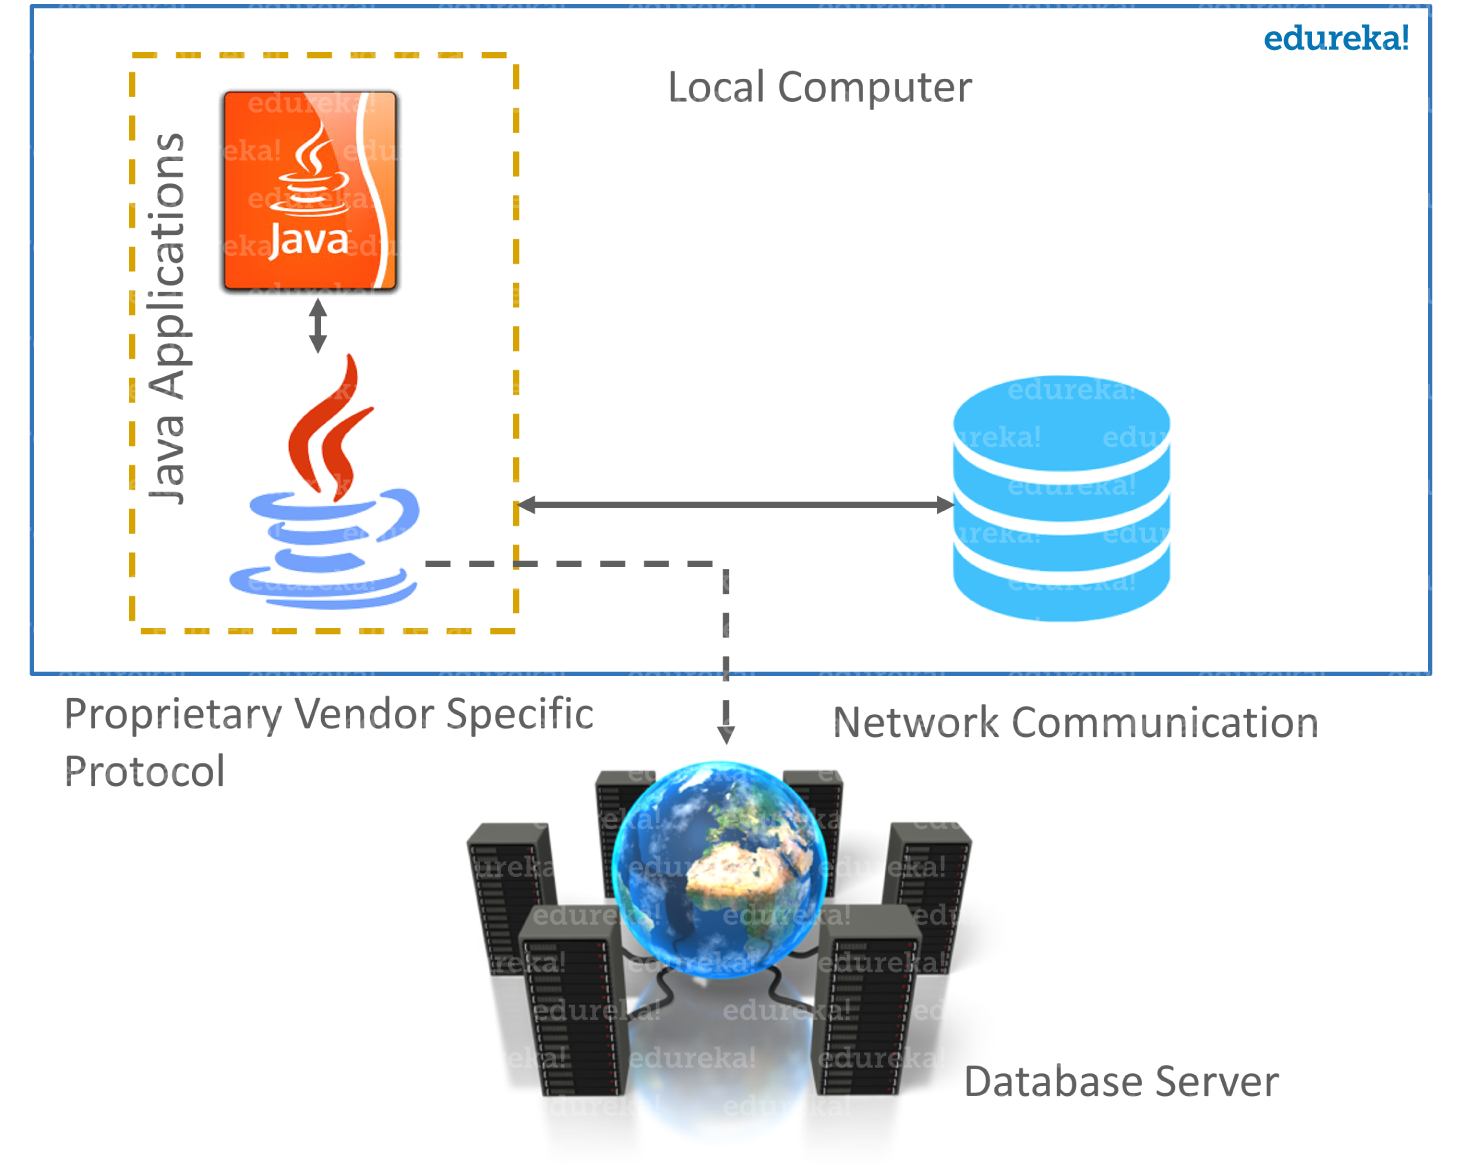
Type 3: JDBC-Net pure Java
In a Type 3 driver, a three-tier approach is used to access databases. The JDBC clients use standard network sockets to communicate with a middleware application server. The socket information is then translated by the middleware application server into the call format required by the DBMS and forwarded to the database server.
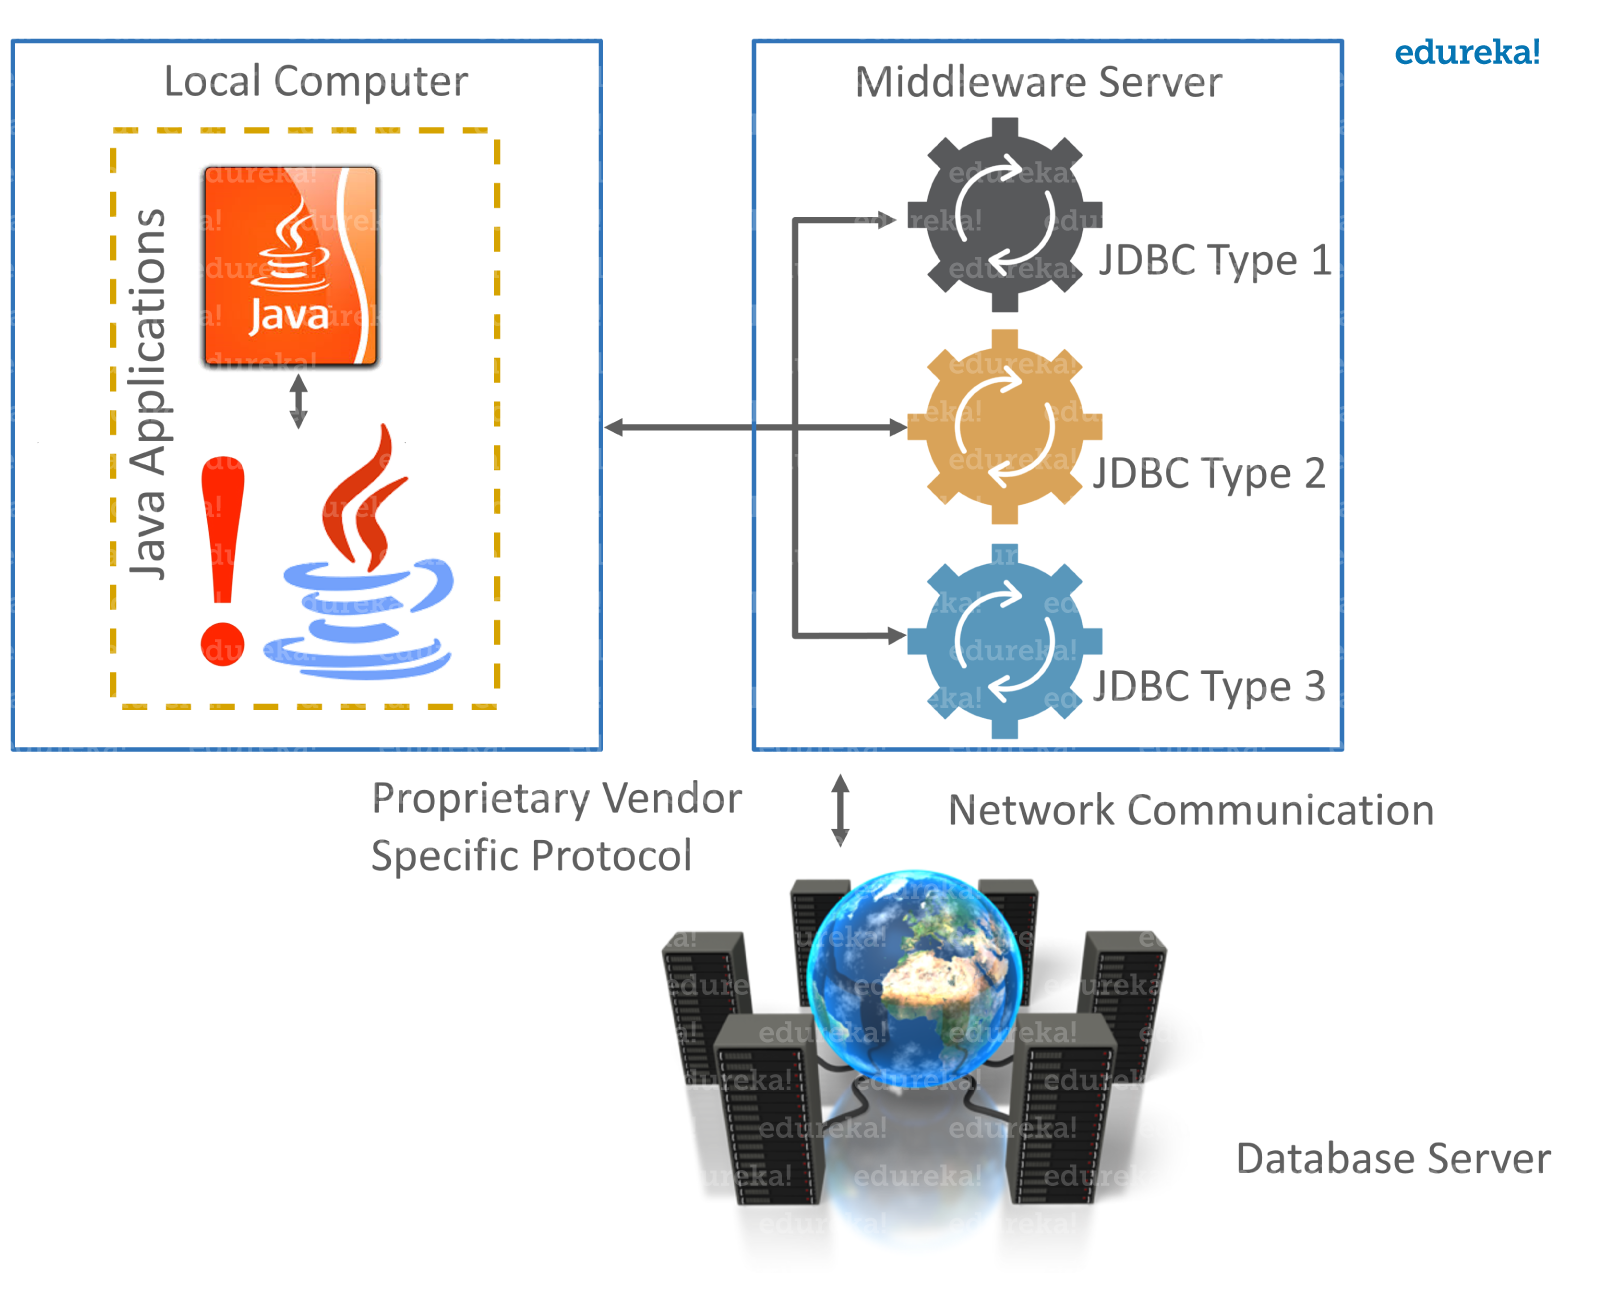

Type 4: 100% Pure Java
In a Type 4 driver, a pure Java-based driver communicates directly with the vendor’s database through a socket connection. This is the highest performance driver available for the database and is usually provided by the vendor itself.

MySQL’s Connector/J driver is a Type 4 driver. Because of the proprietary nature of their network protocols, database vendors usually supply type 4 drivers.
Subscribe to our youtube channel to get new updates..!
So here comes the question, which Driver should be used?
- If you are accessing one type of database, such as Oracle, Sybase, or IBM, the preferred driver type is 4.
- If your Java application is accessing multiple types of databases at the same time, type 3 is the preferred driver.
- Type 2 drivers are useful in situations, where a type 3 or type 4 driver is not available yet for your database.
- The type 1 driver is not considered a deployment-level driver and is typically used for development and testing purposes only.
Java Full Course – 10 Hours | Java Full Course for Beginners | Java Tutorial for Beginners | Edureka

🔥𝐄𝐝𝐮𝐫𝐞𝐤𝐚 𝐉𝐚𝐯𝐚 𝐂𝐨𝐮𝐫𝐬𝐞 𝐓𝐫𝐚𝐢𝐧𝐢𝐧𝐠: https://www.edureka.co/java-j2ee-training-course (Use code “𝐘𝐎𝐔𝐓𝐔𝐁𝐄𝟐𝟎”)
This Edureka Java Full Course will help you understand the various fundamentals of Java programm…
Now, let’s jump into the last topic of JDBC and understand various types of connections.
Advanced Java Tutorial: JDBC Connections
- Import JDBC Packages: Add import statements to your Java program to import required classes in your Java code.
- Register JDBC Driver: This step causes the JVM to load the desired driver implementation into memory so that it can fulfill your JDBC requests. There are 2 approaches to register a driver.
- The most common approach to register a driver is to use Java’s forName()method to dynamically load the driver’s class file into memory, which automatically registers it. This method is preferable because it allows you to make the driver registration configurable and portable. Refer the below code.
try { Class.forName("oracle.jdbc.driver.OracleDriver"); } catch(ClassNotFoundException ex) { System.out.println("Error: unable to load driver class!"); System.exit(1); } - The second approach you can use to register a driver is to use the static registerDriver()method.
 try {
   Driver myDriver = new oracle.jdbc.driver.OracleDriver();
   DriverManager.registerDriver( myDriver );
 }
catch(ClassNotFoundException ex)
{
System.out.println("Error: unable to load driver class!");
System.exit(1);
}
- The most common approach to register a driver is to use Java’s forName()method to dynamically load the driver’s class file into memory, which automatically registers it. This method is preferable because it allows you to make the driver registration configurable and portable. Refer the below code.
You should use the registerDriver() method if you are using a non-JDK compliant JVM, such as the one provided by Microsoft.
- Database URL Formulation: This is to create a properly formatted address that points to the database to which you wish to connect. After you’ve loaded the driver, you can establish a connection using the DriverManager.getConnection() method. DriverManager.getConnection() methods are−
- getConnection(String url)
- getConnection(String url, Properties prop)
- getConnection(String url, String user, String password)
Here each form requires a database URL. A database URL is an address that points to your database.
A table lists down the popular JDBC driver names and database URL.
| RDBMS | JDBC Driver Name | URL |
| 1. MYSQL | com.mysql.jdbc.Driver | jdbc:mysql://hostname/ databaseName |
| 2. Oracle | oracle.jdbc.driver.OracleDriver | jdbc:oracle:thin:@hostname:port Number:databaseName |
| 3. Sybase | com.Sybase.jdbc.SybDriver | jdbc:sybase:Tds:hostname: port Number/databaseName |
- Create a connection object
You can simply create or open a connection using database url, username, and password and also using properties object. A Properties object holds a set of keyword-value pairs. It is used to pass the driver properties to the driver during a call to the getConnection() method.
- Close
At the end of your JDBC program, we have to close all the database connections to end each database session. However, if you forget, Java’s garbage collector will close the connection when it cleans up stale objects.
conn.close();// Used to close the connection
That was all about Java Database Connectivity. If you wish to know more about JDBC, you can refer these interview questions. Now move ahead and learn Servlets.
Advanced Java Tutorial: Introduction to Servlets
A servlet is a Java programming language class that is used to extend the capabilities of servers that host applications accessed by means of a request-response programming model. Although servlets can respond to any type of request, they are commonly used to extend the applications hosted by web servers.
Servlet can be described as follows:
- Servlet is a technology which is used to create a web application.
- It is an API that provides many interfaces and classes including documentation.
- Servlet is an interface that must be implemented for creating any Servlet.
- It is also a class that extends the capabilities of the servers and responds to the incoming requests. It can respond to any requests.
- Servlet is a technology which is used to create a web application.

Advanced Java Tutorial: Servlet Life Cycle
The entire life cycle of a Servlet is managed by the Servlet container which uses the javax.servlet.Servlet interface to understand the Servlet object and manage it.
Stages of the Servlet Life Cycle: The Servlet life cycle mainly goes through four stages,
- Loading a Servlet.
- Initializing the Servlet.
- Request handling
- Destroying the Servlet.
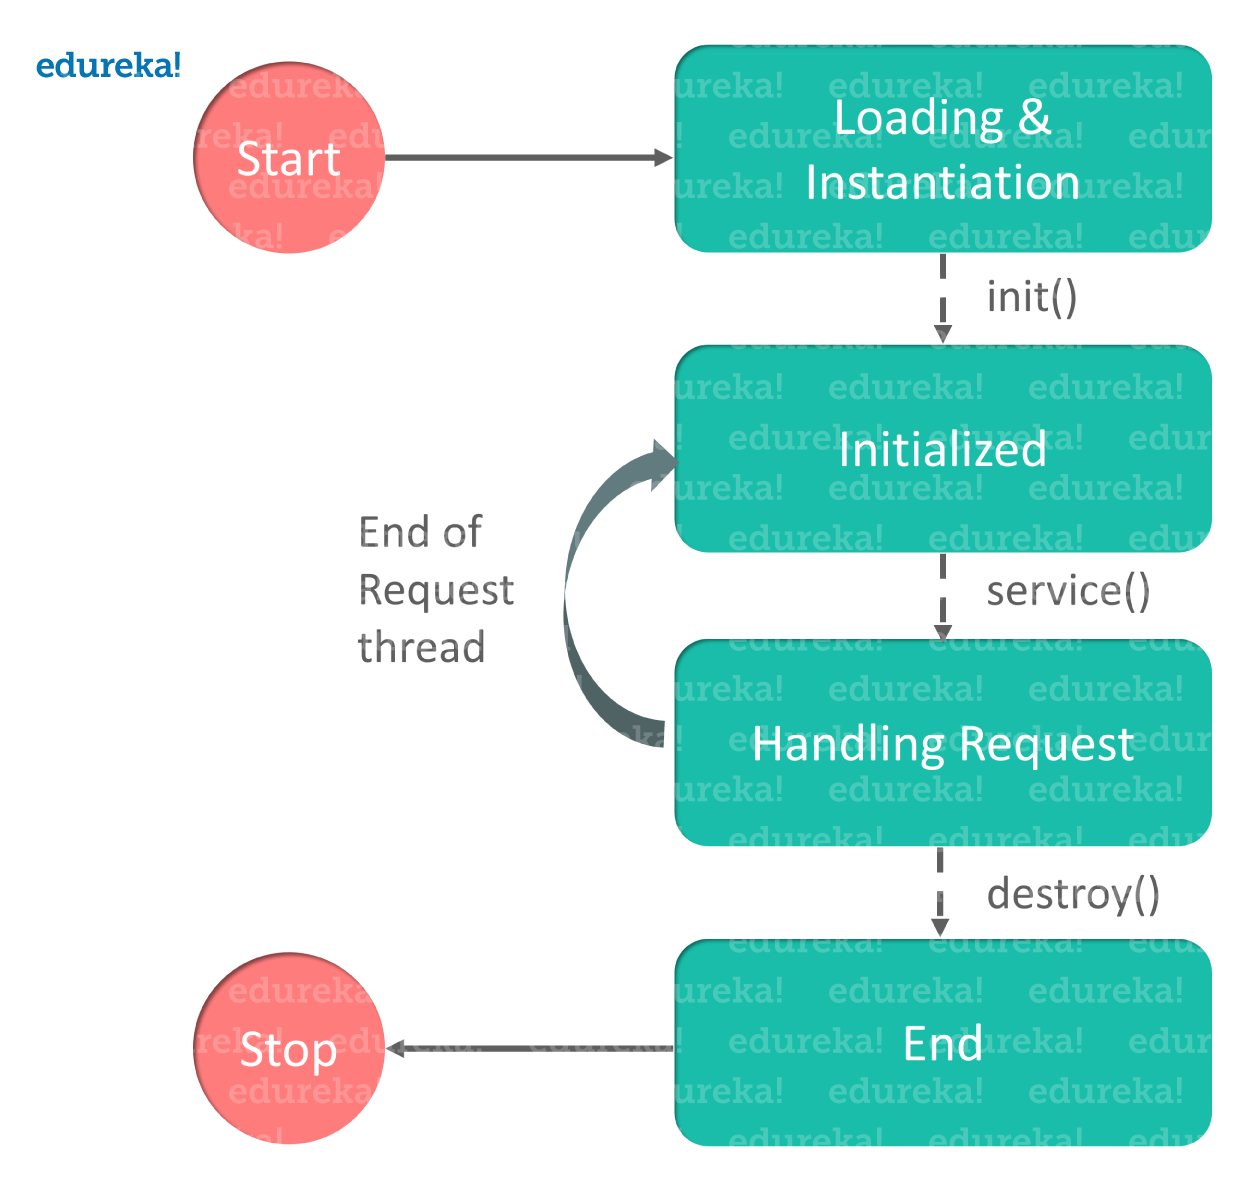

- Loading a Servlet: The first stage of the Servlet life cycle involves loading and initializing the Servlet by the Servlet container. The Web container or Servlet Container can load the Servlet at either of the following two stages :
- Initializing the context, on configuring the Servlet with a zero or positive integer value.
- If the Servlet is not preceding the stage, it may delay the loading process until the Web container determines that this Servlet is needed to service a request.
- Initializing a Servlet: After the Servlet is instantiated successfully, the Servlet container initializes the instantiated Servlet object. The container initializes the Servlet object by invoking the init(ServletConfig) method which accepts ServletConfig object reference as a parameter.
- Handling request: After initialization, the Servlet instance is ready to serve the client requests. The Servlet container performs the following operations when the Servlet instance is located to service a request :
- It creates the ServletRequest and ServletResponse. In this case, if this is an HTTP request then the Web container creates HttpServletRequest and HttpServletResponse objects which are subtypes of the ServletRequest and ServletResponse objects respectively.
- Destroying a Servlet: When a Servlet container decides to destroy the Servlet, it performs the following operations,
After the destroy() method is executed, the Servlet container releases all the references of this Servlet instance so that it becomes eligible for garbage collection.
Now that you have understood the basics of a servlet, let’s move further and understand what are the steps involved to create a Servlet application.
Advanced Java Tutorial: Steps to create Servlet
- Create a directory structure
- Create a Servlet
- Compile the Servlet
- Add mappings to web.xml file
- Start the server and deploy the project
- Access the servlet
Now, based on the above steps let’s write a program and understand how servlet works.
Step 1: To run a servlet program, we should have Apache tomcat server installed and configured. Once the server is configured, you can start with your program.
Step 2: For a servlet program, you need 3 files – index.html file, Java class file, and web.xml file. The very first step is to create Dynamic Web Project and then proceed further
Step 3: Now let’s see how to add 2 numbers using servlets and display the output in the browser.
First, I will write index.html file
<!DOCTYPE html> <html> <body> <form action ="add"> Enter 1st number: <input type="text" name="num1"> Enter 2nd number: <input type="text" name="num2"> <input type ="submit"> </form> </body> </html>
Above program creates a form to enter the numbers for the addition operation.
Step 4: Now without the Java class file, you can’t perform addition on 2 numbers. So let’s write a class file.
import java.io.IOException;
import java.io.PrintWriter;
import javax.servlet.http.HttpServlet;
import javax.servlet.http.HttpServletRequest;
import javax.servlet.http.HttpServletResponse;
public class Add extends HttpServlet{
       public void service(HttpServletRequest req, HttpServletResponse res) throws IOException
       {
              int i = Integer.parseInt(req.getParameter("num1"));
              int j = Integer.parseInt(req.getParameter("num2");
              int k= i+j;
              PrintWriter out = res.getWriter();
              out.println("Result is"+k);
       }
}
Step 5: After writing the Java class file, the last step is to add mappings to the web.xml file. Let’s see how to do that.
Step 6: web.xml file will be present in the WEB-INF folder of your web content. If it is not present, then you can click on Deployment Descriptor and click on Generate Deployment Descriptor Stub.
Step 7: After that, you can proceed further and add the mappings to it.
<?xml version="1.0" encoding="UTF-8"?> <web-app xmlns:xsi="http://www.w3.org/2001/XMLSchema-instance" xmlns=<"http://java.sun.com/xml/ns/javaee" xsi:schemaLocation="http://java.sun.com/xml/ns/javaee http://java.sun.com/xml/ns/javaee/web-app_3_0.xsd"</em> version=<em>"3.0"</em>> <display-name>Basic</display-name> <servlet> <servlet-name>Addition</servlet-name> <servlet-class>edureka.Add</servlet-class> </servlet> <servlet-mapping> <servlet-name>Addition</servlet-name> <url-pattern>/add</url-pattern> </servlet-mapping> <welcome-file-list> <welcome-file>index.html</welcome-file> </welcome-file-list> </web-app>
Step 8: After all this, you can run the program by starting the server. You will get the desired output on the browser.
Basically, this is how servlet should be configured. Now let’s move further and understand the concept of session tracking.
Session Tracking
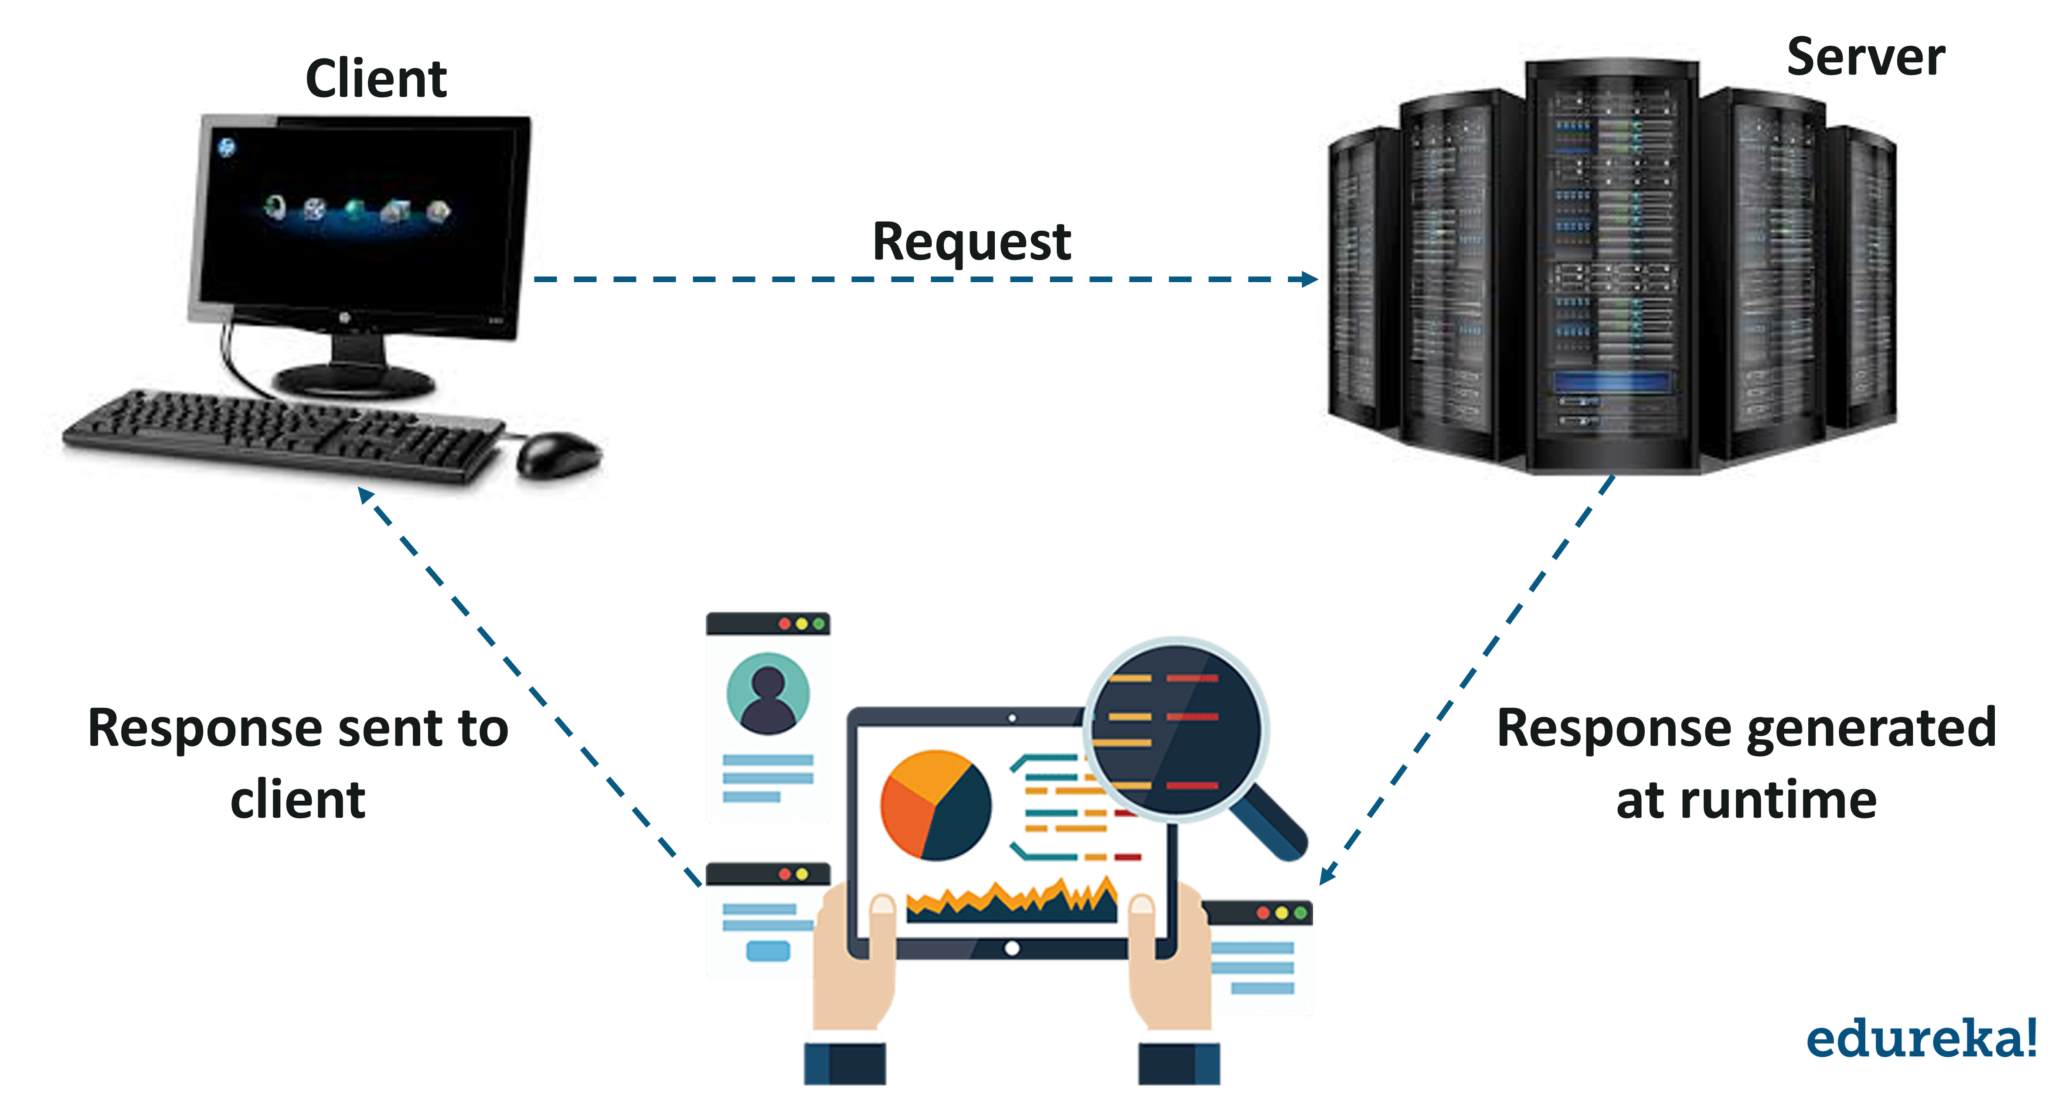
Session simply means a particular interval of time. And session tracking is a way to maintain state (data) of a user. It is also known as session management in servlet. We know that the Http protocol is stateless, so we need to maintain state using session tracking techniques. Each time user requests to the server, the server treats the request as the new request. So we need to maintain the state of a user to recognize a particular user.
You can see in the figure when you send a request it is considered as a new request.![]()

In order to recognize the particular user, we need session tracking. So this was all about Servlets.
Now, let’s dive into the last section of our blog and understand what is JSP.
Advanced Java Tutorial: Java Server Pages
JSP or Java Server Pages is a technology that is used to create web application just like Servlet technology. It is an extension to Servlet – as it provides more functionality than servlet such as expression language, JSTL, etc. A JSP page consists of HTML tags and JSP tags. The JSP pages are easier to maintain than Servlet because we can separate designing and development. It provides some additional features such as Expression Language, Custom Tags, etc.
Now let’s see various features of JSP with the help of below figure.
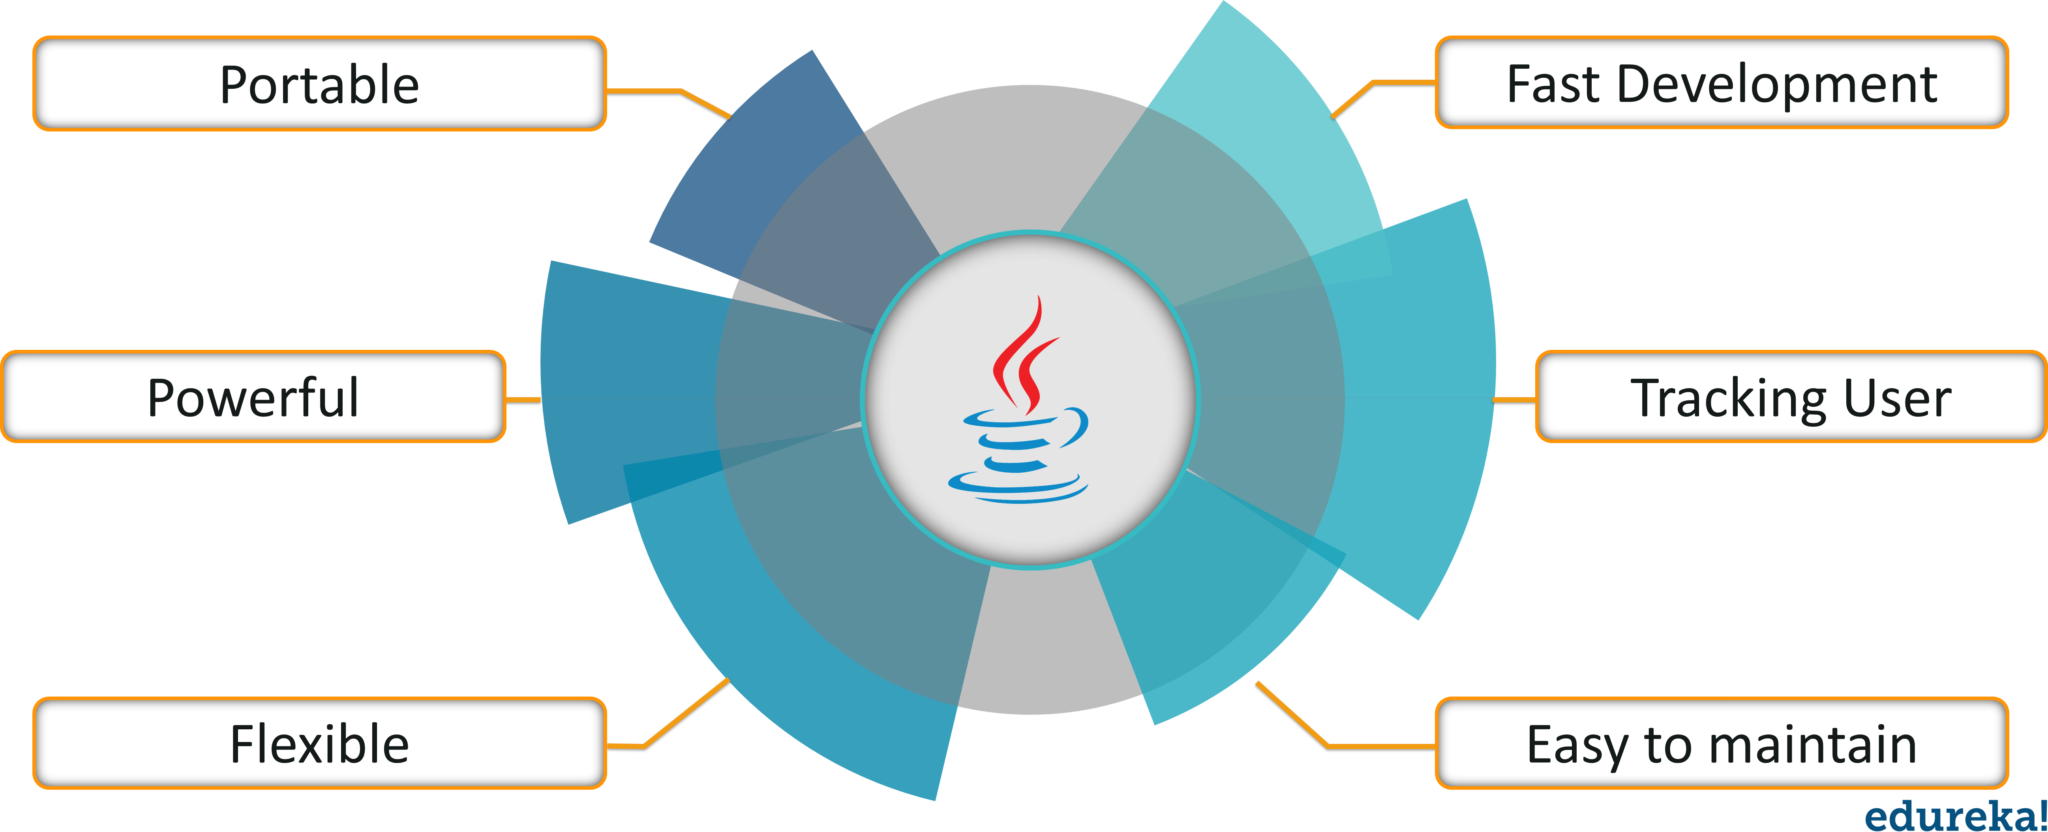

- Portable: JSP tags will process and execute by the server side web container, So that these are browser independent and J2EE server independent.
- Powerful: JSP consists of bytecode so that all Java features are applicable in case of JSP like robust, dynamic, secure, platform independent.
- Flexible: It allows to define custom tags so that the developer can fill conferrable to use any kind, framework based markup tags in JSP.
- Fast Development: If JSP page is modified, we don’t need to recompile and redeploy the project. The Servlet code needs to be updated and recompiled if we have to change the look and feel of the application.
- Tracking the User: JSP allows us to track the selections made by the user during user interaction with the website by maintaining the information in the session or cookies
- Easy: JSP is easy to learn, easy to understand and easy to develop. JSPs are more convenient to write than Servlets because they allow you to embed Java code directly into your HTML pages.
Now that you understood what is JSP, let’s see how JSP and Servlets differ from each other and why JSP is better than Servlets with the help of below table.
Now let’s dig deeper into Java Server Pages and understand Life Cycle of JSP.
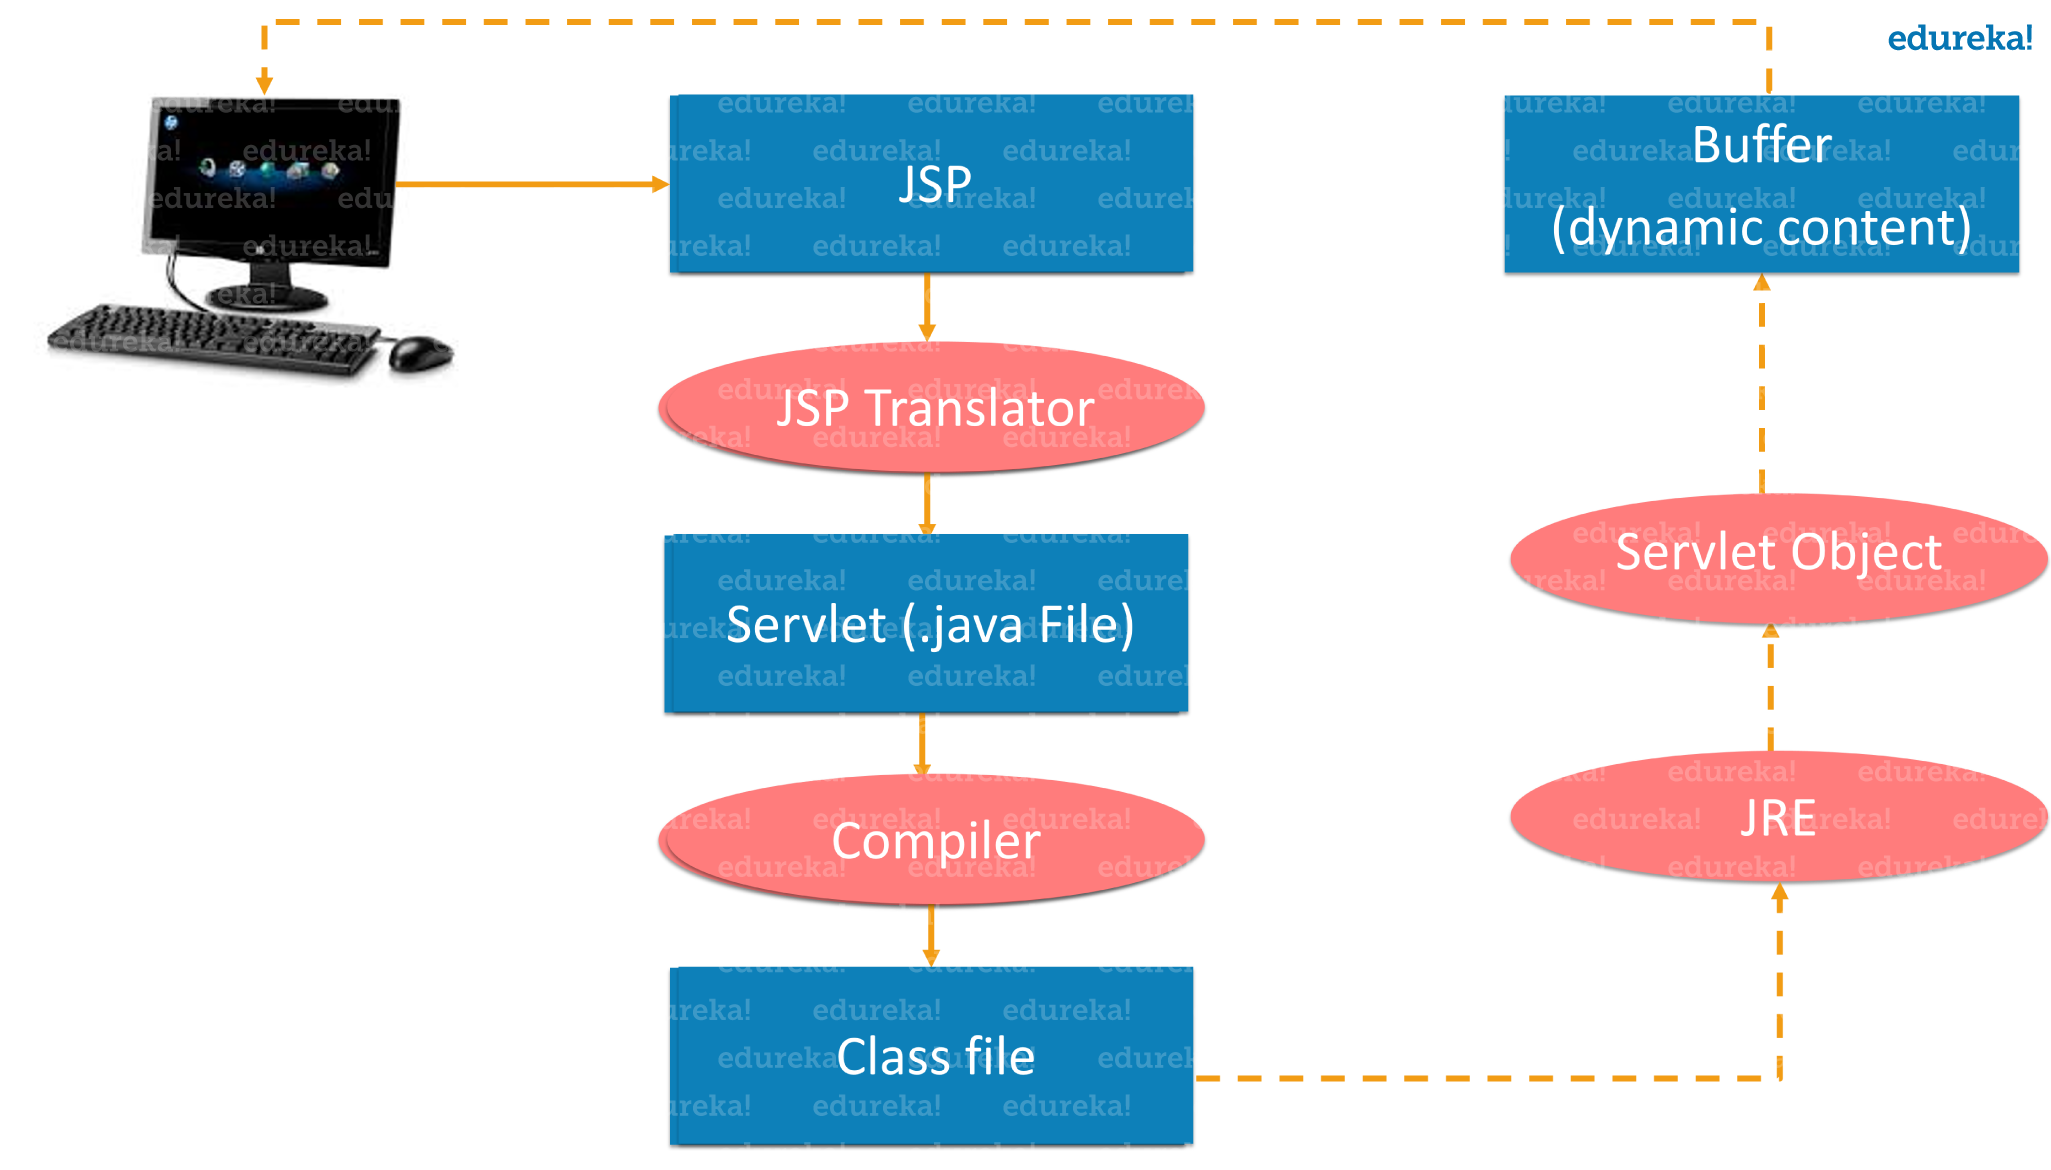
Advanced Java Tutorial: Life Cycle of JSP
The JSP pages follow these phases:
- Translation of JSP Page
- Compilation of JSP Page
- Classloading (the classloader loads class file)
- Instantiation (Object of the Generated Servlet is created)
- Initialization ( the container invokes jspInit())
- Request processing ( the container invokes _jspService())
- Destroy ( the container invokes jspDestroy())

Advanced Java Tutorial: JSP Scripting Elements:
The scripting elements provide the ability to insert java code inside the JSP. There are three types of scripting elements:
- scriptlet tag – A scriptlet tag is used to execute Java source code in JSP.
Syntax is: <% java source code %> - expression tag – The code placed within JSP expression tag is written to the output stream of the response. So you need not write out.print() to write data. It is mainly used to print the values of variable or method.
Syntax : <%= statement %> - declaration tag – The JSP declaration tag is used to declare fields and methods. The code written inside the JSP declaration tag is placed outside the service() method of an auto-generated servlet. So it doesn’t get memory at each request.
Syntax: <%! field or method declaration %>
If you wish to know more about JSP, you can refer these interview questions.
This brings us to the end of our blog on Advanced Java Tutorial. I hope you found this blog informative and added value to your knowledge.
Check out the Java Certification Training by Edureka, a trusted online learning company with a network of more than 250,000 satisfied learners spread across the globe. Edureka’s Java J2EE and SOA training and certification course is designed for students and professionals who want to be a Java Developer. The course is designed to give you a head start into Java programming and train you for both core and advanced Java concepts along with various Java frameworks like Hibernate & Spring.
Got a question for us? Please mention it in the comments section of this “Advanced Java” blog and we will get back to you as soon as possible or you can also join our Java Training in Al Jubayl.