Android is the open-source operating system which is useful for many tasks. When you start or open your android application, it will undergo various states and that is called as Android Activity Life Cycle.
Below topics are covered in this article:
- Introduction to Android
- What is Android Activity Life Cycle?
- Life Cycle Methods and Callbacks
- Demo: Implement Activity LifeCycle
Let’s get started!
Introduction to Android
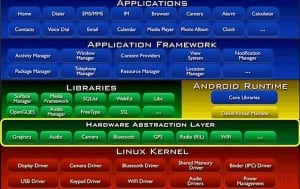
Android is an open-source operating system which is based on Linux with a Java programming interface for mobile devices like Smartphones (Touch Screen Devices who supports Android OS).

With this, let’s move further and know what is the Android activity life cycle.
What is Android Activity Life Cycle?
As a user navigates through the app, Activity instances in your app transition through different stages in their life-cycle. The Activity class provides a number of callbacks that allow the activity to know that a state has changed: that the system is creating, stopping, or resuming an activity, or destroying the process in which the activity resides.
Now let’s know the Android Activity Life Cycle in a more detailed manner with the help of life cycle methods and callbacks.
Life Cycle Methods and Callbacks
In general, activity lifecycle has seven callback methods:
- onCreate()
- onStart()
- onResume()
- onPause()
- onStop()
- onRestart()
- onDestroy()
Now let’s get into the details of Android Activity Life cycle methods and callbacks. Take a look at the below figure to understand the life cycle.
 You must be aware that a program starts from a main() function in different programming languages. Similarly, android initiates the program within an activity with a call to onCreate() callback method. There is a sequence of callback methods that starts up an activity and then tear down in different methods shown in the above Activity life cycle diagram:
1. onCreate(): In this state, the activity is created.
2. onStart(): This callback method is called when the activity becomes visible to the user.
3. onResume(): The activity is in the foreground and the user can interact with it.
4. onPause(): Activity is partially obscured by another activity. Another activity that’s in the foreground is semi-transparent.
5. onStop(): The activity is completely hidden and not visible to the user.
6. onRestart(): From the Stopped state, the activity either comes back to interact with the user or the activity is finished running and goes away. If the activity comes back, the system invokes onRestart()
7. onDestroy(): Activity is destroyed and removed from the memory.
So these are the various methods of the Activity Life Cycle. Now let’s see the situations where the life cycle methods and states will occur.
- When you open the app it will go through below states:
onCreate() –> onStart() –> onResume()
When you press the back button and exit the app
onPaused() — > onStop() –> onDestory()
When you press the home button
onPaused() –> onStop()
After pressing the home button, again when you open the app from a recent task list
onRestart() –> onStart() –> onResume()
After dismissing the dialog or back button from the dialog
onResume()
If a phone is ringing and user is using the app
onPause() –> onResume()
After the call ends
When your phone screen is off
onPaused() –> onStop()
When your phone screen is turned back on
onRestart() –> onStart() –> onResume()
So these are some of the situations when your app goes through various states. Now let’s see how to implement this with the help of a below example.
Demo: Implement Activity LifeCycle
Step1: First you need to build a simple Android App using either Java or Kotlin Programming language. In this demo, I am using Kotlin programming language because Kotlin has a fewer number of lines of code when compared to Java. If you wish to know how to create an Android App using Java, kindly refer to Android Tutorial. Also, if you want to create an Android Application using Kotlin, then check out this article on Kotlin Android Tutorial.
Step 2: Once you build your app, you need to configure your MainActivity.kt class file and override the callbacks methods. Let’s look at the below code to understand this in a broader gauge.
package com.example.activitycycle
import androidx.appcompat.app.AppCompatActivity
import android.os.Bundle
import android.util.Log
import android.widget.Toast

class MainActivity : AppCompatActivity() {
override fun onCreate(savedInstanceState: Bundle?) {
super.onCreate(savedInstanceState)
setContentView(R.layout.activity_main)
print("***App state: OnCreate***n")
Toast.makeText(getApplicationContext(),"App state: OnCreate",Toast.LENGTH_LONG).show();
}
override fun onStart() {
super.onStart()
print("***App state: OnStart***n")
Toast.makeText(getApplicationContext(),"App state: OnStart",Toast.LENGTH_LONG).show();
}
override fun onResume() {
super.onResume()
print("***App state: OnResume***n")
Toast.makeText(getApplicationContext(),"App state: OnResume",Toast.LENGTH_LONG).show();
}
override fun onStop() {
super.onStop()
print("***App state: OnStop***n")
Toast.makeText(getApplicationContext(),"App state: OnStop",Toast.LENGTH_LONG).show();
}
override fun onPause() {
super.onPause()
print("***App state: OnPause***n")
Toast.makeText(getApplicationContext(),"App state: OnPause",Toast.LENGTH_LONG).show();
}
override fun onRestart() {
super.onRestart()
print("***App state: OnReStart***n")
Toast.makeText(getApplicationContext(),"App state: OnRestart",Toast.LENGTH_LONG).show();
}
override fun onDestroy() {
super.onDestroy()
print("***App state: OnDestroy***n")
Toast.makeText(getApplicationContext(),"App state: OnDestroy",Toast.LENGTH_LONG).show();
}
}
Basically, in the above example, I am overriding all the methods and printing the states. Also, I have used Toast.makeText(), to display the life cycle methods in the app itself. Whenever application goes through various states, it invokes and displays the methods in the app itself. That’s how Android activity life cycle works. If you wish to know the fundamentals of Android, then kindly check this article on Android Tutorial.
This brings us to the end of this article on Android Activity Life Cycle. Hope you are clear with all that has been shared with you in this article.
Now that you have gone through our Kotlin Android Tutorial, you can check out Edureka’s Android App Development Certification Training Got a question for us? Please mention it in the comments of ” Android Activity Life Cycle” blog section and we will get back to you.


